一:Docker基础
1.1:环境准备
环境准备
1、需要会一点点Linux的基础
2、CentOS 7
3、链接服务器Xshell
环境查看
# 系统内核时3.10以上的
[root@iz2ze7kchfwcvrdgoe1tr6z ~]# uname -r
3.10.0-1160.15.2.el7.x86_64
#  系统版本
[root@iz2ze7kchfwcvrdgoe1tr6z ~]# cat /etc/os-release
NAME="CentOS Linux"
VERSION="7 (Core)"
ID="centos"
ID_LIKE="rhel fedora"
VERSION_ID="7"
PRETTY_NAME="CentOS Linux 7 (Core)"
ANSI_COLOR="0;31"
CPE_NAME="cpe:/o:centos:centos:7"
HOME_URL="https://www.centos.org/"
BUG_REPORT_URL="https://bugs.centos.org/"

CENTOS_MANTISBT_PROJECT="CentOS-7"
CENTOS_MANTISBT_PROJECT_VERSION="7"
REDHAT_SUPPORT_PRODUCT="centos"
REDHAT_SUPPORT_PRODUCT_VERSION="7"
1.2:Docker安装
卸载旧版本
yum remove docker \
                  docker-client \
                  docker-client-latest \
                  docker-common \
                  docker-latest \
                  docker-latest-logrotate \
                  docker-logrotate \
                  docker-engine
需要的安装包
yum install -y yum-utils
设置阿里镜像仓库
yum-config-manager \
    --add-repo \
    http://mirrors.aliyun.com/docker-ce/linux/centos/docker-ce.repo
更新yum软件包索引
yum makecache fast
安装docker相关的内容 docker-ce 社区版 ee企业版
yum install docker-ce docker-ce-cli containerd.io
启动docker
systemctl start docker
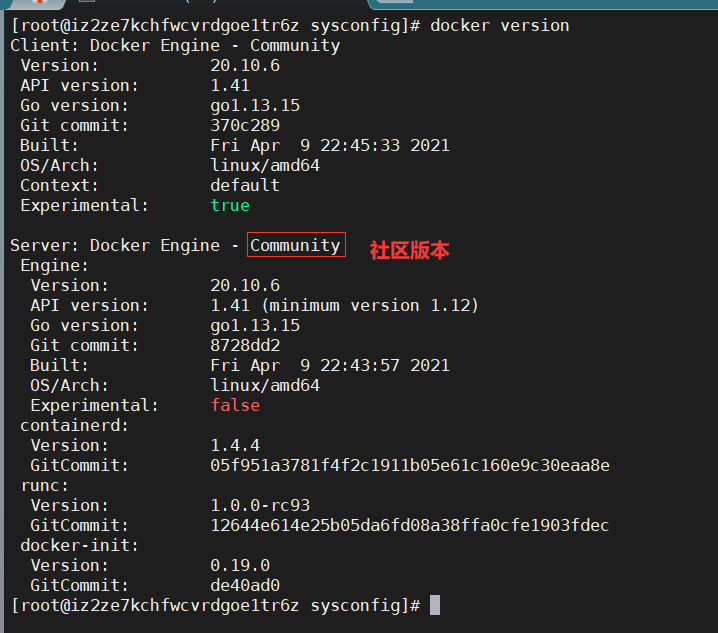
查看docker版本
docker version
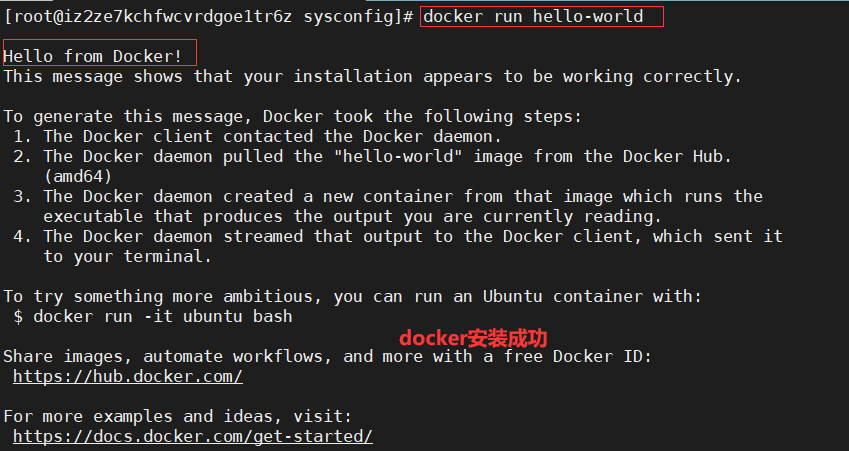
启动HelloWorld测试
docker run hello-world
查看一下下载的这个 hello-world镜像
docker images

1.3:Docker卸载(了解)
卸载依赖
yum remove docker-ce docker-ce-cli containerd.io
删除资源
rm -rf /var/lib/docker
rm -rf /var/lib/containerd
1.4:阿里云镜像加速
登录阿里云搜索 容器镜像服务
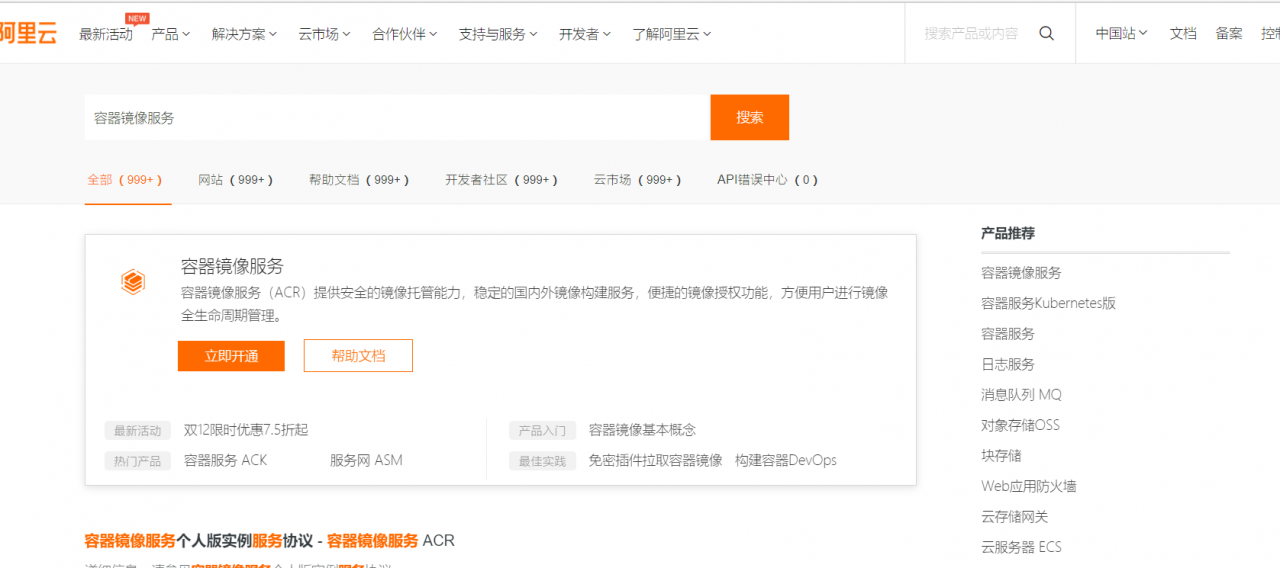
立即开通进入镜像加速服务(免费)
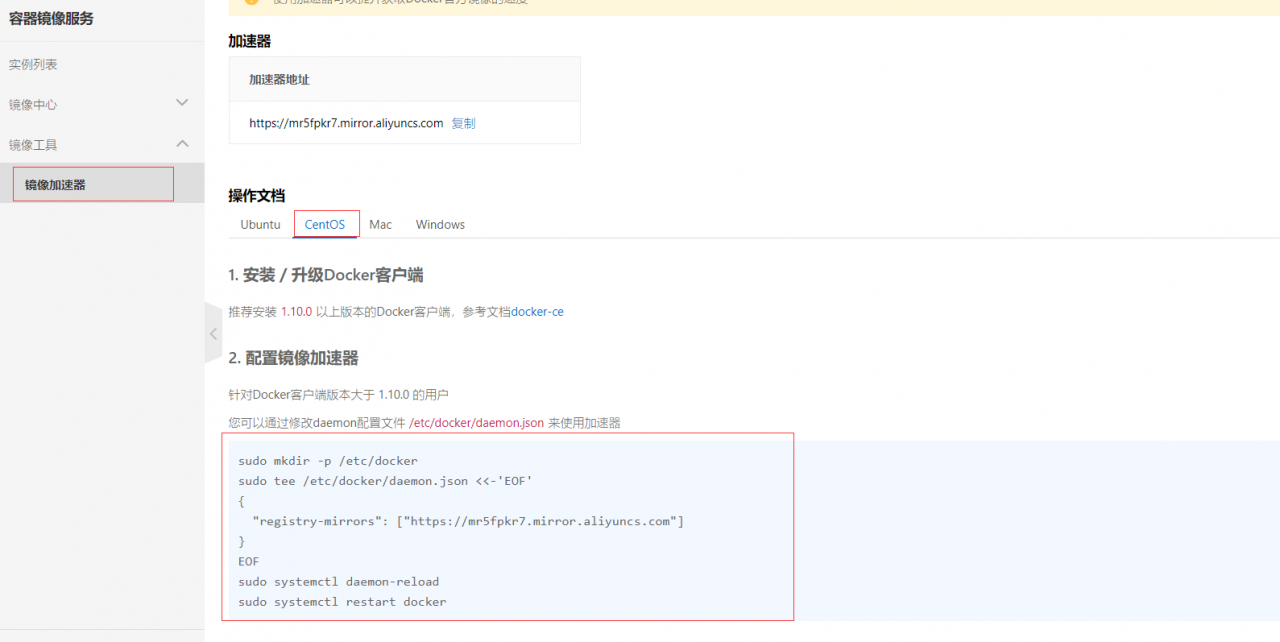
配置使用
sudo mkdir -p /etc/docker

sudo tee /etc/docker/daemon.json <<-'EOF'
{
  "registry-mirrors": ["https://mr5fpkr7.mirror.aliyuncs.com"]
}
EOF

sudo systemctl daemon-reload

sudo systemctl restart docker
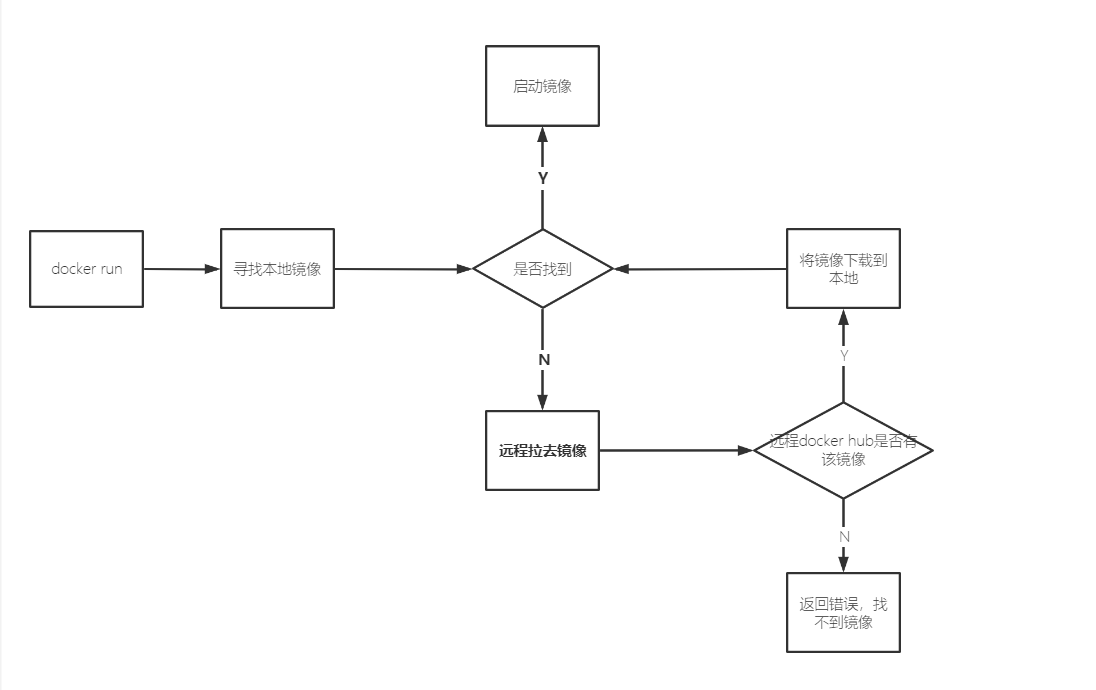
1.5:docker run运行流程
- 用户执行 docker run 镜像名 命令
- docker在本地仓库中寻找该镜像
- 若在仓库中找到该镜像,则启动该镜像
- 若没有找到该镜像,docker将在远程仓库(Docker Hub)去寻找
- 若远程仓库中拥有该镜像,将该镜像下载到本地仓库中启动
- 若没有该镜像,返回错误,并报错找不到该镜像
1.6:Docker的常用命令
1.6.1:帮助命令
docker version   #显示docker的版本信息
docker info      #显示docker的系统信息,包括镜像和容器的数量
docker --help	 #帮助命令
帮助文档地址:https://docs.docker.com/engine/reference/commandline/build/
1.6.2:镜像命令
docker images 查看所有本地上的镜像
[root@iz2ze7kchfwcvrdgoe1tr6z ~]# docker images
REPOSITORY    TAG       IMAGE ID       CREATED       SIZE
hello-world   latest    d1165f221234   6 weeks ago   13.3kB

#解释
REPOSITORY  	镜像的仓库源
TAG				镜像的标签
d1165f221234 	镜像的ID
CREATED		 	镜像的创建时间
SIZE			镜像的大小


#可选项
-a, --all            	#列出所有镜像
  -q, --quiet           #只显示镜像的ID
docker search 搜索镜像
[root@iz2ze7kchfwcvrdgoe1tr6z ~]# docker search mysql
NAME                              DESCRIPTION                                     STARS     OFFICIAL   AUTOMATED
mysql                             MySQL is a widely used, open-source relation…   10766     [OK]
mariadb                           MariaDB Server is a high performing open sou…   4052      [OK]

#可选项,通过搜索来过略
-f, --filter filter   	--filter=stars=3000  #只搜索镜像STARS大于3000

#搜索Mysql中STARS大于3000的镜像
[root@iz2ze7kchfwcvrdgoe1tr6z ~]# docker search mysql --filter=STARS=4000
NAME      DESCRIPTION                                     STARS     OFFICIAL   AUTOMATED
mysql     MySQL is a widely used, open-source relation…   10766     [OK]
mariadb   MariaDB Server is a high performing open sou…   4052      [OK]
docker pull 下载镜像
#下载镜像 docker pull 镜像名[:tag] 默认下载最新版
[root@iz2ze7kchfwcvrdgoe1tr6z ~]# docker pull mysql
Using default tag: latest    			#如果不选tag,默认就是latest
latest: Pulling from library/mysql
f7ec5a41d630: Pull complete				#分层下载,docker image的核心 联合文件系统
9444bb562699: Pull complete
6a4207b96940: Pull complete
181cefd361ce: Pull complete
8a2090759d8a: Pull complete
15f235e0d7ee: Pull complete
d870539cd9db: Pull complete
5726073179b6: Pull complete
eadfac8b2520: Pull complete
f5936a8c3f2b: Pull complete
cca8ee89e625: Pull complete
6c79df02586a: Pull complete
Digest: sha256:6e0014cdd88092545557dee5e9eb7e1a3c84c9a14ad2418d5f2231e930967a38 		#签名
Status: Downloaded newer image for mysql:latest
docker.io/library/mysql:latest			#真实地址

# docker pull mysql 等价于 docker pull docker.io/library/mysql:latest`
指定版本下载
#指定下载 myqsl 5.7
[root@iz2ze7kchfwcvrdgoe1tr6z ~]# docker pull mysql:5.7
5.7: Pulling from library/mysql
f7ec5a41d630: Already exists
9444bb562699: Already exists   #联合文件系统,不需要下载这些
6a4207b96940: Already exists
181cefd361ce: Already exists
8a2090759d8a: Already exists
15f235e0d7ee: Already exists
d870539cd9db: Already exists
7310c448ab4f: Pull complete
4a72aac2e800: Pull complete 	#只需要下载需要更新的
b1ab932f17c4: Pull complete
1a985de740ee: Pull complete
Digest: sha256:e42a18d0bd0aa746a734a49cbbcc079ccdf6681c474a238d38e79dc0884e0ecc
Status: Downloaded newer image for mysql:5.7
docker.io/library/mysql:5.7
docker rmi 删除镜像!
[root@iz2ze7kchfwcvrdgoe1tr6z ~]# docker images				#查看当前拥有的镜像
REPOSITORY    TAG       IMAGE ID       CREATED       SIZE
mysql         5.7       450379344707   9 days ago    449MB
mysql         latest    cbe8815cbea8   9 days ago    546MB
hello-world   latest    d1165f221234   6 weeks ago   13.3kB


[root@iz2ze7kchfwcvrdgoe1tr6z ~]# docker rmi -f cbe8815cbea8  	#根据ID删除镜像
Untagged: mysql:latest
Untagged: mysql@sha256:6e0014cdd88092545557dee5e9eb7e1a3c84c9a14ad2418d5f2231e930967a38
Deleted: sha256:cbe8815cbea8fb86ce7d3169a82d05301e7dfe1a8d4228941f23f4f115a887f2
Deleted: sha256:c74b92ab7fde96874c2f7afa77e338ebe739b829f5cb28a9975c9b0dcb47feb9
Deleted: sha256:fded7187915726c2d2d18c8178cd70ab9aceab27f49a68ead928a662664b9402
Deleted: sha256:217ef0e6aab8111068df664529c4bdcfc2b58701913028fd0d61b00265ad5a9b
Deleted: sha256:1ab4dbca7ef7a8eb6f7ea8ddd780b5d55aac2a0098f2c217c68e31216a2de140
Deleted: sha256:1fbdda78e87b76772be16bd4a745db7f95d9af70d5a3728260548380121ae711


[root@iz2ze7kchfwcvrdgoe1tr6z ~]# docker images					#删除后重新查看已没有
REPOSITORY    TAG       IMAGE ID       CREATED       SIZE
mysql         5.7       450379344707   9 days ago    449MB
hello-world   latest    d1165f221234   6 weeks ago   13.3kB


#删除docker中的所有镜像  							docker images -aq获取所有镜像的ID  $()以参数的方式传入
[root@iz2ze7kchfwcvrdgoe1tr6z ~]# docker rmi -f $(docker images -aq)
Untagged: mysql:5.7
Untagged: mysql@sha256:e42a18d0bd0aa746a734a49cbbcc079ccdf6681c474a238d38e79dc0884e0ecc
Deleted: sha256:450379344707c56f47d1391c18fc3ac22e2c59fbf384a0de77f2bdfc59bcbc61
Deleted: sha256:f524a8b23a8a8a9d862f6c0251b19365eda045117dae4f82bd9f16edcaf31402
Deleted: sha256:c18828290fa30349004e01790ede1117f82dd6ea26a74c83a6e985c7a3ffafdd
Deleted: sha256:33db070b2792af524b7a61a855835c813f3b06178d6103766a5c90024fe25a76
Deleted: sha256:556286c5cd9dae96e08fbef933278ca181e296098ee44ca083891e5739a87fdc
Deleted: sha256:cd35e2328f0670969657f1abae8beffbc1eb1fddbaf667e1e6e6286598500a35
Deleted: sha256:068b92efc0504adcd3c23f16fde80775a2f4dfe485e242206f638eae72c4fa1b
Deleted: sha256:7c8818a166d9666c68fcdbe421c30568d60d51a505e540f42901664113047a75
Deleted: sha256:5aa8f65565168fd7db2aa6b9f8fb1db746aa598fa3854dcbdbb49d5a29f6d8a5
Deleted: sha256:cca9d1bafa1ee67bb4d7178732c0955a40a5dea6e5b989f61248984f26f7306b
Deleted: sha256:34ca91e79c4027120ca740231d415c739cccad57d1ee68d6a6e67ca60bbaf3a4
Deleted: sha256:7e718b9c0c8c2e6420fe9c4d1d551088e314fe923dce4b2caf75891d82fb227d
Untagged: hello-world:latest
Untagged: hello-world@sha256:f2266cbfc127c960fd30e76b7c792dc23b588c0db76233517e1891a4e357d519
Deleted: sha256:d1165f2212346b2bab48cb01c1e39ee8ad1be46b87873d9ca7a4e434980a7726


#成功删除所有镜像
[root@iz2ze7kchfwcvrdgoe1tr6z ~]# docker images
REPOSITORY   TAG       IMAGE ID   CREATED   SIZE
1.6.3:容器命令
说明:我们有了镜像才可以创建容器,linux,下载一个centos镜像来学习
docker pull centos
新建容器并启动
docker run [可选参数]  image

#参数说明
--name-"Name" 		容器名字  mysql1 mysql2  用来区分容器
-d					后台方式运行
-it					使用交互方式运行,进入容器查看内容
-p 				    指定容器端口 -p 8080:8080
	-p 	主机端口:容器端口  (常用)
	-p	容器端口
	-p 	ip:主机端口:容器端口
-P(大写P)			   随机指定端口


#测试,启动并进入容器
[root@iz2ze7kchfwcvrdgoe1tr6z ~]# docker run -it centos /bin/bash
#主机名就是镜像名
[root@8fae50428564 /]#
#查看容器内的centos 基础版本,很多命令都是不完善的

[root@8fae50428564 /]# ls
bin  etc   lib    lost+found  mnt  proc  run   srv  tmp  var
dev  home  lib64  media       opt  root  sbin  sys  usr

#从容器真退回到主机
[root@8fae50428564 /]# exit
exit
[root@iz2ze7kchfwcvrdgoe1tr6z ~]#
列出所有运行中的容器 docker ps
#列出当前赈灾运行的容器
doc[root@iz2ze7kchfwcvrdgoe1tr6z ~]# docker ps
CONTAINER ID   IMAGE     COMMAND   CREATED   STATUS    PORTS     NAMES

#列出所有运行过的容器 -a
[root@iz2ze7kchfwcvrdgoe1tr6z ~]# docker ps -a
CONTAINER ID   IMAGE          COMMAND       CREATED         STATUS                          PORTS     NAMES
8fae50428564   centos         "/bin/bash"   4 minutes ago   Exited (0) About a minute ago             bold_murdock
ab1ac1e252e4   d1165f221234   "/hello"      11 hours ago    Exited (0) 11 hours ago                   elegant_hypatia
94ef98cdd123   d1165f221234   "/hello"      11 hours ago    Exited (0) 11 hours ago                   sharp_ishizaka

#列出最近创建的容器  -n=? ?代表个数
[root@iz2ze7kchfwcvrdgoe1tr6z ~]# docker ps -n=2
CONTAINER ID   IMAGE          COMMAND       CREATED         STATUS                     PORTS     NAMES
8fae50428564   centos         "/bin/bash"   7 minutes ago   Exited (0) 4 minutes ago             bold_murdock
ab1ac1e252e4   d1165f221234   "/hello"      11 hours ago    Exited (0) 11 hours ago              elegant_hypatia

#列出所有容器的ID  -aq
[root@iz2ze7kchfwcvrdgoe1tr6z ~]# docker ps -aq
8fae50428564
ab1ac1e252e4
94ef98cdd123
退出容器
exit	#直接容器停止并退出
ctrl + P + Q #容器不停止但退出
删除容器
#删除指定容器,不能删除正在运行的容器	如果需要强制 rm -f
docker rm 容器ID
#删除所有容器
docker rm -f $(docker ps -aq)
#删除所有容器
docker ps -a -q|xargs docker rm
启动或停止容器操作
docker start 容器ID 			#启动容器
docker restart 容器ID			#重启容器
docker stop 容器ID			#停止正在运行的容器
docker kill 容器ID			#强制停止容器
1.6.4:常用其他命令
后台启动容器
#命令  docker run -d 容器名
[root@iz2ze7kchfwcvrdgoe1tr6z ~]# docker run -d centos
d7cec58c1e5f4f5df7d07eb5cb8de068adba78186ea576913bc04948b9ffa106

#问题  docker ps 发现centos停止了
[root@iz2ze7kchfwcvrdgoe1tr6z ~]# docker ps
CONTAINER ID   IMAGE     COMMAND   CREATED   STATUS    PORTS     NAMES

#常见的坑:docker 容器使用后台运行,就必须要有一个前台程序,docker发现没有应用,就会自动停止
#nginx,容器启动后,发现自己没有提供福,就会立刻停止,就没有程序了
查看日志
docker logs  -f -t --tail 行数

#自己编写一段shell脚本
[root@iz2ze7kchfwcvrdgoe1tr6z ~]# docker run -d centos /bin/bash -c "while true;do echo zhaoliming;sleep 1;done"
ca8a8526b431bdc4c4a0a1fcd385db26d88fd8a5ca9b1ea4f21929a1dbcf89f8
[root@iz2ze7kchfwcvrdgoe1tr6z ~]# docker ps
CONTAINER ID   IMAGE
ca8a8526b431   centos

#显示日志  每个一秒打印一句
[root@iz2ze7kchfwcvrdgoe1tr6z ~]# docker logs -f -t --tail 10 ca8a8526b431
2021-04-20T02:51:40.803859669Z zhaoliming
2021-04-20T02:51:41.806541663Z zhaoliming
2021-04-20T02:51:42.809288233Z zhaoliming
2021-04-20T02:51:43.812129590Z zhaoliming

#显示日志  显示指定条数的日志

-t		#显示日志
-f 		#显示时间戳
--tail number #要显示的日志条数

[root@iz2ze7kchfwcvrdgoe1tr6z ~]# docker logs -f -t --tail 10 ca8a8526b431
查看容器中的进程信息 ps
# top命令
[root@iz2ze7kchfwcvrdgoe1tr6z ~]# docker top ca8a8526b431
# 用户ID				#父ID				#父进程ID
UID                 PID                 PPID                C                   STIME               TTY
root                16545               16526               0                   10:48               ?        root                18082               16545               0                   10:57               ?
查看镜像源数据
#命令   docker inspect 容器ID
[root@iz2ze7kchfwcvrdgoe1tr6z ~]# docker inspect ca8a8526b431
[
    {
        "Id": "ca8a8526b431bdc4c4a0a1fcd385db26d88fd8a5ca9b1ea4f21929a1dbcf89f8"
        "Created": "2021-04-20T02:48:41.247163141Z",
        "Path": "/bin/bash",
        "Args": [
            "-c",
            "while true;do echo zhaoliming;sleep 1;done"
        ],
        "State": {
            "Status": "running",
            "Running": true,
            "Paused": false,
            "Restarting": false,
            "OOMKilled": false,
            "Dead": false,
            "Pid": 16545,
            "ExitCode": 0,
            "Error": "",
            "StartedAt": "2021-04-20T02:48:42.212374816Z",
            "FinishedAt": "0001-01-01T00:00:00Z"
        },
        "Image": "sha256:300e315adb2f96afe5f0b2780b87f28ae95231fe3bdd1e16b9ba606
        "ResolvConfPath": "/var/lib/docker/containers/ca8a8526b431bdc4c4a0a1fcd3
        "HostnamePath": "/var/lib/docker/containers/ca8a8526b431bdc4c4a0a1fcd385
        "HostsPath": "/var/lib/docker/containers/ca8a8526b431bdc4c4a0a1fcd385db2
        "LogPath": "/var/lib/docker/containers/ca8a8526b431bdc4c4a0a1fcd385db26dbcf89f8-json.log",
        "Name": "/dazzling_mclaren",
        "RestartCount": 0,
        "Driver": "devicemapper",
        "Platform": "linux",
        "MountLabel": "",
        "ProcessLabel": "",
        "AppArmorProfile": "",
        "ExecIDs": null,
        "HostConfig": {
            "Binds": null,
            "ContainerIDFile": "",
            "LogConfig": {
                "Type": "json-file",
                "Config": {}
            },
            "NetworkMode": "default",
            "PortBindings": {},
            "RestartPolicy": {
                "Name": "no",
                "MaximumRetryCount": 0
            },
            "AutoRemove": false,
            "VolumeDriver": "",
            "VolumesFrom": null,
            "CapAdd": null,
            "CapDrop": null,
            "CgroupnsMode": "host",
            "Dns": [],
            "DnsOptions": [],
            "DnsSearch": [],
            "ExtraHosts": null,
            "GroupAdd": null,
            "IpcMode": "private",
            "Cgroup": "",
            "Links": null,
            "OomScoreAdj": 0,
            "PidMode": "",
            "Privileged": false,
            "PublishAllPorts": false,
            "ReadonlyRootfs": false,
            "SecurityOpt": null,
            "UTSMode": "",
            "UsernsMode": "",
            "ShmSize": 67108864,
            "Runtime": "runc",
            "ConsoleSize": [
                0,
                0
            ],
            "Isolation": "",
            "CpuShares": 0,
            "Memory": 0,
            "NanoCpus": 0,
            "CgroupParent": "",
            "BlkioWeight": 0,
            "BlkioWeightDevice": [],
            "BlkioDeviceReadBps": null,
            "BlkioDeviceWriteBps": null,
            "BlkioDeviceReadIOps": null,
            "BlkioDeviceWriteIOps": null,
            "CpuPeriod": 0,
            "CpuQuota": 0,
            "CpuRealtimePeriod": 0,
            "CpuRealtimeRuntime": 0,
            "CpusetCpus": "",
            "CpusetMems": "",
            "Devices": [],
            "DeviceCgroupRules": null,
            "DeviceRequests": null,
            "KernelMemory": 0,
            "KernelMemoryTCP": 0,
            "MemoryReservation": 0,
            "MemorySwap": 0,
            "MemorySwappiness": null,
            "OomKillDisable": false,
            "PidsLimit": null,
            "Ulimits": null,
            "CpuCount": 0,
            "CpuPercent": 0,
            "IOMaximumIOps": 0,
            "IOMaximumBandwidth": 0,
            "MaskedPaths": [
                "/proc/asound",
                "/proc/acpi",
                "/proc/kcore",
                "/proc/keys",
                "/proc/latency_stats",
                "/proc/timer_list",
                "/proc/timer_stats",
                "/proc/sched_debug",
                "/proc/scsi",
                "/sys/firmware"
            ],
            "ReadonlyPaths": [
                "/proc/bus",
                "/proc/fs",
                "/proc/irq",
                "/proc/sys",
                "/proc/sysrq-trigger"
            ]
        },
        "GraphDriver": {
            "Data": {
                "DeviceId": "41",
                "DeviceName": "docker-253:1-269513-317cb84b59e6271cd5df3962331e2
                "DeviceSize": "10737418240"
            },
            "Name": "devicemapper"
        },
        "Mounts": [],
        "Config": {
            "Hostname": "ca8a8526b431",
            "Domainname": "",
            "User": "",
            "AttachStdin": false,
            "AttachStdout": false,
            "AttachStderr": false,
            "Tty": false,
            "OpenStdin": false,
            "StdinOnce": false,
            "Env": [
                "PATH=/usr/local/sbin:/usr/local/bin:/usr/sbin:/usr/bin:/sbin:/b
            ],
            "Cmd": [
                "/bin/bash",
                "-c",
                "while true;do echo zhaoliming;sleep 1;done"
            ],
            "Image": "centos",
            "Volumes": null,
            "WorkingDir": "",
            "Entrypoint": null,
            "OnBuild": null,
            "Labels": {
                "org.label-schema.build-date": "20201204",
                "org.label-schema.license": "GPLv2",
                "org.label-schema.name": "CentOS Base Image",
                "org.label-schema.schema-version": "1.0",
                "org.label-schema.vendor": "CentOS"
            }
        },
        "NetworkSettings": {
            "Bridge": "",
            "SandboxID": "475e17ea5b2781da351ac6e1a7398af376e5525a705c2501413208
            "HairpinMode": false,
            "LinkLocalIPv6Address": "",
            "LinkLocalIPv6PrefixLen": 0,
            "Ports": {},
            "SandboxKey": "/var/run/docker/netns/475e17ea5b27",
            "SecondaryIPAddresses": null,
            "SecondaryIPv6Addresses": null,
            "EndpointID": "e9e41e6e100f77f99dff7192f9ebc142fafffa17dc6cb3ff41631
            "Gateway": "172.17.0.1",
            "GlobalIPv6Address": "",
            "GlobalIPv6PrefixLen": 0,
            "IPAddress": "172.17.0.2",
            "IPPrefixLen": 16,
            "IPv6Gateway": "",
            "MacAddress": "02:42:ac:11:00:02",
            "Networks": {
                "bridge": {
                    "IPAMConfig": null,
                    "Links": null,
                    "Aliases": null,
                    "NetworkID": "e9a4f2241f7ad33945350e00ec3a6332000e66e1fc820c
                    "EndpointID": "e9e41e6e100f77f99dff7192f9ebc142fafffa17dc6cb
                    "Gateway": "172.17.0.1",
                    "IPAddress": "172.17.0.2",
                    "IPPrefixLen": 16,
                    "IPv6Gateway": "",
                    "GlobalIPv6Address": "",
                    "GlobalIPv6PrefixLen": 0,
                    "MacAddress": "02:42:ac:11:00:02",
                    "DriverOpts": null
                }
            }
        }
    }
]
进入当前正在运行的容器
# 我们通常容器都是使用后台方式运行的,需要进入容器,修改一些配置


#方式一:
#命令 docker exec -it 容器id bashShell
[root@iz2ze7kchfwcvrdgoe1tr6z ~]# docker exec -it ca8a8526b431 /bin/bash
[root@ca8a8526b431 /]#

#方式二:
#命令: docker attach 容器ID
[root@iz2ze7kchfwcvrdgoe1tr6z ~]# docker attach ca8a8526b431
正在执行的代码。。。。。。

#docker exec #进入容器后开启一个新的终端,可以在里面操作(常用)
#docker attach #进入容器正在执行的终端,不会启动新的进程!
从容器内考本文件到主机上
docker cp 容器id:容器内路径 目的地主机路径


#进入docker的容器中,在honme目录下创建test.java
[root@0aed7d5b45b7 home]# touch test.java
#退出到主机中
[root@0aed7d5b45b7 home]# exit
exit
#将容器中的文件复制到主机的(/usr/local/software/)目录下
[root@iz2ze7kchfwcvrdgoe1tr6z software]# docker cp  0aed7d5b45b7:/home/test.java /usr/local/software/
#进入 /usr/local/software/ 目录
[root@iz2ze7kchfwcvrdgoe1tr6z software]# cd /usr/local/software/
#查看文件
[root@iz2ze7kchfwcvrdgoe1tr6z software]# ll
total 688496
#test.java成功复制
-rw-r--r--  1 root root         0 Apr 20 11:20 test.java
-rw-r--r--  1 root root         0 Apr 20 11:18 zhaoliming.java


#考本是一个手动的过程,未来我们使用 -v 卷的技术。可以实现,自动同步  将容器中的目录与主机的目录连通
1.6.5:小结
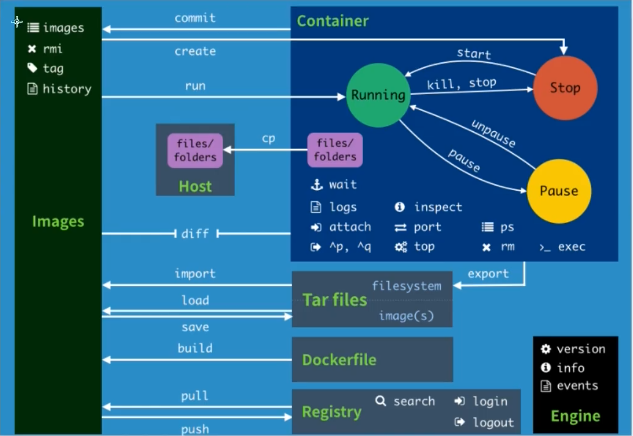
Docker命令总结
attach   	 	Attach to a running container  #当前shell下attach连接指定运行镜像
build     		Build an image from a Dockerfile  #通过Dockerfile定制镜像
commit   		Create a new image from a containers changes  #提交当前容器为新的镜像
cp    			Copy files/folders from a container to a HOSTDIR or to STDOUT  #从容器中拷贝指定文件或者目录到宿主机中
create    		Create a new container  #创建一个新的容器,同run 但不启动容器
diff    		Inspect changes on a containers filesystem  #查看docker容器变化
events    		Get real time events from the server#从docker服务获取容器实时事件
exec    		Run a command in a running container#在已存在的容器上运行命令
export    		Export a containers filesystem as a tar archive  #导出容器的内容流作为一个tar归档文件(对应import)
history    		Show the history of an image  #展示一个镜像形成历史
images    		List images  #列出系统当前镜像
import    		#从tar包中的内容创建一个新的文件系统映像(对应export)
info    		Display system-wide information  #显示系统相关信息
inspect    		Return low-level information on a container or image  #查看容器详细信息
kill    		Kill a running container  #kill指定docker容器
load    		Load an image from a tar archive or STDIN  #从一个tar包中加载一个镜像(对应save)
login    		Register or log in to a Docker registry#注册或者登陆一个docker源服务器
logout    		Log out from a Docker registry  #从当前Docker registry退出
logs    		Fetch the logs of a container  #输出当前容器日志信息
pause    		Pause all processes within a container#暂停容器
port    		List port mappings or a specific mapping for the CONTAINER  #查看映射端口对应的容器内部源端口
ps    			List containers  #列出容器列表
pull    		Pull an image or a repository from a registry  #从docker镜像源服务器拉取指定镜像或者库镜像
push    		Push an image or a repository to a registry  #推送指定镜像或者库镜像至docker源服务器
rename    		Rename a container  #重命名容器
restart    		Restart a running container  #重启运行的容器
rm    			Remove one or more containers  #移除一个或者多个容器
rmi    			#移除一个或多个镜像(无容器使用该镜像才可以删除,否则需要删除相关容器才可以继续或者-f强制删除)
run    			#创建一个新的容器并运行一个命令
save    		Save an image(s) to a tar archive#保存一个镜像为一个tar包(对应load)
search    		Search the Docker Hub for images  #在docker
hub中搜索镜像
start    		Start one or more stopped containers#启动容器
stats    		Display a live stream of container(s) resource usage statistics  #统计容器使用资源
stop    		Stop a running container  #停止容器
tag         	Tag an image into a repository  #给源中镜像打标签
top       		Display the running processes of a container #查看容器中运行的进程信息
unpause    		Unpause all processes within a container  #取消暂停容器
version    		Show the Docker version information#查看容器版本号
wait         	Block until a container stops, then print its exit code  #截取容器停止时的退出状态值
1.7:Docker安装Nginx
搜索镜像
docker search nginx
拉取镜像
docker pull nginx
查看镜像
[root@iz2ze7kchfwcvrdgoe1tr6z ~]# docker images
REPOSITORY   TAG       IMAGE ID       CREATED        SIZE
#Nginx 成功下载
nginx        latest    62d49f9bab67   7 days ago     133MB
centos       latest    300e315adb2f   4 months ago   209MB
启动镜像
#  -d 以后台方式启动nginx
#  --name 给nginx容器起一个名字叫做  mynginx
#  -p 将nginx 容器中默认的端口号80 映射为本机的3344
docker run -d --name mynginx -p 3344:80 nginx
查看启动状态

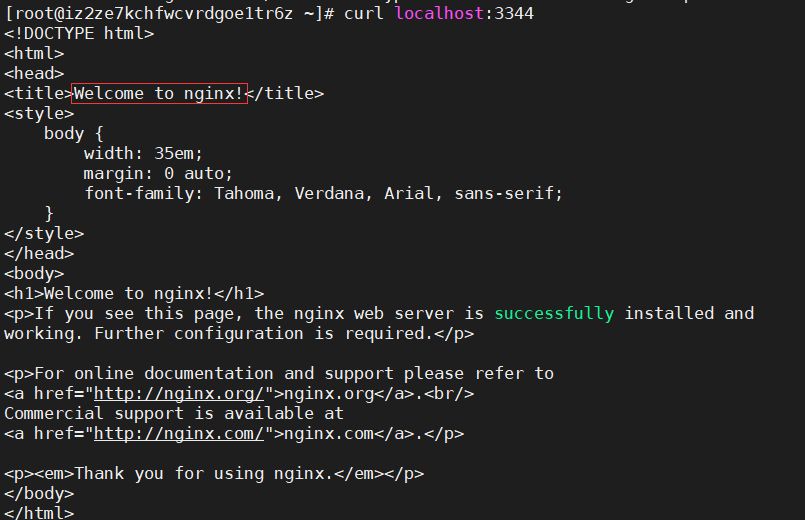
运行测试Nginx
#访问本机的 3344端口
curl localhost:3344
1.8:Docker安装TomCat
拉群镜像
#tomcat:n n为你想要下载的版本
docker pull tomcat:9.0
查看镜像

启动镜像
# -d  以后台方式启动
# -p  将容器中的tomcat默认端口8080映射到本机的3355端口
# --name 给tomcat容器命名为 mytomcat
docker run -d -p 3355:8080 --name mytomcat tomcat9.0
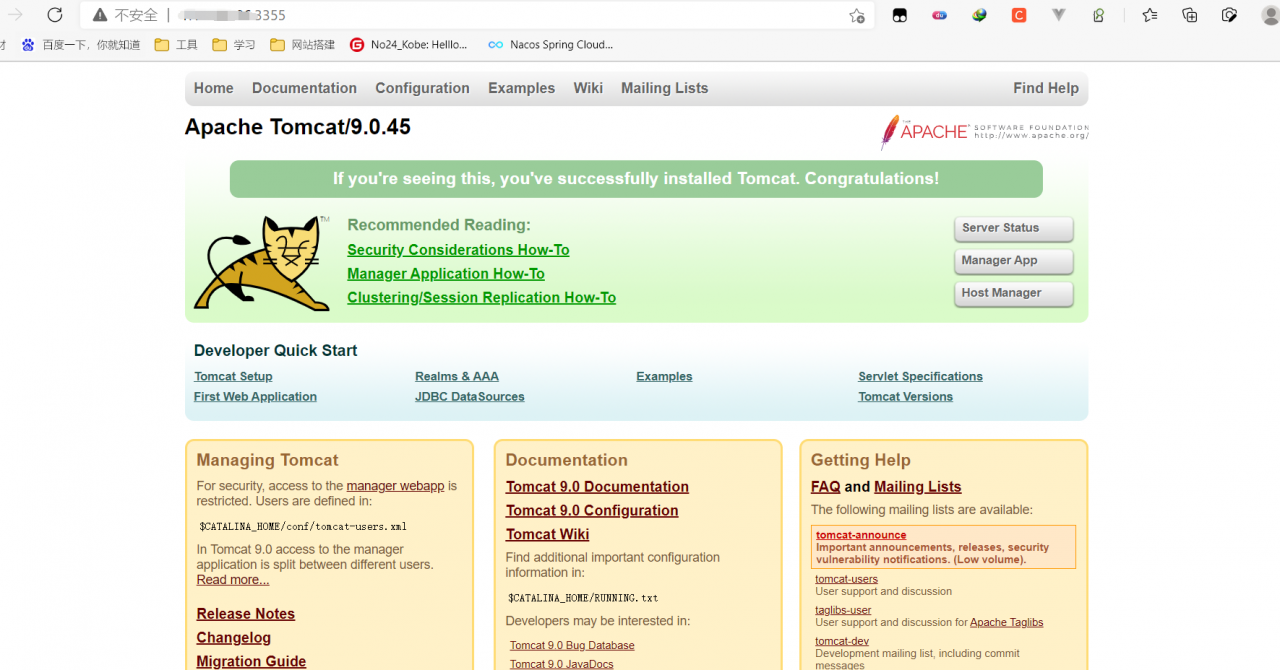
测试访问
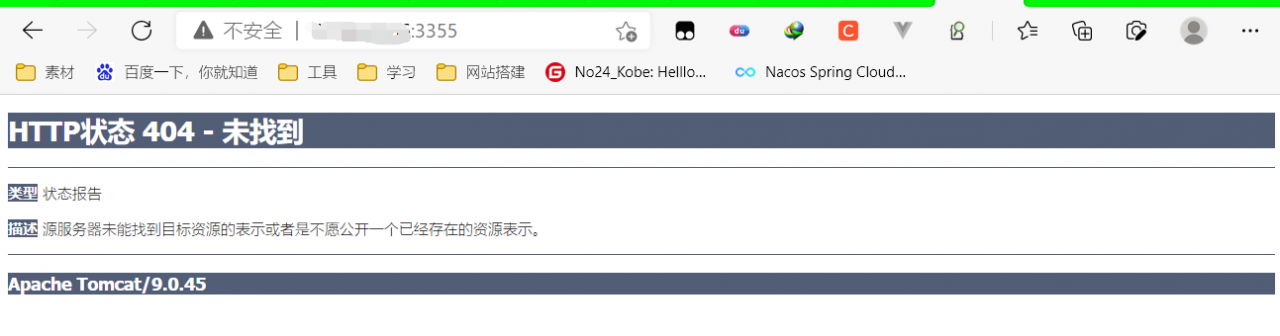
测试访问没有,但是没有显示网页
进入容器内部
# exec 进入正在运行容器内部
# -it 交互式访问
docker exec -it mytomcat /bin/bash
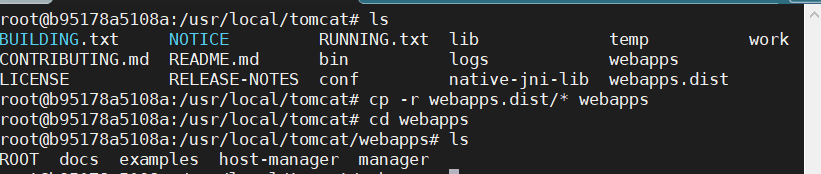
root@b95178a5108a:/usr/local/tomcat# ls
BUILDING.txt     NOTICE         RUNNING.txt  lib             temp          work
CONTRIBUTING.md  README.md      bin          logs            webapps
LICENSE          RELEASE-NOTES  conf         native-jni-lib  webapps.dist
#进入webapps
root@b95178a5108a:/usr/local/tomcat# cd webapps
root@b95178a5108a:/usr/local/tomcat/webapps# ls -la
total 4
drwxr-xr-x  2 root root    6 Apr 11 03:31 .
drwxr-xr-x 11 root root 4096 Apr 11 03:31 ..
发现问题,1:linux命令少了,2、webapps东西不全,3:阿里云镜像的原因,默认是最小的镜像,所有不必要的的都剔除掉,保证最小的可运行环境
解决 我们发现Root目录在webapps.dist下面
#将webapps.dist中的所有文件复制到webapps中
cp -r webapps.dist/* webapps
重新测试访问