记录使用cosmos/ethermint的一些操作记录与错误总结
注意: 目前ethermint转移到了新的项目地址:https://github.com/tharsis/ethermint.git
老的项目地址是:https://github.com/cosmos/ethermint.git,官网文档地址:https://docs.ethermint.zone
需要注意的是官网教程对应老版本(cosmos)的ethermint, 会有所冲突。
本文使用的是老版本的ethermint,另一篇是新版本的ethermint
文章目录
一、Introduction
Ethermint是一个可扩展的、高吞吐量的权益证明区块链,与以太坊完全兼容并可互操作。它使用运行在Tendermint核心共识引擎上的Cosmos SDK构建。
特点:
- 拥有以太坊的功能
- 能够与Cosmos其他链交换价值
- 兼容Web3
- 高吞吐量 (Tendermint)
- 水平拓展能力 (IBC)
- 快速交易最终一致性
- Hard Spoon
Ethermint通过以下方式启用这些关键特性:
- 实现Tendermint Core的应用区块链接口(ABCI)来管理区块链
- 利用Cosmos SDK实现的模块和其他机制。
- 利用geth作为库来避免代码重用并提高可维护性。
- 公开一个完全兼容的Web3 JSON-RPC层,用于与现有以太坊客户端和工具(Metamask、Remix、Truffle等)交互。
这些特性使开发人员可以利用现有的以太坊生态系统工具和软件无缝部署智能合约,与Cosmos生态系统的其他部分交互!
1.1 Architeture
- Ethermint 就是一个ABCI的应用实例,它通过TBFT代替了以太坊的POW
- Ethermint区块链让以太坊开发者可以将他们的智能合约部署到Ethermint EVM,并获得快速最终权益证明(PoS)链的好处
- 开发人员还将受益于高可靠的客户,这些客户可以使用测试网来测试和部署他们的合同。
- 可以建立互操作函数同IBC操作其他链,还可以用中继网桥()实现ethermint和ethereum互操作
- 封装在ethermint内部的EVM模块(x/EVM)可以作为自己独立的模块单独使用。对任何Cosmos可以添加依赖,实现合约
- 以预设定的Validator集合和EVM模型作为依赖,能够让项目快速达到最终一致性
- 导入EVM模块可以使链实现网络和一些特殊的细粒度配置
- 使用Ethemint链可以直接部署合约到Ethermint网络上
- 利用Ethermint 客户端将链维护推迟到Ethemint 网络,并允许参与更成熟的区块链。
- 目前Ethermint 客户端还不支持IBC跨链互操作
二、Quick Start
2.1 Install
二进制源码安装
git clone https://github.com/tharsis/ethermint.git
cd ethermint
make install
2.2 Run a Node
自动部署 (在ethermint文件夹下)./init.sh
或者已经启动过,重新启动:
ethermintd start --pruning=nothing --rpc.unsafe --log_level "main:info,state:info,mempool:info" --trace
报错: jq: 未找到命令
下载jq:
# 安装EPEL源:
$ yum install epel-release

# 安装完EPEL源后,可以查看下jq包是否存在:
$ yum list jq

# 安装jq:
$ yum install jq
which 报错:
which: no stringer ….
which: no gencodec …
which: no solcjs ….
原因: 依赖缺失未安装
解决:
go get golang.org/x/tools/cmd/stringer
go get github.com/fjl/gencodec
yum -y install go-bindata protoc-gen-go
npm install -g solc
# 添加yarn仓库
wget https://dl.yarnpkg.com/rpm/yarn.repo -O /etc/yum.repos.d/yarn.repo
yum -y install yarn
在另一个终端运行JSON-RPC服务:
ethermintcli rest-server --laddr "tcp://localhost:8545" --unlock-key mykey --chain-id ethermint-1
注意: --laddr 中的localhost如果是在服务器上则可以改成0.0.0.0:8545
Key Management
更加安全的做法是输入密码,如果想安全的钥匙环借助于本地文件或者OS,那么可以添加以下命令:
ethermintcli config keyring-backend file # 设置文件读取钥匙
Reset Data
- Validtor节点不要轻易reset
- 每个节点的
priv_validator.json文件都是独一无二的,不要复制,可能会导致双重签名
rm $HOME/.ethermintd/config/addrbook.json $HOME/.ethermintd/config/genesis.json ethermintd unsafe-reset-all
Delete Data
rm -rf ~/.emint*
三、Testnet
3.1 Single-node, Local, Manual Testnet
单节点、本地、手动启动测试网络
创建一个单独的验证器节点,该节点在本地运行网络,用于测试和其他开发相关用途。
具体操作与执行
./init.sh相同
单机RPC调用访问测试:
curl -v -k -X POST --data '{"jsonrpc":"2.0","method":"eth_accounts","params":[],"id":1}' -H "Content-Type: application/json" 127.0.0.1:8545
3.2 Multi-node, Local, Automated Testnet
使用docker创建四个节点
项目目录下make localnet-start,具体看官网文档,写的很详细。
这里记录一下报的错误:
报错1:
docker-compose down
Removing network ethermint_localnet
WARNING: Network ethermint_localnet not found.
mkdir -p ./build/
make[1]: 进入目录“/root/software/ethermint”
docker build -f ./networks/local/ethermintnode/Dockerfile . -t ethermintd/node
Sending build context to Docker daemon 96.66 MB
Step 1/14 : FROM golang:stretch as build-env
Error parsing reference: "golang:stretch as build-env" is not a valid repository/tag: invalid reference format
make[1]: *** [docker-localnet] 错误 1
make[1]: 离开目录“/root/software/ethermint”
make: *** [localnet-start] 错误 2
解决:重新下载docker-ce(社区版), 注意不是docker
=> 卸载与安装:https://blog.csdn.net/weixin_39477597/article/details/87715899
解决: 检查客户端与服务器版本是否统一,解决见上链接
3.3 Multi-node, Public, Manual Testnet
多节点,公链,手动配置
此部分官方文档写的很简单,这里详细说明一下:
节点配置(在一个局域网下的两台机):
| 名称 | IP | Seed |
|---|---|---|
| node1 | 192.168.31.214 | 716256d39fca45c43a15d895ee85024de3c35058@192.168.31.214:26656 |
| Node2 | 192.168.31.51 | 749a74315e6916a244b85214b9e66361b45dcaa2@192.168.31.51:26656 |
1. 创建一个单节点
与3.1一样,首先创建一个单节点node1,init.sh
2. 启动其他节点、复制文件
在另一个机器上初始化node2,init.sh,在用户根目录下创建需要的ethermintcli、ethermintd两个文件夹即可,ctrl+c关闭当前运行的节点。
在节点1机子上复制node1节点的$HOME/.ethermintd/config/genesis.json文件到节点2机器(可以用scp命令)
3. 设置Seed
在节点1获取其nodeID,使用命令:ethermintd tendermint show-node-id,得到:716256d39fca45c43a15d895ee85024de3c35058
那么节点1的seed就是716256d39fca45c43a15d895ee85024de3c35058@192.168.31.214:26656
在节点2的文件$HOME/.ethermintd/config/config.toml中的seeds中加入节点1的seed
![]()
现在准备工作完毕,先启动节点1,再启动节点2,可以看到两个节点之间实现了同步。
ethermintd start --pruning=nothing --rpc.unsafe --log_level "main:info,state:info,mempool:info" --trace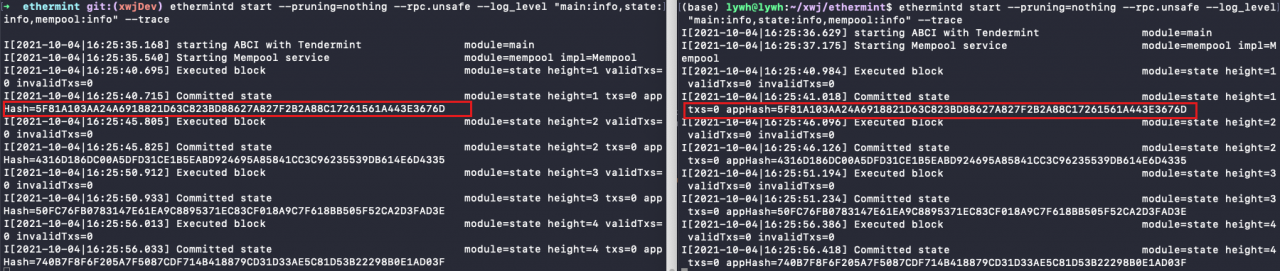
如果两个节点启动相差时间较大,那么区块高度也会有很大差异,新版本会自动快速同步,老版本则不会
如果是老版本ethermint那么可以都重制区块链数据,再同时启动
ethermintd unsafe-reset-all
四、Truffle/Metamask/Remix
使用此部分出现的错误:
导出账户私钥钥命令:
ethermintcli keys unsafe-export-eth-key [创建的账户名]
导出私钥后,将其加入MetaMask钱包中管理
错误:Returned error: the method net_version does not exist/is not available
原因:开启RPC服务时没有开启网络模块权限
解决:
ethermintcli rest-server --laddr "tcp://0.0.0.0:8545" --unlock-key mykey --chain-id ethermint-1 --trace --rpc-api "web3,eth,net,personal"
错误:Metamask导入了账户,但是无法显示余额
原因: 可能链id为1默认为主网
解决: 修改
init.sh文件中的链参数以及启动RPC/REST的链ID参数(我换成了789),重新切换Metamask的网络
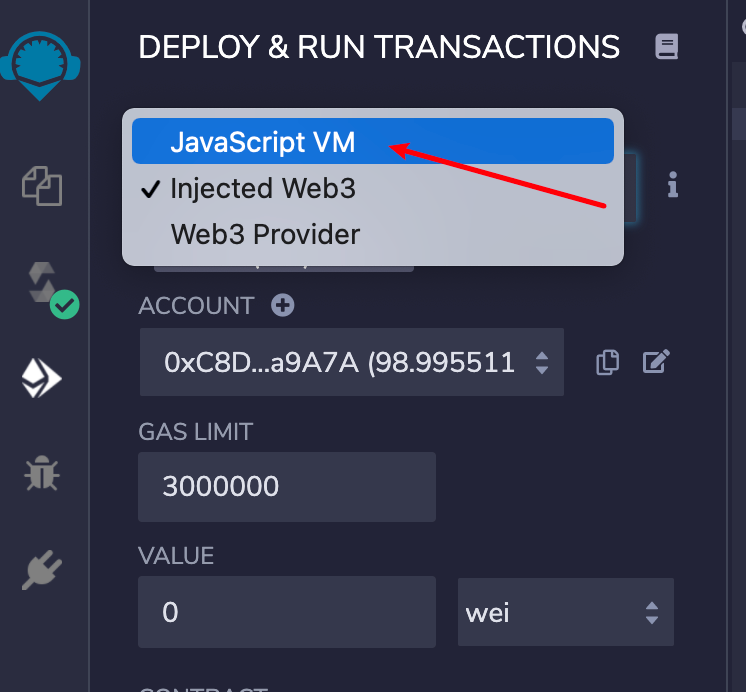
错误: 在remix中运行合约方法出现:
Gas estimation errored with the following message (see below). The transaction execution will likely fail. Do you want to force sending?
Internal JSON-RPC error. { “code”: -32000, “message”: “internal” }原因: 使用了web3注入的方式进行测试, 当函数中出现了错误(例如不满足require时)就会出现无法评估gas费的错误提示
解决: 先使用javaScriptVM模式再次运行, 可以看到具体的错误提示
错误: web3.js报错:Error: Returned error: the method personal_sign does not exist/is not available at Object.ErrorResponse
原因: 开启RPC服务的时候没有开启personal模块
解决: 重新启动rpc服务:
ethermintcli rest-server --laddr "tcp://0.0.0.0:8545" --unlock-key mykey --chain-id ethermint-1 --trace --rpc-api "web3,eth,net,personal"