笔者最近花了点时间研究Oauth2原理,基于spring写了一些demo用于实践探索,深深体会到
Spring Security Oauth2框架的便利,框架帮我们封装太多了底层实现,所以使用起来非常方便,除了可以为第三方应用提供授权,也可以作为应用的登录框架。
文章基于Spring Security Oauth2.0授权码模式实践,采用SpringBoot搭建Demo讲述基本使用过程。
概述
简单来说Oauth2是一个授权协议,用于为第三方访问服务提供特定的授权流程。
它的最终目的是为第三方应用颁发一个有时效性的令牌 token。使得第三方应用能够通过该令牌获取相关的资源。常见的场景就是:第三方登录。当你想要登录某个论坛,但没有账号,而这个论坛接入了如 QQ、Facebook 等登录功能,在你使用 QQ 登录的过程中就使用的OAuth 2.0协议。
在进入正式实践章节之前,有必要先了解下Oauth2的关键知识点。关于Oauth2协议更多详细内容,可以参考10 分钟理解什么是 OAuth 2.0 协议,是一个比较好的科普文章。
Oauth2.0协议中的几个角色
resource owner资源所有者,能够允许访问受保护资源的实体。如果是个人,被称为end-user。resource server资源服务器,受保护资源的服务器,即访问该服务器需要获取授权或许可。client客户端,使用资源所有者的授权代表资源所有者发起对受保护资源的请求的应用程序。如:web网站,移动应用等。authorization server,授权服务器,能够向客户端client颁发令牌。User-Agent,用户代理,帮助资源所有者与客户端沟通的工具,一般为 web 浏览器,移动 APP 等。
几个角色间的认证步骤
+--------+                               +---------------+
|        |--(A)- 请求用户授权许可---- >   |   Resource    |
|        |                               |     Owner     |
|        |<-(B)-- 授权许可   ----------- |               |
|        |                               +---------------+
|        |
|        |                               +---------------+
|        |--(C)-- 获取token ---------->  | Authorization |
| Client |                               |     Server    |
|        |<-(D)----- 发放token ----------|               |
|        |                               +---------------+
|        |
|        |                               +---------------+
|        |--(E)----- token访问资源 ------>|    Resource   |
|        |                               |     Server    |
|        |<-(F)--- 返回受保护的资源 ------|               |
+--------+                               +---------------+
Spring Security Oauth2.0 几个端点的作用
启动项目时会有这发布这些端点,用于Oauth2交互逻辑:
- 根据用户认证获得授权码code
AuthorizationEndpoint
{[/oauth/authorize]}
{[/oauth/authorize],methods=[POST]
- 客户端根据授权码code获取令牌token
TokenEndpoint
{[/oauth/token],methods=[GET]}
{[/oauth/token],methods=[POST]}
- 可以用于远程解码令牌
CheckTokenEndpoint
{[/oauth/check_token]}
- 显示授权服务器的确认页
WhitelabelApprovalEndpoint
{[/oauth/confirm_access]}
- 显示授权服务器的错误页
WhitelabelErrorEndpoint
{[/oauth/error]}
Oauth2.0四种授权模式
- 授权码模式(authorization code)
最常用,可用于第三方应用授权、SSO登录实现等。 - 简化模式(implicit)
一般不用 - 密码模式(resource owner password credentials)
- 客户端模式(client credentials)
一般用于后台服务接口间的认证
实践
搭建Oauth2应用,主要分为4个步骤:搭建认证/授权服务器、搭建资源服务器、配置SpringSercurity、客户端服务器。
以github作为授权服务器举例说明授权码模式的流程:
- 用户访问第三方应用
A-Server,未登录,A-Server提供github认证登录; - 用户点击
github认证,跳转到github; - 如用户在
github未登录,跳转到github登录页,用户输入账户密码即可完成登录,并跳转到原来的第三方应用A-Server并得到颁布的token; - 如用户已在
github登录,则跳转到github确认授权页,用户点击授权后即可跳转到原来的第三方应用A-Server并得到颁布的token
项目准备
- 建立项目
oauth-server,引入依赖
<?xml version="1.0" encoding="UTF-8"?>
<project xmlns="http://maven.apache.org/POM/4.0.0"
         xmlns:xsi="http://www.w3.org/2001/XMLSchema-instance"
         xsi:schemaLocation="http://maven.apache.org/POM/4.0.0 http://maven.apache.org/xsd/maven-4.0.0.xsd">
    <parent>
        <artifactId>parent</artifactId>
        <groupId>com.oauth.demo</groupId>
        <version>1.0-SNAPSHOT</version>
    </parent>
    <modelVersion>4.0.0</modelVersion>

    <artifactId>oauth-server</artifactId>
    <!-- security stater -->
    <dependencies>
        <dependency>
            <groupId>org.springframework.boot</groupId>
            <artifactId>spring-boot-starter-web</artifactId>
            <version>1.5.10.RELEASE</version>
        </dependency>

        <dependency>
            <groupId>org.springframework.boot</groupId>
            <artifactId>spring-boot-starter-security</artifactId>
            <version>1.5.3.RELEASE</version>
        </dependency>
        <dependency>
            <groupId>org.springframework.boot</groupId>
            <artifactId>spring-boot-starter-test</artifactId>
            <version>1.5.10.RELEASE</version>
            <scope>test</scope>
        </dependency>
        <dependency>
            <groupId>org.springframework.security.oauth</groupId>
            <artifactId>spring-security-oauth2</artifactId>
            <version>2.3.4.RELEASE</version>
        </dependency>

        <dependency>
            <groupId>redis.clients</groupId>
            <artifactId>jedis</artifactId>
            <version>2.9.0</version>
        </dependency>

        <!-- 数据库 mybatis 连接池等相关配置 -->
        <dependency>
            <groupId>tk.mybatis</groupId>
            <artifactId>mapper-spring-boot-starter</artifactId>
            <version>1.2.3</version>
        </dependency>
        <dependency>
            <groupId>mysql</groupId>
            <artifactId>mysql-connector-java</artifactId>
        </dependency>
        <dependency>
            <groupId>com.alibaba</groupId>
            <artifactId>druid</artifactId>
            <version>1.1.2</version>
        </dependency>

        <dependency>
            <groupId>com.alibaba</groupId>
            <artifactId>fastjson</artifactId>
        </dependency>
        <dependency>
            <groupId>org.springframework.data</groupId>
            <artifactId>spring-data-redis</artifactId>
            <version>1.8.3.RELEASE</version>
        </dependency>
    </dependencies>

</project>
- 项目参数配置
server:
  port: 9011
  context-path: /auth
  session:
    cookie:
      name: OAUTH2SESSIONID
spring:
  application:
    name: auth-server

  # 数据库配置
  datasource:
    driver-class-name: com.mysql.jdbc.Driver
    type: com.alibaba.druid.pool.DruidDataSource
    filters: stat,wall,log4j
    initialSize: 5
    minIdle: 5
    maxActive: 20
    maxWaite: 60000
    validationQuery: SELECT 1 FROM DUA
    url: jdbc:mysql://localhost:3306/oauth?useSSL=false&useUnicode=true&characterEncoding=utf-8
    username: root
    password: admin

redis:
  url: localhost
  port: 20806
  timeout: 20000
  password: test|test

mapper:
  mappers: com.oauth2.demo.mapper.BaseMapper
  not-empty: true
  identity: MYSQL
logging:
  level:
    root: debug
Oauth2服务端配置
数据库结构
文中demo基于mysql数据库存储Oauth2相关数据。也可以采用内存简单配置,但实际生产使用中需要用mysql等数据库进行持久化配置。
CREATE TABLE `oauth_client_details` (
   `client_id` varchar(128) NOT NULL,
   `client_secret` varchar(256) NOT NULL,
   `resource_ids` varchar(256) DEFAULT NULL,
   `scope` varchar(1024) DEFAULT NULL,
   `authorized_grant_types` varchar(256) DEFAULT NULL,
   `web_server_redirect_uri` varchar(256) DEFAULT NULL,
   `authorities` varchar(2048) DEFAULT NULL,
   `access_token_validity` int(11) DEFAULT NULL,
   `refresh_token_validity` int(11) DEFAULT NULL,
   `additional_information` varchar(4096) DEFAULT NULL,
   `autoapprove` varchar(256) DEFAULT NULL,
   PRIMARY KEY (`client_id`)
 ) ENGINE=InnoDB DEFAULT CHARSET=utf8 COMMENT='oauth2客户端信息'

-- 添加一个客户端
insert into `oauth_client_details` (`client_id`, `client_secret`, `resource_ids`, `scope`, `authorized_grant_types`, `web_server_redirect_uri`, `authorities`, `access_token_validity`, `refresh_token_validity`, `additional_information`, `autoapprove`) values('B5CDC04D8D8D419DA406364168F276A2','E2DA5B2DEDD548AEB7ABA689436C2E2C','','userProfile','authorization_code,client_credentials,password','http://localhost:9101/client1/login,http://www.baidu.com','','43200','2592000','','');

CREATE TABLE `oauth_access_token` (
   `token_id` varchar(256) DEFAULT NULL,
   `token` blob,
   `authentication_id` varchar(128) NOT NULL,
   `user_name` varchar(256) DEFAULT NULL,
   `client_id` varchar(256) DEFAULT NULL,
   `authentication` blob,
   `refresh_token` varchar(256) DEFAULT NULL,
   PRIMARY KEY (`authentication_id`)
 ) ENGINE=InnoDB DEFAULT CHARSET=utf8 COMMENT='oauth2访问令牌'


CREATE TABLE `oauth_code` (
   `code` varchar(256) DEFAULT NULL,
   `authentication` blob,
   `create_ts` timestamp NULL DEFAULT CURRENT_TIMESTAMP
 ) ENGINE=InnoDB DEFAULT CHARSET=utf8 COMMENT='oauth2授权码'

CREATE TABLE `oauth_approvals` (
   `userId` varchar(256) DEFAULT NULL,
   `clientId` varchar(256) DEFAULT NULL,
   `scope` varchar(256) DEFAULT NULL,
   `status` varchar(10) DEFAULT NULL,
   `expiresAt` datetime DEFAULT NULL,
   `lastModifiedAt` datetime DEFAULT NULL
 ) ENGINE=InnoDB DEFAULT CHARSET=utf8 COMMENT='oauth2已授权客户端'
授权服务器
用于实现Oauth2认证,关键配置@EnableAuthorizationServer表示开启Oauth2认证服务器
@Configuration
@EnableAuthorizationServer
public class AuthServerConfiguration extends AuthorizationServerConfigurerAdapter{

    @Autowired
    private OauthClientDetailsServiceImpl oauthClientDetailsService;
    @Autowired
    private AuthenticationManager authenticationManager;

    @Autowired
    private UserDetailServiceImpl userDetailService;
    @Autowired
    private DruidDataSource dataSource;
    @Autowired
    private JedisConnectionFactory jedisConnectionFactory;

    /**
     * 已授权客户端存储记录
     * @return
     */
    @Bean
    public ApprovalStore approvalStore() {
        return new JdbcApprovalStore(dataSource);
    }

    /**
     * access_token 采用redis缓存,Redis连接池采用Jedis框架
     * 当然也可以采用Jdbc实现用mysql存储
     * @return
     */
    @Bean
    public RedisTokenStore tokenStore() {
        return new RedisTokenStore(jedisConnectionFactory);
    }

    /**
     * 授权码code的存储-mysql中
     * @return
     */
    @Bean
    public AuthorizationCodeServices authorizationCodeServices() {
        JdbcAuthorizationCodeServices service = new JdbcAuthorizationCodeServices(dataSource);
        return service;
    }
    // 配置Oauth2客户端,存储到数据库中
    @Override
    public void configure(ClientDetailsServiceConfigurer clients) throws Exception {
        clients.withClientDetails(oauthClientDetailsService);
    }

    /**
     * 配置oauth2端点信息
     * @param endpoints
     * @throws Exception
     */
    @Override
    public void configure(AuthorizationServerEndpointsConfigurer endpoints) throws Exception {
        endpoints
                .allowedTokenEndpointRequestMethods(HttpMethod.GET, HttpMethod.POST)
                .authenticationManager(authenticationManager)
                .approvalStore(approvalStore())
                .userDetailsService(userDetailService)
                .tokenStore(tokenStore())
                .authorizationCodeServices(authorizationCodeServices());
        // 自定义确认授权页面
        endpoints.pathMapping("/oauth/confirm_access", "/oauth/confirm_access");
        // 自定义错误页
        endpoints.pathMapping("/oauth/error", "/oauth/error");

    }

    @Override
    public void configure(AuthorizationServerSecurityConfigurer security) throws Exception {

        security.checkTokenAccess("isAuthenticated()")
                .allowFormAuthenticationForClients();  //主要是让/oauth/token支持client_id以及client_secret作登录认证
    }
}
配置SpingSecurity
用于保护oauth相关的endpoints,主要作用于用户的登录(form login,Basic auth),主要是通过一系列过滤链实现登录相关
/**
 * Web服务配置类
 */
@Slf4j
@Configuration
@EnableWebSecurity
public class WebSecurityConfiguration extends WebSecurityConfigurerAdapter {

    @Autowired
    private UserDetailServiceImpl userDetailsService;

    @Autowired
    private BCryptPasswordEncoder passwordEncoder;

    /**
     * 不定义没有password grant_type模式
     * @return
     * @throws Exception
     */
    @Override
    @Bean
    public AuthenticationManager authenticationManagerBean() throws Exception {
        return super.authenticationManagerBean();
    }

    /**
    * 配置用户账密的处理类   userDetailsService提供登录用户的账密信息供springsecurity框架校验
    */
    @Override
    protected void configure(AuthenticationManagerBuilder auth) throws Exception {
        auth.userDetailsService(userDetailsService)
                .passwordEncoder(passwordEncoder);
    }

    @Override
    protected void configure(HttpSecurity http) throws Exception {
        http.sessionManagement().sessionCreationPolicy(SessionCreationPolicy.IF_REQUIRED)
                .and()
                .requestMatchers()  //所有端点配置
                .antMatchers("/oauth/**", "/login")  // 匹配一个数据 ant路径格式
                .and()
                .authorizeRequests()  // url权限配置
                .antMatchers("/login").permitAll()  // 表示登录表单页面不拦截
                .antMatchers("/oauth/**").authenticated()  // 保护url,需要用户登录
                .and()
                .formLogin().permitAll()  //没有自定义loginpage  则不要写上loginPage("/xxxx") 否则404
                .and()
                .logout().permitAll()
                // /logout退出清除cookie
                .addLogoutHandler(new CookieClearingLogoutHandler("token", "remember-me"))
                .and()
                .csrf().disable()
                // 禁用httpBasic
                .httpBasic().disable();
    }

}
资源服务器
配置受保护的资源,用于保护oauth受限资源,主要作用于client端以及token的认证,security配置WebSecurityConfigurerAdapter与资源服务配置ResourceServerConfigurerAdapter比较像,它们的区别会在本文末讲到。
@Slf4j
@Configuration
@EnableResourceServer
public class ResourceConfiguration extends ResourceServerConfigurerAdapter {
    @Override
    public void configure(HttpSecurity http) throws Exception {
        http
                .requestMatchers().antMatchers("/userInfo")
                .and()
                .authorizeRequests()
                .antMatchers("/userInfo").authenticated();  //受保护资源url: /userInfo 需要认证
    }
}
用户信息接口(受保护资源)
@Slf4j
@Controller
public class HomeController {
    /**
    * 提供通过access_token获取用户信息的问题
    * @return
    */
    @RequestMapping("userInfo")
    @ResponseBody
    public Object userInfo(Principal principal) {
        return principal
    }
}
其它配置
通用配置
@Configuration
public class CommonConfiguration {

    /**
     * 账户密码加密类
     * @return
     */
    @Bean
    public BCryptPasswordEncoder passwordEncoder() {
        return new BCryptPasswordEncoder();
    }
}
Redis连接池配置:这里采用的是spring-data-redis自定义配置,不需要依赖
starter
@Configuration
public class JedisPoolConfiguration {

    @Value("${redis.url}")
    private String redisUrl;
    @Value("${redis.port}")
    private int redisPort;
    @Value("${redis.timeout}")
    private int redisTimeout;
    @Value("${redis.password}")
    private String redisPasswd;

    @Bean
    public JedisConnectionFactory connectionFactory() {
        JedisConnectionFactory jedisConnectionFactory = new JedisConnectionFactory();
        jedisConnectionFactory.setPort(redisPort);
        jedisConnectionFactory.setHostName(redisUrl);
        jedisConnectionFactory.setPassword(redisPasswd);
        return jedisConnectionFactory;
    }
}
用户账密处理类:文章简单处理,允许所有的账号用密码111111登录。其中 UserInfoEntity 继承 UserDetails 类。
@Configuration
public class UserDetailServiceImpl implements UserDetailsService{

    @Autowired
    private BCryptPasswordEncoder passwordEncoder;

    @Override
    public UserDetails loadUserByUsername(String s) throws UsernameNotFoundException {
        UserInfoEntity userInfoEntity = new UserInfoEntity();
        userInfoEntity.setUsername(s);
        userInfoEntity.setPassword(passwordEncoder.encode("111111"));
        return userInfoEntity;
    }
}
Oauth2客户端业务类:文章采用
mybatis框架实现ORM
@Slf4j
@Configuration
public class OauthClientDetailsServiceImpl implements ClientDetailsService{

    @Autowired
    private OauthClientDetailsDao oauthClientDetailsDao;
    /**
     * 根据id client_id获取客户端信息
     * @param s
     * @return
     * @throws ClientRegistrationException
     */
    public ClientDetails loadClientByClientId(String s) throws ClientRegistrationException {
        // 根据Id查询
        OauthClientDetails oauthClientDetails = oauthClientDetailsDao.selectByPrimaryKey(s);
        try {
            return translateClient(oauthClientDetails);
        } catch (Exception e) {
            log.error("===> {}", e);
            throw new ClientRegistrationException("无效client");
        }
    }

    public ClientDetails translateClient(OauthClientDetails details) {
        BaseClientDetails clientDetails = new BaseClientDetails(details.getClientId(), details.getResourceIds(), details.getScope(),
                details.getAuthorizedGrantTypes(), details.getAuthorities(), details.getWebServerRedirectUri());
        clientDetails.setClientSecret(details.getClientSecret());
        clientDetails.setScope(StringUtils.commaDelimitedListToSet(details.getScope()));
        clientDetails.setAutoApproveScopes(new ArrayList<String>());
        clientDetails.setRefreshTokenValiditySeconds(details.getRefreshTokenValidity());
        clientDetails.setAccessTokenValiditySeconds(details.getAccessTokenValidity());
        return clientDetails;
    }
}
至此,Oauth2+ 资源 就配置完成,下面进行测试。
测试
- 获取code,跳转到登录页
/login,输入账号密码admin/111111,登录后返回code
http://localhost:9011/auth/oauth/authorize?client_id=B5CDC04D8D8D419DA406364168F276A2&response_type=code&redirect_uri=http://localhost:9101/client1/login
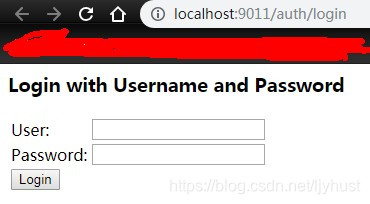
登录成功后获取到的授权code为9cB8ks (生产环境一般是由localhost:9101/client1/login前端将code传给后端)
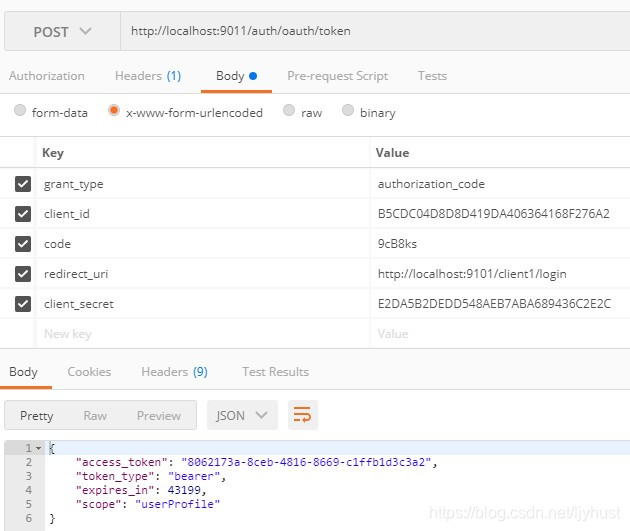
- 通过code获取令牌token(POST请求)
http://localhost:9011/auth/oauth/token?client_id=B5CDC04D8D8D419DA406364168F276A2&client_secret=E2DA5B2DEDD548AEB7ABA689436C2E2C&grant_type=authorization_code&redirect_uri=http://localhost:9101/client1/login&code=9cB8ks
- 通过access_token访问资源:获取用户信息
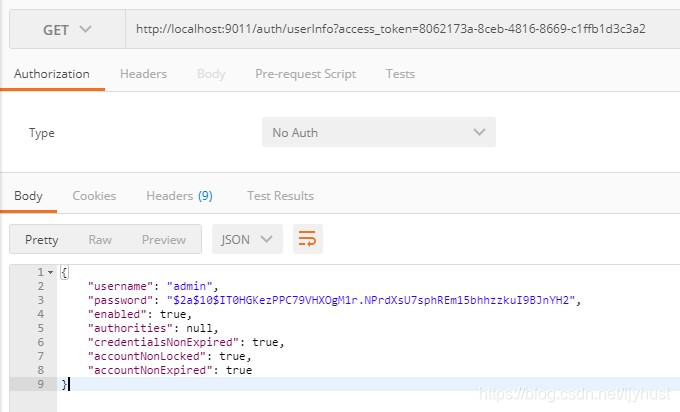
这样就完成了一个基于spring security oauth2授权码模式的认证服务。
WebSecurityConfigurerAdapter与ResourceServerConfigurerAdapter
二者都有针对http security的配置,都可用于拦截验证url甚至有相同的作用效果,但在功能及使用场景上有区别
- 过滤顺序
WebSecurityConfigurerAdapter(order=100)的拦截要低于@EnableResourceServer(order=3)
WebSecurityConfigurerAdapter用于保护oauth相关的endpoints,同时主要作用于用户的登录(form login,Basic auth) - 使用场景
ResourceServerConfigurerAdapter用于保护oauth要开放的资源,主要作用于client端以及token的认证(Bearer auth) - 两者分工协作
因此WebSecurityConfigurerAdapter需要拦截oauth资源,不拦截保护资源;而被保护资源由ResourceServerConfigurerAdapter拦截,配置需要acess_token访问的url
总结
文章简单介绍Oauth2协议的过程,spring sercurity oauth2框架实现及最常用的授权码模式的实践。其它功能或实践,比如密码登录模式、客户端如何接入使用、sso统一登录等,笔者后续有空会继续更新实践。