PC端系统:Ubuntu 18.04
ros版本:melodic
polyscope版本:3.14
机器人:UR5/CB3
- 以下步骤亲测可用
1、Ubuntu18.04 安装ros-melodic
最好按照官网步骤来,以防秘钥有变
官网地址:http://wiki.ros.org/Installation
(1)配置Ubuntu软件库
保证 “restricted,” “universe,” and “multiverse” 被选中,以及【下载自】选项选择一个国内镜像源。

(2)设置sources.list
官网默认提供的是国外源,点击【Mirrors】进入国内源的配置,下面使用的是中科大的源。
sudo sh -c '. /etc/lsb-release && echo "deb http://mirrors.ustc.edu.cn/ros/ubuntu/ `lsb_release -cs` main" > /etc/apt/sources.list.d/ros-latest.list'
(3)设置秘钥
操作不成功的话,可以将hkp://keyserver.ubuntu.com:80 换成 hkp://pgp.mit.edu:80 或者hkp://keyserver.ubuntu.com:80
sudo apt-key adv --keyserver 'hkp://keyserver.ubuntu.com:80' --recv-key C1CF6E31E6BADE8868B172B4F42ED6FBAB17C654
(4)安装
sudo apt update

sudo apt install ros-melodic-desktop-full
(5)设置环境变量
当使用ros的时候,必须每启动一个终端执行一次:
source /opt/ros/noetic/setup.bash
因此可以将其写入~/.bashrc中,就不用每次手动source了
echo "source /opt/ros/melodic/setup.bash" >> ~/.bashrc
source ~/.bashrc	# 使修改起作用
(5)安装依赖包
sudo apt install python-rosdep python-rosinstall python-rosinstall-generator python-wstool build-essential

# 初始化rosdep
sudo apt install python-rosdep
sudo rosdep init
# rosdep update 这个命令一直没执行成功,按照网上说的修改/etc/hosts和用热点连接都没用,后来就没管它继续往下操作了
rosdep update
ROS安装的部分到这基本就结束了,接下来就是安装UR5机器人的驱动了。
2、安装Universal_Robots_ROS_driver
驱动包的github地址:https://github.com/UniversalRobots/Universal_Robots_ROS_Driver
按照README里的步骤安装即可。
PS:如果github下载失败,可以在github.com后面加上cnpmjs.org,即:github.com.cnpmjs.org
# source global ros
$ source /opt/ros/melodic/setup.bash

# create a catkin workspace
$ mkdir -p catkin_ws/src && cd catkin_ws

# clone the driver
$ git clone https://github.com/UniversalRobots/Universal_Robots_ROS_Driver.git src/Universal_Robots_ROS_Driver

# clone fork of the description. This is currently necessary, until the changes are merged upstream.
$ git clone -b calibration_devel https://github.com/fmauch/universal_robot.git src/fmauch_universal_robot

# install dependencies
$ sudo apt update -qq
$ rosdep update	 # 同样未成功
$ rosdep install --from-paths src --ignore-src -y

# build the workspace. We need an isolated build because of the non-catkin library package.
$ catkin_make

# activate the workspace (ie: source it)
$ source devel/setup.bash
- 网上有的教程说要下载
universal_robot(地址:https://github.com/ros-industrial/universal_robot),但经过实际测验发现并不需要,因为按照上述步骤已经下载了fmauch_universal_robot,如果再下载一个universal_robot的话,就重复了,catkin_make会编译出错。 - 但也不要觉得
universal_robot和fmauch_universal_robot都是UR机器人描述包,就可以用universal_robot代替fmauch_universal_robot了,这样做的话universal_robot编译不会出错,但是Universal_Robots_ROS_Driver编译就会出错了。
驱动的部分到此就结束了。PS:
fmauch_universal_robot里有moveit配置包,可以直接启动在rviz中进行运动规划。
3、在实体UR机器人端安装 externalcontrol-1.0.4.urcap
这个同样有官方教程,按照教程来即可:https://github.com/UniversalRobots/Universal_Robots_ROS_Driver/blob/master/ur_robot_driver/doc/install_urcap_cb3.md
PS:要安装externalcontrol,polyscope版本需 >= 3.7
(1)首先,从Universal_Robots_ROS_Driver/ur_robot_driver/resources下载externalcontrol-1.0.4.urcap,然后用自己的U盘拷贝到UR机器人。
- 控制器里面的U盘不能用
- U盘插到控制器上后,示教器上找不到文件的话,可以尝试格式化U盘,然后在【类型】中选择【所有系统和设备共用(FAT)(S)】,如下图:
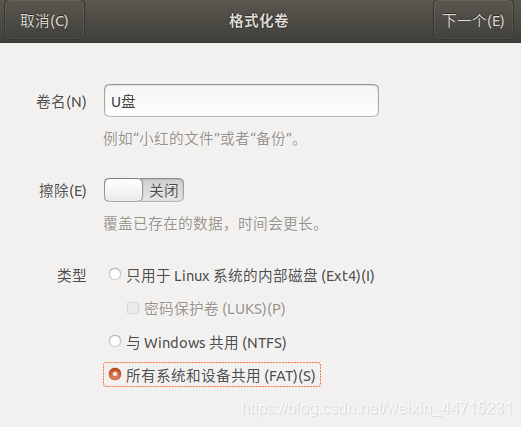
当然,如果你的U盘插上去能找到文件,就不用格式化了。
接下来的操作都是在示教器上进行的。
(2)欢迎屏幕上,选择【Setup Robot】,然后选择【URCaps】进入URCaps安装屏幕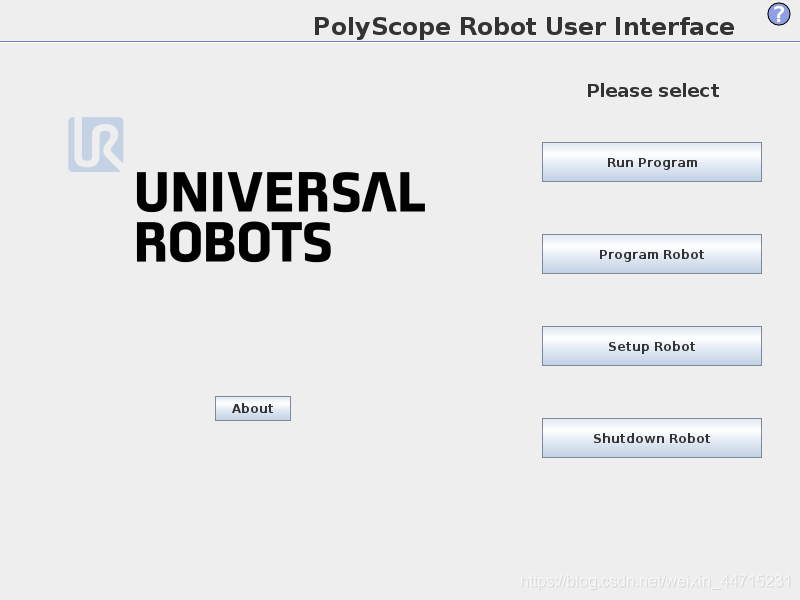
(3)单击底部的【+】以打开文件选择器,点击后可以看到存储在机器人程序文件夹或插入的USB驱动器中的所有urcap文件。 选择externalcontrol-1.0.4urcap文件,然后单击打开,最后【Restart】。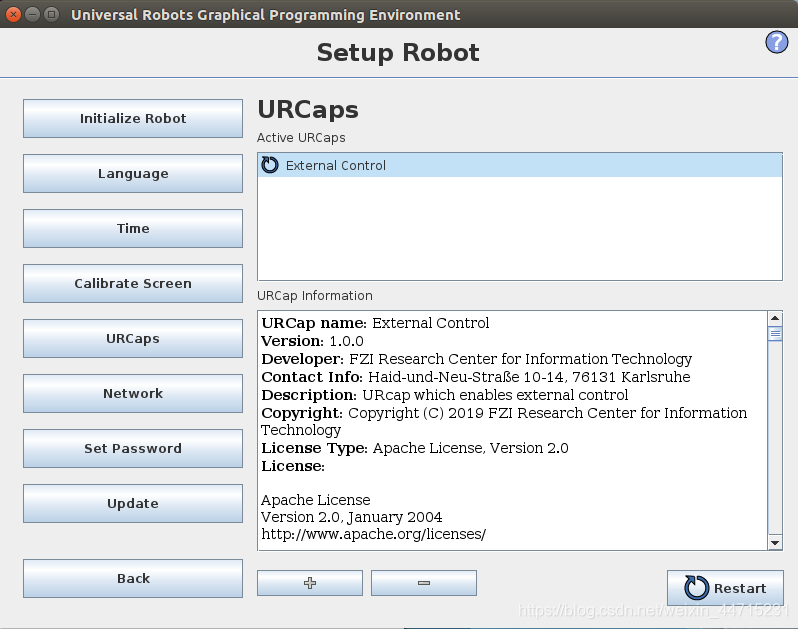
(4)重启后,选择【Program Robot】,在【Installation】选项卡中找到【External Control】,然后设置你PC电脑的IP地址,该地址应该和UR机器人在同一个局域网中,端口为50002,不用动。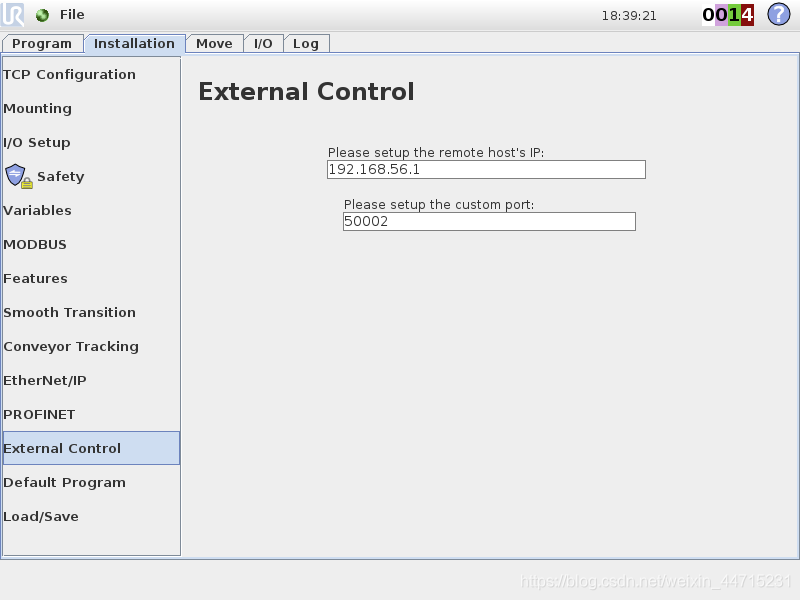
(5)接下来,创建一个空程序,并将External Control程序节点插入到程序树中,然后点击命令选项卡。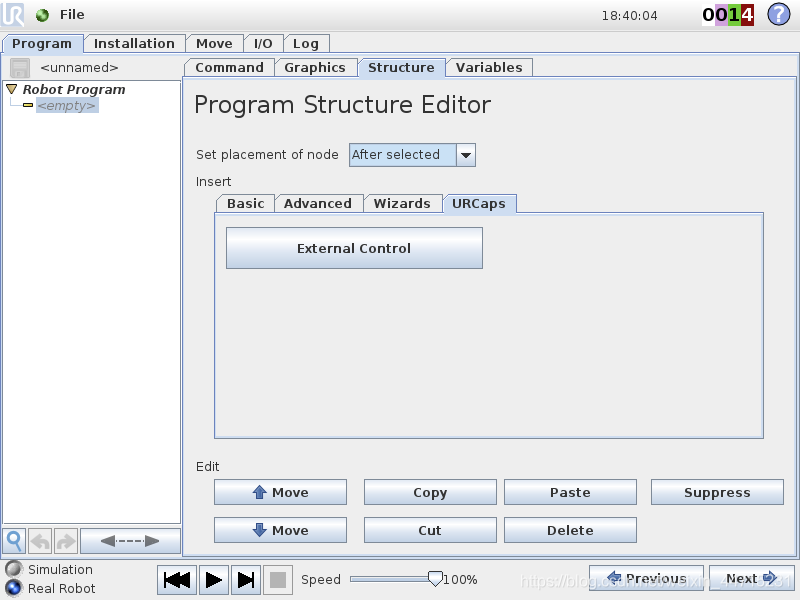
(6)检查信息无误后,保存文件(软件会自动给创建的文件加上一个后缀名.urp)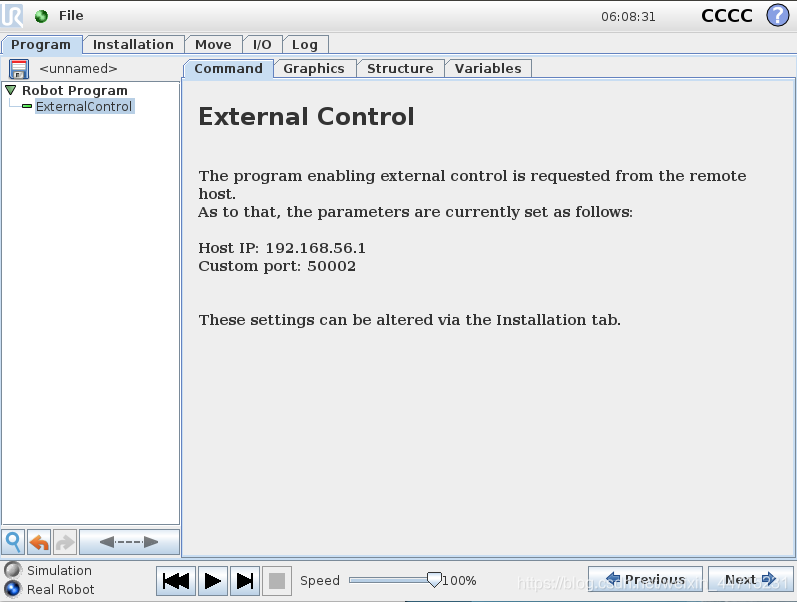
(7)配置UR机器人的网络
- 前面通过.urcap文件在示教器上设置了要通信的PC端的IP地址和通信端口,现在需要配置好机器人自身的IP地址。
- 机器人需与PC端处于同一局域网内。
- 在示教器上点击【设置机器人】,进入机器人设置界面后点击【网络】,默认为禁用网络。可以先通过DHCP给机器人分配一个IP地址后,再将这个IP地址设置为静态。
- 可以在PC主机上通过
ping IP_OF_ROBOT来测试PC主机与机器人之间的网络连接。
在机器人端进行安装和网络设置的部分就结束了。在这一部分创建的.urp文件建议不要删除,因为之后使用ROS与机器人进行通信时需要用到。
4、使用ROS驱动UR5机器人
这一部分同样可以按照GitHub上的README来:https://github.com/UniversalRobots/Universal_Robots_ROS_Driver
(1)提取标定信息
roslaunch ur_calibration calibration_correction.launch robot_ip:=IP_OF_ROBOT target_filename:="${HOME}/catkin_ws/src/fmauch_universal_robot/ur_description/config/ur5_calibration.yaml"
- 将上述的IP_OF_ROBOT替换成你自己机器人的IP地址。
(2)开启一个终端,执行roscore
(3)再开启一个新终端,启动机器人驱动程序:
roslaunch ur_robot_driver ur5_bringup.launch limited:=true robot_ip:=IP_OF_ROBOT
(3)在机器人示教器上,点击【运行程序】,选择【加载文件】,然后选择上一步中保存的.urp文件,打开并运行。之后可以看到运行驱动的终端显示:
[ INFO] [1615715907.527568874]: Robot requested program
[ INFO] [1615715907.527840385]: Sent program to robot
[ INFO] [1615715907.564855461]: Robot ready to receive control commands.
(4)开启一个新终端,启动 moveit :
roslaunch ur5_moveit_config ur5_moveit_planning_execution.launch limited:=true
(5)开启一个新终端,启动 rviz:
roslaunch ur5_moveit_config moveit_rviz.launch config:=true
(6)接下来就可以在 rviz 中进行运动规划,并控制真实机器人按照规划的路径运动了。
5、踩过的坑
错误描述
- 在rviz中进行运动规划时,规划成功后,机器人保持静止,一动不动
- 开启rviz的端口显示:
[ INFO] [1615715355.318064333]: ABORTED: Solution found but controller failed during execution
- 开启moveit的端口显示:
[ERROR] [1615715355.301931123]: Unable to identify any set of controllers that can actuate the specified joints: [ elbow_joint shoulder_lift_joint shoulder_pan_joint wrist_1_joint wrist_2_joint wrist_3_joint ]
[ERROR] [1615715355.302004812]: Known controllers and their joints:
解决方法
- 将
$(HOME)/catkin_ws/src/fmauch_universal_robot/ur5_moveit_config/config/controllers.yaml文件中的action_ns字段的值修改为/scaled_pos_joint_traj_controller/follow_joint_trajectory,问题解决。 - 修改后的文件内容为:
controller_list:
 - name: ""
    action_ns: /scaled_pos_joint_traj_controller/follow_joint_trajectory
    type: FollowJointTrajectory
    joints:
      - shoulder_pan_joint
      - shoulder_lift_joint
      - elbow_joint
      - wrist_1_joint
      - wrist_2_joint
      - wrist_3_joint
- 以上的解决方法是在
Universal_Robots_ROS_Driver的issue里找到的,链接:https://github.com/UniversalRobots/Universal_Robots_ROS_Driver/issues/55