http://www.alanzucconi.com/2016/11/07/shadergui-custom-material-inspectors-unity-5/
This tutorial explains how to create custom material inspectors for your shaders in Unity 5.
- Introduction
- Step 1. The Setup
- Step 2. Finding Properties
- Step 3. Toggles
- Step 4. Conditions
- Conclusion
This is a tutorial for Unity 5: Unity 4 used MaterialEditor (legacy documentation here) to customise a material’s inspector. That is now deprecated; you should use the new ShaderGUI (documentation here) instead.
Introduction
Back in 2011, Nicoll Hunt gave a talk at GaME on the lessons he have learnt during his career as a game developer. He couldn’t stress enough how important tools are in this job. Despite sceptical at first, it took me 5 years to fully embrace his advice. Tools are developer’s best friends. Unity Technologies know this very well, and is the reason why they have invested so much in the making of a fully customisable and extendable editor.
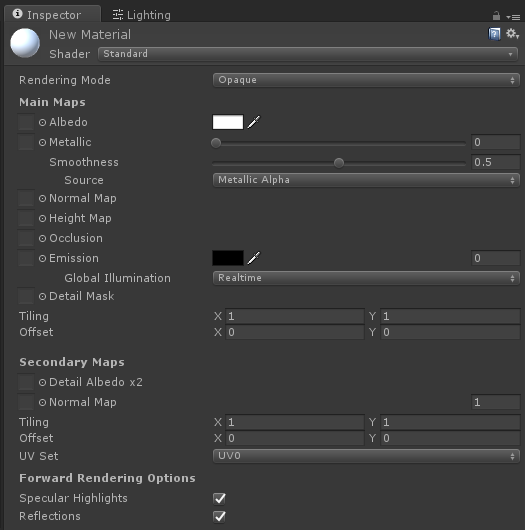
When you create a new material in Unity, the Inspector window is where you can change all of its properties. By default, Unity exposes all the field that have been defined in the Properties section of the shader used by the material. A notable exception to this rule is the Standard Shader. When selected, a variety of options and custom menus are available to the developer (below).
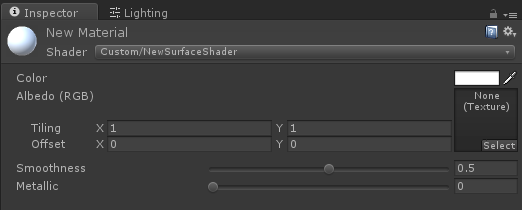
Surprisingly enough, creating a new Standard Surface Shader directly from Unity (Assets > Create > Shader > Standard Surface Shader) leads to a rather disappointing result (below).
Despite differences between these two shaders exist, they’re not what make their respective inspectors look so different. The Default Standard Shader is coupled with a script, called StandardShaderGUI, which overrides the default inspector and replaces it with a custom one. Customising a material inspector is done, in Unity 5, using the class ShaderGUI (documentation here).
Step 1. The Setup
Customising a material inspector is something that does not take place in a shader. All the code necessary for the custom behaviours is hosted in a script that extends ShaderGUI. The only change that the target shader needs is a reference to the above mention script. For the purpose of this tutorial, it has been called CustomShaderGUI.
Any class that extends ShaderGUI can be used to affect the behaviour of a material inspector. The method that Unity invokes when the inspector needs to be drawn is OnGUI. It takes two parameters. One is MaterialEditor represents the material that we are using; the other is an array of MaterialProperty. There is an element for each property that has been defined in the Shader.
The standard behaviour of OnGUI draws each property in the inspector. ShaderGUI also detect changes and propagates them to the material.
In order to work, CustomShaderGUI must be placed in a folder called “Editor”. You can place this folder where you want it, and there can several folders called “Editor” in your project. When you compile a game, Unity only includes the libraries that are strictly necessary. All the classes that are used to extend the editor will not be included in the final build of your game. This means that if a script that uses usingUnityEditor, it won’t compile when building the game because the namespace UnityEditor has not been made available by Unity. Scripts in the “Editor” folders are not compiled when building a game, hence solving the issue.
Step 2. Finding properties
A first step to understand how OnGUI works is to replace it with a much simpler implementation. Looping over all the properties, you can visualise them in the inspector using MaterialEditor.ShaderProperty.
This piece of code simply takes all the properties defined in the shader and puts them into the inspector. This usually produces the same effect of OnGUI, but there are few minor differences. OnGUI, for instance, does not draw properties that are decorated with the [HideInInspector] attribute. Our code simply draws all the properties.
With ShaderGUI you have the power to selectively draw only the properties you need, when you want. Unity provides methods to search for specific properties and to get/set their values. Assuming our shader has a property called _Color, we can retrieve it from the properties array using FindProperty.
Step 3. Toggles
The most common way in which ShaderGUIs are used is to selectively hide or show certain properties. For the sake of this tutorial, let’s imagine a shader with two modes. The first one uses a solid color; the second one uses two colours for a gradient. Depending on the mode we have selected, the second color is unused and it should not be shown in the inspector.
The first step is to record the developer’s choice. We can do this by adding a toggle in the shader.
By default, this is what is going to appear in the material inspector:
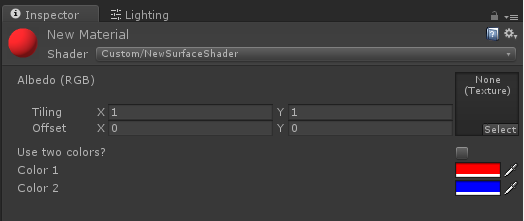
Unity does not support boolean properties; _UseTwoColors is an integer variable. The attribute [Toggle] makes sure it will only be either zero or one, and forces the inspector to draw a checkbox.
Step 4. Conditions
What we want now is showing the second colour only when _UseTwoColors is checked. We can do this with the following piece of code:
The code is rather self explanatory. It finds all the properties that we need. It then draws the first three in the inspector. Finally, it draws the second colour depending on the value of the toggle.
Conclusion
This tutorial shows a very simple approach to customise the look of a material inspector. Despite being effective, there are several issues that still needs to be addressed. Unity allows to have different variants of a shader, which can be swapped very easily. In our case, we could create two variants of the same shader, and pick the right one depending on the value of the checkbox. This topic will be covered in another tutorial.
Other Resources
- Unity: Custom Shader GUI
- Martin Palko: Shader More Efficiently
Support this blog! ♥
For the past three years I've been dedicating more and more of my time to the creation of quality tutorials, mainly about game development and machine learning. If you think these posts have either helped or inspired you, please consider supporting this blog.