一 主要参考资料
https://echocow.cn/articles/2019/07/14/1563082088646.html
1.1 博客地址:
echocow.cn【重点关注,对应的代码路径为:/Users/leixingbang/GitProject/spring-security-oauth2-demo】
https://blog.csdn.net/lightofmiracle/article/details/79151074
https://segmentfault.com/u/wotrd/articles?page=2
https://segmentfault.com/a/1190000019344734
极客时间相关代码【/Users/leixingbang/GitProject/spring-security-oauth2-demo】
1.2 github相关的代码(极客时间)
https://github.com/spring2go/
https://github.com/spring2go/oauth2lab
二 授权服务器的主要端点
主要提供了几个端点。
(1)授权端点:
/oauth2/authorize
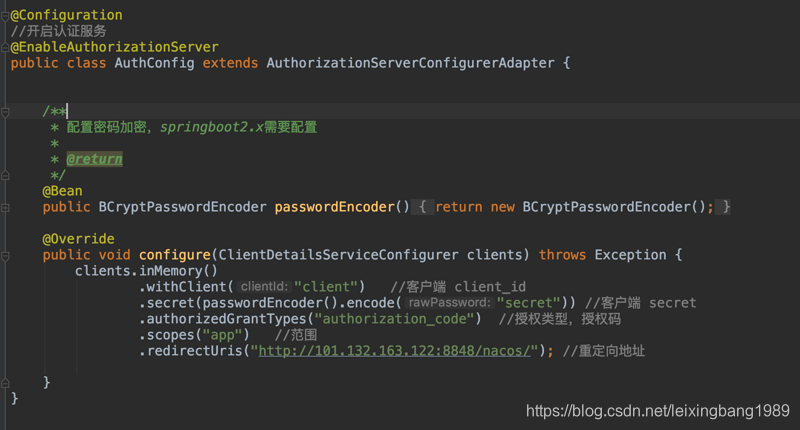
对应授权端点配置的源码eg:
@Configuration
@RequiredArgsConstructor
@EnableAuthorizationServer
public class Oauth2AuthorizationServerConfig extends AuthorizationServerConfigurerAdapter {

    private final @NonNull AuthenticationManager authenticationManager;
    private final @NonNull UserDetailsService userDetailsService;


    public BCryptPasswordEncoder passwordEncoder(){
        return new BCryptPasswordEncoder();
    }

    /**
     * 用来配置授权端点:/oauth/authorize,通过次端点跳转到授权服务器进行认证。
     * response_type 对应authorizedGrantTypes 授权类型,由于这里是授权码方式所以填:authorization_code
     * client_id:对应客户端的id
     * scope:申请的授权范围
     * redirect_uri 获取授权码后重定向的地址
     * state 客户端的当前状态,认证服务器会原封返回
     * @param clients
     * @throws Exception
     */

    @Override
    public void configure(ClientDetailsServiceConfigurer clients) throws Exception {
       clients.inMemory()
               .withClient("client")
               .secret(passwordEncoder().encode("secret"))
               .authorizedGrantTypes("authorization_code")
               .scopes("app")
               .redirectUris("www.baidu.com");
    }

    @Override
    public void configure(AuthorizationServerEndpointsConfigurer endpoints) {
        endpoints.authenticationManager(this.authenticationManager)
                .userDetailsService(userDetailsService);
    }

    @Override
    public void configure(AuthorizationServerSecurityConfigurer security) {
        security
                .checkTokenAccess("isAuthenticated()");
    }

}
http://localhost:9000/oauth/authorize?client_id=client&response_type=code
http://localhost:9000/oauth/authorize?client_id=client&response_type=code
对应极客时间的请求获取授权码路径:
http://localhost:8080/oauth/authorize?client_id=clientapp&redirect_uri=http://localhost:9001/callback&response_type=code&scope=read_userinfo
这里的client_id对应的授权客户端id,scope对应的是授权的范围。类似于猎聘网客户端读取用户头像(一个授权范围)、用户名(一个授权范围)
场景:使用微信账号登陆猎聘网,(在猎聘网中获取微信的token)跳转到用户登录页面(eg:qq登录),进行授权.
[外链图片转存失败,源站可能有防盗链机制,建议将图片保存下来直接上传(img-ETbbZOtE-1614821714739)(认证服务器.png)]
认证通过后,会跳转到截图中定义的重定向地址,并返回授权码。(相当于猎聘网获取到微信的授权码)
http://101.132.163.122:8848/nacos/?code=9Qb5SM#/login
猎聘网(客户端)得到授权码后,可以使用授权码获取对应的token,拿到token后就可以访问资源服务器中的内容。(eg:访问获得微信头像)
4.1.1对应uac系统的代码:
com.ilxb.ipd.uac.config.AuthorizationServerConfig
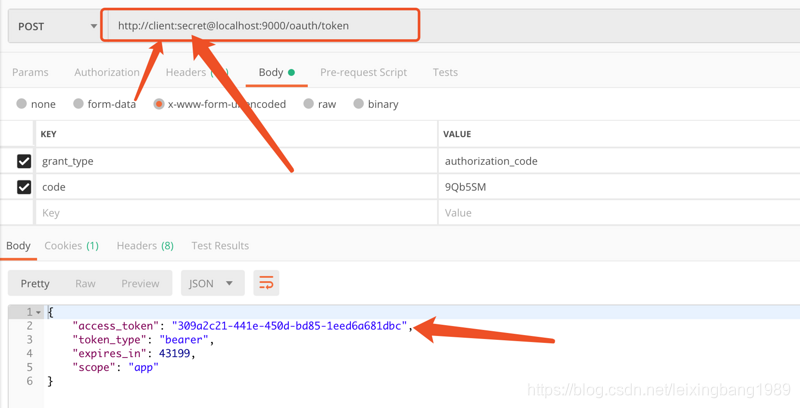
(2) token端点(令牌端点)获取token的端点
/oauth2/token
这里的token就是对应的授权码。
[外链图片转存失败,源站可能有防盗链机制,建议将图片保存下来直接上传(img-YdBeFNuI-1614821714750)(/Users/leixingbang/Desktop/spring oauth2学习/客户端使用授权码获取对应的token.png)]
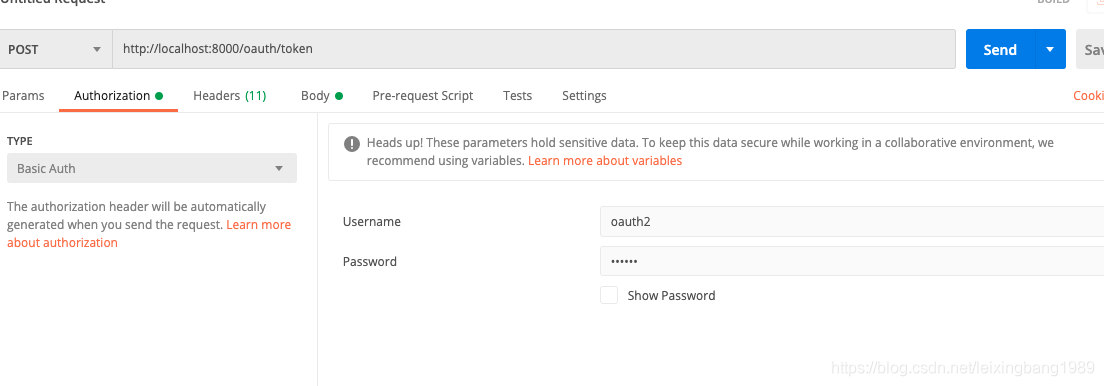
如果报401错误则需要设置:
[外链图片转存失败,源站可能有防盗链机制,建议将图片保存下来直接上传(img-46kusVKR-1614821714751)(获取token报401错误.png)]
Authorization:Basic Auth
其username为:client_id
password为:client_secrit
本地示例:http://client:secret@localhost:8000/oauth/token
对应的key值:
grant_type:authorization_code
code:WUCkt1
| 参数名称 | 是否必填 | 描述 |
|---|---|---|
| grant_type | REQUIRED | 使用的授权模式,值固定为"authorization_code" |
| code | REQUIRED | 上一步获得的授权码 |
| redirect_uri | REQUIRED | 重定向URI,必须与上一步中的该参数值保持一致 |
| client_id | REQUIRED | 客户端的 id |
| scope | RECOMMENDED | 授权范围,必须与第一步相同 |
选填值:redirect_uri 描述:重定向URI,必须与上一步中的该参数值保持一致
返回的参数:grant_type、token_type、expires_in、scope对应的含义如下:
| 参数名称 | 是否必有 | 描述 | 是否有实现 |
|---|---|---|---|
| access_token | REQUIRED | 授权服务器颁发的访问令牌 | 是 |
| token_type | REQUIRED | 令牌类型,该值大小写不敏感,可以是bearer类型或mac类型 | 是 |
| expires_in | RECOMMENDED | 过期时间,单位为秒 | 是 |
| refresh_token | OPTIONAL | 表示更新令牌,用来获取下一次的访问令牌 | 是,需要设置 |
| scope | OPTIONAL | 权限范围,如果有,则与客户端申请的范围一致 | 是 |
http://localhost:8000/oauth/authorize?client_id=oauth2&response_type=code&redirect_uri=http://example.com&scope=all
http://localhost:8000/oauth/authorize?response_type=code&client_id=oauth2&redirect_uri=http://example.com&scope=all
(3)introspect 校验端点
/oauth2/introspect
(4)吊销端点
/oauth2/revoke
三 Spring security Oauth2 架构
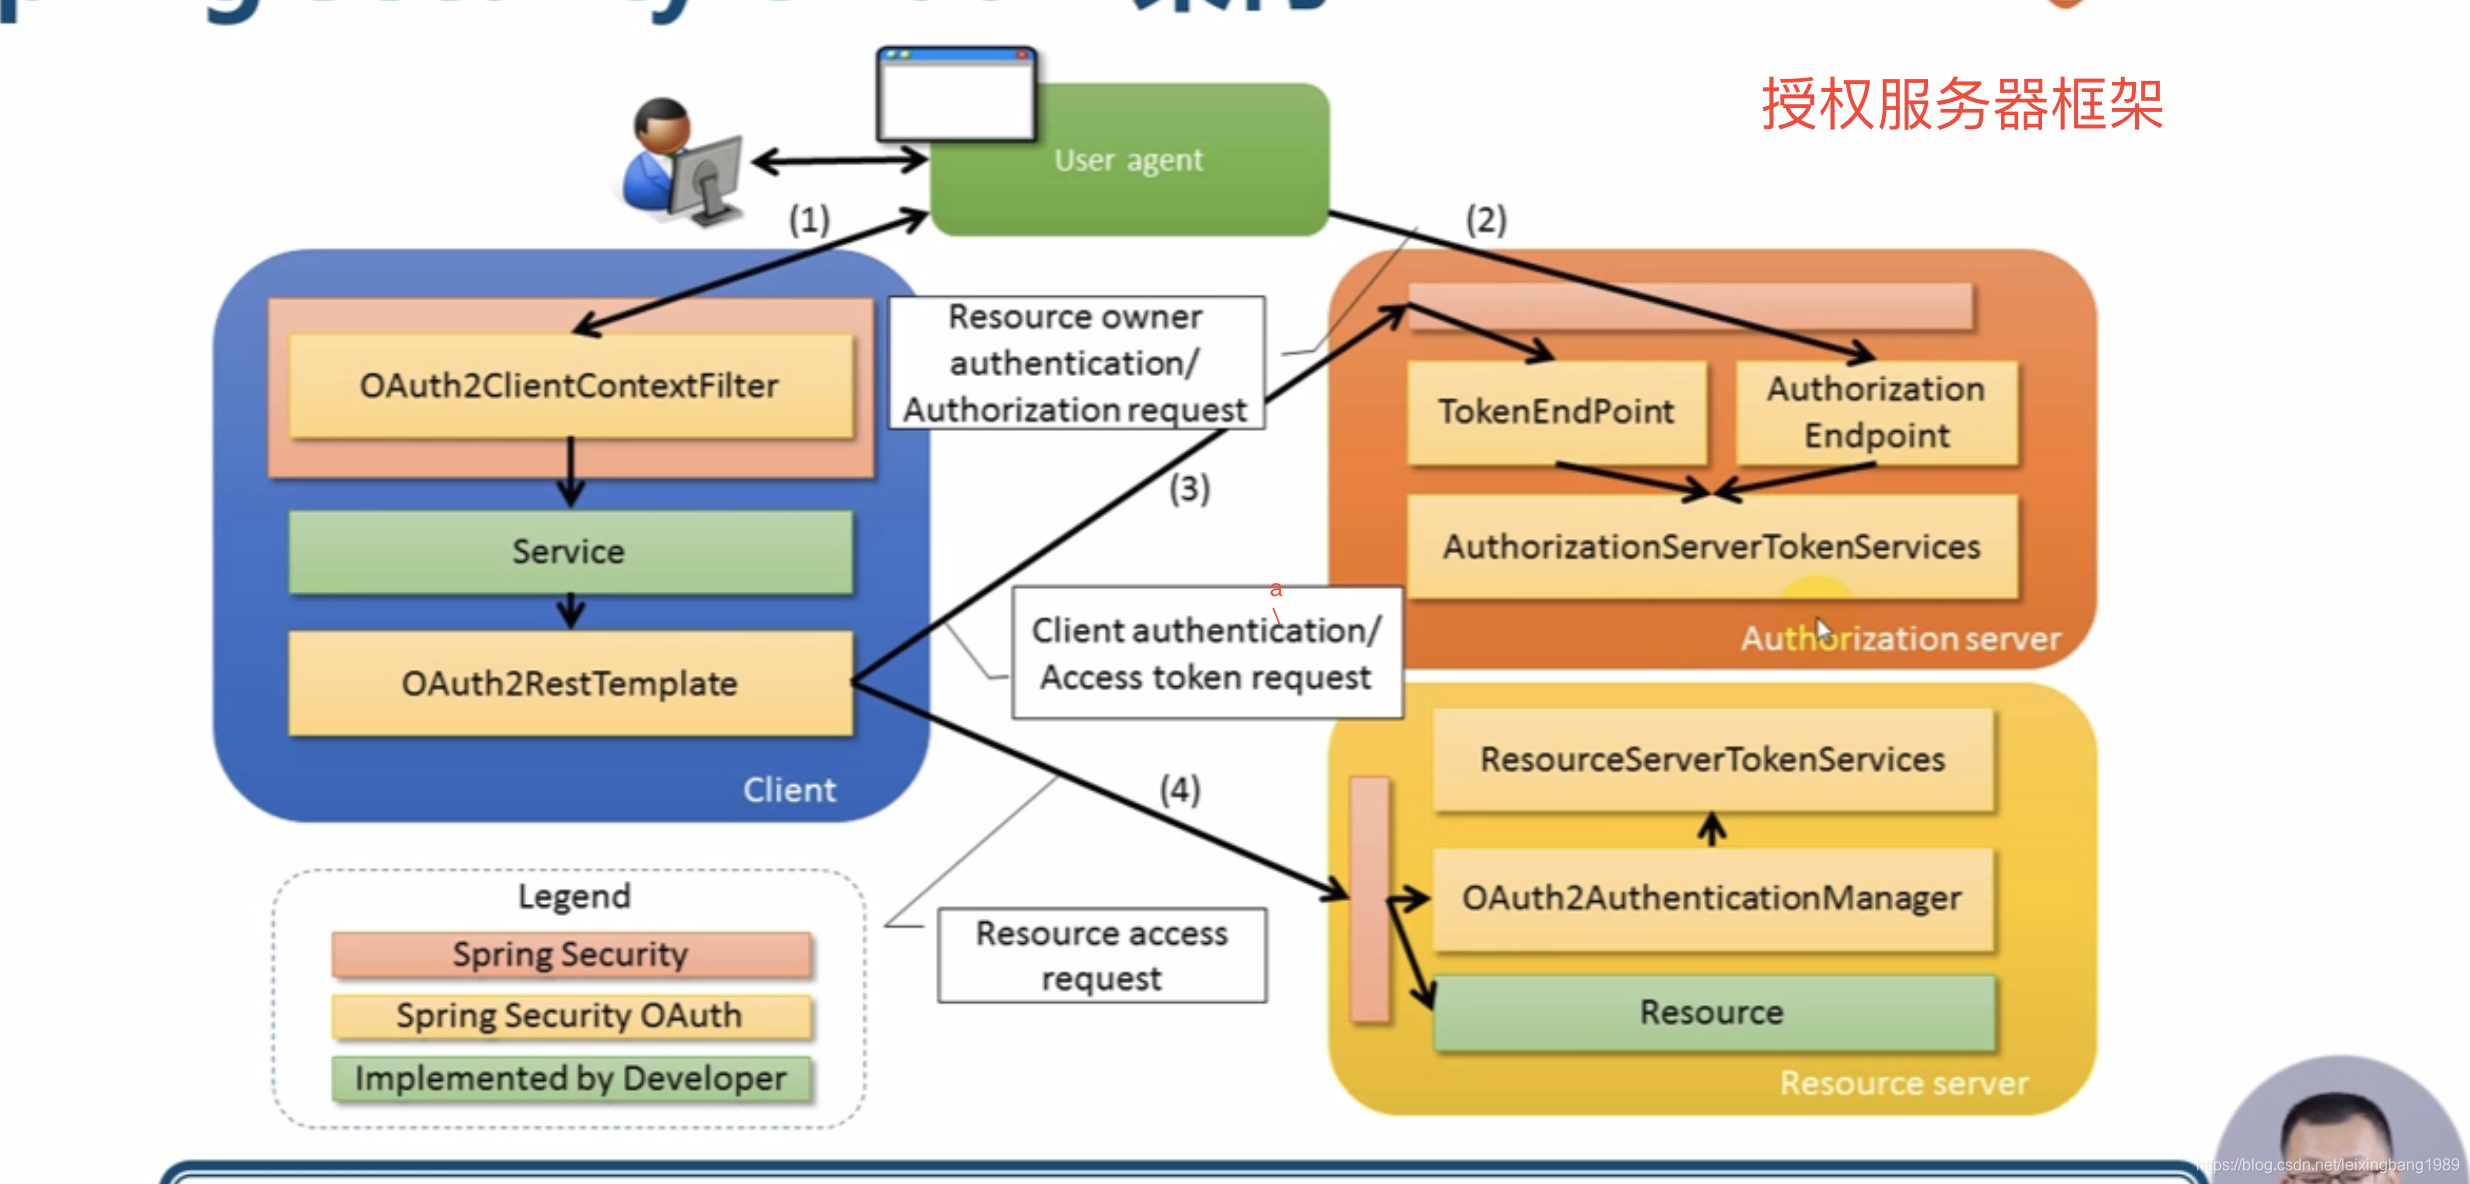
[外链图片转存失败,源站可能有防盗链机制,建议将图片保存下来直接上传(img-Hem29h0i-1614821714753)(/Users/leixingbang/Desktop/spring oauth2学习/架构图.png)]
**(1)客户端:**左侧为spring security为服务器提供的客户端框架类。
(2)授权服务器
(3)资源服务器
红色部分是spring security提供的服务。黄色为Spring security Oauth2提供的服务。绿色部分为开发人员需要自己实现的服务。
如果一开始,直接调用资源服务器的服务,则客户端中OAuth2ResTemplate会报错,然后重定向到授权服务器。授权服务器首先会去授权端点【authrization】进行授权,随后通过AuthorizationServerTokenService获取到授权码。取到授权码后,客户端的OAuthRestTemplate会通过TokenEndPoint获取访问令牌【具体生成仍然是AuthorizationServerTokenService】。访问资源服务器时,资源服务器通过ResourceServerTokenService对token进行校验,并且填充与用户相关的上下文。
四 授权服务器实验
4.1 授权码模式
1. 获取授权码
浏览器请求:
http://localhost:8080/oauth/authorize?client_id=clientapp&redirect_uri=http://localhost:9001/callback&response_type=code&scope=read_userinfo
输入该地址之后,需要输入spring-security中的用户名和密码。相当于QQ用户登录,然后再给客户端授权。
注意:state参数暂忽略
响应案例:
http://localhost:9001/callback?code=8uYpdo
2. 获取访问令牌
curl -X POST --user clientapp:112233 http://localhost:8080/oauth/token -H “content-type: application/x-www-form-urlencoded” -d “code=8uYpdo&grant_type=authorization_code&redirect_uri=http://localhost:9001/callback&scope=read_userinfo”
注意这里的redirect_uri必须与步骤1中的完全一致,否则将会报错。
案例响应:
{
    "access_token": "36cded80-b6f5-43b7-bdfc-594788a24530",
    "token_type": "bearer",
    "expires_in": 43199,
    "scope": "read_userinfo"
}
3. 调用API
curl -X GET http://localhost:8080/api/userinfo -H “authorization: Bearer 36cded80-b6f5-43b7-bdfc-594788a24530”
案例响应:
{
    "name": "bobo",
    "email": "bobo@spring2go.com"
}
4.2 简化[implict]模式
简化模式,直接获取令牌。
授权服务器主要核心代码:
import org.springframework.context.annotation.Configuration;
import org.springframework.security.oauth2.config.annotation.configurers.ClientDetailsServiceConfigurer;
import org.springframework.security.oauth2.config.annotation.web.configuration.AuthorizationServerConfigurerAdapter;
import org.springframework.security.oauth2.config.annotation.web.configuration.EnableAuthorizationServer;

//授权服务器配置
@Configuration
@EnableAuthorizationServer
public class OAuth2AuthorizationServer extends
        AuthorizationServerConfigurerAdapter {

    @Override
    public void configure(ClientDetailsServiceConfigurer clients)
            throws Exception {
        clients.inMemory()
            .withClient("clientapp")
            .secret("112233")
            .redirectUris("http://localhost:9001/callback")
            // 简化模式
            .authorizedGrantTypes("implicit")
            .accessTokenValiditySeconds(120)//配置失效时间
            .scopes("read_userinfo", "read_contacts");
    }

}
1. 客户端获取访问令牌
浏览器请求:
http://localhost:8080/oauth/authorize?client_id=clientapp&redirect_uri=http://localhost:9001/callback&response_type=token&scope=read_userinfo&state=abc
注意简化模式只是将response_type改为了token【对比授权码模式为code】
根据提示输入用户名密码(在[application.properties](file:///Users/leixingbang/GitProject/oauth2lab/lab01/implicit-server/src/main/resources/application.properties)文件里头)进行认证,并Approve授权。
响应案例:
http://localhost:9001/callback#access_token=0406040a-779e-4b5e-adf1-bf2f02031e83&token_type=bearer&state=abc&expires_in=119
2. 调用API
curl -X GET http://localhost:8080/api/userinfo -H “authorization: Bearer 0406040a-779e-4b5e-adf1-bf2f02031e83”
案例响应:
{
    "name": "bobo",
    "email": "bobo@spring2go.com"
}
4.3 密码模式
密码模式下授权服务器资源配置:
import org.springframework.beans.factory.annotation.Autowired;
import org.springframework.context.annotation.Configuration;
import org.springframework.security.authentication.AuthenticationManager;
import org.springframework.security.oauth2.config.annotation.configurers.ClientDetailsServiceConfigurer;
import org.springframework.security.oauth2.config.annotation.web.configuration.AuthorizationServerConfigurerAdapter;
import org.springframework.security.oauth2.config.annotation.web.configuration.EnableAuthorizationServer;
import org.springframework.security.oauth2.config.annotation.web.configurers.AuthorizationServerEndpointsConfigurer;

// 授权服务器配置
@Configuration
@EnableAuthorizationServer
public class OAuth2AuthorizationServer extends
        AuthorizationServerConfigurerAdapter {

	// 用户认证
    @Autowired
    private AuthenticationManager authenticationManager;

    @Override
    public void configure(AuthorizationServerEndpointsConfigurer endpoints)
            throws Exception {
        endpoints.authenticationManager(authenticationManager);
    }

    @Override
    public void configure(ClientDetailsServiceConfigurer clients)
            throws Exception {
        clients.inMemory()
            .withClient("clientapp")
            .secret("112233")
            // 密码模式
            .authorizedGrantTypes("password")
                .accessTokenValiditySeconds(120)//令牌超时时间
            .scopes("read_userinfo", "read_contacts");//授权范围
    }

}
这种模式可以理解成我们普通应用的用户名密码登录,在第三方接入的时候不建议使用这种模式,但是如果是自己的应用,那么这种模式是最为简单方便快捷的了。步骤只有一个:
注意:以下所有请求都必须在请求头中携带上面所说的客户端加密信息!
- 用户携带用户名密码请求授权服务器,验证通过后下发令牌
他只需要一个请求,所以它只有一个令牌端点:
令牌端点
- /oauth/token:令牌端点,携带如下参数请求即可:
| 请求参数 | 是否必填 | 描述 |
|---|---|---|
| grant_type | REQUIRED | 使用的密码模式,值固定为"password" |
| username | REQUIRED | 用户名 |
| password | REQUIRED | 密码 |
| scope | OPTIONAL | 请求权限范围 |
请求成功和失败的响应同授权码模式。
1.通过/oauth/token 令牌端点,获取访问令牌
教程请求参数:
curl -X POST --user clientapp:112233 http://localhost:8080/oauth/token -H "accept: application/json" -H "content-type: application/x-www-form-urlencoded" -d "grant_type=password&username=bobo&password=xyz&scope=read_userinfo"
自测请求参数:
curl --location --request POST 'http://localhost:8080/oauth/token?grant_type=password&username=bobo&password=xyz&scope=read_userinfo' \
--header 'Authorization: Basic Y2xpZW50YXBwOjExMjIzMw=='
请求返回结果:
{
    "access_token": "87f90722-f544-40ee-a63e-afb175a61372",
    "token_type": "bearer",
    "expires_in": 42919,
    "scope": "read_userinfo"
}
2.使用获取的token,调用API
curl --location --request POST 'http://localhost:8080/api/userinfo' \

--header 'Authorization: Bearer 87f90722-f544-40ee-a63e-afb175a61372'
获取返回结果:
{
    "name": "bobo",
    "email": "bobo@spring2go.com"
}
3.uac系统使用客户端来获取token
| URL | /oauth/token | |||||
| 描述 | 获取access_token | |||||
| 接口协议 | HTTP POST | |||||
| 接口定义 | 接口参数 | 字段 | 名称 | 是否必须 | 类型 | 备注 |
| username | 用户名 | 是 | string | 登录标识,支持用户名、手机号、邮箱 | ||
| password | 密码 | 是 | string | |||
| client_id | 应用标识 | 是 | string | 授权服务器分配,标识client身份采用HTTP basic方式验证可不传client_id、client_secret,添加header"Authorization", “Basic Y2xpZW50X3Rlc3QyOnRlc3Q=” | ||
| client_secret | 应用秘钥 | 是 | string | 授权服务器分配 | ||
| grant_type | 授权类型 | 是 | string | oauth2.0授权模式,此处采用password模式 | ||
| scope | 授权作用域 | 是 | string | 控制应用访问权限,默认all | ||
| 接口响应 |
接口响应示例:
{
  "access_token":"6de62e2a-7179-43af-a39f-704054a3df7c",
  "token_type":"bearer",
  "refresh_token":"29196c4a-3752-4ad6-9a90-32677b14dcc1",
  "expires_in":2516585,
  "scope":"all"
}
4.4 客户端模式(client credentials)
配置授权服务器:
// 授权服务器配置
@Configuration
@EnableAuthorizationServer
public class OAuth2AuthorizationServer extends
        AuthorizationServerConfigurerAdapter {

    @Override
    public void configure(ClientDetailsServiceConfigurer clients)
            throws Exception {
        clients.inMemory()
            .withClient("clientdevops")
            // 密码模式
            .secret("789")
            .authorizedGrantTypes("client_credentials")
            .scopes("devops");
    }

}
此时,已经没有用户的概念,因此不需要配置security用户,只要通过客户端即可获取对应的token
1.获取访问令牌
curl -X POST “http://localhost:8080/oauth/token” --user clientdevops:789 -d “grant_type=client_credentials&scope=devops”
响应案例:
{
    "access_token": "776b162a-949e-4dcb-b16b-9985e8171dc0",
    "token_type": "bearer",
    "expires_in": 43188,
    "scope": "devops"
}
2.调用API
curl -X GET http://localhost:8080/api/userlist -H “authorization: Bearer 776b162a-949e-4dcb-b16b-9985e8171dc0”
案例响应:
[
    {
        "name": "bobo",
        "email": "bobo@spring2go.com"
    },
    {
        "name": "eric",
        "email": "eric@spring2go.com"
    },
    {
        "name": "franky",
        "email": "franky@spring2go.com"
    }
]
4.5 refresh token & 与jwt进行交互
详细参考wik:
https://juejin.im/post/6844903549395009544
线上用户登录获取refresh_token&token详细使用方式:
curl --location --request POST 'http://gateway-ipd.online.lxb.qae/uac/oauth/token' \
--header 'Authorization: Basic Y2xpZW50X2RlbGl2ZXJ5X3BsYXRmb3JtOnl0VGwha0hE' \
--header 'Content-Type: application/x-www-form-urlencoded' \
--data-urlencode 'username=18516879366' \
--data-urlencode 'password=^Y&U*I999lxb' \
--data-urlencode 'grant_type=password' \
--data-urlencode 'scope=all'
客户端用户名:client_delivery_platform
客户端密码:ytTl!kHD
五 Spring boot oauth2自动匹配的实现
相关具体代码路径:
/Users/leixingbang/GitProject/spring-security-oauth2-demo/spring-boot-oauth2-auto-sample
具体对应的wiki:
https://echocow.cn/articles/2019/07/14/1563082247386.html
5.1 快速自定义 通过配置文件来配置客户端
spring boot 最大一个特点就是 约定大于配置,去繁就简 。既然如此,其提供了oauth2 的自动化配置.
logging:
  level:
    org:
      springframework:
        security: DEBUG

security:
  oauth2:
    # 对客户端的配置,客户端可以理解成前端或者用户
    client:
      # 注册客户端的回调地址
      registered-redirect-uri: http://example.com
      # 客户端 id
      client-id: oauth
      # 客户端密钥
      client-secret: oauth
      # 授权范围
      scope: all
      # token 有效期
      access-token-validity-seconds: 6000
      # 刷新 token 的有效期
      refresh-token-validity-seconds: 6000
      # 允许的授权类型
      grant-type: authorization_code,password,refresh_token
      # 可以访问的资源 id
      resource-ids: oauth2
    # 资源服务器的配置
    resource:
      # 资源的 id
      id: oauth2
    # 授权服务器的配置
    authorization:
      # 允许使用 /oauth/check_token 端点
      check-token-access: isAuthenticated()
5.2 从springSecurity上下文中所获取当前用户信息
主要参考wiki:
https://segmentfault.com/a/1190000012557493
@RestController
@RequestMapping("/auth")
public class OauthController {

    /**
     * 获取当前登录的用户信息
     *
     * @param principal 用户信息
     * @return http 响应
     */
    @GetMapping("/me")
    public HttpEntity<?> oauthMe(Principal principal) {
        return ResponseEntity.ok(principal);
    }

}
postman请求:
curl --location --request GET 'localhost:9000/auth/me' \
--header 'Authorization: Bearer 06f432ea-7265-44c5-8df7-b7896878de00'
返回用户信息:
{
    "authorities": [
        {
            "authority": "ROLE_USER"
        }
    ],
    "details": {
        "remoteAddress": "0:0:0:0:0:0:0:1",
        "sessionId": null,
        "tokenValue": "06f432ea-7265-44c5-8df7-b7896878de00",
        "tokenType": "Bearer",
        "decodedDetails": null
    },
    "authenticated": true,
    "userAuthentication": {
        "authorities": [
            {
                "authority": "ROLE_USER"
            }
        ],
        "details": null,
        "authenticated": true,
        "principal": "user",
        "credentials": "N/A",
        "name": "user"
    },
    "credentials": "",
    "clientOnly": false,
    "principal": "user",
    "oauth2Request": {
        "clientId": "oauth2",
        "scope": [
            "all"
        ],
        "requestParameters": {
            "client_id": "oauth2"
        },
        "resourceIds": [
            "oauth2"
        ],
        "authorities": [],
        "approved": true,
        "refresh": false,
        "redirectUri": null,
        "responseTypes": [],
        "extensions": {},
        "grantType": null,
        "refreshTokenRequest": null
    },
    "name": "user"
}
使用代码获取用户示例1:
 Object principal =SecurityContextHolder.getContext().getAuthentication().getPrincipal();
    if (principal instanceof UserDetails) {
        String username = ((UserDetails)principal).getUsername();
    } else {
        String username = principal.toString();
    }
使用代码获取用户示例2:
@GetMapping("/users/current")
    public String getCurrentUser(Principal principal) {
        OAuth2Authentication auth2Authentication = (OAuth2Authentication) principal;//此处已经确定使用OAuth2认证
        OAuth2Request oAuth2Request = auth2Authentication.getOAuth2Request());
        boolean hiddenSensitiveInfo = true;
        String login = auth2Authentication.getName();
        return userService.findOneByUsernameOrPhoneNoOrEmail(login)
                .map(currentUser -> {
                    Map<String, List<String>> permissionMap = Maps.newHashMap();
                    List<String> routerAuth = Lists.newArrayList();
                    List<String> buttonAuth = Lists.newArrayList();
                    List<String> apiAuth = Lists.newArrayList();
                    Collection<GrantedAuthority> authorities = auth2Authentication.getAuthorities();
                    authorities.forEach(grantedAuthority -> {
                        String authority = grantedAuthority.getAuthority();
                        if (authority.startsWith(Permission.PREMISSION_ROUTER_PREFIX)) {
                            routerAuth.add(authority);
                        } else if (authority.startsWith(Permission.PREMISSION_BUTTON_PREFIX)) {
                            buttonAuth.add(authority);
                        } else {
                            apiAuth.add(authority);
                        }
                        // 管理员标识
                        /*if (AdminVoter.ADMIN.equals(authority)) {
                            currentUser.setIsAdmin(Constants.ALL_YES);
                        }*/
                    });
                    permissionMap.put("routerAuth", routerAuth);
                    permissionMap.put("buttonAuth", buttonAuth);
                    permissionMap.put("apiAuth", apiAuth);
                    currentUser.setPermissionMap(permissionMap);
                    Map resultMap = JSON.parseObject(JSON.toJSONString(currentUser), Map.class);
                    if (hiddenSensitiveInfo && StringUtils.isNotBlank(currentUser.getPhoneNo())) {
                        resultMap.put("phoneNo", currentUser.getPhoneNo().replaceAll("(\\d{3})\\d{4}(\\d{4})", "$1xxxx$2"));
                    }
                    return Constants.getResponseStr(Constants.CODE_SUC, resultMap);
                })
                .orElseGet(() -> Constants.getResponseStr(Constants.CODE_FAIL));
    }
六、资源服务器配置
/**
 * @author lxb
 * @date 2019/10/11 16:07
 * @Description: 资源访问配置
 * ResourceServerConfigurerAdapter 为资源服务器配置关键接口,只需要继承其适配器即可
 */
@Configuration
@EnableResourceServer
public class ResourceServerConfig extends ResourceServerConfigurerAdapter {
    /**
     * 资源服务器的 属性配置,默认值适用于许多应用程序
     * @param resources
     * @throws Exception
     */
    @Override
    public void configure(ResourceServerSecurityConfigurer resources) throws Exception {
        super.configure(resources);
    }

    /**
     * 此项用来配置安全资源的访问规则,默认情况下,不在"/oauth/**”中的所有资源受保护,与spring securirty配置一样
     * @param http
     * @throws Exception
     */
    @Override
    public void configure(HttpSecurity http) throws Exception {
        http
                .requestMatchers()
                .antMatchers("/delivery/**")
        .and()
                .authorizeRequests()
                .antMatchers("/delivery/platform/analyzePackage").permitAll()
                .antMatchers("/delivery/**")
                .authenticated();
    }
}
| 方法名 | 参数 | 描述 |
|---|---|---|
| configure | AuthorizationServerSecurityConfigurer | 配置授权服务器的安全信息,比如 ssl 配置、checktoken 是否允许访问,是否允许客户端的表单身份验证等。 |
| configure | ClientDetailsServiceConfigurer | 配置客户端的 service,也就是应用怎么获取到客户端的信息,一般来说是从内存或者数据库中获取,已经提供了他们的默认实现,你也可以自定义。 |
| configure | AuthorizationServerEndpointsConfigurer | 配置授权服务器各个端点的非安全功能,如令牌存储,令牌自定义,用户批准和授权类型。如果需要密码授权模式,需要提供 AuthenticationManager 的 bean。 |
数据库存储oauth表结构:
3.授权服务器相关的配置:
import lombok.NonNull;
import lombok.RequiredArgsConstructor;
import org.springframework.context.annotation.Configuration;
import org.springframework.security.authentication.AuthenticationManager;
import org.springframework.security.core.authority.AuthorityUtils;
import org.springframework.security.oauth2.config.annotation.builders.ClientDetailsServiceBuilder;
import org.springframework.security.oauth2.config.annotation.builders.InMemoryClientDetailsServiceBuilder;
import org.springframework.security.oauth2.config.annotation.configurers.ClientDetailsServiceConfigurer;
import org.springframework.security.oauth2.config.annotation.web.configuration.AuthorizationServerConfigurerAdapter;
import org.springframework.security.oauth2.config.annotation.web.configuration.EnableAuthorizationServer;
import org.springframework.security.oauth2.config.annotation.web.configurers.AuthorizationServerEndpointsConfigurer;
import org.springframework.security.oauth2.config.annotation.web.configurers.AuthorizationServerSecurityConfigurer;
import org.springframework.security.oauth2.provider.client.BaseClientDetails;

import java.time.Duration;

/**
 * oauth2 授权服务器配置
 * 自定义授权服务器
 *
 *spring-security-oauth2会在@ConditonalOnMissingBean(AuthorizationServerConfigure.class)如果该类已经被用户自营一实现,
 * OAuth2AuthorziationServerConfiguration相关的代码将不再会执行。
 * 这里只要继承这个类即可。
 * @author <a href="https://echocow.cn">EchoCow</a>
 * @date 19-7-13 下午4:11
 */
@Configuration
@RequiredArgsConstructor
@EnableAuthorizationServer
public class Oauth2AuthorizationServerConfig extends AuthorizationServerConfigurerAdapter {

    private final @NonNull AuthenticationManager authenticationManager;
    private final @NonNull ClientDetails clientDetails;

    /**
     * 配置客户端的 service,也就是应用怎么获取到客户端的信息,一般来说是从内存或者数据库中获取,已经提供了他们的默认实现,你也可以自定义。
     * @param clients
     * @throws Exception
     */
    @Override
    public void configure(ClientDetailsServiceConfigurer clients) throws Exception {
//        InMemoryClientDetailsServiceBuilder builder = clients.inMemory();
//        builder
//                .withClient("oauth2")
//                .secret("$2a$10$wlgcx61faSJ8O5I4nLiovO9T36HBQgh4RhOQAYNORCzvANlInVlw2")
//                .resourceIds("oauth2")
//                .authorizedGrantTypes("password", "authorization_code", "refresh_token")
//                .authorities("ROLE_ADMIN", "ROLE_USER")
//                .scopes("all")
//                .accessTokenValiditySeconds(Math.toIntExact(Duration.ofHours(1).getSeconds()))
//                .refreshTokenValiditySeconds(Math.toIntExact(Duration.ofHours(1).getSeconds()))
//                .redirectUris("http://example.com");
//        builder
//                .withClient("test")
//                .secret("$2a$10$wlgcx61faSJ8O5I4nLiovO9T36HBQgh4RhOQAYNORCzvANlInVlw2")
//                .resourceIds("test")
//                .authorizedGrantTypes("password", "authorization_code", "refresh_token")
//                .authorities("ROLE_ADMIN", "ROLE_USER")
//                .scopes("all")
//                .accessTokenValiditySeconds(Math.toIntExact(Duration.ofHours(1).getSeconds()))
//                .refreshTokenValiditySeconds(Math.toIntExact(Duration.ofHours(1).getSeconds()))
//                .redirectUris("http://example.com");

        clients.inMemory()
                .withClient("oauth2")
                    .secret("$2a$10$wlgcx61faSJ8O5I4nLiovO9T36HBQgh4RhOQAYNORCzvANlInVlw2")
                    .resourceIds("oauth2")
                    .authorizedGrantTypes("password", "authorization_code", "refresh_token")
                    .authorities("ROLE_ADMIN", "ROLE_USER")
                    .scopes("all")
                    .accessTokenValiditySeconds(Math.toIntExact(Duration.ofHours(1).getSeconds()))
                    .refreshTokenValiditySeconds(Math.toIntExact(Duration.ofHours(1).getSeconds()))
                    .redirectUris("http://example.com")
                .and()
                .withClient("test")
                    .secret("$2a$10$wlgcx61faSJ8O5I4nLiovO9T36HBQgh4RhOQAYNORCzvANlInVlw2")
                    .resourceIds("oauth2")
                    .authorizedGrantTypes("password", "authorization_code", "refresh_token")
                    .authorities("ROLE_ADMIN", "ROLE_USER")
                    .scopes("all")
                    .accessTokenValiditySeconds(Math.toIntExact(Duration.ofHours(1).getSeconds()))
                    .refreshTokenValiditySeconds(Math.toIntExact(Duration.ofHours(1).getSeconds()))
                    .redirectUris("http://example.com");

//        configClient(clients);
    }

    private void configClient(ClientDetailsServiceConfigurer clients) throws Exception {
        InMemoryClientDetailsServiceBuilder builder = clients.inMemory();
        for (BaseClientDetails client : clientDetails.getClient()) {
            ClientDetailsServiceBuilder<InMemoryClientDetailsServiceBuilder>.ClientBuilder clientBuilder =
                    builder.withClient(client.getClientId());
            clientBuilder
                    .secret(client.getClientSecret())
                    .resourceIds(client.getResourceIds().toArray(new String[0]))
                    .authorizedGrantTypes(client.getAuthorizedGrantTypes().toArray(new String[0]))
                    .authorities(
                            AuthorityUtils.authorityListToSet(client.getAuthorities())
                                    .toArray(new String[0]))
                    .scopes(client.getScope().toArray(new String[0]));
            if (client.getAutoApproveScopes() != null) {
                clientBuilder.autoApprove(
                        client.getAutoApproveScopes().toArray(new String[0]));
            }
            if (client.getAccessTokenValiditySeconds() != null) {
                clientBuilder.accessTokenValiditySeconds(
                        client.getAccessTokenValiditySeconds());
            }
            if (client.getRefreshTokenValiditySeconds() != null) {
                clientBuilder.refreshTokenValiditySeconds(
                        client.getRefreshTokenValiditySeconds());
            }
            if (client.getRegisteredRedirectUri() != null) {
                clientBuilder.redirectUris(
                        client.getRegisteredRedirectUri().toArray(new String[0]));
            }
        }
    }

    /**
     * 配置授权服务器各个端点的非安全功能,如令牌存储,令牌自定义,用户批准和授权类型。如果需要密码授权模式,需要提供 `AuthenticationManager` 的 bean。
     * @param endpoints
     */

    @Override
    public void configure(AuthorizationServerEndpointsConfigurer endpoints) {
        endpoints.authenticationManager(this.authenticationManager);
        // 自定义 请求 路径
        // endpoints.pathMapping("/oauth/token", "/my/token")
        //        .pathMapping("", "");
    }

    /**
     * 配置已经授权服务器的端点:check_token 通过该端点,资源服务器可以验证token
     * 示例eg:交付平台项目配置信息
     * security:
     *     oauth2:
     *         client:
     *             client-id: client_delivery_platform
     *             client-secret: ytTl!kHD
     *             access-token-uri: http://10.16.85.153:8088/oauth/token
     *             user-authorization-uri: http://10.16.85.153:8088/oauth/authorize
     *         resource:
     *             token-info-uri: http://10.16.85.153:8088/oauth/check_token
     * 配置授权服务器的安全信息,比如 ssl 配置、checktoken 是否允许访问,是否允许客户端的表单身份验证等。
     * 资源服务器所需,后面会讲
     * 具体作用见本系列的第二篇文章授权服务器最后一部分
     * 具体原因见本系列的第三篇文章资源服务器
     *
     * @param security security
     */
    @Override
    public void configure(AuthorizationServerSecurityConfigurer security) {
        security
                .checkTokenAccess("isAuthenticated()");
    }

}
七、自定义验证码手机、邮箱验证相关的配置&uac短信验证实例
7.1 主要参考wiki&对应的代码路径
7.1.1 wiki
https://echocow.cn/articles/2019/07/30/1564498598952.html
7.1.2 对应的代码路径
/Users/leixingbang/GitProject/spring-security-oauth2-demo/spring-security-oauth2-authorization-more-grant-type/
对应的github代码路径:
https://github.com/54dabang/spring-security-oauth2-authorization-more-grant-type
7.2 两种方式实现自定义授权模式(短信、验证码)
大体的实现思路:
a.添加自定义的授权模式sms
b.添加过滤器或者controller,实现发送短信的功能,并将短信存储于redis中
c.添加过滤器,对验证码进行验证
d.由自定义端点生成对应的accesstoken
7.2.1 自定义端点方式
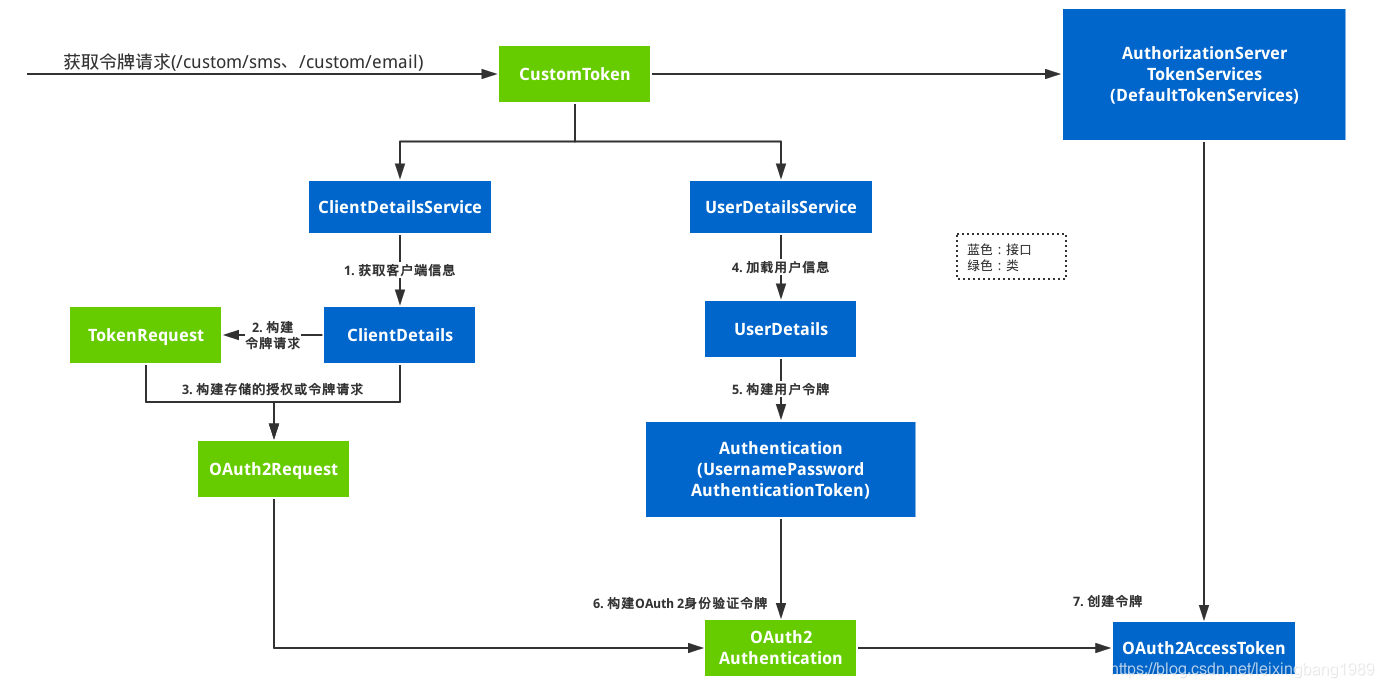
整体流程:
[外链图片转存失败,源站可能有防盗链机制,建议将图片保存下来直接上传(img-W2QqGyba-1614821714754)(/Users/leixingbang/Desktop/spring oauth2学习/springsecurity自定义自定义验证码-自定义端点模式.png)]
1.添加对redis的maven依赖
<dependencies>
    <dependency>
        <groupId>org.springframework.boot</groupId>
        <artifactId>spring-boot-starter-security</artifactId>
    </dependency>
    <dependency>
        <groupId>org.springframework.security.oauth.boot</groupId>
        <artifactId>spring-security-oauth2-autoconfigure</artifactId>
        <version>${spring.boot.version}</version>
    </dependency>
    <dependency>
        <groupId>org.springframework.boot</groupId>
        <artifactId>spring-boot-starter-data-redis</artifactId>
    </dependency>
</dependencies>
2.添加授权模式
在原来的端点:/oauth/token上,我们需要添加新的授权类型,即grant_type参数应该要多一个sms或者email
对于自定义的sms或者email应:
- grant_type —— 必须为
sms或者- code
- client_id
- scope
对应代码块:Oauth2AuthorizationServerConfig
@Configuration
@RequiredArgsConstructor
@EnableAuthorizationServer
public class Oauth2AuthorizationServerConfig extends AuthorizationServerConfigurerAdapter {

    private final @NonNull AuthenticationManager authenticationManager;
    private final @NonNull UserDetailsService userDetailsService;
    private final @NonNull PasswordEncoder passwordEncoder;

    @Override
    public void configure(ClientDetailsServiceConfigurer clients) throws Exception {
        clients.inMemory()
                .withClient("oauth2")
                    .secret("$2a$10$uLCAqDwHD9SpYlYSnjtrXemXtlgSvZCNlOwbW/Egh0wufp93QjBUC")
                    .resourceIds("oauth2")
                    .authorizedGrantTypes("password", "authorization_code", "refresh_token", "sms")
                    .authorities("ROLE_ADMIN", "ROLE_USER")
                    .scopes("all")
                    .accessTokenValiditySeconds(Math.toIntExact(Duration.ofHours(1).getSeconds()))
                    .refreshTokenValiditySeconds(Math.toIntExact(Duration.ofHours(1).getSeconds()))
                    .redirectUris("http://example.com")
                .and()
                .withClient("test")
                    .secret(passwordEncoder.encode("1234"))
                    .resourceIds("oauth2")
                    //注意这里自定义的授权类型 sms
                    .authorizedGrantTypes("password", "authorization_code", "refresh_token", "sms")
                    .authorities("ROLE_ADMIN", "ROLE_USER")
                    .scopes("all")
                    .accessTokenValiditySeconds(Math.toIntExact(Duration.ofHours(1).getSeconds()))
                    .refreshTokenValiditySeconds(Math.toIntExact(Duration.ofHours(1).getSeconds()))
                    .redirectUris("http://example.com");
    }

    @Override
    public void configure(AuthorizationServerEndpointsConfigurer endpoints) {
        endpoints.authenticationManager(this.authenticationManager);
        endpoints.tokenGranter(tokenGranter(endpoints));
    }

    /**
     * 重点
     * 先获取已经有的五种授权,然后添加我们自己的进去
     *
     * @param endpoints AuthorizationServerEndpointsConfigurer
     * @return TokenGranter
     */
    private TokenGranter tokenGranter(final AuthorizationServerEndpointsConfigurer endpoints) {
        List<TokenGranter> granters = new ArrayList<>(Collections.singletonList(endpoints.getTokenGranter()));
        granters.add(new SmsTokenGranter(endpoints.getTokenServices(), endpoints.getClientDetailsService(),
                endpoints.getOAuth2RequestFactory(), userDetailsService));
        return new CompositeTokenGranter(granters);
    }

    /**
     * 资源服务器所需,后面会讲
     * 具体作用见本系列的第二篇文章授权服务器最后一部分
     * 具体原因见本系列的第三篇文章资源服务器
     *
     * @param security security
     */
    @Override
    public void configure(AuthorizationServerSecurityConfigurer security) {
        security
                .checkTokenAccess("isAuthenticated()");
    }

}
3.配置对应的用户,并允许对应路径的代码路径不经过授权访问
package cn.lxb.oauth.authorization.config;

import cn.lxb.oauth.authorization.auth.sms.SmsAuthenticationSecurityConfig;
import cn.lxb.oauth.authorization.validate.ValidateCodeFilter;
import cn.lxb.oauth.authorization.validate.ValidateCodeGranterFilter;
import lombok.NonNull;
import lombok.RequiredArgsConstructor;
import org.springframework.context.annotation.Bean;
import org.springframework.security.authentication.AuthenticationManager;
import org.springframework.security.config.annotation.web.builders.HttpSecurity;
import org.springframework.security.config.annotation.web.configuration.EnableWebSecurity;
import org.springframework.security.config.annotation.web.configuration.WebSecurityConfigurerAdapter;
import org.springframework.security.core.userdetails.User;
import org.springframework.security.core.userdetails.UserDetailsService;
import org.springframework.security.crypto.bcrypt.BCryptPasswordEncoder;
import org.springframework.security.crypto.password.PasswordEncoder;
import org.springframework.security.provisioning.InMemoryUserDetailsManager;
import org.springframework.security.web.authentication.preauth.AbstractPreAuthenticatedProcessingFilter;

/**
 * spring security
 *
 * @author <a href="https://echocow.cn">EchoCow</a>
 * @date 19-7-27 下午9:54
 */
@EnableWebSecurity
@RequiredArgsConstructor
public class SecurityConfig extends WebSecurityConfigurerAdapter {

    private final @NonNull ValidateCodeFilter validateCodeFilter;
    private final @NonNull ValidateCodeGranterFilter validateCodeGranterFilter;
    private final @NonNull SmsAuthenticationSecurityConfig smsAuthenticationSecurityConfig;

    /**
     * 密码加密方式,spring 5 后必须对密码进行加密
     *
     * @return BCryptPasswordEncoder
     */
    @Bean
    public PasswordEncoder passwordEncoder() {
        return new BCryptPasswordEncoder();
    }

    /**
     * 创建两个内存用户
     * 用户名 user 密码 123456 角色 ROLE_USER
     * 用户名 admin 密码 admin 角色 ROLE_ADMIN
     *
     * @return InMemoryUserDetailsManager
     */
    @Bean
    @Override
    public UserDetailsService userDetailsService() {
        InMemoryUserDetailsManager manager = new InMemoryUserDetailsManager();
        manager.createUser(User.withUsername("18811753918")
                .password(passwordEncoder().encode("123456"))
                .authorities("ROLE_USER").build());
        manager.createUser(User.withUsername("admin")
                .password(passwordEncoder().encode("admin"))
                .authorities("ROLE_ADMIN").build());
        manager.createUser(User.withUsername("13712341234")
                .password(passwordEncoder().encode("123456"))
                .authorities("ROLE_ADMIN").build());
        return manager;
    }

    /**
     * 认证管理
     *
     * @return 认证管理对象
     * @throws Exception 认证异常信息
     */
    @Override
    @Bean
    public AuthenticationManager authenticationManagerBean() throws Exception {
        return super.authenticationManagerBean();
    }

    @Override
    protected void configure(HttpSecurity http) throws Exception {
       /* http
                .apply(smsAuthenticationSecurityConfig)
                .and()
                .authorizeRequests()
                .antMatchers("/code/*").permitAll()
                .antMatchers("/auth/sms").permitAll()
                .antMatchers("/custom/*").permitAll()
                .anyRequest().authenticated()
                .and()
                .csrf().disable()
                .formLogin()
                .and()
                .httpBasic();


        http
                .addFilterBefore(validateCodeFilter, AbstractPreAuthenticatedProcessingFilter.class)
                .addFilterBefore(validateCodeGranterFilter, AbstractPreAuthenticatedProcessingFilter.class);*/
        http
                .authorizeRequests()
                // 添加路径
                .antMatchers("/oauth/sms").access("permitAll()")
                .antMatchers("/oauth/email").access("permitAll()")
                .antMatchers("/code/*").permitAll()
                .antMatchers("/custom/*").permitAll()
                .anyRequest()
                .authenticated()
                // 务必关闭 csrf,否则除了 get 请求,都会报 403 错误
                .and()
                .csrf().disable();

        // 添加过滤器
        http
                .addFilterBefore(validateCodeFilter, AbstractPreAuthenticatedProcessingFilter.class);

    }
}
4.添加对应的过滤器
对指定的验证路径进行拦截,sms、email
package cn.echocow.oauth.authorization.validate;

import lombok.NonNull;
import lombok.RequiredArgsConstructor;
import lombok.extern.slf4j.Slf4j;
import org.springframework.http.HttpMethod;
import org.springframework.stereotype.Component;
import org.springframework.util.AntPathMatcher;
import org.springframework.util.StringUtils;
import org.springframework.web.context.request.ServletWebRequest;
import org.springframework.web.filter.OncePerRequestFilter;

import javax.servlet.FilterChain;
import javax.servlet.ServletException;
import javax.servlet.http.HttpServletRequest;
import javax.servlet.http.HttpServletResponse;
import java.io.IOException;
import java.util.*;

/**
 * 验证码过滤器。
 *
 * <p>继承于 {@link OncePerRequestFilter} 确保在一次请求只通过一次filter</p>
 * <p>需要配置指定拦截路径,默认拦截 POST 请求</p>
 *
 * @author <a href="https://echocow.cn">EchoCow</a>
 * @date 2019/7/28 下午11:15
 */
@Slf4j
@Component
@RequiredArgsConstructor
public class ValidateCodeFilter extends OncePerRequestFilter {

    private final @NonNull ValidateCodeProcessorHolder validateCodeProcessorHolder;
    private Map<String, String> urlMap = new HashMap<>();
    private AntPathMatcher antPathMatcher = new AntPathMatcher();

    @Override
    public void afterPropertiesSet() throws ServletException {
        super.afterPropertiesSet();
        // 路径拦截
        urlMap.put("/auth/sms", "sms");
        //urlMap.put("/custom/sms", "sms");
        //urlMap.put("/oauth/sms", "sms");
    }

    @Override
    protected void doFilterInternal(HttpServletRequest request, HttpServletResponse response, FilterChain filterChain) throws ServletException, IOException {
        String validateCodeType = getValidateCodeType(request);
        if (!StringUtils.isEmpty(validateCodeType)) {
            try {
                log.info("请求需要验证!验证请求:" + request.getRequestURI() + " 验证类型:" + validateCodeType);
                validateCodeProcessorHolder.findValidateCodeProcessor(validateCodeType)
                        .validate(new ServletWebRequest(request, response));
            } catch (Exception e) {
                e.printStackTrace();
                return;
            }
        }
        filterChain.doFilter(request, response);
    }

    private String getValidateCodeType(HttpServletRequest request) {
        if (HttpMethod.POST.matches(request.getMethod())) {
            Set<String> urls = urlMap.keySet();
            for (String url : urls) {
                // 如果路径匹配,就回去他的类型,也就是 map 的 value
                if (antPathMatcher.match(url, request.getRequestURI())) {
                    return urlMap.get(url);
                }
            }
        }
        return null;
    }
}
5.通过拦截后,生成对应的token
[外链图片转存失败,源站可能有防盗链机制,建议将图片保存下来直接上传(img-YhkYWVpi-1614821714755)(/Users/leixingbang/Desktop/spring oauth2学习/springsecurity自定义自定义验证码-自定义端点模式.png)]
import lombok.NonNull;
import lombok.RequiredArgsConstructor;
import lombok.extern.slf4j.Slf4j;
import org.springframework.http.HttpEntity;
import org.springframework.http.ResponseEntity;
import org.springframework.security.authentication.BadCredentialsException;
import org.springframework.security.authentication.UsernamePasswordAuthenticationToken;
import org.springframework.security.core.Authentication;
import org.springframework.security.core.userdetails.UserDetails;
import org.springframework.security.core.userdetails.UserDetailsService;
import org.springframework.security.crypto.password.PasswordEncoder;
import org.springframework.security.oauth2.common.OAuth2AccessToken;
import org.springframework.security.oauth2.common.exceptions.UnapprovedClientAuthenticationException;
import org.springframework.security.oauth2.common.exceptions.UnsupportedGrantTypeException;
import org.springframework.security.oauth2.provider.*;
import org.springframework.security.oauth2.provider.token.AuthorizationServerTokenServices;
import org.springframework.web.bind.annotation.PathVariable;
import org.springframework.web.bind.annotation.PostMapping;
import org.springframework.web.bind.annotation.RequestMapping;
import org.springframework.web.bind.annotation.RestController;

import javax.servlet.http.HttpServletRequest;
import java.nio.charset.StandardCharsets;
import java.util.Base64;
import java.util.HashMap;

/**
 * 自定义 controller 授权端点
 *
 * @author <a href="https://echocow.cn">EchoCow</a>
 * @date 2019/7/29 下午6:40
 */
@Slf4j
@RestController
@RequiredArgsConstructor
@RequestMapping("/custom")
public class CustomToken {

    private final @NonNull UserDetailsService userDetailsService;
    private final @NonNull ClientDetailsService clientDetailsService;
    private final @NonNull PasswordEncoder passwordEncoder;
    private final @NonNull AuthorizationServerTokenServices authorizationServerTokenServices;

    @PostMapping("/{type}")
    public HttpEntity<?> auth(HttpServletRequest request, @PathVariable String type) {

        // 判断是否是我们自定义的授权类型
        if (!"sms".equalsIgnoreCase(type) && !"email".equalsIgnoreCase(type)) {
            throw new UnsupportedGrantTypeException("Unsupported grant type: " + type);
        }

        log.info(type + " login succeed!");
        // 1. 获取客户端认证信息
        String header = request.getHeader("Authorization");
        if (header == null || !header.toLowerCase().startsWith("basic ")) {
            throw new UnapprovedClientAuthenticationException("请求头中无客户端信息");
        }

        // 解密请求头
        String[] client = extractAndDecodeHeader(header);
        if (client.length != 2) {
            throw new BadCredentialsException("Invalid basic authentication token");
        }
        String clientId = client[0];
        String clientSecret = client[1];

        // 获取客户端信息进行对比判断
        ClientDetails clientDetails = clientDetailsService.loadClientByClientId(clientId);
        if (clientDetails == null) {
            throw new UnapprovedClientAuthenticationException("客户端信息不存在:" + clientId);
        } else if (!passwordEncoder.matches(clientSecret, clientDetails.getClientSecret())) {
            throw new UnapprovedClientAuthenticationException("客户端密钥不匹配" + clientSecret);
        }
        // 2. 构建令牌请求
        TokenRequest tokenRequest = new TokenRequest(new HashMap<>(0), clientId, clientDetails.getScope(), "custom");
        // 3. 创建 oauth2 令牌请求
        OAuth2Request oAuth2Request = tokenRequest.createOAuth2Request(clientDetails);
        // 4. 获取当前用户信息
        UserDetails userDetails = userDetailsService.loadUserByUsername(request.getParameter(type));
        // 5. 构建用户授权令牌
        Authentication authentication = new UsernamePasswordAuthenticationToken(
                userDetails.getUsername(), userDetails.getPassword(), userDetails.getAuthorities());
        // 6. 构建 oauth2 身份验证令牌
        OAuth2Authentication oAuth2Authentication = new OAuth2Authentication(oAuth2Request, authentication);
        // 7. 创建令牌
        OAuth2AccessToken accessToken = authorizationServerTokenServices.createAccessToken(oAuth2Authentication);
        return ResponseEntity.ok(accessToken);
    }


    /**
     * 对请求头进行解密以及解析
     *
     * @param header 请求头
     * @return 客户端信息
     */
    private String[] extractAndDecodeHeader(String header) {
        byte[] base64Token = header.substring(6).getBytes(StandardCharsets.UTF_8);
        byte[] decoded;
        try {
            decoded = Base64.getDecoder().decode(base64Token);
        } catch (IllegalArgumentException e) {
            throw new BadCredentialsException(
                    "Failed to decode basic authentication token");
        }
        String token = new String(decoded, StandardCharsets.UTF_8);
        int delimiter = token.indexOf(":");

        if (delimiter == -1) {
            throw new BadCredentialsException("Invalid basic authentication token");
        }
        return new String[]{token.substring(0, delimiter), token.substring(delimiter + 1)};
    }


}
6.post man发送实际请求
- 获取对应的code
curl --location --request GET 'http://localhost:8000/code/sms?sms=18811753918' \
--header 'Authorization: Basic b2F1dGgyOm9hdXRoMg==' \
--header 'Content-Type: application/x-www-form-urlencoded' \
--header 'Cookie: JSESSIONID=B339A118FCC66F33069CEEF9E8C8D7E2' \
--data-urlencode 'grant_type=sms' \
--data-urlencode 'code=1962' \
--data-urlencode 'client_id=oauth2' \
--data-urlencode 'scope=all' \
--data-urlencode 'sms=13712341234'
使用code和手机号获取对应的token
curl --location --request POST 'http://localhost:8000/custom/sms?sms=18811753918&code=2346' \
--header 'Authorization: Basic b2F1dGgyOm9hdXRoMg==' \
--header 'Content-Type: application/x-www-form-urlencoded' \
--header 'Cookie: JSESSIONID=B339A118FCC66F33069CEEF9E8C8D7E2' \
--data-urlencode 'grant_type=sms' \
--data-urlencode 'code=1962' \
--data-urlencode 'client_id=oauth2' \
--data-urlencode 'scope=all' \
--data-urlencode 'sms=13712341234'
注意:需要在header中添加username【clientId】和password【secret】对应的Base64 编码 Authorization选择 【Basic Auth】
7.2.2 spring security标准流程
八、 springboot集成Spring security认证流程
8.1相关参考博客
https://blog.csdn.net/yuanlaijike/article/details/84703690
https://blog.csdn.net/yuanlaijike/article/details/86164160
spring security整合cas单点登录
https://blog.csdn.net/u010475041/article/details/79592661
https://www.jianshu.com/p/2ba25bd3a5cb【重点学习】
Spring security源码分析:
https://juejin.cn/post/6844903841490550798
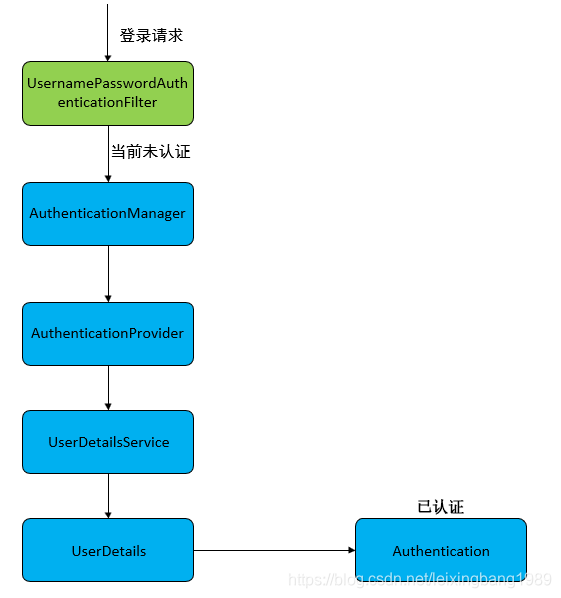
8.2认证流程图