1. 概念
Java集合框架(Java Collections Framework简称JCF)是为表示和操作集合,而规定的一种统一的标准的体系结构。集合框架包含三大块内容:对外的接口、接口的实现和对集合运算的算法。
集合就是用于存储对象的容器。 只要是对象类型就可以存进集合框架中。集合的长度是可变的。 集合中不可以存储基本数据类型的值。
2. 集合和数组的区别
数组和集合相比,数组的缺点是它长度是固定的,没有办法动态扩展。而集合存储数据时是没有长度限制的,是可以动态扩展的。集合容器因为内部的数据结构不同,有多种不同的容器对象。这些容器对象不断的向上抽取,就形成了集合框架。
数组:定容 集合:长度可以动态扩展
3. 为什么要使用集合
在讲为什么要使用集合之前,我们首先讲一个案例:
案例:手撕可变长度的容器
首先创建一个MyArray类,实现可以动态扩展数组的功能,并包含添加数据,打印数组和查询数组下标对应的数据内容这三个功能。代码如下:
package com.qy151.test1;

import java.util.Arrays;

/**
 * @作者:刘壬杉
 * @创建时间 2022/4/15
 **/
public class MyArry {
    private int size;        //创建一个int变量size,默认值为0
    private Object [] arr ;  //创建一个Object[]数组
    //创建无参构造
    public MyArry(){
        this(3);             //调用无参构造时,this(3) 代表的是调用有参构造并传入参数值为3
                             //即调用无参构造时,inSize = 3.
    }
    //创建有参构造
    public MyArry(int inSize){
        if (inSize<0){
            throw new RuntimeException("长度不合法");  //抛出异常
        }
        arr = new Object[inSize];
    }
    //创建addDate方法,实现将数据填入数组的共能。
    public void addDate(Object obj){
        if (size>=arr.length){
            Object[] newArr = Arrays.copyOf(arr, size * 2);
            arr = newArr;
        }
        arr[size] = obj;
        size++;
    }
    //创建getDate方法,实现查询下标所对应的数据内容。
    public Object getData(int index){
        if (index>=size){            //判断是否超过数组长度
            throw new ArrayIndexOutOfBoundsException("下标越界");//抛出异常
        }
        Object obj = arr[index];
        return obj;
    }
    //创建String方法,实现打印数组的功能(for循环遍历数组)
    public void String(){
        for (int i = 0 ;i<size;i++){
            System.out.println(arr[i]);
        }
    }
}
接下来创建一个测试类检测功能是否实现:
package com.qy151.test1;

/**
 * @作者:刘壬杉
 * @创建时间 2022/4/14
 **/
public class Test1 {
    public static void main(String[] args) {
        MyArry arr = new MyArry(2);
        arr.addDate("aaa01");
        arr.addDate("aaa02");
        arr.addDate("aaa03");
        arr.addDate("aaa04");
        Object obj = arr.getData(3);
        System.out.println(obj);
        arr.String();
    }
}
运行结果如下:
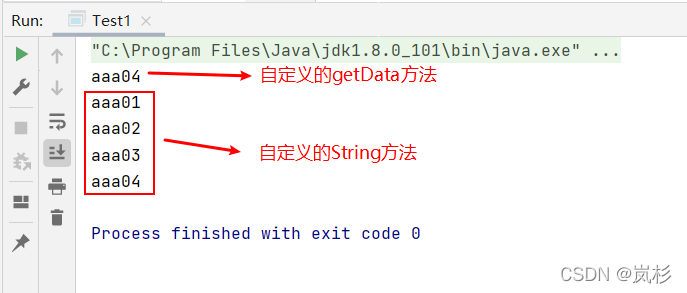
那么,我们可以想到自定义一个动态扩容的数组类,Java的开发人员一样可以想到。
于是,java官网 基于数组 根据不同的数据结构,创建了多个类。这些类统称为——集合框架。
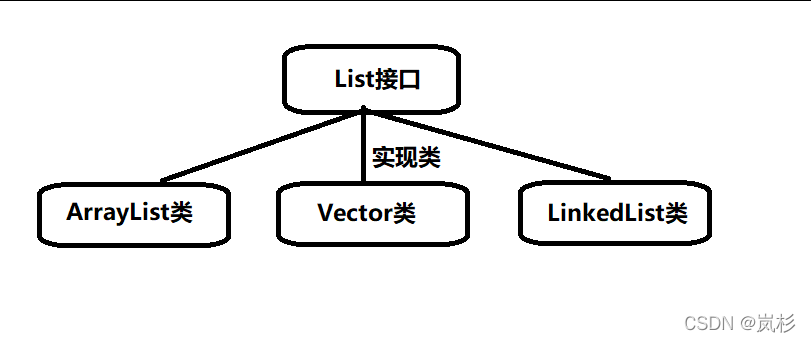
4. 集合的架构

5. List接口及其实现类
5.1 List集合的特点
- List集合是有序集合: 数据的添加和存储次序一致
- List集合可以存储重复的数据
- List集合中的数据可以通过下标访问
5.2 ArrayList实现类
5.2.1 特点
特点:
- 实现了List接口
- 可以动态扩容(我们只管存,长度不够,底层会自动的扩容)
- 通过下标可以快速访问数据
- 查找快,插入删除慢
- ArrayList底层是数组,对数组做了封装
- 可以存储任意类型的数据,包括null
- 数据按照存储次序排列
- 数据可以重复
- 多线程访问时不安全
5.2.2 ArrayList的创建
List list1 = new ArrayList();  //默认情况下,ArrayList集合对象的长度默认为10

List list2 = new ArrayList(3);  //创建一个长度为3的ArrayList集合对象
5.2.3 ArrayList添加操作
add与addAll的区别:
一个案例讲明二者的区别。
首先创建一个变量名为list1的ArrayList对象。内容为[a,b,c]。
再创建一个list2对象,让其内容为[1,2,3]。
将list1的内容赋给list2:
lsit2.add(list1):将list1作为一个对象整个放在list2的下标为0的位置。
此时list2的内容为:[1,2,3,[a,b,c]]
list2.addAll(list1):将list1中的元素逐个添加到list2中。
此时list2的内容为:[1,2,3,a,b,c]
public class Test2 {
    public static void main(String[] args) {
        List list1 = new ArrayList(3);
        //.add()  :  可以添加任意类型的数据。例如 String/new Date等等。。。
        list1.add("aaa01");
        list1.add("aaa02");
        list1.add("aaa03");
        list1.add(new Date());
        list1.add(1234);
        System.out.println(list1);
        //打印结果为:[aaa01, aaa02, aaa03, Fri Apr 15 18:11:33 CST 2022, 1234]
        list1.add(2,"aaa01");
        System.out.println(list1);
        List list2 = new ArrayList();
        list2.add("a");
        list2.add("b");
        list1.addAll(list2);
        System.out.println(list1);
        list1.add(2,"aaa01");        //下标为2的位置添加数据“aaa01”
        System.out.println(list1);
        //打印结果为:[aaa01, aaa02, aaa01, aaa03, Fri Apr 15 18:11:33 CST 2022, 1234]
        List list2 = new ArrayList();
        list2.add("a");
        list2.add("b");
        list1.addAll(list2);    //添加多个元素,把list2中的每个元素一一添加到list1中
        System.out.println(list1);
        //[aaa01, aaa02, aaa01, aaa03, Fri Apr 15 18:11:33 CST 2022, 1234, a, b]
        list1.addAll(0,list2);    //下标为0的位置,将list2中的元素添加到list1中
        System.out.println(list1);
        //[a, b, aaa01, aaa02, aaa01, aaa03, Fri Apr 15 18:11:33 CST 2022, 1234, a, b]
    }
}
5.2.4 ArrayList删除操作
remove() :可以通过内容进行删除,也可以通过下标进行删除操作。
clear() : 清空集合中的元素。
     public class Test2 {
    public static void main(String[] args) {
        List list1 = new ArrayList(3);
        //.add()  :  可以添加任意类型的数据。例如 String/new Date等等。。。
        list1.add("aaa01");
        list1.add("aaa02");
        list1.add("aaa03");

        list1.remove("aaa01");     //删除第一个内容为“aaa01”的数据(之后的都不删除)
        System.out.println(list1);
        //[aaa02,aaa03]
        list1.remove(0);          //删除下标为2的数据
        //[aaa03]
        System.out.println(list1);
        //[aaa02,aaa03]
        list1.clear();            //清空集合中的元素
        //[]

    }
}
5.2.5 ArrayList修改操作
set() :实现将指定下标位置的内容修改的操作。
public class Test2 {
    public static void main(String[] args) {
        List list1 = new ArrayList(3);
        //.add()  :  可以添加任意类型的数据。例如 String/new Date等等。。。
        list1.add("aaa01");
        list1.add("aaa02");
        list1.add("aaa03");

        list1.set(0,"java111");        //将下标为0的数据修改为“java111”,其他内容不变。
        System.out.println(list1);

    }
}
5.2.6 ArrayList查询操作
.get( ) :根据下标获取元素
.size( ) :获取集合元素的个数
.contains( ):判断元素是否在集合中
.indexOf( ) :查询元素在集合中第一次出现的位置
public class Test2 {
    public static void main(String[] args) {
        List list1 = new ArrayList(3);
        list1.add("aaa01");
        list1.add("aaa02");
        list1.add("aaa03");
        //查询的方法
        Object o = list1.get(1);    //根据下标获取元素
        int size = list1.size();    //获取集合元素的个数
        boolean f = list1.contains("aaa01");    //判断元素是否在集合中
        int index = list1.indexOf("aaa02");    //查询元素在集合中第一次出现的位置

        //for循环遍历集合中的元素
        for(int i = 0;i < list1.size();i++){
            Object m = list1.get(i);
            System.out.println(m);
        }
        //foreach遍历集合中的元素
        for (Object z : list1){
            System.out.println(z);
        }

    }
}
5.2.7 ArrayList 底层原理
我们需要了解一个类的底层原理,可以从构造函数入手:
List list1 = new ArrayList(3);在底层就是:
/**
 * Constructs an empty list with the specified initial capacity.
 *
 * @param  initialCapacity  the initial capacity of the list
 * @throws IllegalArgumentException if the specified initial capacity
 *         is negative
 */
public ArrayList(int initialCapacity) {
    if (initialCapacity > 0) {
        this.elementData = new Object[initialCapacity];
    } else if (initialCapacity == 0) {
        this.elementData = EMPTY_ELEMENTDATA;
    } else {
        throw new IllegalArgumentException("Illegal Capacity: "+
                                           initialCapacity);
    }
}
也就是说,我们的ArrayList的底层就是一个 Object[]数组,赋值给了this.elementData.
当我们去调用list1.add("aaa01");时,此时底层就是往elementData添加数据。
    /** add的底层源码
     * Appends the specified element to the end of this list.
     *
     * @param e element to be appended to this list
     * @return <tt>true</tt> (as specified by {@link Collection#add})
     */
    public boolean add(E e) {
        ensureCapacityInternal(size + 1);  // Increments modCount!!扩容操作
        elementData[size++] = e;           //将数据添加到elemetData数组中
        return true;
    }

    /** size的底层源码
     * The size of the ArrayList (the number of elements it contains).
     *
     * @serial
     */
    private int size;
获取当前list2存储了多少个数据:int size = list2.size();在底层其实就是返回成员变量size的值
    /**
     * Returns the number of elements in this list.
     *
     * @return the number of elements in this list
     */
    public int size() {
        return size;
    }
获取指定数据艘次出现的位置:int index = list1.indexOf("aaa01");底层就是获取“aaa01”在数组中首次出现的位置。
/**
* Returns the index of the first occurrence of the specified element
* in this list, or -1 if this list does not contain the element.
* More formally, returns the lowest index <tt>i</tt> such that
* <tt>(o==null ? get(i)==null : o.equals(get(i)))</tt>,
* or -1 if there is no such index.
*/
public int indexOf(Object o) {
if (o == null) {
for (int i = 0; i < size; i++)
if (elementData[i]==null)
return i;
} else {
for (int i = 0; i < size; i++)
if (o.equals(elementData[i]))
return i;
}
return -1;
}判断当前list是否包含某个数据:boolean contains = list1.contains("aaa01");底层是调用了当前类的indexOf 获取指定索引并判断是否>=0:
/**
* Returns <tt>true</tt> if this list contains the specified element.
* More formally, returns <tt>true</tt> if and only if this list contains
* at least one element <tt>e</tt> such that
* <tt>(o==null ? e==null : o.equals(e))</tt>.
*
* @param o element whose presence in this list is to be tested
* @return <tt>true</tt> if this list contains the specified element
*/
public boolean contains(Object o) {
return indexOf(o) >= 0;
}
获取指定索引位置的数据:Object obj = list1.get(1);底层就是 获取数组中指定索引位置的数据
    /**
     * Returns the element at the specified position in this list.
     *
     * @param  index index of the element to return
     * @return the element at the specified position in this list
     * @throws IndexOutOfBoundsException {@inheritDoc}
     */
    public E get(int index) {
        rangeCheck(index);

        return elementData(index);
    }

    /*rangeCheck底层源代码*/
    private void rangeCheck(int index) {
        if (index >= size)
            throw new IndexOutOfBoundsException(outOfBoundsMsg(index));
    }

    /*elementData底层源代码*/
    E elementData(int index) {
        return (E) elementData[index];
    }
5.3 LinkedList实现类
5.3.1 LinkedList的创建
和ArrayList的添加基本相同。多了两个内容:
1).addFirst() :在最前面的位置添加内容
2).addLast() :在最后面的位置添加内容
public class Test3 {
    public static void main(String[] args) {
        LinkedList list1 = new LinkedList();
        list1.add("张三");
        list1.add("李四");
        list1.add("王五");
        //[张三, 李四, 王五]
        System.out.println(list1);
        list1.addFirst("张二");
        list1.addLast("赵六");
        //[张二, 张三, 李四, 王五, 赵六]
        System.out.println(list1);
        //[张二, 张三, 鸣人, 李四, 王五, 赵六]
        list1.add(2,"鸣人");
        System.out.println(list1);
    }
}
5.3.2 LinkedList 修改和删除操作
与ArrayList的修改和删除操作基本相同。删除多了两个内容:
1) .removeFirst() :删除最前面的数据。
2).removeLast() :删除最后面的数据。
public class Test3 {
    public static void main(String[] args) {
        LinkedList list1 = new LinkedList();
        list1.add("张三");
        list1.add("李四");
        list1.add("王五");
        //[张三, 李四, 王五]
        System.out.println(list1);
        list1.addFirst("张二");
        list1.addLast("赵六");
        //[张二, 张三, 李四, 王五, 赵六]
        System.out.println(list1);
        //[张二, 张三, 鸣人, 李四, 王五, 赵六]
        list1.add(2,"鸣人");
        System.out.println(list1);

        //修改
        list1.set(2,"佐助");
        //[张二, 张三, 佐助, 李四, 王五, 赵六]
        System.out.println(list1);

        //删除
        list1.remove(0);
        //[张三, 佐助, 李四, 王五, 赵六]
        System.out.println(list1);
        list1.remove("张三");
        //[佐助, 李四, 王五, 赵六]
        System.out.println(list1);
        list1.removeFirst();
        //[李四, 王五, 赵六]
        System.out.println(list1);
        list1.removeLast();
        //[李四, 王五]
        System.out.println(list1);
    }
}
5.3.3 LinkedList 查询操作
与ArrayList的查询关键字大致相同,多了一些内容:
1).getFirst() :获取第一个下标所对应的数据
2) .getLast() :获取最后一个下标所对应的数据
3) .toArray() :将对象转换为数组
public class Test4 {
    public static void main(String[] args) {
        LinkedList list1 = new LinkedList();
        list1.add("张三");
        list1.add("李四");
        list1.add("王五");
        //[张三, 李四, 王五]
        System.out.println(list1);
        Object first = list1.getFirst();
        System.out.println(first);      //张三
        Object last = list1.getLast();
        System.out.println(last);       //王五
        Object obj = list1.get(2);
        System.out.println(obj);        //王五
        int size = list1.size();
        System.out.println(size);       //3
        boolean empty = list1.isEmpty();
        System.out.println(empty);      //false
        int m = list1.indexOf("张三");
        System.out.println(m);          //0
        boolean contains = list1.contains("王五");
        System.out.println(contains);   //true
        Object[] objects = list1.toArray();
        System.out.println(Arrays.toString(objects));   //[张三, 李四, 王五]

        //for循环遍历对象
        for (int i = 0;i<size;i++){
            Object o = list1.get(i);
            System.out.println(o);
        }

    }
}
5.3.4 LinkedList的底层源码
老规矩,学习底层原理,我们就要从学习构造函数开始:
/**
* Constructs an empty list.
*/
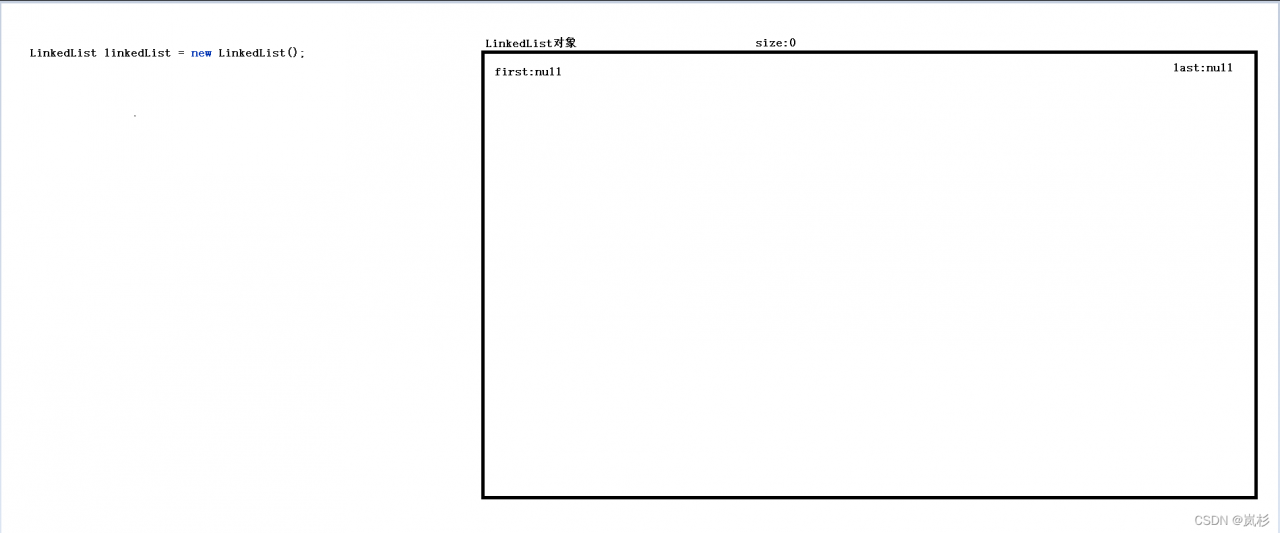
public LinkedList() {
}
我们可以发现LinkedList 底层什么也没有,但是注意,此时有三个成员变量被初始化:
public class LinkedList<E>
    extends AbstractSequentialList<E>
    implements List<E>, Deque<E>, Cloneable, java.io.Serializable
{
    transient int size = 0;

    /**
     * Pointer to first node.
     * Invariant: (first == null && last == null) ||
     *            (first.prev == null && first.item != null)
     */
    transient Node<E> first;

    /**
     * Pointer to last node.
     * Invariant: (first == null && last == null) ||
     *            (last.next == null && last.item != null)
     */
    transient Node<E> last;
由此可以看出,在new一个LinkedList对象时,会随之产生三个成员变量,即:int size, Node first和 Node last。并且没有赋值,所以他们的初始值为size=0,first=null,last=null。
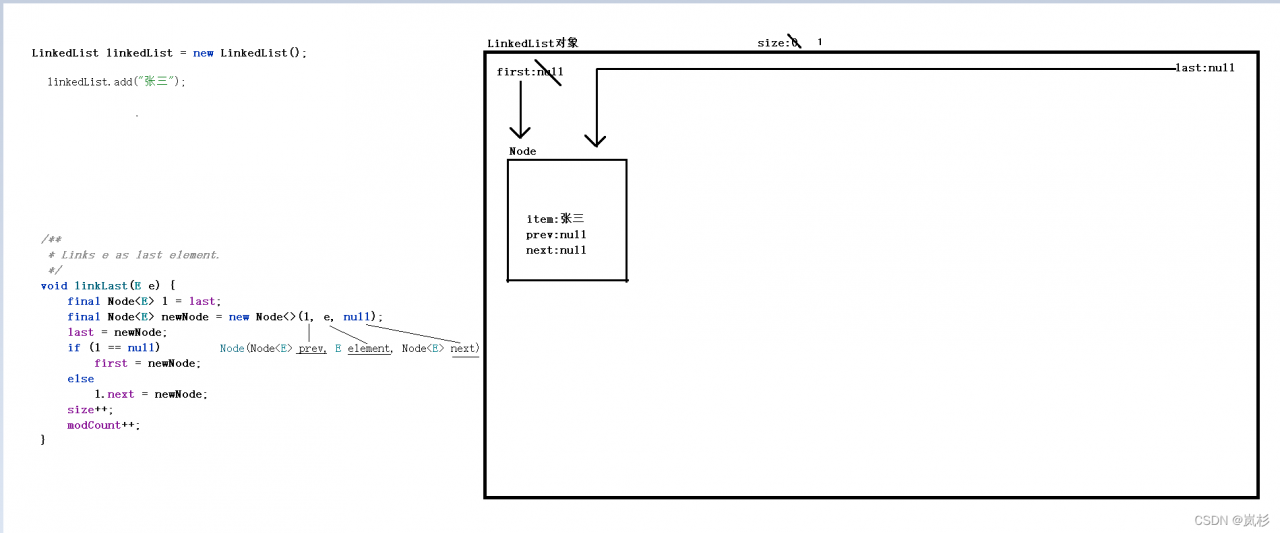
接下来用一张图让大家明白大致的实现方式:
当我们调用 linkedList.add("张三"); 在底层其实调用了LinkedLast(e);
    public boolean add(E e) {
        linkLast(e);
        return true;
    }
此时LinkedLast(e);操作是这个样子的:
    /**
     * Links e as last element.
     */
    void linkLast(E e) {
        final Node<E> l = last;
        final Node<E> newNode = new Node<>(l, e, null);
        last = newNode;
        if (l == null)
            first = newNode;
        else
            l.next = newNode;
        size++;
        modCount++;
    }
       //此时当前类有一个私有静态内部类 是Node
    private static class Node<E> {
        E item;
        Node<E> next;
        Node<E> prev;

        Node(Node<E> prev, E element, Node<E> next) {
            this.item = element;
            this.next = next;
            this.prev = prev;
        }
    }
这段代码看起来比较难以理解,接下来我们还是用画图的方法给大家刨析以下他的实现原理:
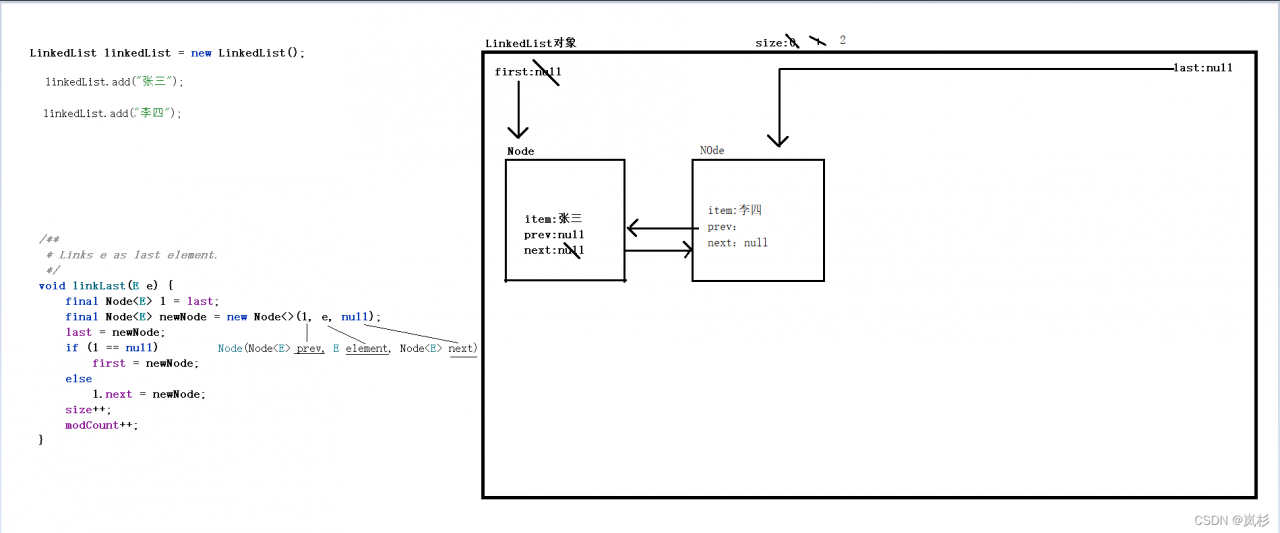
linkedList.add("张三");首先代码第一行,让last赋值给l,l就是我们的prev;然后第二行创建一个newNode对象,其中e就是我们的 item = 张三;next = null; prev = l = last = null;然后第三行执行if判断语句。当我们向对象中写入第一个数据时,l = null,所以执行if里面的代码块。此时,我们让first = 创建的Node。最后让size++,modCount++(modeCount的意义我们以后再讲)。
也就是说,此时LinkedList中,我们的first和last都指向了我们对象中唯一的数据。这就很符合我们的链表结构。
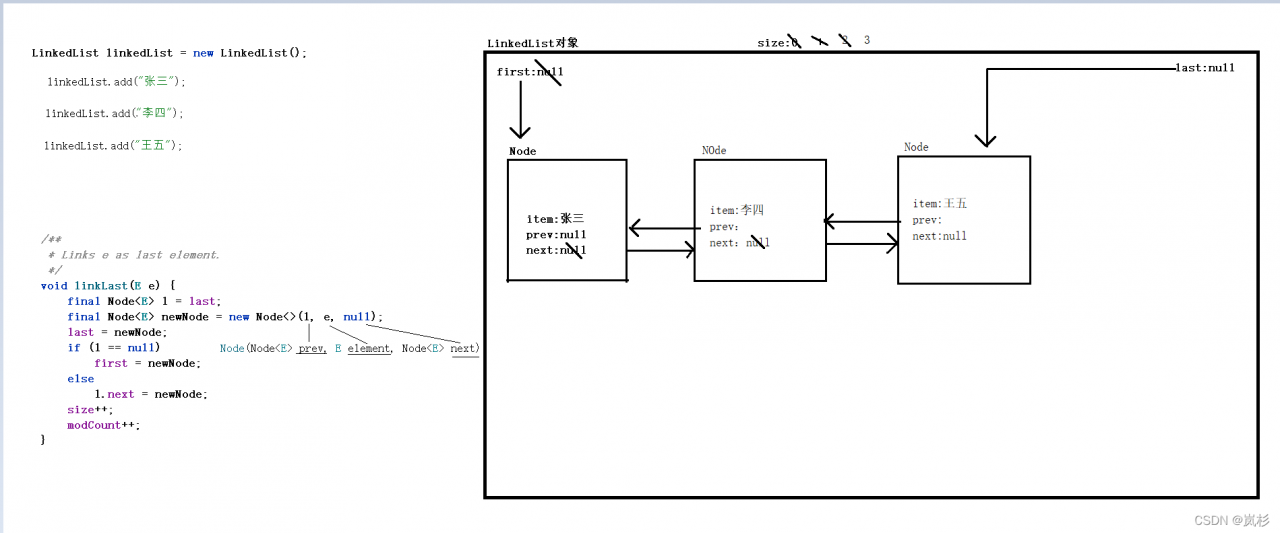
如果我们再添加一个对象,linkedList.add("李四"); 那么又会变成什么样子呢?聪明的小伙伴不妨先自己试着去模拟的画一下,看看是否和我下面的这张图是一样的:
当我们再添加一个“李四”对象的时候,首先,我们的l=last=“张三”对象,然后我们创建了一个新的Node,其中:prev = l = "张三"对象, item = e = "李四",next = null。然后执行if判断语句,此时很关键,我们的l是不是等于null呢?并不是,此时的l等于的是"张三"这个对象,所以我们要执行else里面的代码块。让我们的l.next = 我们新创建的"李四"对象。注意区分"l",此时的l指的是我们第一行执行的Node l(见本段标记部分)。最后不要忘了size++,modeCount++。
如果小伙伴们还没有看明白的话,我们再添加一个对象帮助大家理解。原理和添加"李四"对象相同。见下图:
在了解了创建和添加的底层原理后,我们再来看一看LinkedList的查询操作原理:
注:(size>>1)移位运算。可以理解为:size/2.
    public E get(int index) {
        checkElementIndex(index);     //检查索引编号是否越界
        return node(index).item;      //获取指定索引的node对象,并且将其item存储的数据进行返回
    }

    //此时获取node

    Node<E> node(int index) {
        // assert isElementIndex(index);
        //判断的目的是: 索引在size的前半部分还是后半部分,提高效率。
        if (index < (size >> 1)) {
            Node<E> x = first;
            for (int i = 0; i < index; i++)
                x = x.next;
            return x;
        } else {
            Node<E> x = last;
            for (int i = size - 1; i > index; i--)
                x = x.prev;
            return x;
        }
    }
假如我们 linkedlist.get(1);在调用get方法时,先让我们的x = first = "张三"对象,然后我们判断inedx(此时是我们填入的1)是否大于size/2?(此时让我们的size=3,linkedlist对象为[张三,李四,王五])很明显,比index<size/2,所以索引在size的前半部分,从前往后找。接下来是for循环。第一次循环时,i=0,x = x.next = "李四对象",第二次循环,i=1,i<index不成立,循环结束,输出x,即输出的内容即为李四对象,也就是我们要的结果。
5.4 ArrayList 与LinkedList的区别
在我们对ArrayList和LinkedList有了大致的了解以后,我们就可以大致归纳以下二者区别以及优缺点:
ArrayList:他的底层是数组结构,它的查询效率高,但是他的添加和删除效率低,因为它涉及到数据的迁移。常见方法有:add();size();indexOf();contains();get();remove();isEmpty();
LinkedList:他得底层是双向链表结构,他的增加和删除效率高,但是他的查询效率低。因为他要一个节点一个节点的往后找。常见的方法有:addFirst();addLast();getFirst();getLast();
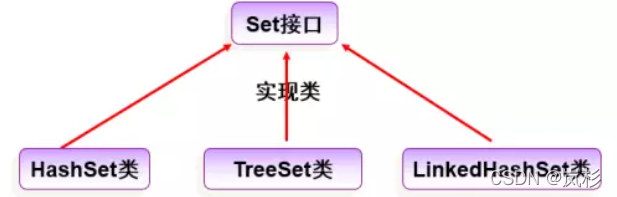
6.Set集合及其实现类
6.1Set集合的特点
- Set接口是无序的
- Set接口中的数据不允许重复
- Set接口无法通过下标访问数据
- 查找慢,插入删除快(底层数据结构是哈希表和红黑树)
- Set集合使用equals()和hashCode()方法实现元素去重
6.2HashSet实现类
6.2.1特点
- HashSet是Set接口的实现类
- 线程不安全
6.2.2 创建HashSet对象
有了之前我们学习list集合的经验,Set集合这里的操作大致相同,我们就不做过多的累述。
public class Test02 {
public static void main(String[] args) {
HashSet hashSet= new HashSet(); //默认长度为16,负载因子为0.75
HashSet hashSet1 = new HashSet(16);//初始容器的大小
//loadFactor:--->0.7f 表示负载因子 当空间使用70%时 要求扩容
HashSet hashSet2 = new HashSet(16,0.7f);
}
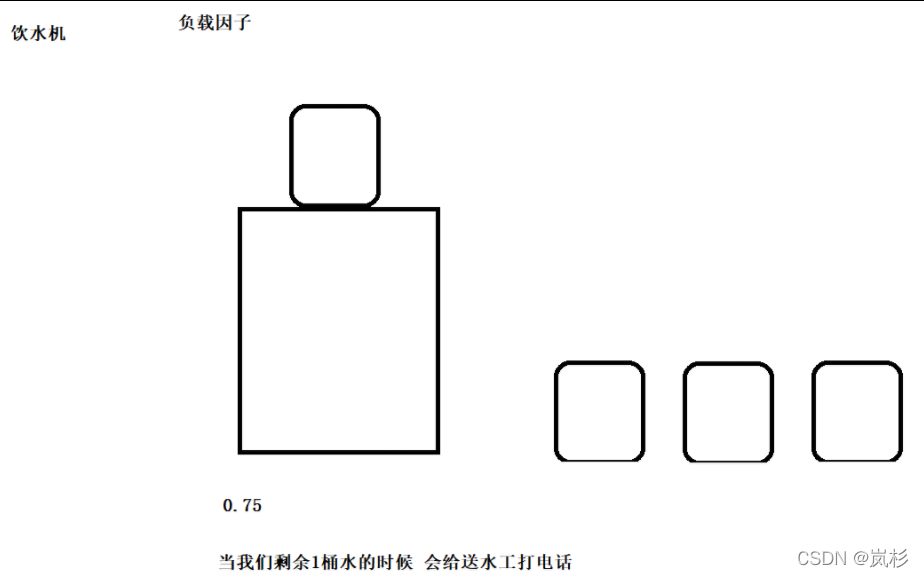
}怎么理解负载因子?负载因子就好比时我们饮水机的水桶,当你4个水桶用掉了75%也就是剩1桶水(即负载因子0.75)时,就会给送水工打电话。给送水工打电话这个行为就好比HashSet对象进行了扩容。
6.2.3 HashSet添加操作
     //添加操作
        hashSet.add("java01");
        hashSet.add("java02");
        hashSet.add("java04");
        hashSet.add("java03");
        hashSet.add("java02");

        HashSet set2=new HashSet();
        set2.add("刘德华");
        set2.add("张学友");
        set2.add("黎明");

        hashSet.addAll(set2); //把set2中的每个元素添加到hashset中
        System.out.println(hashSet); //元素不能重复 而且无序
6.2.4 HashSet删除操作
        //删除
        hashSet.remove("黎明");
        //清空容器集合
        hashSet.clear();
6.2.5 HashSet其他常用操作
因为Set集合时无序的,所以我们没有办法用get()方法做修改操作。
          //判断是否为空
          boolean empty = hashSet.isEmpty();
         //判断元素是否在容器中
          boolean b = hashSet.contains("刘德华");
6.2.6 HashSet的遍历
(1)通过foreach遍历
//遍历--- foreach
for(Object o: hashSet){
System.out.println(o);
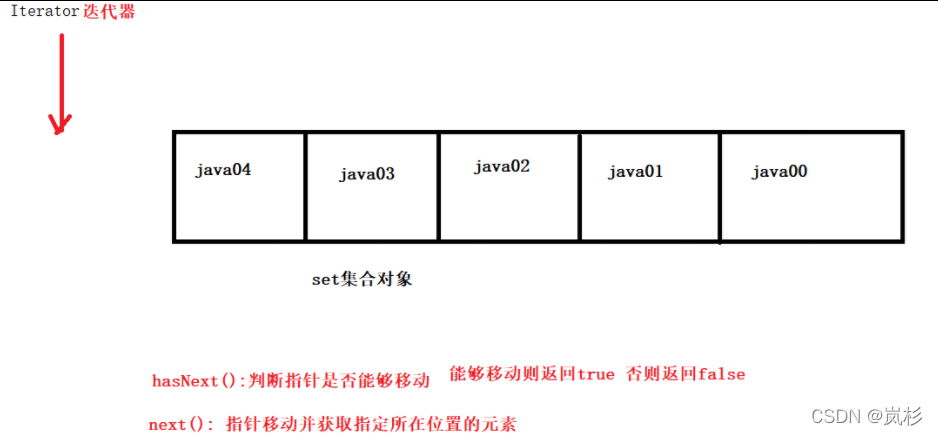
}(2)通过迭代器来遍历
 //迭代器遍历
        Iterator iterator = hashSet.iterator();//获取迭代器对象 有序:有下标
        while (iterator.hasNext()){//判断是否指针能够移动
            Object next = iterator.next();//指针移动并获取当前的元素
            System.out.println(next);
        }
这里我们引出了一个迭代器Iterator的概念,我们单独建一个标题来讲述。
6.2.7迭代器Iterator
迭代器(iterator)有时又称游标(cursor)是程序设计的软件设计模式,可在容器对象(container,例如链表或数组)上遍访的接口,设计人员无需关心容器对象的内存分配的实现细节。
HashSet类中没有提供根据集合索引获取索引对应的值的⽅法,因此遍历HashSet时需要使⽤Iterator迭代器。Iterator的主要⽅法如下:

当我们用迭代器进行HashSet遍历时,首先获取迭代器对象,然后通过hasNext()方法判断指针是否能够移动,如果可以移动,就通过next()方法让指针移动并获取当前的元素。不能移动的话,就输出Object next。
6.2.8 HashSet底层源码
在创建一个HashSet的对象时,底层创建的是HashMap。我们说hashset的底层原理时,我们就在后HashMap的原理就行。 讲HashMap时给大家说原理。
    /**
     * Constructs a new, empty set; the backing <tt>HashMap</tt> instance has
     * default initial capacity (16) and load factor (0.75).
     */
    public HashSet() {
        map = new HashMap<>();
    }
6.3TreeSet实现类
TreeSet 基于TreeMap 实现。TreeSet可以实现有序集合,但是有序性需要通过比较器实现。
6.3.1 TreeSet集合特点
- 有序
- 不重复
- 添加、删除、判断元素存在性效率比较高
- 线程不安全
6.3.2TreeSet对元素排序方式
1) 如果是基本数据类型和String类型,无需其它操作,可以直接进行排序。
2) 对象类型元素排序,需要实现Comparable接口,并覆盖其compareTo方法。
3) 自己定义实现了Comparator接口的排序类,并将其传给TreeSet,实现自定义的排序规则。
例子1:存储String类型的数据:
TreeSet treeSet=new TreeSet();
        treeSet.add("java05");
        treeSet.add("java03");
        treeSet.add("java04");
        treeSet.add("java01");
        treeSet.add("java02");
        treeSet.add("java04");

        System.out.println(treeSet);
例子2:存储对象类型的数据:
public class Test04 {
    public static void main(String[] args) {
        TreeSet treeSet=new TreeSet();
        treeSet.add(new Student("张三",17));
        treeSet.add(new Student("李四",16));
        treeSet.add(new Student("王五",16));
        treeSet.add(new Student("老六",15));

        System.out.println(treeSet);
    }
}
此时运行,我们就会发现,运行出现了如下的错误:

这就验证了TreeSet中的元素必须实现Comparable接口 方可放入TreeSet 。
那么,我们怎么才能把对象类型的数据放入TreeSet中呢?实现方式有以下两种:
1)让你的类实现Comparable接口
public class Test {
    public static void main(String[] args) {
        TreeSet treeSet=new TreeSet(); //TreeSet不允许重复元素
        treeSet.add(new Student("张三",17));
        treeSet.add(new Student("李四",16));
        treeSet.add(new Student("王五",16));
        treeSet.add(new Student("老六",15));

        System.out.println(treeSet);
    }
}
class Student implements Comparable{
     private String name;
     private Integer age;

    @Override
    public String toString() {
        return "Student{" +
                "name='" + name + '\'' +
                ", age=" + age +
                '}';
    }

    public Student(String name, Integer age) {
        this.name = name;
        this.age = age;
    }

    public Student() {
    }

    public String getName() {
        return name;
    }

    public void setName(String name) {
        this.name = name;
    }

    public Integer getAge() {
        return age;
    }

    public void setAge(Integer age) {
        this.age = age;
    }
   //排序:---返回如果大于0 表示当前元素比o大  如果返回-1 当前添加的元素比o小  返回0表示相同元素。
    @Override
    public int compareTo(Object o) {
        Student student= (Student) o;
        System.out.println(this+"===================>"+o);

        if(this.age>student.age){
            return 1;
        }
        if(this.age<student.age){
            return -1;
        }

        return 0;
    }
}
2)在创建TreeSet时指定排序的对象
 public class MyComparator implements Comparator {

    //需要比对得两个对象
     @Override
     public int compare(Object o1, Object o2) {
     Student s1= (Student) o1;
     Student s2= (Student) o2;
     if(s1.getAge()>s2.getAge()){
         return 1;
     }else if(s1.getAge()<s2.getAge()){
         return -1;
     }else {
         return 0;
     }
   }
 }

 public class Demo01 {
 public static void main(String[] args) {
     //Comparator<? super E> comparator
     //为TreeSet容器指定了排序规则
     TreeSet treeSet=new TreeSet(new MyComparator());
     treeSet.add(new Student(18,"张三"));
     treeSet.add(new Student(17,"李四"));
     treeSet.add(new Student(19,"王五"));
     treeSet.add(new Student(19,"赵六"));
     System.out.println(treeSet);
     }
 }
7. Map集合及其实现类
7.1 如何创建HashMap对象
//默认初始化大小为16 负载因子为0.75
Map map=new HashMap();
//初始化大小
Map map2=new HashMap(16);
//初始化大小 负载因子
Map map3=new HashMap(16,0.78f);
7.2 添加操作
//默认初始化大小为16 负载因子为0.75
 Map map=new HashMap();
//添加操作 key: name value: 张三
 map.put("name","张三");
//注意: 要求map得key必 须唯一。
map.put("age",18); map.put("name","王五");
//因为key不能重复,所以后 者会把前者覆盖
Map m1=new HashMap(); m1.put("k1","v1");
m1.put("k2","v2"); map.putAll(m1);
//把m1中得每个元素 添加到map中
map.putIfAbsent("age",28) ;
//如果指定得key存在, 则不放入map中,如果不存在则放入map中
System.out.println(map);
7.3 删除操作
//删除操作
map.remove("age2");
//根据指定得key移除元素
System.out.println(map);
map.clear();
//清空map容器
System.out.println(map);
7.4 修改操作
//修改操作
map.replace("name","刘德华");
//替换元素
System.out.println(map);
7.5 查询操作
public static void main(String[] args) {
    Map map=new HashMap();
    map.put("k1","v1");
    map.put("k4","v4");
    map.put("k2","v2");
    map.put("k3","v3");
    //查询操作
    boolean f = map.containsKey("k5");
    //判断map是否 存在指定得key
    Object v = map.get("k5");
    //根据指定的key获取对应 得value值
    System.out.println(v);
    Set keys = map.keySet();
    //返回该map中所有得key
    System.out.println(keys);
    //遍历
    map. for(Object k:keys){
        Object value= map.get(k);
        System.out.println(k+"================>"+value);
    }
}
7.6 HashMap的底层原理
JDK1.7 和 JDK1.8他们是有区别得。
JDK1.7使用得数据结构: 数组+链表 而且链表插入模式为头部插入(造成死循环)。
jdk1.8使用得数据结构: 数组+链表+红黑树 而且链表得插入模式为尾部插入。
首先我们从构造函数入手:
  /**
     * Constructs an empty <tt>HashMap</tt> with the default initial capacity
     * (16) and the default load factor (0.75).
     */
   public HashMap() {
        this.loadFactor = DEFAULT_LOAD_FACTOR; // all other fields defaulted
    }
当我们new一个HashMap时,在底层是以数组的形式表现出来的。默认长度为16.

接下来我们讲解一下调用put方法时,底层的原理:
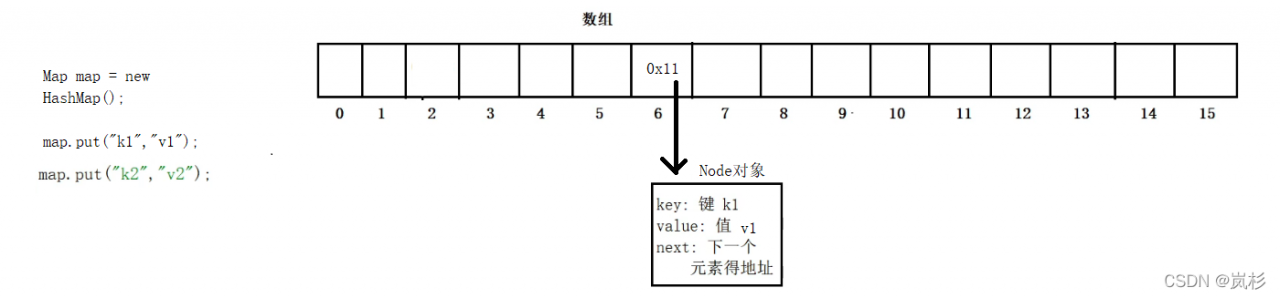
Map map = new HashMap();
map.put("k1","v1");当我们put("k1","v1")时,底层会根据key的hash值计算出一个整数。通过下面的代码我们可以验证这个事情:
public class Test {
    public static void main(String[] args){
        String s = "k1";
        System.out.println(s.hasCode());
    }
}

//最终的输出结果为3366
根据hash整数求出在数组中的位置。k1.hash(3366)%16 即可得到0~15之间的一个下标。根据所得的下标放入对应的数组中。数组中实际存储的时地址,地址指向的是Node对象。
我们再put一组key-value值,让key为“aa”,value为"bb",假设此时key的hash值计算结果也是6,那么在底层是怎么存放数据的呢?我们看下面的图:
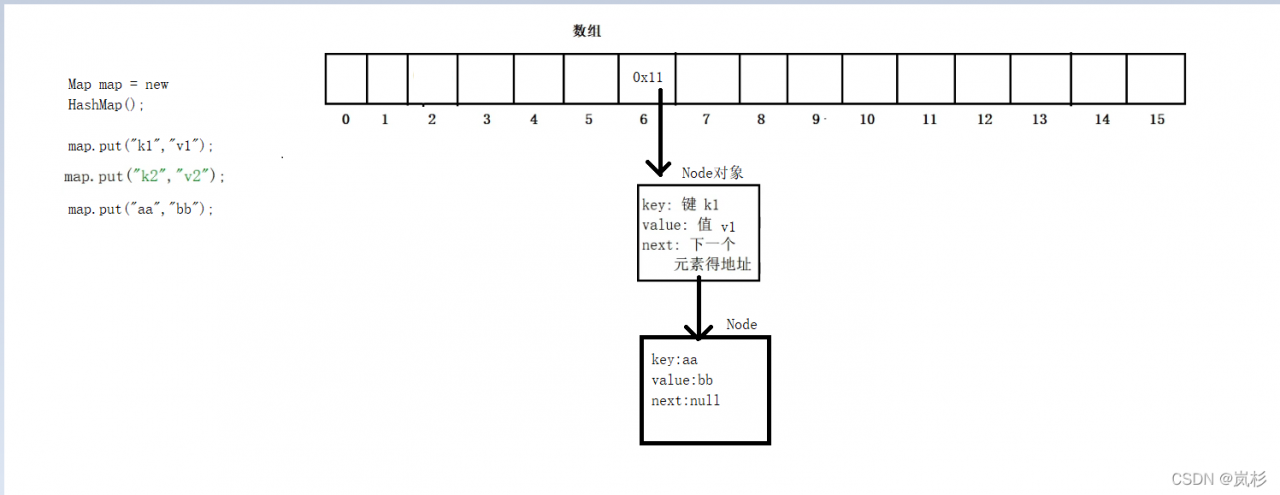
由上图我们就可以明白,如果key.hash%16计算后得到的结果相同,这时我们便称之为hash碰撞(冲突),此时我们变需要比对他们的equals方法,如果equals不同,则将后来的数据挂在单向链表上(尾插法)。
但是现在又会出现一个问题,如果我们的hash冲突个数比较多,此时只使用链表结构,则会出现插入和查询效率低的现象。这是我们就会用到底层原理的最后一个结构:红黑二叉树。
注意:当hash冲突个数超过8个时才会使用红黑二叉树。为什么不能直接用红黑树呢?因为创建一个红黑树非常耗费资源,但是他的效率很高。所以数据少的时候我们不用红黑二叉树。
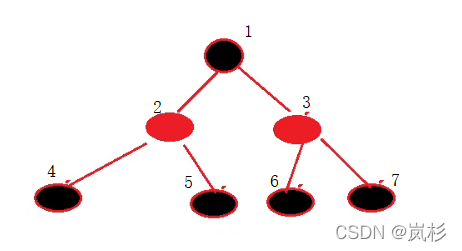
为什么使用了红黑二叉树以后查询和修改的效率就提高了呢?
我们现在粗线的讲解一下红黑二叉树的原理。假设我们要查询 7,如果不用红黑二叉树,我们需要从头到尾一个接一个的查询,最终要查询7次。使用红黑二叉树,我们首先将索引和1比较,比1大,向右边查找,再和3比较,比3大,向右查找,最后查找到了7。所以用红黑二叉树,我们一共就查询了3次,这样大大提高了我们的查询和插入的效率。
最后我们在总结一波:
JDK1.8 HashMap原理
Hashmap得原理,存储元素使用得put(key,value),根据key得hash计算出相应得哈希值,根据相应得算法求出该元素在数组中得位置, 如果求出得哈希值相同,则称为哈希冲突,会根据equals来判断元素是否一致,如果equals不同,则存入单向链表上, 如果哈希碰撞得个数超过8个,则把链表转换为红黑二叉树。
JDK1.7和JDK1.8 HashMap得区别。
JDK1.7使用得数据结构: 数组+链表 而且链表插入模式为头部插入(造成死循环)。
jdk1.8使用得数据结构: 数组+链表+红黑树 而且链表得插入模式为尾部插入。
我们来看一下put方法的底层代码

final V putVal(int hash, K key, V value, boolean onlyIfAbsent,
                   boolean evict) {
        Node<K,V>[] tab; Node<K,V> p; int n, i;
        if ((tab = table) == null || (n = tab.length) == 0)
            n = (tab = resize()).length;
        if ((p = tab[i = (n - 1) & hash]) == null)
            tab[i] = newNode(hash, key, value, null);
        else {
            Node<K,V> e; K k;
            if (p.hash == hash &&
                ((k = p.key) == key || (key != null && key.equals(k))))
                 //如果key得hash值相同,判断key得equals是否相同,替换原来得元素
                e = p;
            else if (p instanceof TreeNode)
                e = ((TreeNode<K,V>)p).putTreeVal(this, tab, hash, key, value);
            else {
                for (int binCount = 0; ; ++binCount) {
                    if ((e = p.next) == null) {
                        p.next = newNode(hash, key, value, null);
                        // 判断链表得长度是否超过8个
                        if (binCount >= TREEIFY_THRESHOLD - 1) // -1 for 1st
                            // 把链表转换为红黑树结构
                            treeifyBin(tab, hash);
                        break;
                    }
                    if (e.hash == hash &&
                        ((k = e.key) == key || (key != null && key.equals(k))))
                        break;
                    p = e;
                }
            }
            if (e != null) { // existing mapping for key
                V oldValue = e.value;
                if (!onlyIfAbsent || oldValue == null)
                    e.value = value;
                afterNodeAccess(e);
                return oldValue;
            }
        }
        ++modCount;
        if (++size > threshold)
            resize();
        afterNodeInsertion(evict);
        return null;
    }
8. 泛型
8.1 什么是泛型
List list=new ArrayList();//该集合没有使用泛型
list.add("java01");
list.add("java02");
String str= (String) list.get(0);//获取元素 需要
进行强制类型转换
System.out.println(str); 8.2 泛型的使用
语法:
List<类型> list=new ArrayList<类型>();
public static void main(String[] args) {
List<String> list=new ArrayList<>();//这里就限制了集合中每个元素得类型。
list.add("aaa");
list.add("bbb"); //因为集合中只能添加String类型
list.add("ccc"); //因为集合中只能添加String类型
String s = list.get(0); //在获取元素时 默认就是相应得数据类型 而无需在进行转换


//<K,V>:K:表示键得泛型 V:表示值得泛型
HashMap<String,Integer> map=new HashMap<>();
map.put("a",1);
map.put("b",2);
Set<String> keys = map.keySet();
}
8.3 自定义泛型
基本的语法格式如下:
public class 类名<标识,标识....> {
标识 变量名;
public 标识 方法名(){
}
public void 方法名(标识 参数名){
}
.........
}
下面用一个实例来讲明:
我们自定义一个坐标类,可以实现输入并打印x坐标,y坐标:
public class Test1 {
    public static void main(String[] args) {
       Point<String> p = new Point<>();
       p.setX("东京15°");
       p.setY("北纬11°");
       p.show();
    }
}

class Point<T>{
    private T x;
    private T y;

    public void show(){
        System.out.println("x的坐标:"+x+" y的坐标:"+y);
    }

    public T getX() {
        return x;
    }

    public void setX(T x) {
        this.x = x;
    }

    public T getY() {
        return y;
    }

    public void setY(T y) {
        this.y = y;
    }
}