目录
- labelme批量转换json文件出现AttributeError
- 问题描述
在批量转换 json 文件时,出现以下报错:
AttributeError: module ‘labelme.utils’ has no attribute ‘draw’
类似的还可能出现:
AttributeError: module ‘labelme.utils’ has no attribute 'draw_label’
等错误。这是由于 labelme 版本的问题。高版本在 labelme 的utils文件夹里缺少 draw.py 文件。
- 解决方案
有如下解决方案:
- 降低 labelme 的版本,可参考博客1。
- 在labelme的安装目录下手动添加 draw.py 文件,可参考博客2。
1)在utils文件夹中新建一个draw.py文件 ,如果是在 Anaconda 中安装的,具体路径为:D:\Anaconda3\Lib\site-packages\labelme\utils。 draw.py 的代码在此给出:
import io

import numpy as np
import PIL.Image
import PIL.ImageDraw


def label_colormap(N=256):

    def bitget(byteval, idx):
        return ((byteval & (1 << idx)) != 0)

    cmap = np.zeros((N, 3))
    for i in range(0, N):
        id = i
        r, g, b = 0, 0, 0
        for j in range(0, 8):
            r = np.bitwise_or(r, (bitget(id, 0) << 7 - j))
            g = np.bitwise_or(g, (bitget(id, 1) << 7 - j))
            b = np.bitwise_or(b, (bitget(id, 2) << 7 - j))
            id = (id >> 3)
        cmap[i, 0] = r
        cmap[i, 1] = g
        cmap[i, 2] = b
    cmap = cmap.astype(np.float32) / 255
    return cmap


# similar function as skimage.color.label2rgb
def label2rgb(lbl, img=None, n_labels=None, alpha=0.5, thresh_suppress=0):
    if n_labels is None:
        n_labels = len(np.unique(lbl))

    cmap = label_colormap(n_labels)
    cmap = (cmap * 255).astype(np.uint8)

    lbl_viz = cmap[lbl]
    lbl_viz[lbl == -1] = (0, 0, 0)  # unlabeled

    if img is not None:
        img_gray = PIL.Image.fromarray(img).convert('LA')
        img_gray = np.asarray(img_gray.convert('RGB'))
        # img_gray = cv2.cvtColor(img, cv2.COLOR_RGB2GRAY)
        # img_gray = cv2.cvtColor(img_gray, cv2.COLOR_GRAY2RGB)
        lbl_viz = alpha * lbl_viz + (1 - alpha) * img_gray
        lbl_viz = lbl_viz.astype(np.uint8)

    return lbl_viz


def draw_label(label, img=None, label_names=None, colormap=None):
    import matplotlib.pyplot as plt
    backend_org = plt.rcParams['backend']
    plt.switch_backend('agg')

    plt.subplots_adjust(left=0, right=1, top=1, bottom=0,
                        wspace=0, hspace=0)
    plt.margins(0, 0)
    plt.gca().xaxis.set_major_locator(plt.NullLocator())
    plt.gca().yaxis.set_major_locator(plt.NullLocator())

    if label_names is None:
        label_names = [str(l) for l in range(label.max() + 1)]

    if colormap is None:
        colormap = label_colormap(len(label_names))

    label_viz = label2rgb(label, img, n_labels=len(label_names))
    plt.imshow(label_viz)
    plt.axis('off')

    plt_handlers = []
    plt_titles = []
    for label_value, label_name in enumerate(label_names):
        if label_value not in label:
            continue
        if label_name.startswith('_'):
            continue
        fc = colormap[label_value]
        p = plt.Rectangle((0, 0), 1, 1, fc=fc)
        plt_handlers.append(p)
        plt_titles.append('{value}: {name}'
                          .format(value=label_value, name=label_name))
    plt.legend(plt_handlers, plt_titles, loc='lower right', framealpha=.5)

    f = io.BytesIO()
    plt.savefig(f, bbox_inches='tight', pad_inches=0)
    plt.cla()
    plt.close()

    plt.switch_backend(backend_org)

    out_size = (label_viz.shape[1], label_viz.shape[0])
    out = PIL.Image.open(f).resize(out_size, PIL.Image.BILINEAR).convert('RGB')
    out = np.asarray(out)
    return out
2)打开 utils 文件夹下的 __init__.py 文件,导入 draw.py 里面的函数:
from .draw import label_colormap
from .draw import label2rgb
from .draw import draw_label
- labelme 标注类别顺序
注意标注的类别顺序,在 Polygon Labels 列表中,第一个出现的类别后续处理中对应为1,第二个出现的类别后续处理中对应为 2,以此类推。因此需要保证标注时所有图片标注的类的顺序是相同的。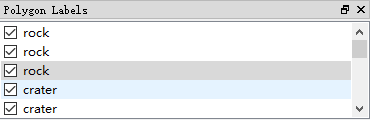
此时rock=1,crater=2,若不小心某些图片类别顺序标记错误,可以把该类拖动,改变其次序。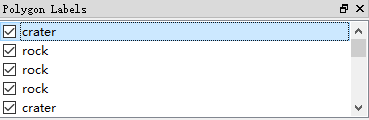
改变次序后,crater=1,rock=2。修改次序时可以把该对话框拖出来。
- labelme 读入16位图像
labelme 读入的如果是 16 位的图像,则标注后得到的 label.png 也将是 16 位的图像。16位图像的像素值一共有:2 16 = 65536 2^{16}=65536216=65536 种,而 8 位图像只有:2 8 = 256 2^8=25628=256 种。
利用 Image.open(path) 读入图像时,它默认的是 8 位的图像,因此对16 位的图像和16 位的标签读入的都是错误的值。
- 解决方法:16位图像转换为8位图像
- 对于 16 位的原图,可以用
cv2模块来转换,即像素值*255/65535:
import cv2
img = cv2.imread('1.png')
img = cv2.cvtColor(img, cv2.COLOR_BGR2GRAY)
cv2.imwrite('1.png', img)
- 对于 16 位的标签图,显然不能这么做,只能改变位数,不能改变数值:
from PIL import Image
img1 = Image.open('label.png')
img = Image.fromarray(np.uint8(img1))
img.save('label.png')
- 参考:
- labelme 设置标签对应的类别
前面提到过标签标注的顺序对最后处理结果的影响,但是这样比较麻烦,并且会出现一个问题:
如果数据集中每张图片不包含所有的类别,则在标注的时候不同的类别可能会标注成相同的类别和颜色,这样在训练的时候会出现错误。如这张图中只有标签 car ,那么它会被当做类别 1,另一张图只有标签 people,那么它经过处理之后对应类别还是 1。这显然是不对的。
因此,需要在解析 json 文件的时候主动设置标签对应的类别。