文章目录
本地Win10用SSH登录腾讯轻量云Ubuntu20.04.1
重装了云系统, 选择了 Ubuntu Server 20.04 LTS 64bit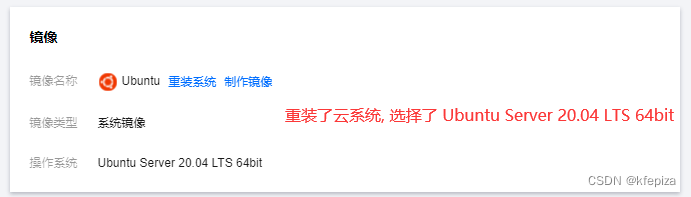
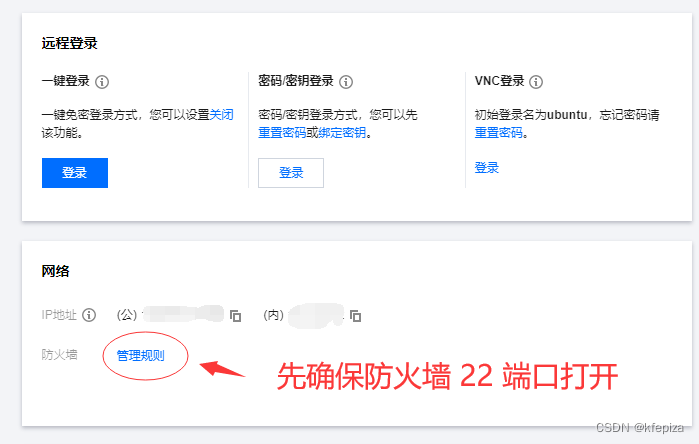
先确保防火墙 22 端口打开

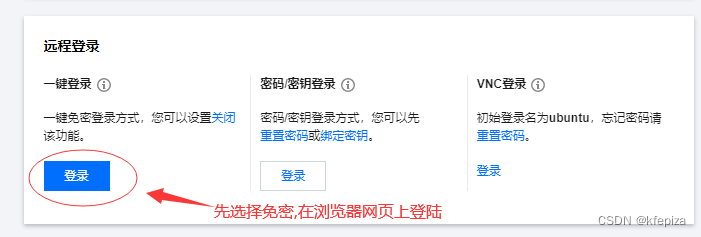
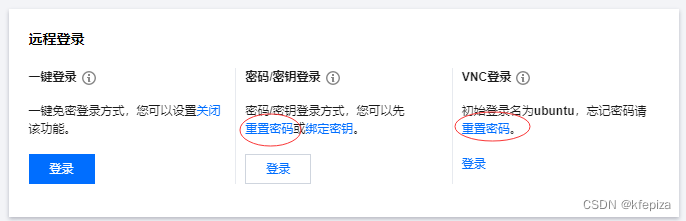
先选择免密,在浏览器网页上登陆
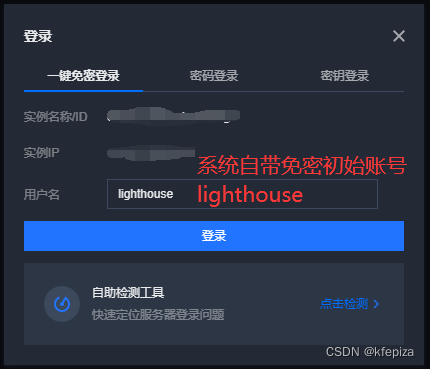
系统自带免密初始账号 :lighthouse
lighthouse登录不用密码, 但必须在官方指定控制台登录, 其它控制台不能登录
ubuntu 和 root 一开始都没有密码,需要指定密码才能使用
lighthouse使用sudo不用输入密码, 可以为ubuntu 和 root 指定密码
登录lighthouse
用vi打开/etc/ssh/sshd_config进行编辑 设置 PasswordAuthentication 属性

sudo vi /etc/ssh/sshd_config
腾讯轻量云Ubuntu20.04Server原版/etc/ssh/sshd_config?
###   腾讯轻量云Ubuntu20.04Server原版/etc/ssh/sshd_config
#       $OpenBSD: sshd_config,v 1.103 2018/04/09 20:41:22 tj Exp $

# This is the sshd server system-wide configuration file.  See
# sshd_config(5) for more information.

# This sshd was compiled with PATH=/usr/bin:/bin:/usr/sbin:/sbin

# The strategy used for options in the default sshd_config shipped with
# OpenSSH is to specify options with their default value where
# possible, but leave them commented.  Uncommented options override the
# default value.

Include /etc/ssh/sshd_config.d/*.conf

#Port 22
AddressFamily any
#ListenAddress 0.0.0.0
#ListenAddress ::

#HostKey /etc/ssh/ssh_host_rsa_key
#HostKey /etc/ssh/ssh_host_ecdsa_key
#HostKey /etc/ssh/ssh_host_ed25519_key

# Ciphers and keying
#RekeyLimit default none

# Logging
#SyslogFacility AUTH
#LogLevel INFO

# Authentication:

#LoginGraceTime 2m
#PermitRootLogin prohibit-password
#StrictModes yes
#MaxAuthTries 6
#MaxSessions 10

#PubkeyAuthentication yes

# Expect .ssh/authorized_keys2 to be disregarded by default in future.
#AuthorizedKeysFile     .ssh/authorized_keys .ssh/authorized_keys2

#AuthorizedPrincipalsFile none

#AuthorizedKeysCommand none
#AuthorizedKeysCommandUser nobody

# For this to work you will also need host keys in /etc/ssh/ssh_known_hosts
#HostbasedAuthentication no
# Change to yes if you don't trust ~/.ssh/known_hosts for
# HostbasedAuthentication
#IgnoreUserKnownHosts no
# Don't read the user's ~/.rhosts and ~/.shosts files
#IgnoreRhosts yes

# To disable tunneled clear text passwords, change to no here!
#PasswordAuthentication yes
#PermitEmptyPasswords no

# Change to yes to enable challenge-response passwords (beware issues with
# some PAM modules and threads)
ChallengeResponseAuthentication no

# Kerberos options
#KerberosAuthentication no
#KerberosOrLocalPasswd yes
#KerberosTicketCleanup yes
#KerberosGetAFSToken no

# GSSAPI options
#GSSAPIAuthentication no
#GSSAPICleanupCredentials yes
#GSSAPIStrictAcceptorCheck yes
#GSSAPIKeyExchange no

# Set this to 'yes' to enable PAM authentication, account processing,
# and session processing. If this is enabled, PAM authentication will
# be allowed through the ChallengeResponseAuthentication and
# PasswordAuthentication.  Depending on your PAM configuration,
# PAM authentication via ChallengeResponseAuthentication may bypass
# the setting of "PermitRootLogin without-password".
# If you just want the PAM account and session checks to run without
# PAM authentication, then enable this but set PasswordAuthentication
# and ChallengeResponseAuthentication to 'no'.
UsePAM yes

#AllowAgentForwarding yes
#AllowTcpForwarding yes
#GatewayPorts no
X11Forwarding yes
#X11DisplayOffset 10
#X11UseLocalhost yes
#PermitTTY yes
PrintMotd no
#PrintLastLog yes
#TCPKeepAlive yes
#PermitUserEnvironment no
#Compression delayed
#ClientAliveInterval 0
#ClientAliveCountMax 3
#UseDNS no
#PidFile /var/run/sshd.pid
#MaxStartups 10:30:100
#PermitTunnel no
#ChrootDirectory none
#VersionAddendum none

# no default banner path
#Banner none

# Allow client to pass locale environment variables
AcceptEnv LANG LC_*

# override default of no subsystems
Subsystem sftp  /usr/lib/openssh/sftp-server

# Example of overriding settings on a per-user basis
#Match User anoncvs
#       X11Forwarding no
#       AllowTcpForwarding no
#       PermitTTY no
#       ForceCommand cvs server
PasswordAuthentication no
PasswordAuthentication这个属性出现了两次
PasswordAuthentication第一次 出现在58行, 加了#号注释 ,不起作用
(vi在一般模式(esc模式)下输入冒号:set nu , 可显示行号)
 57 # To disable tunneled clear text passwords, change to no here!
 58 #PasswordAuthentication yes
 59 #PermitEmptyPasswords no
PasswordAuthentication第二次在末尾124行, 值被设为了 yes
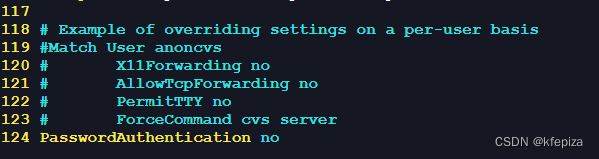
118 # Example of overriding settings on a per-user basis
119 #Match User anoncvs
120 #       X11Forwarding no
121 #       AllowTcpForwarding no
122 #       PermitTTY no
123 #       ForceCommand cvs server
124 PasswordAuthentication no
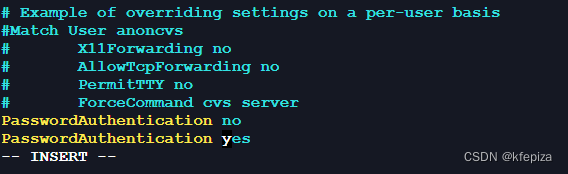
更改PasswordAuthentication为yes 或 取消 PasswordAuthentication 就能启用远程密码登录
可以给所以PasswordAuthentication加上#号,或者移出, 系统在没有指定PasswordAuthentication时是允许用密码远程 登录的
也可以把 PasswordAuthentication 的值改为 yes
或者在下方加上 PasswordAuthentication yes , 会覆盖上方的值
只要最后一个PasswordAuthentication的值是yes 就能远程密码登录
一步允许普通用户远程密码登录
echo -e "\n# 允许普通用户用密码远程登录\nPasswordAuthentication yes" | sudo tee -a /etc/ssh/sshd_config ; sudo systemctl restart sshd
给root , ubuntu设置密码
sudo passwd root
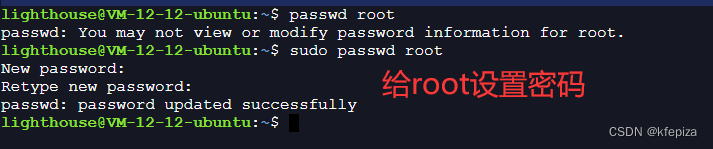
也可以用云官方提供的按钮给root设置密码, 但难免排版会变, 不好找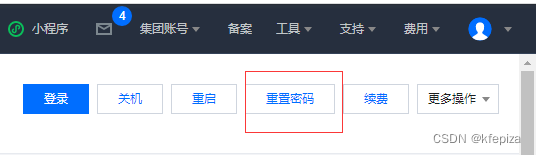
系统还带一个叫ubuntu的账户, 也给设置密码
sudo passwd ubuntu

用adduser创建一个用户 , Ubuntu环境下的useradd不大好用,/home/用户主目录,也要手动指定
题外: CentOS7的adduser是useradd的软链接(符号链接), 而且自动创建用户主目录
sudo adduser user
根据提示指定密码,全名,电话…
让 root 也可以远程登录 PermitRootLogin yes
设置PasswordAuthentication yes后, ubuntu 和新增的 user 都可以远程登录了, 但 root 还不能远程登录;
原因是系统默认不允许以root身份用密码远程登录
/etc/ssh/sshd_config , 在34行有这么一条 #PermitRootLogin prohibit-password
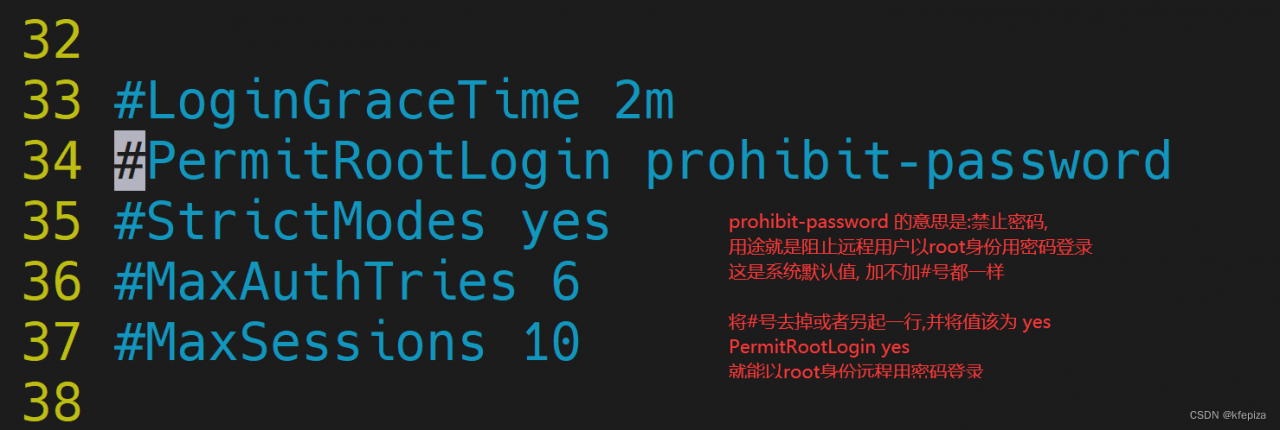
prohibit-password是禁止密码的意思, 用途就是阻止以root身份远程用密码登录
将#PermitRootLogin prohibit-password改为PermitRootLogin yes 或者另起一行
重启sshd
sudo systemctl restart sshd
一步设置 root 也可以远程登录
echo -e "\n#允许root用密码远程登录\nPermitRootLogin yes" | sudo tee -a /etc/ssh/sshd_config ; sudo systemctl restart sshd ;
一步设置普通用户和root都可以用密码远程登录
echo -e "\n# 允许普通用户用密码远程登录\nPasswordAuthentication yes\n# 允许root用密码远程登录\nPermitRootLogin yes" | sudo tee -a /etc/ssh/sshd_config ; sudo systemctl restart sshd
OpenSSH 登录语法
Win10自带OpenSSH客户端,可以在命令行或PowerShell控制台用ssh进行远程登录
基本登录
ssh root@域名或IP
或
ssh root@域名或IP -p 22(端口)
登录,并且长时间保持连接
#保持连接
#TCPKeepAlive=yes是TCP层的保持连接, ServerAliveInterval=300是每300秒发送心跳包,是OpenSSH自己的保持连接方式, 可以只用一个
ssh -o TCPKeepAlive=yes -o ServerAliveInterval=300 用户@域名或IP -p 端口
登录,不检查公钥,保持连接
# ssh登录
# StrictHostKeyChecking=no 是不严格检查公钥, 远程机重装后,公钥会变,
# TCPKeepAlive=yes是TCP层的保持连接,
# ServerAliveInterval=300是每300秒发送心跳包,是OpenSSH自己的保持连接方式, 可以只用一个
ssh -o StrictHostKeyChecking=no -o TCPKeepAlive=yes -o ServerAliveInterval=300 用户@域名或IP -p 端口
如果ssh登录遇到WARNING: REMOTE HOST IDENTIFICATION HAS CHANGED!
ssh登录重装系统的远程机, 报:
@@@@@@@@@@@@@@@@@@@@@@@@@@@@@@@@@@@@@@@@@@@@@@@@@@@@@@@@@@@
@    WARNING: REMOTE HOST IDENTIFICATION HAS CHANGED!     @
@@@@@@@@@@@@@@@@@@@@@@@@@@@@@@@@@@@@@@@@@@@@@@@@@@@@@@@@@@@
IT IS POSSIBLE THAT SOMEONE IS DOING SOMETHING NASTY!
Someone could be eavesdropping on you right now (man-in-the-middle attack)!
It is also possible that a host key has just been changed.
The fingerprint for the ECDSA key sent by the remote host is
SHA256:SfkkNfqNK0VZsvnX6PS+XKicWzxx9GoG/vWhbtCjiBI.
Please contact your system administrator.
Add correct host key in C:\\Users\\K/.ssh/known_hosts to get rid of this message.
Offending ECDSA key in C:\\Users\\K/.ssh/known_hosts:17
原因是远端的公钥改变, 比如远端重装了系统
解决办法1:
Windows下, 打开编辑 “C:\Users\用户目录\.ssh\known_hosts”
删除地址对应的一行

或者删除全部行,或干脆删除这个文件known_hosts
解决办法2:
命令行输入: ssh-keygen -R <远程机地址>
ssh-keygen -R 远程机地址