1、maven引用
        <dependency>
            <groupId>com.corundumstudio.socketio</groupId>
            <artifactId>netty-socketio</artifactId>
            <version>1.7.18</version>
        </dependency>
2、application.yml 添加配置
#socketio配置
socketio:
  host: localhost
  port: 9099
  # 设置最大每帧处理数据的长度,防止他人利用大数据来攻击服务器
  maxFramePayloadLength: 1048576
  # 设置http交互最大内容长度
  maxHttpContentLength: 1048576
  # socket连接数大小(如只监听一个端口boss线程组为1即可)
  bossCount: 1
  workCount: 100
  allowCustomRequests: true
  # 协议升级超时时间(毫秒),默认10秒。HTTP握手升级为ws协议超时时间
  upgradeTimeout: 1000000
  # Ping消息超时时间(毫秒),默认60秒,这个时间间隔内没有接收到心跳消息就会发送超时事件
  pingTimeout: 6000000
  # Ping消息间隔(毫秒),默认25秒。客户端向服务器发送一条心跳消息间隔
  pingInterval: 25000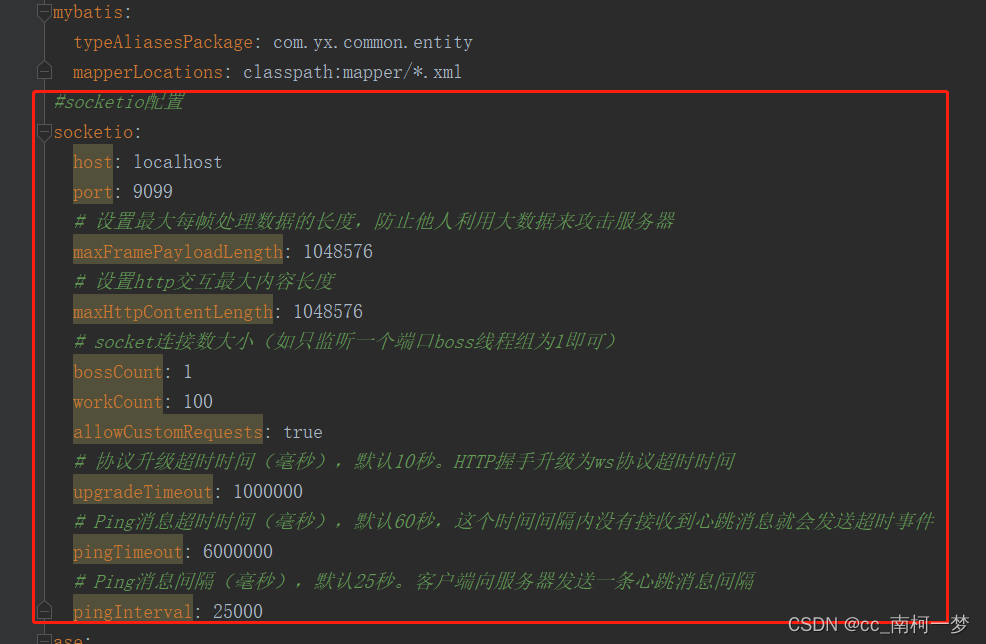
3、配置类:SocketIOConfig
package com.yx.oauth.nettySoketIo;
import com.corundumstudio.socketio.SocketConfig;
import com.corundumstudio.socketio.annotation.SpringAnnotationScanner;
import org.springframework.beans.factory.annotation.Value;
import org.springframework.context.annotation.Bean;
import org.springframework.context.annotation.Configuration;
import com.corundumstudio.socketio.SocketIOServer;

/**
 * @author cc
 * @data 2022年05月18日 15:50
 */
@Configuration
public class SocketIOConfig {
    @Value("${socketio.host}")
    private String host;

    @Value("${socketio.port}")
    private Integer port;

    @Value("${socketio.bossCount}")
    private int bossCount;

    @Value("${socketio.workCount}")
    private int workCount;

    @Value("${socketio.allowCustomRequests}")
    private boolean allowCustomRequests;

    @Value("${socketio.upgradeTimeout}")
    private int upgradeTimeout;

    @Value("${socketio.pingTimeout}")
    private int pingTimeout;

    @Value("${socketio.pingInterval}")
    private int pingInterval;

    /**
     * 以下配置在上面的application.properties中已经注明
     * @return
     */
    @Bean
    public SocketIOServer socketIOServer() {
        SocketConfig socketConfig = new SocketConfig();
        socketConfig.setTcpNoDelay(true);
        socketConfig.setSoLinger(0);
        com.corundumstudio.socketio.Configuration config = new com.corundumstudio.socketio.Configuration();
        config.setSocketConfig(socketConfig);
        config.setHostname(host);
        config.setPort(port);
        config.setBossThreads(bossCount);
        config.setWorkerThreads(workCount);
        config.setAllowCustomRequests(allowCustomRequests);
        config.setUpgradeTimeout(upgradeTimeout);
        config.setPingTimeout(pingTimeout);
        config.setPingInterval(pingInterval);
        SocketIOServer socketIOServer = new SocketIOServer(config);
        socketIOServer.start();
        return socketIOServer;
    }

    /**
     * 用于扫描netty-socketio的注解,比如 @OnConnect、@OnEvent
     */
    @Bean
    public SpringAnnotationScanner springAnnotationScanner() {
        return new SpringAnnotationScanner(socketIOServer());
    }
}
4、消息处理器:
package com.yx.oauth.nettySoketIo;

import com.corundumstudio.socketio.AckRequest;
import com.corundumstudio.socketio.SocketIOClient;
import com.corundumstudio.socketio.SocketIOServer;
import com.corundumstudio.socketio.annotation.OnConnect;
import com.corundumstudio.socketio.annotation.OnDisconnect;
import com.corundumstudio.socketio.annotation.OnEvent;
import lombok.extern.slf4j.Slf4j;
import org.springframework.beans.factory.annotation.Autowired;
import org.springframework.stereotype.Component;
import sun.plugin2.message.Message;

import java.util.concurrent.ConcurrentHashMap;
import java.util.concurrent.ConcurrentMap;

/**
 * @author cc
 * @data 2022年05月18日 17:14
 */
@Component
@Slf4j
public class MessageEventHandler {

    @Autowired
    private SocketIOServer socketIoServer;

    public static ConcurrentMap<String, SocketIOClient> socketIOClientMap = new ConcurrentHashMap<>();

    /**
     * 客户端连接的时候触发
     *
     * @param client
     */
    @OnConnect
    public void onConnect(SocketIOClient client) {
        String socketId = client.getHandshakeData().getSingleUrlParam("socketId");
        //存储SocketIOClient,用于发送消息
        socketIOClientMap.put(socketId, client);
        //回发消息
        client.sendEvent("message", "onConnect back");
        log.info("客户端:" + client.getSessionId() + "已连接,socketId=" + socketId);
    }

    /**
     * 客户端关闭连接时触发
     *
     * @param client
     */
    @OnDisconnect
    public void onDisconnect(SocketIOClient client) {
        String socketId = client.getHandshakeData().getSingleUrlParam("socketId");
        socketIOClientMap.remove(socketId);
        log.info("客户端:" + client.getSessionId() + "断开连接");
    }

    /**
     * 客户端事件
     *
     * @param client   客户端信息
     * @param request 请求信息
     * @param data     客户端发送数据
     */
    @OnEvent(value = "messageevent")
    public void onEvent(SocketIOClient client, AckRequest request, String data) {
        log.info("发来消息:" + data);
        //回发消息
        client.sendEvent("messageevent", "我是服务器都安发送的信息");
        //广播消息
        sendBroadcast();
    }

    public void sendUserEvent(String socketId, String msg){
        SocketIOClient client = socketIOClientMap.get(socketId);
        client.sendEvent("messageevent", msg);
    }

    /**
     * 广播消息
     */
    public void sendBroadcast() {
        for (SocketIOClient client : socketIOClientMap.values()) {
            if (client.isChannelOpen()) {
                client.sendEvent("Broadcast", "当前时间", System.currentTimeMillis());
            }
        }
    }

}
5、html页面
<!DOCTYPE html>
<html lang="en">
<head>
    <meta charset="UTF-8">
    <meta http-equiv="X-UA-Compatible" content="IE=edge">
    <meta name="viewport" content="width=device-width, initial-scale=1.0">
    <title>Document</title>
    <script src="https://cdn.bootcss.com/socket.io/2.2.0/socket.io.js"></script>
</head>
<body>
    <h1>Socket.io Test</h1>
    <div><p id="status">Waiting for input</p></div>
    <div><p id="message">hello world!</p></div>
    <button id="connect" onClick='connect()'/>Connect</button>
    <button id="disconnect" onClick='disconnect()'>Disconnect</button>
    <button id="send" onClick='send()'/>Send Message</button>
</body>
<script type="text/javascript">
/**
     * 前端js的 socket.emit("事件名","参数数据")方法,是触发后端自定义消息事件的时候使用的,
     * 前端js的 socket.on("事件名",匿名函数(服务器向客户端发送的数据))为监听服务器端的事件
     **/
     var socket = io.connect("http://localhost:9099?socketId=123456");
    var firstconnect = true;

    function connect() {
        if(firstconnect) {

            //socket.on('reconnect', function(){ status_update("Reconnected to Server"); });
            //socket.on('reconnecting', function( nextRetry ){ status_update("Reconnecting in "
            //+ nextRetry + " seconds"); });
            //socket.on('reconnect_failed', function(){ message("Reconnect Failed"); });
            //firstconnect = false;
        } else {
            socket.socket.reconnect();
        }
    }

    //监听服务器连接事件
    socket.on('connect', function(){ status_update("Connected to Server"); });
    //监听服务器关闭服务事件
    socket.on('disconnect', function(){ status_update("Disconnected from Server"); });
    //监听服务器端发送消息事件
    socket.on('messageevent', function(data) {
        message(data)
        //console.log("服务器发送的消息是:"+data);
    });

    //断开连接
    function disconnect() {
        socket.disconnect();
    }

    function message(data) {
        document.getElementById('message').innerHTML = "Server says: " + data;
    }

    function status_update(txt){
        document.getElementById('status').innerHTML = txt;
    }

    function esc(msg){
        return msg.replace(/</g, '<').replace(/>/g, '>');
    }
    //点击发送消息触发
    function send() {
        console.log("点击了发送消息,开始向服务器发送消息")
        var msg = "我很好的,是的.";
        socket.emit('messageevent', msg);
    };

</script>
</html>
6、发送测试
package com.yx.oauth.nettySoketIo;

import org.springframework.beans.factory.annotation.Autowired;
import org.springframework.web.bind.annotation.RequestMapping;
import org.springframework.web.bind.annotation.RestController;

/**
 * @author cc
 * @data 2022年05月18日 16:49
 */
@RestController
public class TestController {
    @Autowired
    private MessageEventHandler messageEventHandler;

    @RequestMapping("/testmsg")
    public void  testmsg(){
        messageEventHandler.sendUserEvent("123456","cctest");
    }
}
7、测试截图
调用testmsg给页面发送消息
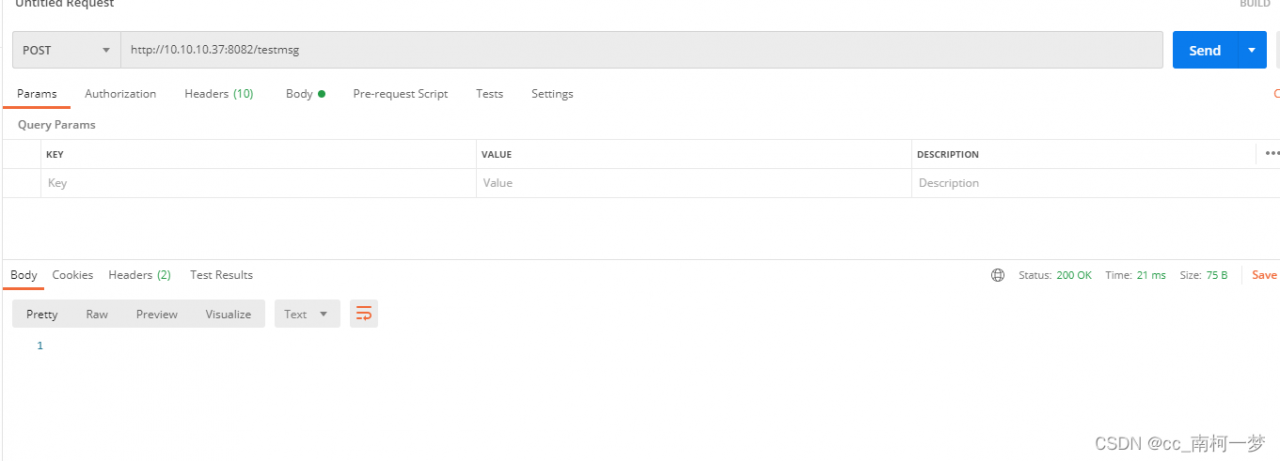
页面变化

页面点击 Send Message 按钮

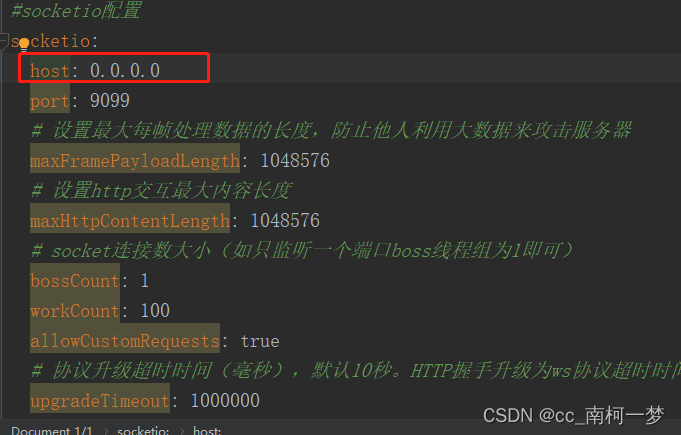
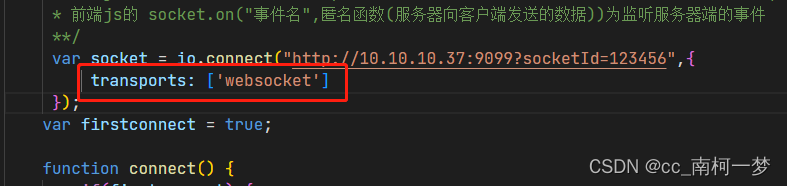
可能会发生的问题:
1、host 配置尽量修改为 0.0.0.0
2、页面设置为 transports: ['websocket']
版权声明:本文为qq_28326501原创文章,遵循CC 4.0 BY-SA版权协议,转载请附上原文出处链接和本声明。