本来是想把前端项目开发完了之后,再进行开发后端代码的,但是由于前端在中途就需要使用,所有我们来把后端也开发着走吧
- 下面有些是我改过的,他自己上面是有一定坑的
- 有什么不懂的,可以私信我解决,或者自己找百度和Google
mybatis官网
一. 创建项目
(一)创建我们的后端项目
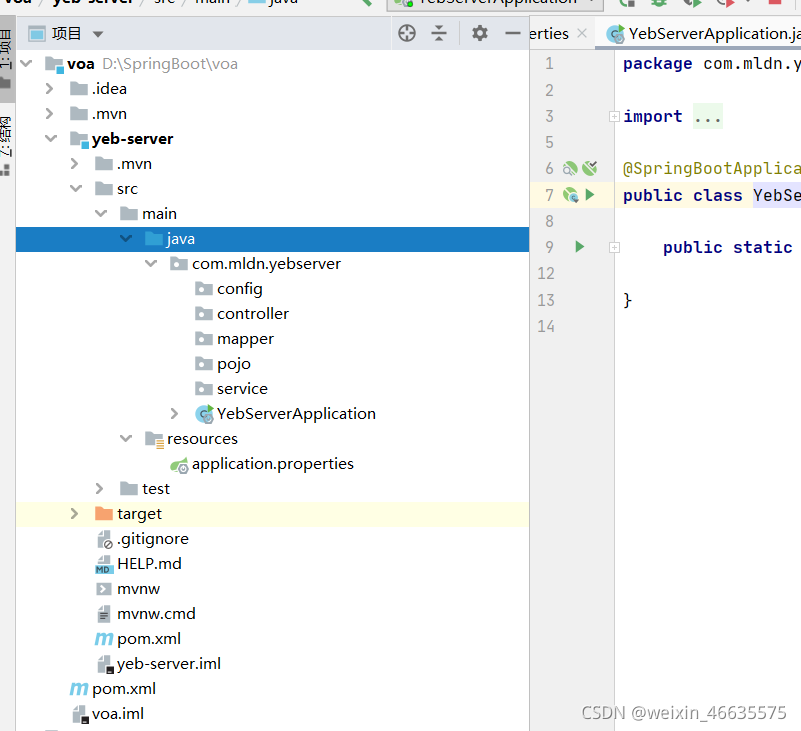
- 创建项目,使用idea里面new initalizr进行创建一个voa项目(先不用导入什么依赖)
- 再创建yeb-server模块
- 创建好啦之后就是先导入如下依赖
<?xml version="1.0" encoding="UTF-8"?>
<project xmlns="http://maven.apache.org/POM/4.0.0" xmlns:xsi="http://www.w3.org/2001/XMLSchema-instance"
         xsi:schemaLocation="http://maven.apache.org/POM/4.0.0 https://maven.apache.org/xsd/maven-4.0.0.xsd">
    <modelVersion>4.0.0</modelVersion>
    <parent>
        <artifactId>yeb</artifactId>
        <groupId>com.xxxx</groupId>
        <version>0.0.1-SNAPSHOT</version>
    </parent>
    <groupId>com.mldn</groupId>
    <artifactId>yeb-server</artifactId>
    <version>0.0.1-SNAPSHOT</version>
    <name>yeb-server</name>
    <properties>
        <java.version>1.8</java.version>
    </properties>
    <dependencies>
        <!--导入Web的依赖-->
        <dependency>
            <groupId>org.springframework.boot</groupId>
            <artifactId>spring-boot-starter-web</artifactId>
        </dependency>
        <!--lombok依赖-->
        <dependency>
            <groupId>org.projectlombok</groupId>
            <artifactId>lombok</artifactId>
            <optional>true</optional>
        </dependency>
        <!--mysql依赖-->
        <dependency>
            <groupId>mysql</groupId>
            <artifactId>mysql-connector-java</artifactId>
            <scope>runtime</scope>
        </dependency>
        <!--Mybatis plus依赖-->
        <dependency>
            <groupId>com.baomidou</groupId>
            <artifactId>mybatis-plus-boot-starter</artifactId>
            <version>3.4.3</version>
        </dependency>
        <!--swagger2的依赖导入-->
        <dependency>
            <groupId>io.springfox</groupId>
            <artifactId>springfox-swagger2</artifactId>
            <version>2.7.0</version>
        </dependency>
        <!--swagger第三方ui依赖-->
        <dependency>
            <groupId>com.github.xiaoymin</groupId>
            <artifactId>swagger-bootstrap-ui</artifactId>
            <version>1.9.6</version>
        </dependency>
        <!---->


        <!--下面两个是测试的-->
        <dependency>
            <groupId>org.springframework.boot</groupId>
            <artifactId>spring-boot-starter</artifactId>
        </dependency>

        <dependency>
            <groupId>org.springframework.boot</groupId>
            <artifactId>spring-boot-starter-test</artifactId>
            <scope>test</scope>
        </dependency>
    </dependencies>

    <build>
        <plugins>
            <plugin>
                <groupId>org.springframework.boot</groupId>
                <artifactId>spring-boot-maven-plugin</artifactId>
            </plugin>
        </plugins>
    </build>

</project>
- 然后编写application.properties文件
server.port=8081

##下面是配mysql的
spring.datasource.driver-class-name=com.mysql.cj.jdbc.Driver
spring.datasource.url=jdbc://localhost:3306/yeb?useUnicode=true&characterEncoding=UTF-8&&serverTimezone=Asia/shanghai
spring.rabbitmq.username=root
spring.rabbitmq.password=111
#下面是配置从连接池返回的连接的自动提交
spring.datasource.hikari.auto-commit=true
#下面是配置连接池名字
spring.datasource.hikari.pool-name=DateHikariCP
#下面是配置最小空闲连接池
spring.datasource.hikari.minimum-idle=5
#最大连接数,默认10
spring.datasource.hikari.maximum-pool-size=10
#空闲连接存活最大时间,默认为60000(6分钟)
spring.datasource.hikari.idle-timeout=1800000
#连接最大存活时间,0表示永久存活,默认为1800000
spring.datasource.hikari.max-lifetime=1800000
#连接超时时间,默认为30000(三十秒)
spring.datasource.hikari.connection-timeout=30000
#测试连接时候可用查询
spring.datasource.hikari.connection-test-query=SELECT 1

##下面配置Mybatis的内容

#mapper映射文件
mybatis-plus.mapper-locations=classpath*:/mapper/*Mapper.xml
#配置mybatis数据返回类型别名(默认别名是类名)
mybatis-plus.type-aliases-package=com.mldn.yebserver.pojo
#自动驼峰命名
mybatis-plus.configuration.map-underscore-to-camel-case=false
#Mybatis SQL打印(方法接口所在的包,不是mapper.xml所有在的包)
logging.level.com.mldn.yebserver.mapper: debug
- 编写启动类(大部分用上面种创建方式是已经创建好啦的启动类)
- 完成目录
(二). 创建AutoGenerator项目
- AutoGenerator是什么
AutoGenerator 是 MyBatis-Plus 的代码生成器,通过 AutoGenerator 可以快速生成 Pojo、Mapper、
Mapper XML、Service、Controller 等各个模块的代码。 - AutoGenerator能干什么
对于单表而言,几乎是一个全能的工具,极大的提升了开发效率。更多的关注业务逻辑的实现。 - 怎么使用呢?
创建建AutoGenerator项目:这个项目时从maven里面创建原始类型,勾选那个archer-quickstart
AutoGenerator本身和我们项目没有关联,所以可以单独新建为一个Project,这边也做成Maven聚
合项目里的一个子项目 - 导入依赖
<?xml version="1.0" encoding="UTF-8"?>

<project xmlns="http://maven.apache.org/POM/4.0.0" xmlns:xsi="http://www.w3.org/2001/XMLSchema-instance"
         xsi:schemaLocation="http://maven.apache.org/POM/4.0.0
         http://maven.apache.org/xsd/maven-4.0.0.xsd">
    <parent>
        <artifactId>voa</artifactId>
        <groupId>com.mldn</groupId>
        <version>0.0.1-SNAPSHOT</version>
    </parent>
    <modelVersion>4.0.0</modelVersion>

    <artifactId>voa-generator</artifactId>

    <name>voa-generator</name>
    <!-- FIXME change it to the project's website -->
    <url>http://www.example.com</url>

    <properties>
        <project.build.sourceEncoding>UTF-8</project.build.sourceEncoding>
        <maven.compiler.source>1.7</maven.compiler.source>
        <maven.compiler.target>1.7</maven.compiler.target>
    </properties>


    <dependencies>
        <!--web 依赖-->
        <dependency>
            <groupId>org.springframework.boot</groupId>
            <artifactId>spring-boot-starter-web</artifactId>
        </dependency>
        <!--mybatis-plus 依赖-->
        <dependency>
            <groupId>com.baomidou</groupId>
            <artifactId>mybatis-plus-boot-starter</artifactId>
            <version>3.3.1.tmp</version>
        </dependency>
        <!--mybatis-plus 代码生成器依赖-->
        <dependency>
            <groupId>com.baomidou</groupId>
            <artifactId>mybatis-plus-generator</artifactId>
            <version>3.3.1.tmp</version>
        </dependency>
        <!--freemarker 依赖-->
        <dependency>
            <groupId>org.freemarker</groupId>
            <artifactId>freemarker</artifactId>
        </dependency>
        <!--mysql 依赖-->
        <dependency>
            <groupId>mysql</groupId>
            <artifactId>mysql-connector-java</artifactId>
            <scope>runtime</scope>
        </dependency>

        <dependency>
            <groupId>junit</groupId>
            <artifactId>junit</artifactId>
            <version>4.11</version>
            <scope>test</scope>
        </dependency>
    </dependencies>


    <build>
        <pluginManagement><!-- lock down plugins versions to avoid using Maven defaults (may be moved to parent pom) -->
            <plugins>
                <!-- clean lifecycle, see https://maven.apache.org/ref/current/maven-core/lifecycles.html#clean_Lifecycle -->
                <plugin>
                    <artifactId>maven-clean-plugin</artifactId>
                    <version>3.1.0</version>
                </plugin>
                <!-- default lifecycle, jar packaging: see https://maven.apache.org/ref/current/maven-core/default-bindings.html#Plugin_bindings_for_jar_packaging -->
                <plugin>
                    <artifactId>maven-resources-plugin</artifactId>
                    <version>3.0.2</version>
                </plugin>
                <plugin>
                    <artifactId>maven-compiler-plugin</artifactId>
                    <version>3.8.0</version>
                </plugin>
                <plugin>
                    <artifactId>maven-surefire-plugin</artifactId>
                    <version>2.22.1</version>
                </plugin>
                <plugin>
                    <artifactId>maven-jar-plugin</artifactId>
                    <version>3.0.2</version>
                </plugin>
                <plugin>
                    <artifactId>maven-install-plugin</artifactId>
                    <version>2.5.2</version>
                </plugin>
                <plugin>
                    <artifactId>maven-deploy-plugin</artifactId>
                    <version>2.8.2</version>
                </plugin>
                <!-- site lifecycle, see https://maven.apache.org/ref/current/maven-core/lifecycles.html#site_Lifecycle -->
                <plugin>
                    <artifactId>maven-site-plugin</artifactId>
                    <version>3.7.1</version>
                </plugin>
                <plugin>
                    <artifactId>maven-project-info-reports-plugin</artifactId>
                    <version>3.0.0</version>
                </plugin>
            </plugins>
        </pluginManagement>
    </build>
</project>
- 编写CodeGenerator工具类来使用
package com.mldn.generator;


import com.baomidou.mybatisplus.core.exceptions.MybatisPlusException;
import com.baomidou.mybatisplus.core.toolkit.StringPool;
import com.baomidou.mybatisplus.core.toolkit.StringUtils;
import com.baomidou.mybatisplus.generator.AutoGenerator;
import com.baomidou.mybatisplus.generator.InjectionConfig;
import com.baomidou.mybatisplus.generator.config.DataSourceConfig;
import com.baomidou.mybatisplus.generator.config.FileOutConfig;
import com.baomidou.mybatisplus.generator.config.GlobalConfig;
import com.baomidou.mybatisplus.generator.config.PackageConfig;
import com.baomidou.mybatisplus.generator.config.StrategyConfig;
import com.baomidou.mybatisplus.generator.config.TemplateConfig;
import com.baomidou.mybatisplus.generator.config.po.TableInfo;
import com.baomidou.mybatisplus.generator.config.rules.NamingStrategy;
import com.baomidou.mybatisplus.generator.engine.FreemarkerTemplateEngine;
import java.util.ArrayList;
import java.util.List;
import java.util.Scanner;
/**
 * 执行 main 方法控制台输入模块表名回车自动生成对应项目目录中
 *
 * @author zhoubin
 * @since 1.0.0
 */
public class CodeGenerator {
  public static String scanner(String tip) {
      Scanner scanner = new Scanner(System.in);
      StringBuilder help = new StringBuilder();
      help.append("请输入" + tip + ":");
      System.out.println(help.toString());
      if (scanner.hasNext()) {
          String ipt = scanner.next();
          if (StringUtils.isNotEmpty(ipt)) {
              return ipt;
          }
      }
      throw  new MybatisPlusException("请输入正确的" + tip + "!");
 }

 public static void main(String[] args) {
  // 代码生成器
  AutoGenerator mpg = new AutoGenerator();
  // 全局配置
  GlobalConfig gc = new GlobalConfig();
  final String projectPath = System.getProperty("user.dir");
  gc.setOutputDir(projectPath + "/yeb-generator/src/main/java");
  //作者
  gc.setAuthor("zhoubin");
  //打开输出目录
  gc.setOpen(false);
  //xml开启 BaseResultMap
  gc.setBaseResultMap(true);
  //xml 开启BaseColumnList
  gc.setBaseColumnList(true);
  // 实体属性 Swagger2 注解
  gc.setSwagger2(true);
  mpg.setGlobalConfig(gc);
  // 数据源配置
  DataSourceConfig dsc = new DataSourceConfig();
  dsc.setUrl("jdbc:mysql://localhost:3306/yeb? useUnicode=true&characterEncoding=UTF-8&serverTimezone=Asia" +
          "/Shanghai");
  dsc.setDriverName("com.mysql.cj.jdbc.Driver");
  dsc.setUsername("root");
  dsc.setPassword("111");
  mpg.setDataSource(dsc);
  // 包配置
  PackageConfig pc = new PackageConfig();
  pc.setParent("com.xxxx")
          .setEntity("pojo")
          .setMapper("mapper")
          .setService("service")
          .setServiceImpl("service.impl")
          .setController("controller");
  mpg.setPackageInfo(pc);
  // 自定义配置
  InjectionConfig cfg = new InjectionConfig() {
   @Override
   public void initMap() {
    // to do nothing
   }
  };
  // 如果模板引擎是 freemarker
  String templatePath = "/templates/mapper.xml.ftl";
  // 如果模板引擎是 velocity
  // String templatePath = "/templates/mapper.xml.vm";
  // 自定义输出配置
  List<FileOutConfig> focList = new ArrayList<>();
  // 自定义配置会被优先输出
  focList.add(new FileOutConfig(templatePath) {
   @Override
   public String outputFile(TableInfo tableInfo) {
    // 自定义输出文件名 , 如果你 Entity 设置了前后缀、此处注意 xml 的名称会跟着发生变化!!
    //return projectPath + "/yeb-generator/src/main/resources/mapper/" + tableInfo.getEntityName() + "Mapper" + StringPool.DOT_XML;
    return projectPath +  "/yeb-generator/src/main/resources/mapper/" + tableInfo.getEntityName() + "Mapper" + StringPool.DOT_XML;
   }
  });
  cfg.setFileOutConfigList(focList);
  mpg.setCfg(cfg);
  // 配置模板
  TemplateConfig templateConfig = new TemplateConfig();
//执行 执行main方法,在控制台直接输出表名,多个表名用 , 隔开 结果
  templateConfig.setXml(null);
  mpg.setTemplate(templateConfig);
  // 策略配置
  StrategyConfig strategy = new StrategyConfig();
  //数据库表映射到实体的命名策略
  strategy.setNaming(NamingStrategy.underline_to_camel);
  //数据库表字段映射到实体的命名策略
  strategy.setColumnNaming(NamingStrategy.no_change);
  //lombok模型
  strategy.setEntityLombokModel(true);
  //生成 @RestController 控制器
  strategy.setRestControllerStyle(true);
  strategy.setInclude(scanner("表名,多个英文逗号分割").split(","));
  strategy.setControllerMappingHyphenStyle(true);
  //表前缀
  strategy.setTablePrefix("t_");
  mpg.setStrategy(strategy);
  mpg.setTemplateEngine(new FreemarkerTemplateEngine());
  mpg.execute();
 }
}
- 测试
运行我们编写的那个类中的main方法,然后在下面输入我们的表就可以了,下面的表的话(就是数据库里面对应的表)然后会自动生成对应的mapper文件呀
二. 正式开始开发模块
(一)登录模块
- 我们这边使用 Spring Security 框架实现登录功能,关于 Spring Security 知识点请参考之前文档
1. 添加需要的依赖
<!--security 依赖-->
<dependency>
   <groupId>org.springframework.boot</groupId>
   <artifactId>spring-boot-starter-security</artifactId>
</dependency>
<!--JWT 依赖-->
<dependency>
   <groupId>io.jsonwebtoken</groupId>
   <artifactId>jjwt</artifactId>
   <version>0.9.0</version>
</dependency>
2. 编写我们的application.yaml文件
jwt:
  tokenHeader: Authorization
  secret: yeb-secret
  expiration: 604800
  tokenHead: Bearer
3. 编写我们的JwtTokenUtil.java类
package com.mldn.yebserver.config.utils;


import io.jsonwebtoken.Claims;
import io.jsonwebtoken.Jwts;
import io.jsonwebtoken.SignatureAlgorithm;
import org.springframework.beans.factory.annotation.Value;
import org.springframework.security.core.userdetails.UserDetails;
import org.springframework.stereotype.Component;
import java.util.Date;
import java.util.HashMap;
import java.util.Map;
/**
 * Jwt Token工具类
 *
 * @author zhoubin
 * @since 1.0.0
 */
@Component
public class JwtTokenUtil {
	//下面是常量
	//荷载里面的用户名
    private static final String CLAIM_KEY_USERNAME = "sub";
    //荷载里面的创建时间
    private static final String CLAIM_KEY_CREATED = "created";
    //秘钥通过value注解去拿
    @Value("${jwt.secret}")
    private String secret;
    //失效时间
    @Value("${jwt.expiration}")
    private Long expiration;
    /**
     * 根据负载生成JWT Token
     *
     * @param claims
     * @return
     */
    private String generateToken(Map<String, Object> claims) {
        return Jwts.builder()
        		//设置生成,并且设置荷载
                .setClaims(claims)
                .setExpiration(generateExpirationDate())
                //失效时间
                .signWith(SignatureAlgorithm.ES512, secret)
                //签名
                .compact();
    }
    /**
     * 从token中获取JWT中的负载
     *
     * @param token
     * @return
     */
    private Claims getClaimsFromToken(String token) {
        Claims claims = null;
        try {
            claims = Jwts.parser()
                    .setSigningKey(secret)
                    .parseClaimsJws(token)
                    .getBody();
        } catch (Exception e) {
            e.printStackTrace();
        }
        return claims;
    }
    /**
     * 生成token过期时间
     *
     * @return
     */
    private Date generateExpirationDate() {
        return new Date(System.currentTimeMillis() + expiration * 1000);
    }
    /**
     * 从token中获取过期时间
     *
     * @param token
     * @return
     */
    private Date getExpiredDateFromToken(String token) {
        Claims claims = getClaimsFromToken(token);
        return claims.getExpiration();
    }
    /**
     * 判断token是否失效
     *
     * @param token
     * @return
     */
    private boolean isTokenExpired(String token) {
        Date expiredDate = getExpiredDateFromToken(token);
        return expiredDate.before(new Date());
    }
    /**
     * 从token中获取登录用户名
     *
     * @param token
     * @return
     */
    public String getUserNameFormToken(String token) {
        String username;
        try {
        	//放在荷载里面的,所有要先获取荷载
            Claims claims = getClaimsFromToken(token);
            username = claims.getSubject();
        } catch (Exception e) {
            username = null;
        }
        return username;
    }
    /**
     * 验证token是否有效
     *
     * @param token
     * @param userDetails
     * @return
     */
    public boolean validateToken(String token, UserDetails userDetails) {
        String username = getUserNameFormToken(token);
        return username.equals(userDetails.getUsername()) &&
                !isTokenExpired(token);
    }
    /**
     * 根据用户信息生成token
     * @param userDetails
     * @return
     */
    public String generateToken(UserDetails userDetails){
    	//这个就是我们的荷载
        Map<String,Object> claims = new HashMap<>();
        claims.put(CLAIM_KEY_USERNAME,userDetails.getUsername());
        claims.put(CLAIM_KEY_CREATED,new Date());
        return generateToken(claims);
    }
    // Admin实现UserDetails类
    /**
     * 判断token是否可以被刷新
     * @param token
     * @return
     */
    public boolean canRefresh(String token){
        return !isTokenExpired(token);
    }
    /**
     * 刷新token
     * @param token
     * @return
     */
    public String refreshToken(String token){
        Claims claims = getClaimsFromToken(token);
        claims.put(CLAIM_KEY_CREATED,new Date());
        return generateToken(claims);
    }
}
4. 编写我们的admin类(通常这样叫,或者可以叫为Hr类)
这个类还是很好编写的,代码如下
package com.mldn.yebserver.pojo;

import com.baomidou.mybatisplus.annotation.IdType;
import com.baomidou.mybatisplus.annotation.TableId;
import com.baomidou.mybatisplus.annotation.TableName;
import io.swagger.annotations.ApiModel;
import io.swagger.annotations.ApiModelProperty;
import lombok.Data;
import lombok.EqualsAndHashCode;
import lombok.experimental.Accessors;
import org.springframework.security.core.GrantedAuthority;
import org.springframework.security.core.userdetails.UserDetails;

import java.io.Serializable;
import java.util.Collection;


@Data
//下面这个标签是此注解会生成equals(Object other) 和 hashCode()方法。具体的可以自己查询一些
@EqualsAndHashCode(callSuper = false)
//这个注解是来自与Lombok里的,具体的作用是开启链式编程,让我们写代码更加方便
@Accessors(chain = true)
 该注解主要是现实实体类型和数据库中的表实现映射
@TableName("t_admin")
@ApiModel(value = "admin对象", description = "")

public class Admin implements Serializable , UserDetails{

    //下面这句话主要是为了在这个swagger里面有
    @ApiModelProperty(value = "id")
    //下面这句话就是设置为与表的关系,设置为id,具体可以去自己找一下
    @TableId(value = "id",type = IdType.AUTO)
    private Integer id;

    @ApiModelProperty(value = "姓名")
    private String name;

    @ApiModelProperty(value = "手机号")
    private String phone;

    @ApiModelProperty(value = "住宅电话")
    private String telephone;

    @ApiModelProperty(value = "练习地址")
    private String address;

    @ApiModelProperty(value = "是否可用")
    private Boolean enabled;

    @ApiModelProperty(value = "用户名")
    private String username;

    @ApiModelProperty(value = "密码")
    private String password;

    @ApiModelProperty(value = "用户头像")
    private String userFace;

    @ApiModelProperty(value = "备注")
    private String remark;

    @Override
    public Collection<? extends GrantedAuthority> getAuthorities() {
        return null;
    }

    @Override
    public boolean isAccountNonExpired() {
        return true;
    }
    @Override
    public boolean isAccountNonLocked() {
        return true;
    }
    @Override
    public boolean isCredentialsNonExpired() {
        return true;
    }
    @Override
    public boolean isEnabled() {
        return enabled;
    }

}
5. 编写我们返回给前端进行数据承载的类
----5.1,第一个类
package com.mldn.yebserver.Bean;


/*
* 通用返回结果对象
*
* */

import lombok.AllArgsConstructor;
import lombok.Data;
import lombok.NoArgsConstructor;

@Data
@NoArgsConstructor
@AllArgsConstructor
public class RespBean {

    //看着是long,不是Long
    private long code;

    private String message;

    private Object obj;

    /**
     * 成功返回结果
     * @param message
     * @return
     */
    public static RespBean success(String message) {
        return new RespBean(200,message,null);
    }

    /**
     * 成功返回结果
     */
    public static RespBean success(String message, Object obj) {
        return new RespBean(200,message,obj);
    }


    /**
     * 失败返回结果
     * @param message
     * @param obj
     * @return
     */
    public static RespBean error(String message,Object obj) {
        return new RespBean(500,message,obj);
    }

    /**
     * 失败返回结果
     * @param message
     * @return
     */
    public static RespBean error(String message) {
        return new RespBean(500, message, null);
    }
}
----5.2, 第二个
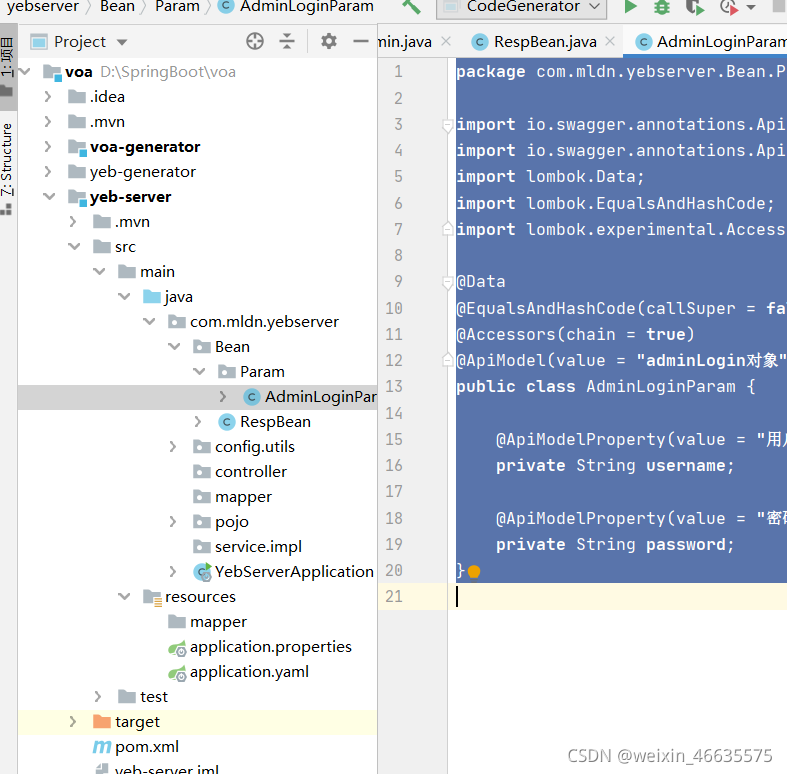
package com.mldn.yebserver.Bean.Param;

import io.swagger.annotations.ApiModel;
import io.swagger.annotations.ApiModelProperty;
import lombok.Data;
import lombok.EqualsAndHashCode;
import lombok.experimental.Accessors;

@Data
@EqualsAndHashCode(callSuper = false)
@Accessors(chain = true)
@ApiModel(value = "adminLogin对象",description = "")
public class AdminLoginParam {

    @ApiModelProperty(value = "用户名", required = true)
    private String username;

    @ApiModelProperty(value = "密码", required = true)
    private String password;
}
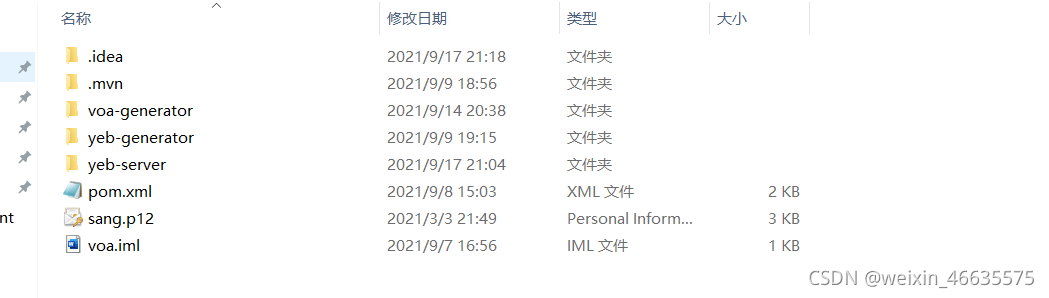
到这里我们来看一下我们的目录结构
|
6. Login的三层处理
----6.1 IAdminService和IAdminServiceImpl
import org.springframework.stereotype.Service;

import javax.servlet.http.HttpServletRequest;

/**
 * <p>
 *     服务类
 * </p>
 */

public interface IAdminService {

    /**
     * 登录返回Token
     * @param username
     * @param password
     * @return
     */
    RespBean login(String username, String password, HttpServletRequest request);


    /**
     * 根据用户名获取用户
     * @param username
     * @return
     */
    Admin getAdminByUserName(String username);

}
package com.mldn.yebserver.service.impl;

import com.baomidou.mybatisplus.core.conditions.query.QueryWrapper;
import com.baomidou.mybatisplus.extension.service.impl.ServiceImpl;
import com.mldn.yebserver.Bean.RespBean;
import com.mldn.yebserver.config.utils.JwtTokenUtil;
import com.mldn.yebserver.mapper.AdminMapper;
import com.mldn.yebserver.pojo.Admin;
import com.mldn.yebserver.service.IAdminService;
import org.springframework.beans.factory.annotation.Autowired;
import org.springframework.beans.factory.annotation.Value;
import org.springframework.security.authentication.UsernamePasswordAuthenticationToken;
import org.springframework.security.core.context.SecurityContextHolder;
import org.springframework.security.core.userdetails.UserDetails;
import org.springframework.security.core.userdetails.UserDetailsService;
import org.springframework.security.crypto.password.PasswordEncoder;

import javax.servlet.http.HttpServletRequest;
import java.util.Collection;
import java.util.HashMap;
import java.util.Map;

@Service
public class IAdminServiceImpl extends ServiceImpl<AdminMapper, Admin> implements IAdminService {

    @Autowired
    private AdminMapper adminMapper;

    @Autowired
    private UserDetailsService userDetailsService;

    @Autowired
    private PasswordEncoder passwordEncoder;

    @Autowired
    private JwtTokenUtil jwtTokenUtil;

    @Value("${jwt.tokenHead}")
    private String tokenHead;

    /**
     * 登录返回Token
     * @param username
     * @param password
     * @return
     */
    public RespBean login(String username, String password, HttpServletRequest request) {
        UserDetails userDetails = userDetailsService.loadUserByUsername(username);
        if (null == userDetails || !passwordEncoder.matches(password,userDetails.getPassword())) {
            return RespBean.error("用户名或密码不正确");
        }
        if (!userDetails.isEnabled()) {
            return RespBean.error("账号被禁用,请联系管理员");
        }
        //下面是更新security登录用户对象
        UsernamePasswordAuthenticationToken authenticationToken = new UsernamePasswordAuthenticationToken(userDetails, null, userDetails.getAuthorities());
        SecurityContextHolder.getContext().setAuthentication(authenticationToken);
        String token = jwtTokenUtil.generateToken(userDetails);
        Map<String, String> tokenMap = new HashMap<>();
        tokenMap.put("token",token);
        tokenMap.put("tokenHead",tokenHead);
        return RespBean.success("登录成功,", tokenMap);
    }


    /**
     * 根据用户名获取用户
     * @param username
     * @return
     */
    public Admin getAdminByUserName(String username) {
        //以下代码如果你看不懂,那么我建议去学习一下Mybatis - plus,我当时也是看不懂的,学习了才懂了
        return adminMapper.selectOne(new QueryWrapper<Admin>().eq("username",username));
    }

}
----6.2 编写Mapper层
package com.mldn.yebserver.mapper;

import com.baomidou.mybatisplus.core.mapper.BaseMapper;
import com.mldn.yebserver.pojo.Admin;

public interface AdminMapper extends BaseMapper<Admin> {
}
----6.4 编写我们的Controller
package com.mldn.yebserver.controller;


import com.mldn.yebserver.Bean.Param.AdminLoginParam;
import com.mldn.yebserver.Bean.RespBean;
import com.mldn.yebserver.pojo.Admin;
import com.mldn.yebserver.service.IAdminService;
import io.swagger.annotations.Api;
import io.swagger.annotations.ApiOperation;
import org.springframework.beans.factory.annotation.Autowired;
import org.springframework.web.bind.annotation.GetMapping;
import org.springframework.web.bind.annotation.PostMapping;
import org.springframework.web.bind.annotation.RequestBody;
import org.springframework.web.bind.annotation.RestController;

import javax.servlet.http.HttpServletRequest;
import java.security.Principal;


/**
 * 登录控制器
 */
@RestController
//下面这个AIP注解是生成的api文档会根据tags分类,直白的说就是这个controller中的所有接口生成的接口文档都会在tags这个list下;tags如果有多个值,会生成多个list,每个list都显示所有接口
@Api(tags = "LoginController")
public class LoginController {

    @Autowired
    private IAdminService adminService;

    @ApiOperation(value = "登录之后返回token")
    @PostMapping("/login")
    public RespBean login(@RequestBody AdminLoginParam adminLoginParam, HttpServletRequest request) {
        return adminService.login(adminLoginParam.getUsername(), adminLoginParam.getPassword(), request);
    }

    @ApiOperation(value = "获取用户当前信息")
    @GetMapping("/admin/info")
    public Admin getAdminInfo(Principal pricipal) {
        if (null == pricipal) {
            return null;
        }
        String username = pricipal.getName();
        Admin admin = adminService.getAdminByUserName(username);
        admin.setPassword(null);
        return admin;
    }

    @ApiOperation("退出登录")
    @PostMapping("/loginout")
    public RespBean logout() {
        return RespBean.success("注销成功");
    }
}
7. 编写securityConfig的代码
-----7.1添加自定义未授权及未登录的结果返回
package com.mldn.yebserver.config.security;

import com.fasterxml.jackson.databind.ObjectMapper;
import com.mldn.yebserver.Bean.RespBean;
import org.springframework.security.core.AuthenticationException;
import org.springframework.security.web.AuthenticationEntryPoint;
import org.springframework.stereotype.Component;

import javax.servlet.ServletException;
import javax.servlet.http.HttpServletRequest;
import javax.servlet.http.HttpServletResponse;
import java.io.IOException;
import java.io.PrintWriter;

/**
 * 当未登录或者token失效时访问接口时,自定义的返回结果
 *
 * @author zhoubin
 * @since 1.0.0
 */
@Component
public class RestAuthenticationEntryPoint implements AuthenticationEntryPoint {
   @Override
   public void commence(HttpServletRequest request, HttpServletResponse response, AuthenticationException authException) throws IOException, ServletException {
      response.setCharacterEncoding("UTF-8");
      response.setContentType("application/json");
      PrintWriter out = response.getWriter();
      RespBean bean = RespBean.error("权限不足,请联系管理员!");
      bean.setCode(401);
      out.write(new ObjectMapper().writeValueAsString(bean));
      out.flush();
      out.close();
   }
}
package com.mldn.yebserver.config.security;

import com.fasterxml.jackson.databind.ObjectMapper;
import com.mldn.yebserver.Bean.RespBean;
import org.springframework.security.access.AccessDeniedException;
import org.springframework.security.web.access.AccessDeniedHandler;
import org.springframework.stereotype.Component;

import javax.servlet.ServletException;
import javax.servlet.http.HttpServletRequest;
import javax.servlet.http.HttpServletResponse;
import java.io.IOException;
import java.io.PrintWriter;

/**
 * 当访问接口没有权限时,自定义返回结果类
 *
 * @author zhoubin
 * @since 1.0.0
 */
@Component
public class RestfulAccessDeniedHandler implements AccessDeniedHandler {
   @Override
   public void handle(HttpServletRequest request, HttpServletResponse response, AccessDeniedException e) throws IOException, ServletException {
        response.setCharacterEncoding("UTF-8");
        response.setContentType("application/json");
        PrintWriter out = response.getWriter();
        RespBean bean = RespBean.error("权限不足,请联系管理员!");
        bean.setCode(403);
        out.write(new ObjectMapper().writeValueAsString(bean));
        out.flush();
        out.close();
   }
}
----7.2添加JWT登录授权过滤器
package com.mldn.yebserver.config.utils;

import org.springframework.beans.factory.annotation.Autowired;
import org.springframework.beans.factory.annotation.Value;
import org.springframework.security.authentication.UsernamePasswordAuthenticationToken;
import org.springframework.security.core.context.SecurityContextHolder;
import org.springframework.security.core.userdetails.UserDetails;
import org.springframework.security.core.userdetails.UserDetailsService;
import org.springframework.security.web.authentication.WebAuthenticationDetailsSource;
import org.springframework.web.filter.OncePerRequestFilter;

import javax.servlet.FilterChain;
import javax.servlet.ServletException;
import javax.servlet.http.HttpServletRequest;
import javax.servlet.http.HttpServletResponse;
import java.io.IOException;


public class JwtAuthenticationTokenFilter extends OncePerRequestFilter {    @Autowired
    private UserDetailsService userDetailsService;
    @Autowired
    private JwtTokenUtil jwtTokenUtil;
    @Value("${jwt.tokenHeader}")
    private String tokenHeader;
    @Value("${jwt.tokenHead}")
    private String tokenHead;
    @Override
    protected void doFilterInternal(HttpServletRequest request,
                                    HttpServletResponse response, FilterChain chain) throws ServletException, IOException {
        String authHeader = request.getHeader(this.tokenHeader);
        //存在token
        if (null != authHeader && authHeader.startsWith(this.tokenHead)) {  String authToken = authHeader.substring(this.tokenHead.length());
        String username = jwtTokenUtil.getUserNameFormToken(authToken);
        //token中存在用户名但未登录
            if (null!=username&&null== SecurityContextHolder.getContext().getAuthentication()){
                //登录
                UserDetails userDetails =   this.userDetailsService.loadUserByUsername(username);
                //验证token是否有效,重新设置用户对象
                if (jwtTokenUtil.validateToken(authToken,userDetails)){
                    UsernamePasswordAuthenticationToken authentication =    new UsernamePasswordAuthenticationToken(userDetails, null, userDetails.getAuthorities());
                    authentication.setDetails(new WebAuthenticationDetailsSource().buildDetails(request));
                    SecurityContextHolder.getContext().setAuthentication(authentication);
                }
            }
        }
        chain.doFilter(request,response);
    }
}
----7.3 再来编写我们的SecurityConfig代码
package com.mldn.yebserver.config.security;

import com.mldn.yebserver.config.utils.JwtAuthenticationTokenFilter;
import com.mldn.yebserver.pojo.Admin;
import com.mldn.yebserver.service.IAdminService;
import org.springframework.security.config.annotation.authentication.builders.AuthenticationManagerBuilder;
import org.springframework.beans.factory.annotation.Autowired;
import org.springframework.context.annotation.Bean;
import org.springframework.context.annotation.Configuration;
import org.springframework.security.config.annotation.web.builders.HttpSecurity;
import org.springframework.security.config.annotation.web.configuration.WebSecurityConfigurerAdapter;
import org.springframework.security.config.http.SessionCreationPolicy;
import org.springframework.security.core.userdetails.UserDetailsService;
import org.springframework.security.crypto.bcrypt.BCryptPasswordEncoder;
import org.springframework.security.crypto.password.PasswordEncoder;
import org.springframework.security.web.authentication.UsernamePasswordAuthenticationFilter;


/**
 * Security 配置类
 *
 */
@Configuration
public class SecurityConfig extends WebSecurityConfigurerAdapter {
    @Autowired
    IAdminService adminService;

    //没有授权或者token失效时访问接口时,自定义的返回结果
    @Autowired
    RestAuthenticationEntryPoint restAuthenticationEntryPoint;

    //当访问接口没有权限时,自定义返回结果类
    @Autowired
    RestfulAccessDeniedHandler restfulAccessDeniedHandler;

    @Autowired
    JwtAuthenticationTokenFilter jwtAuthenticationTokenFilter;

    protected void configure(AuthenticationManagerBuilder auth) throws Exception {
        auth.userDetailsService(userDetailsService()).passwordEncoder(passwordEncoder());
    }

    @Override
    protected void configure(HttpSecurity http) throws Exception {
        http.csrf()
                .disable()
                //基于token,不需要session
                .sessionManagement()
                .sessionCreationPolicy(SessionCreationPolicy.ALWAYS)
                .and()
                .authorizeRequests()
                //允许登录访问
                .antMatchers("/login","/logout")
                .permitAll()
                //除上面外,所有请求都要求认证
                .anyRequest()
                .authenticated()
                .and()
                //禁用缓存
                .headers()
                .cacheControl();
        //添加jwt,登录授权过滤器
        http.addFilterBefore(jwtAuthenticationTokenFilter(), UsernamePasswordAuthenticationFilter.class);
        http.exceptionHandling()
                .accessDeniedHandler(restfulAccessDeniedHandler)
                .authenticationEntryPoint(restAuthenticationEntryPoint);
    }

    //这个就是实现密码的加密的
    @Bean
    public PasswordEncoder passwordEncoder() {
        return new BCryptPasswordEncoder();
    }

    @Override
    @Bean
    public UserDetailsService userDetailsService() {
        //获取用户信息
        return username -> {
            Admin admin = adminService.getAdminByUserName(username);
            if (null != admin) {
                return admin;
            }
            return null;
        };
    }

    //下面是对jwt的bean注入
    @Bean
    public JwtAuthenticationTokenFilter jwtAuthenticationTokenFilter() {
        return new JwtAuthenticationTokenFilter();
    }
}
这里有个报错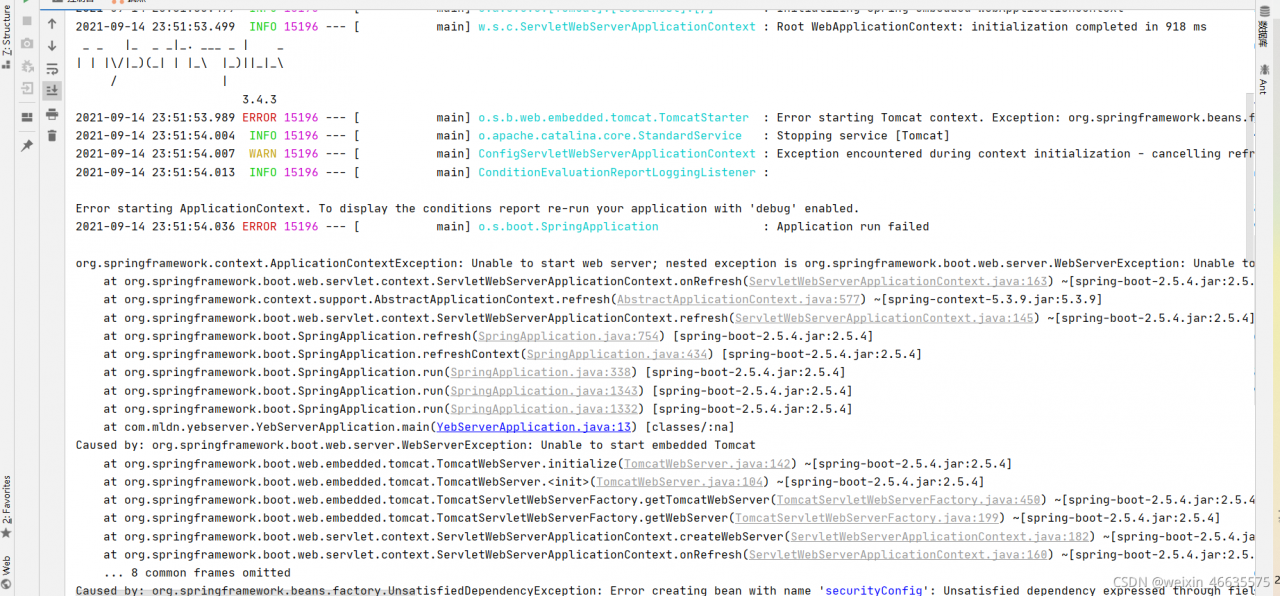
2021-09-14 23:51:53.989 ERROR 15196 --- [           main] o.s.b.web.embedded.tomcat.TomcatStarter  : Error starting Tomcat context. Exception: org.springframework.beans.factory.UnsatisfiedDependencyException. Message: Error creating bean with name 'securityConfig': Unsatisfied dependency expressed through field 'jwtAuthenticationTokenFilter'; nested exception is org.springframework.beans.factory.BeanCurrentlyInCreationException: Error creating bean with name 'jwtAuthenticationTokenFilter': Requested bean is currently in creation: Is there an unresolvable circular reference?
2021-09-14 23:51:54.004  INFO 15196 --- [           main] o.apache.catalina.core.StandardService   : Stopping service [Tomcat]
2021-09-14 23:51:54.007  WARN 15196 --- [           main] ConfigServletWebServerApplicationContext : Exception encountered during context initialization - cancelling refresh attempt: org.springframework.context.ApplicationContextException: Unable to start web server; nested exception is org.springframework.boot.web.server.WebServerException: Unable to start embedded Tomcat
2021-09-14 23:51:54.013  INFO 15196 --- [           main] ConditionEvaluationReportLoggingListener :

Error starting ApplicationContext. To display the conditions report re-run your application with 'debug' enabled.
2021-09-14 23:51:54.036 ERROR 15196 --- [           main] o.s.boot.SpringApplication               : Application run failed

org.springframework.context.ApplicationContextException: Unable to start web server; nested exception is org.springframework.boot.web.server.WebServerException: Unable to start embedded Tomcat
	at org.springframework.boot.web.servlet.context.ServletWebServerApplicationContext.onRefresh(ServletWebServerApplicationContext.java:163) ~[spring-boot-2.5.4.jar:2.5.4]
	at org.springframework.context.support.AbstractApplicationContext.refresh(AbstractApplicationContext.java:577) ~[spring-context-5.3.9.jar:5.3.9]
	at org.springframework.boot.web.servlet.context.ServletWebServerApplicationContext.refresh(ServletWebServerApplicationContext.java:145) ~[spring-boot-2.5.4.jar:2.5.4]
	at org.springframework.boot.SpringApplication.refresh(SpringApplication.java:754) [spring-boot-2.5.4.jar:2.5.4]
	at org.springframework.boot.SpringApplication.refreshContext(SpringApplication.java:434) [spring-boot-2.5.4.jar:2.5.4]
	at org.springframework.boot.SpringApplication.run(SpringApplication.java:338) [spring-boot-2.5.4.jar:2.5.4]
	at org.springframework.boot.SpringApplication.run(SpringApplication.java:1343) [spring-boot-2.5.4.jar:2.5.4]
	at org.springframework.boot.SpringApplication.run(SpringApplication.java:1332) [spring-boot-2.5.4.jar:2.5.4]
	at com.mldn.yebserver.YebServerApplication.main(YebServerApplication.java:13) [classes/:na]
Caused by: org.springframework.boot.web.server.WebServerException: Unable to start embedded Tomcat
	at org.springframework.boot.web.embedded.tomcat.TomcatWebServer.initialize(TomcatWebServer.java:142) ~[spring-boot-2.5.4.jar:2.5.4]
	at org.springframework.boot.web.embedded.tomcat.TomcatWebServer.<init>(TomcatWebServer.java:104) ~[spring-boot-2.5.4.jar:2.5.4]
	at org.springframework.boot.web.embedded.tomcat.TomcatServletWebServerFactory.getTomcatWebServer(TomcatServletWebServerFactory.java:450) ~[spring-boot-2.5.4.jar:2.5.4]
	at org.springframework.boot.web.embedded.tomcat.TomcatServletWebServerFactory.getWebServer(TomcatServletWebServerFactory.java:199) ~[spring-boot-2.5.4.jar:2.5.4]
	at org.springframework.boot.web.servlet.context.ServletWebServerApplicationContext.createWebServer(ServletWebServerApplicationContext.java:182) ~[spring-boot-2.5.4.jar:2.5.4]
	at org.springframework.boot.web.servlet.context.ServletWebServerApplicationContext.onRefresh(ServletWebServerApplicationContext.java:160) ~[spring-boot-2.5.4.jar:2.5.4]
	... 8 common frames omitted
Caused by: org.springframework.beans.factory.UnsatisfiedDependencyException: Error creating bean with name 'securityConfig': Unsatisfied dependency expressed through field 'jwtAuthenticationTokenFilter'; nested exception is org.springframework.beans.factory.BeanCurrentlyInCreationException: Error creating bean with name 'jwtAuthenticationTokenFilter': Requested bean is currently in creation: Is there an unresolvable circular reference?
	at org.springframework.beans.factory.annotation.AutowiredAnnotationBeanPostProcessor$AutowiredFieldElement.resolveFieldValue(AutowiredAnnotationBeanPostProcessor.java:660) ~[spring-beans-5.3.9.jar:5.3.9]
	at org.springframework.beans.factory.annotation.AutowiredAnnotationBeanPostProcessor$AutowiredFieldElement.inject(AutowiredAnnotationBeanPostProcessor.java:640) ~[spring-beans-5.3.9.jar:5.3.9]
	at org.springframework.beans.factory.annotation.InjectionMetadata.inject(InjectionMetadata.java:119) ~[spring-beans-5.3.9.jar:5.3.9]
	at org.springframework.beans.factory.annotation.AutowiredAnnotationBeanPostProcessor.postProcessProperties(AutowiredAnnotationBeanPostProcessor.java:399) ~[spring-beans-5.3.9.jar:5.3.9]
	at org.springframework.beans.factory.support.AbstractAutowireCapableBeanFactory.populateBean(AbstractAutowireCapableBeanFactory.java:1413) ~[spring-beans-5.3.9.jar:5.3.9]
	at org.springframework.beans.factory.support.AbstractAutowireCapableBeanFactory.doCreateBean(AbstractAutowireCapableBeanFactory.java:601) ~[spring-beans-5.3.9.jar:5.3.9]
	at org.springframework.beans.factory.support.AbstractAutowireCapableBeanFactory.createBean(AbstractAutowireCapableBeanFactory.java:524) ~[spring-beans-5.3.9.jar:5.3.9]
	at org.springframework.beans.factory.support.AbstractBeanFactory.lambda$doGetBean$0(AbstractBeanFactory.java:335) ~[spring-beans-5.3.9.jar:5.3.9]
	at org.springframework.beans.factory.support.DefaultSingletonBeanRegistry.getSingleton(DefaultSingletonBeanRegistry.java:234) ~[spring-beans-5.3.9.jar:5.3.9]
	at org.springframework.beans.factory.support.AbstractBeanFactory.doGetBean(AbstractBeanFactory.java:333) ~[spring-beans-5.3.9.jar:5.3.9]
	at org.springframework.beans.factory.support.AbstractBeanFactory.getBean(AbstractBeanFactory.java:208) ~[spring-beans-5.3.9.jar:5.3.9]
	at org.springframework.beans.factory.support.ConstructorResolver.instantiateUsingFactoryMethod(ConstructorResolver.java:410) ~[spring-beans-5.3.9.jar:5.3.9]
	at org.springframework.beans.factory.support.AbstractAutowireCapableBeanFactory.instantiateUsingFactoryMethod(AbstractAutowireCapableBeanFactory.java:1334) ~[spring-beans-5.3.9.jar:5.3.9]
	at org.springframework.beans.factory.support.AbstractAutowireCapableBeanFactory.createBeanInstance(AbstractAutowireCapableBeanFactory.java:1177) ~[spring-beans-5.3.9.jar:5.3.9]
	at org.springframework.beans.factory.support.AbstractAutowireCapableBeanFactory.doCreateBean(AbstractAutowireCapableBeanFactory.java:564) ~[spring-beans-5.3.9.jar:5.3.9]
	at org.springframework.beans.factory.support.AbstractAutowireCapableBeanFactory.createBean(AbstractAutowireCapableBeanFactory.java:524) ~[spring-beans-5.3.9.jar:5.3.9]
	at org.springframework.beans.factory.support.AbstractBeanFactory.lambda$doGetBean$0(AbstractBeanFactory.java:335) ~[spring-beans-5.3.9.jar:5.3.9]
	at org.springframework.beans.factory.support.DefaultSingletonBeanRegistry.getSingleton(DefaultSingletonBeanRegistry.java:234) ~[spring-beans-5.3.9.jar:5.3.9]
	at org.springframework.beans.factory.support.AbstractBeanFactory.doGetBean(AbstractBeanFactory.java:333) ~[spring-beans-5.3.9.jar:5.3.9]
	at org.springframework.beans.factory.support.AbstractBeanFactory.getBean(AbstractBeanFactory.java:213) ~[spring-beans-5.3.9.jar:5.3.9]
	at org.springframework.boot.web.servlet.ServletContextInitializerBeans.getOrderedBeansOfType(ServletContextInitializerBeans.java:212) ~[spring-boot-2.5.4.jar:2.5.4]
	at org.springframework.boot.web.servlet.ServletContextInitializerBeans.addAsRegistrationBean(ServletContextInitializerBeans.java:175) ~[spring-boot-2.5.4.jar:2.5.4]
	at org.springframework.boot.web.servlet.ServletContextInitializerBeans.addAsRegistrationBean(ServletContextInitializerBeans.java:170) ~[spring-boot-2.5.4.jar:2.5.4]
	at org.springframework.boot.web.servlet.ServletContextInitializerBeans.addAdaptableBeans(ServletContextInitializerBeans.java:155) ~[spring-boot-2.5.4.jar:2.5.4]
	at org.springframework.boot.web.servlet.ServletContextInitializerBeans.<init>(ServletContextInitializerBeans.java:87) ~[spring-boot-2.5.4.jar:2.5.4]
	at org.springframework.boot.web.servlet.context.ServletWebServerApplicationContext.getServletContextInitializerBeans(ServletWebServerApplicationContext.java:260) ~[spring-boot-2.5.4.jar:2.5.4]
	at org.springframework.boot.web.servlet.context.ServletWebServerApplicationContext.selfInitialize(ServletWebServerApplicationContext.java:234) ~[spring-boot-2.5.4.jar:2.5.4]
	at org.springframework.boot.web.embedded.tomcat.TomcatStarter.onStartup(TomcatStarter.java:53) ~[spring-boot-2.5.4.jar:2.5.4]
	at org.apache.catalina.core.StandardContext.startInternal(StandardContext.java:5219) ~[tomcat-embed-core-9.0.52.jar:9.0.52]
	at org.apache.catalina.util.LifecycleBase.start(LifecycleBase.java:183) ~[tomcat-embed-core-9.0.52.jar:9.0.52]
	at org.apache.catalina.core.ContainerBase$StartChild.call(ContainerBase.java:1396) ~[tomcat-embed-core-9.0.52.jar:9.0.52]
	at org.apache.catalina.core.ContainerBase$StartChild.call(ContainerBase.java:1386) ~[tomcat-embed-core-9.0.52.jar:9.0.52]
	at java.util.concurrent.FutureTask.run(FutureTask.java:266) ~[na:1.8.0_241]
	at org.apache.tomcat.util.threads.InlineExecutorService.execute(InlineExecutorService.java:75) ~[tomcat-embed-core-9.0.52.jar:9.0.52]
	at java.util.concurrent.AbstractExecutorService.submit(AbstractExecutorService.java:134) ~[na:1.8.0_241]
	at org.apache.catalina.core.ContainerBase.startInternal(ContainerBase.java:919) ~[tomcat-embed-core-9.0.52.jar:9.0.52]
	at org.apache.catalina.core.StandardHost.startInternal(StandardHost.java:835) ~[tomcat-embed-core-9.0.52.jar:9.0.52]
	at org.apache.catalina.util.LifecycleBase.start(LifecycleBase.java:183) ~[tomcat-embed-core-9.0.52.jar:9.0.52]
	at org.apache.catalina.core.ContainerBase$StartChild.call(ContainerBase.java:1396) ~[tomcat-embed-core-9.0.52.jar:9.0.52]
	at org.apache.catalina.core.ContainerBase$StartChild.call(ContainerBase.java:1386) ~[tomcat-embed-core-9.0.52.jar:9.0.52]
	at java.util.concurrent.FutureTask.run(FutureTask.java:266) ~[na:1.8.0_241]
	at org.apache.tomcat.util.threads.InlineExecutorService.execute(InlineExecutorService.java:75) ~[tomcat-embed-core-9.0.52.jar:9.0.52]
	at java.util.concurrent.AbstractExecutorService.submit(AbstractExecutorService.java:134) ~[na:1.8.0_241]
	at org.apache.catalina.core.ContainerBase.startInternal(ContainerBase.java:919) ~[tomcat-embed-core-9.0.52.jar:9.0.52]
	at org.apache.catalina.core.StandardEngine.startInternal(StandardEngine.java:263) ~[tomcat-embed-core-9.0.52.jar:9.0.52]
	at org.apache.catalina.util.LifecycleBase.start(LifecycleBase.java:183) ~[tomcat-embed-core-9.0.52.jar:9.0.52]
	at org.apache.catalina.core.StandardService.startInternal(StandardService.java:432) ~[tomcat-embed-core-9.0.52.jar:9.0.52]
	at org.apache.catalina.util.LifecycleBase.start(LifecycleBase.java:183) ~[tomcat-embed-core-9.0.52.jar:9.0.52]
	at org.apache.catalina.core.StandardServer.startInternal(StandardServer.java:927) ~[tomcat-embed-core-9.0.52.jar:9.0.52]
	at org.apache.catalina.util.LifecycleBase.start(LifecycleBase.java:183) ~[tomcat-embed-core-9.0.52.jar:9.0.52]
	at org.apache.catalina.startup.Tomcat.start(Tomcat.java:486) ~[tomcat-embed-core-9.0.52.jar:9.0.52]
	at org.springframework.boot.web.embedded.tomcat.TomcatWebServer.initialize(TomcatWebServer.java:123) ~[spring-boot-2.5.4.jar:2.5.4]
	... 13 common frames omitted
Caused by: org.springframework.beans.factory.BeanCurrentlyInCreationException: Error creating bean with name 'jwtAuthenticationTokenFilter': Requested bean is currently in creation: Is there an unresolvable circular reference?
	at org.springframework.beans.factory.support.DefaultSingletonBeanRegistry.beforeSingletonCreation(DefaultSingletonBeanRegistry.java:355) ~[spring-beans-5.3.9.jar:5.3.9]
	at org.springframework.beans.factory.support.DefaultSingletonBeanRegistry.getSingleton(DefaultSingletonBeanRegistry.java:227) ~[spring-beans-5.3.9.jar:5.3.9]
	at org.springframework.beans.factory.support.AbstractBeanFactory.doGetBean(AbstractBeanFactory.java:333) ~[spring-beans-5.3.9.jar:5.3.9]
	at org.springframework.beans.factory.support.AbstractBeanFactory.getBean(AbstractBeanFactory.java:208) ~[spring-beans-5.3.9.jar:5.3.9]
	at org.springframework.beans.factory.config.DependencyDescriptor.resolveCandidate(DependencyDescriptor.java:276) ~[spring-beans-5.3.9.jar:5.3.9]
	at org.springframework.beans.factory.support.DefaultListableBeanFactory.doResolveDependency(DefaultListableBeanFactory.java:1380) ~[spring-beans-5.3.9.jar:5.3.9]
	at org.springframework.beans.factory.support.DefaultListableBeanFactory.resolveDependency(DefaultListableBeanFactory.java:1300) ~[spring-beans-5.3.9.jar:5.3.9]
	at org.springframework.beans.factory.annotation.AutowiredAnnotationBeanPostProcessor$AutowiredFieldElement.resolveFieldValue(AutowiredAnnotationBeanPostProcessor.java:657) ~[spring-beans-5.3.9.jar:5.3.9]
	... 64 common frames omitted
解决办法: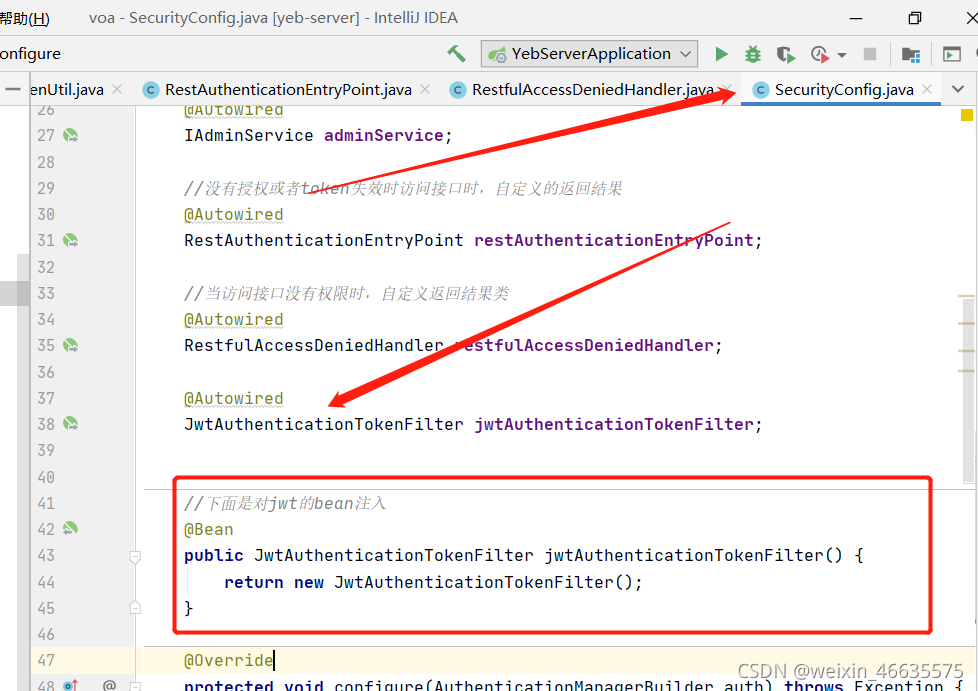
把这个@Autowired的JwtXXXX的实例的删除
----7.4 来测试一波
http://localhost:8081/doc.html,记住看是Http哦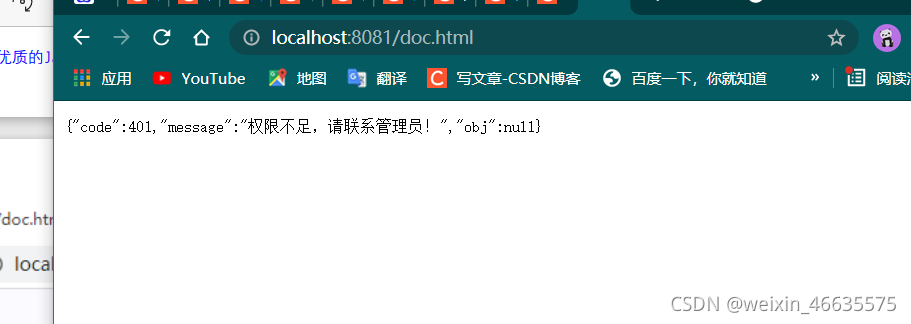
发现我们的权限不足,所有来处理一下
解决我们的权限不足问题
修改我们的SecurityConfig文件
    @Override
    public void configure(WebSecurity web) throws Exception {
        web.ignoring().antMatchers(
                "/login",
                "/logout",
                "/css/**",
                "/js/**",
                "/index.html",
                "favicon.ico",
                "/doc.html",
                "/webjars/**",
                "/swagger-resource/**",
                "v2/api-docs/**"
        );
    }
当然我们在这里登录的时候我们还是显示权限不足
修改一下我们的Swagger2Config类
package com.mldn.yebserver.config.swagger;

import org.springframework.context.annotation.Bean;
import org.springframework.context.annotation.Configuration;
import springfox.documentation.builders.ApiInfoBuilder;
import springfox.documentation.builders.PathSelectors;
import springfox.documentation.builders.RequestHandlerSelectors;
import springfox.documentation.service.ApiInfo;
import springfox.documentation.service.ApiKey;
import springfox.documentation.service.AuthorizationScope;
import springfox.documentation.service.Contact;
import springfox.documentation.service.SecurityReference;
import springfox.documentation.spi.DocumentationType;
import springfox.documentation.spi.service.contexts.SecurityContext;
import springfox.documentation.spring.web.plugins.Docket;
import springfox.documentation.swagger2.annotations.EnableSwagger2;


import java.util.ArrayList;
import java.util.List;

@Configuration
@EnableSwagger2
public class swagger2Config {

    @Bean
    public Docket createRestApi() {
        return new Docket(DocumentationType.SWAGGER_2)
                .apiInfo(apiInfo())
                .select()
                //为当前包下的controller生成api文档
                .apis(RequestHandlerSelectors.basePackage("com.mldn.yebserver.controller"))
                .paths(PathSelectors.any())
                .build()
                //添加登录认证
                .securitySchemes(securitySchemes())
                .securityContexts(securityContexts());
    }

    private List<SecurityContext> securityContexts() {
        //设置需要登录认证的路径
        List<SecurityContext> result = new ArrayList<>();
        result.add(getContextByPath("/hello/*.*"));
        return result;
    }

    private ApiInfo apiInfo() {
        //设置文档信息
        return new ApiInfoBuilder()
                .title("云E办接口文档")
                .description("云E办接口文档")
                .contact(new Contact("xxx","http:localhost:8081/doc.html","xxx@xxx.com"))
                .version("1.0")
                .build();
    }

    private SecurityContext getContextByPath(String pathRegex) {
        return SecurityContext.builder()
                .securityReferences(defaultAuth())
                .forPaths(PathSelectors.regex(pathRegex))
                .build();
    }

    private List<SecurityReference> defaultAuth() {
        List<SecurityReference> result = new ArrayList<>();
        AuthorizationScope authorizationScope = new AuthorizationScope("global",
                "accessEverything");
        AuthorizationScope[] authorizationScopes = new AuthorizationScope[1];
        authorizationScopes[0] = authorizationScope;
        result.add(new SecurityReference("Authorization",authorizationScopes));
        return result;
    }

    private List<ApiKey> securitySchemes(){
        //设置请求头信息
        List<ApiKey> result = new ArrayList<>();
        ApiKey apiKey = new ApiKey("Authorization","Authorization","header");
        result.add(apiKey);
        return result;
    }
}
----7.5 总结一下
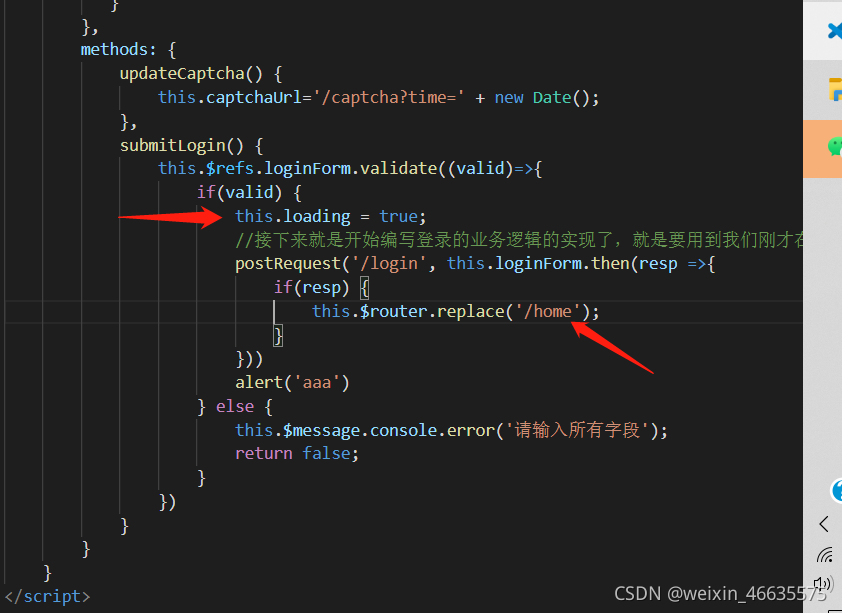
1、大致流程图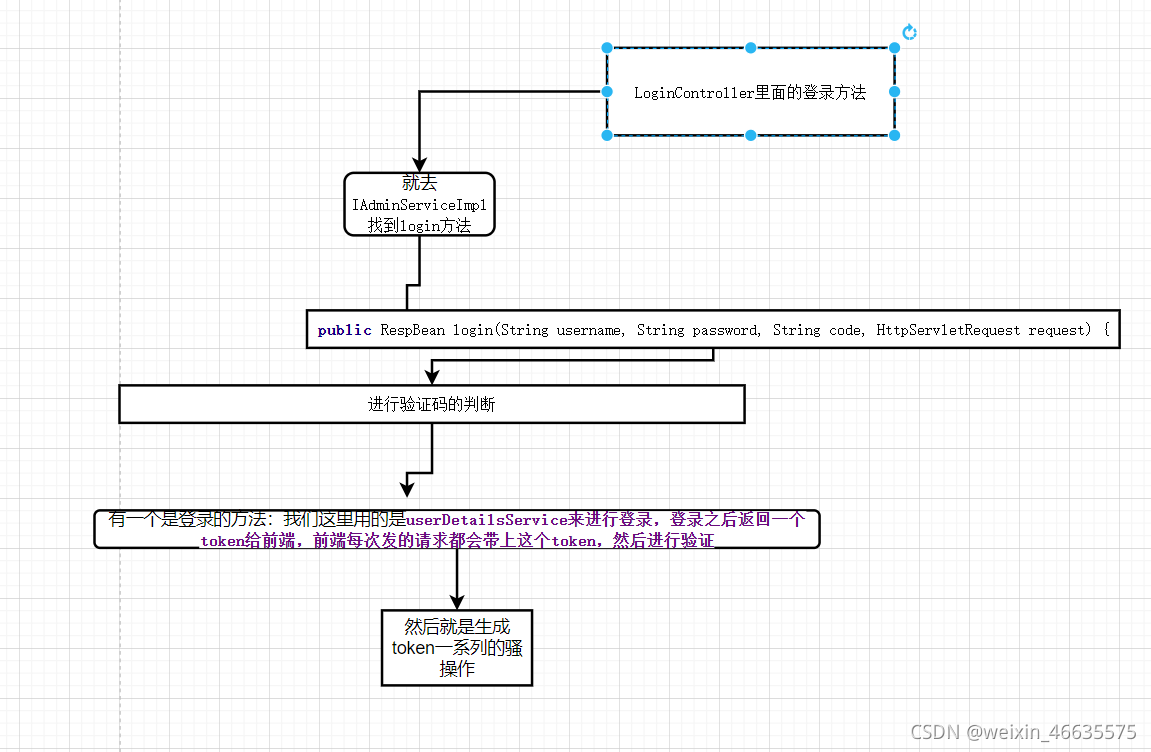
2、都到这个分上了,相信我们很多同学都知道了,
像我们这token生成类呀,还有就是其他的一些类都是可以复用的,以后直接拿到项目中去用就好了
--------------------------------
这里复习一下如何才能支持Https呢
上面我们的测试中的是使用的Http://localhost:8081/doc.html
但是我们的应用程序都基本是支持Https的,所有这里就有点为难了
那我们要怎么才能支持Https呢?接下来这么解决
我现在代码使用的一种方式
-------第一种方式
- 项目是这样搭建的,
创建的SpringInitialize的项目,Maven项目应该不用管这个吧,具体的我还暂时不是很了解,了解了再来补充
- 把我们用JDK生成的那个文件拷贝到voa目录下面
- 配置一下我们的application.properties文件
#下面是关于SSL秘钥的
server.ssl.key-store-type=JKS
server.ssl.key-store=sang.p12
server.ssl.key-alias=tomcathttps
server.ssl.key-store-password=123456
server.ssl.enabled=true
- 然后再接管WebMvc里面的Https的类的处理
@Configuration
public class HttpsConfig {

    @Bean
    public ServletWebServerFactory servletContainer() {
        TomcatServletWebServerFactory tomcat = new TomcatServletWebServerFactory() {
            @Override
            protected void postProcessContext(Context context) {
                SecurityConstraint constraint = new SecurityConstraint();
                constraint.setUserConstraint("CONFIDENTIAL");
                SecurityCollection collection = new SecurityCollection();
                collection.addPattern("/*");
                constraint.addCollection(collection);
                context.addConstraint(constraint);
            }
        };
        tomcat.addAdditionalTomcatConnectors(createHTTPConnector());
        return tomcat;
    }

    private Connector createHTTPConnector() {
        Connector connector = new Connector("org.apache.coyote.http11.Http11NioProtocol");

        connector.setScheme("http");
        connector.setSecure(false);
//		http 端口
        connector.setPort(8082);
//https端口 配置成application中的servlet.port的端口
        connector.setRedirectPort(8081);
        return connector;
    }

}
-------第二种方式
这第二种把吧,好像是用Nginx来完成,具体没有学习到这个,等以后学习到了再来补充
-------第三种方式
第三种嘛,好像是也可以是Maven项目里面是用设置跨域来完成,也可以,具体的自己了解一下吧
--------------------------------
8. 下面来编写我们的后台验证码
我们没有用他这个云E办的验证码生成器,所有如果看视频的朋友,可以以他们的为准
----8. 1 通用的验证码生成类
1. 类编写的问题:总体的概念就是随机产生数据text,然后再通过方法output,写在图片
		上,返回给前端。

```xml
public class VerificationCode {

	private int width = 100;// 生成验证码图片的宽度
	private int height = 30;// 生成验证码图片的高度
	private String[] fontNames = { "宋体", "楷体", "隶书", "微软雅黑" };
	private Color bgColor = new Color(255, 255, 255);// 定义验证码图片的背景颜色为白色
	private Random random = new Random();
	private String codes = "0123456789abcdefghijklmnopqrstuvwxyzABCDEFGHIJKLMNOPQRSTUVWXYZ";
	private String text;// 记录随机字符串

	/**
	 * 获取一个随意颜色
	 *
	 * @return
	 */
	private Color randomColor() {
		int red = random.nextInt(150);
		int green = random.nextInt(150);
		int blue = random.nextInt(150);
		return new Color(red, green, blue);
	}

	/**
	 * 获取一个随机字体
	 *
	 * @return
	 */
	private Font randomFont() {
		String name = fontNames[random.nextInt(fontNames.length)];
		int style = random.nextInt(4);
		int size = random.nextInt(5) + 24;
		return new Font(name, style, size);
	}

	/**
	 * 获取一个随机字符
	 *
	 * @return
	 */
	private char randomChar() {
		return codes.charAt(random.nextInt(codes.length()));
	}

	/**
	 * 创建一个空白的BufferedImage对象
	 *
	 * @return
	 */
	private BufferedImage createImage() {
		BufferedImage image = new BufferedImage(width, height, BufferedImage.TYPE_INT_RGB);
		Graphics2D g2 = (Graphics2D) image.getGraphics();
		g2.setColor(bgColor);// 设置验证码图片的背景颜色
		g2.fillRect(0, 0, width, height);
		return image;
	}

	public BufferedImage getImage() {
		BufferedImage image = createImage();
		Graphics2D g2 = (Graphics2D) image.getGraphics();
		StringBuffer sb = new StringBuffer();
		for (int i = 0; i < 4; i++) {
			String s = randomChar() + "";
			sb.append(s);
			g2.setColor(randomColor());
			g2.setFont(randomFont());
			float x = i * width * 1.0f / 4;
			g2.drawString(s, x, height - 8);
		}
		this.text = sb.toString();
		drawLine(image);
		return image;
	}

	/**
	 * 绘制干扰线
	 *
	 * @param image
	 */
	private void drawLine(BufferedImage image) {
		Graphics2D g2 = (Graphics2D) image.getGraphics();
		int num = 5;
		for (int i = 0; i < num; i++) {
			int x1 = random.nextInt(width);
			int y1 = random.nextInt(height);
			int x2 = random.nextInt(width);
			int y2 = random.nextInt(height);
			g2.setColor(randomColor());
			g2.setStroke(new BasicStroke(1.5f));
			g2.drawLine(x1, y1, x2, y2);
		}
	}

	public String getText() {
		return text;
	}

	public static void output(BufferedImage image, OutputStream out) throws IOException {
		ImageIO.write(image, "JPEG", out);
	}
}
----8.2 再来我们的Controller编写
@GetMapping("/verifyCode")
	//为什么是void,因为下面我是以OutputStream的形式返回的
    public void verifyCode(HttpServletRequest request, HttpServletResponse resp) throws IOException {
        VerificationCode code = new VerificationCode();
        BufferedImage image = code.getImage();
        String text = code.getText();
        HttpSession session = request.getSession(true);
        session.setAttribute("verify_code", text);
        VerificationCode.output(image,resp.getOutputStream());
    }
----8.3 再放行我们的验证码请求
@Override
    public void configure(WebSecurity web) throws Exception {
        web.ignoring().antMatchers(
                "/login",
                "/logout",
                "/css/**",
                "/js/**",
                "/index.html",
                "favicon.ico",
                "/doc.html",
                "/webjars/**",
                "/swagger-resource/**",
                "/v2/api-docs/**",
                "/verifyCode"
        );
    }
9. 我们来效验验证码
能出来,说明我们的代码是没有问题的,那我们接下来,在登录的时候进行效验
----9.1第一步修改我们的参数类:AdminLoginParam类
import io.swagger.annotations.ApiModel;
import io.swagger.annotations.ApiModelProperty;
import lombok.Data;
import lombok.EqualsAndHashCode;
import lombok.experimental.Accessors;

@Data
@EqualsAndHashCode(callSuper = false)
@Accessors(chain = true)
@ApiModel(value = "adminLogin对象",description = "")
public class AdminLoginParam {

    @ApiModelProperty(value = "用户名", required = true)
    private String username;

    @ApiModelProperty(value = "密码", required = true)
    private String password;

    @ApiModelProperty(value = "验证码", required = true)
    private String Code;
}
----9.2第一步修改登录方法验证码判断
@ApiOperation(value = "登录之后返回token")
    @PostMapping("/login")
    public RespBean login(@RequestBody AdminLoginParam adminLoginParam, HttpServletRequest request) {
        return adminService.login(adminLoginParam.getUsername(), adminLoginParam.getPassword(),adminLoginParam.getCode(), request);
    }
----9.3 修改我们的IAdminService.java类
    /**
     * 登录返回Token
     * @param username
     * @param password
     * @return
     */
    RespBean login(String username, String password, String code, HttpServletRequest request);
----9.4修改我们的IAdminServiceImpl文件
/**
     * 登录返回Token
     * @param username
     * @param password
     * @return
     */
    public RespBean login(String username, String password, String code, HttpServletRequest request) {
        UserDetails userDetails = userDetailsService.loadUserByUsername(username);
        String captcha = (String)request.getSession().getAttribute("captcha");
        if (StringUtils.isBlank(code) || !captcha.equals(code)) {
            return RespBean.error("验证码错误");
        }
        if (null == userDetails || !passwordEncoder.matches(password,userDetails.getPassword())) {
            return RespBean.error("用户名或密码不正确");
        }
        if (!userDetails.isEnabled()) {
            return RespBean.error("账号被禁用,请联系管理员");
        }
        //下面是更新security登录用户对象
        UsernamePasswordAuthenticationToken authenticationToken = new UsernamePasswordAuthenticationToken(userDetails, null, userDetails.getAuthorities());
        SecurityContextHolder.getContext().setAuthentication(authenticationToken);
        String token = jwtTokenUtil.generateToken(userDetails);
        Map<String, String> tokenMap = new HashMap<>();
        tokenMap.put("token",token);
        tokenMap.put("tokenHead",tokenHead);
        return RespBean.success("登录成功,", tokenMap);
    }
测试的话我们暂时不能完成
(二)了解和前端的交换的类Menu
1. 了解一下我们的Menu类
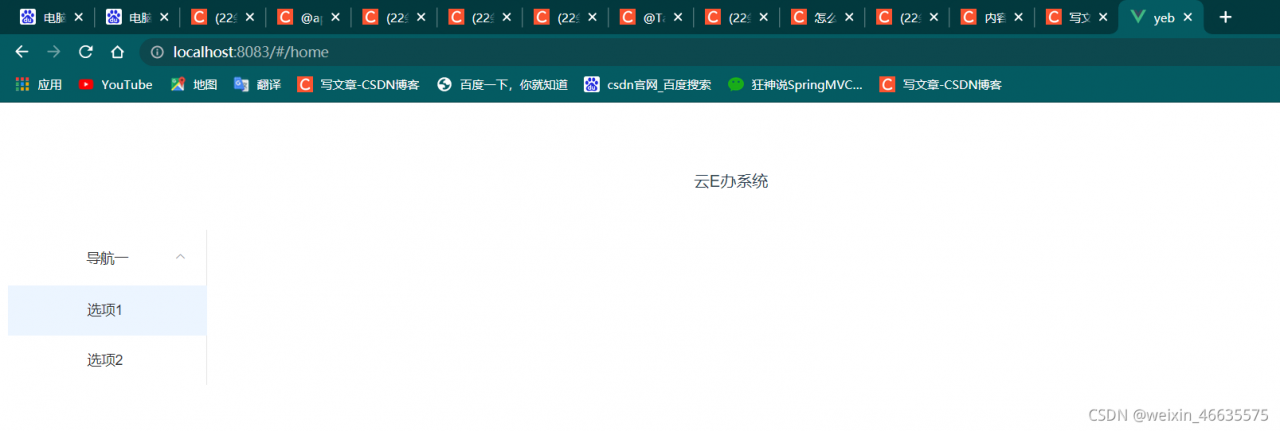
就是我们导航栏上面有不同的选项,如果这个导航栏有改变的话,那我们的前端代码就要修改,但是我们为了不修改,我们把它抽出来提取到数据库里面,每次登录后加载到前端展示,这样如果要修改我们的页面,我们就只是在修改数据库。
2. 我们来写Menu.java类
package com.mldn.yebserver.pojo;


import com.baomidou.mybatisplus.annotation.IdType;
import com.baomidou.mybatisplus.annotation.TableId;
import com.baomidou.mybatisplus.annotation.TableName;
import io.swagger.annotations.ApiModel;
import io.swagger.annotations.ApiModelProperty;
import lombok.Data;
import lombok.EqualsAndHashCode;
import lombok.experimental.Accessors;

import java.io.Serializable;
import java.util.List;


/**
 * 这个是咱们前端的菜单显示栏的,要显示出来的
 */
@Data
@EqualsAndHashCode(callSuper = false)
@Accessors(chain = true)
@TableName("t_menu")
@ApiModel(value = "Menu对象", description = "")
public class Menu implements Serializable {

    //@ApiModelProperty()注解用于方法、字段,表示对model属性的说明或者数据操作更改
    @ApiModelProperty(value = "id")
    //下面就是设置为自增长
    @TableId(value = "id", type = IdType.AUTO)
    private Integer id;

    @ApiModelProperty(value = "url")
    private String url;

    @ApiModelProperty(value = "path")
    private String path;

    @ApiModelProperty(value = "组件")
    private String component;

    @ApiModelProperty(value = "菜单名")
    private String name;

    @ApiModelProperty(value = "图标")
    private String iconCls;

    @ApiModelProperty(value = "是否被激活")
    private Boolean keepAlive;

    @ApiModelProperty(value = "是否要求权限")
    private Boolean requireAuth;

    @ApiModelProperty(value = "父Id")
    private Integer parentId;

    @ApiModelProperty(value = "是否启用")
    private Boolean enabled;

    @ApiModelProperty(value = "子菜单")
    private List<Menu> children;

}
-----------------------------------------------------------------
暂停一下
下面的就是一些权限的设计了,如果有一直认真看的朋友,可以去哔哩哔哩里面搜索云E办,跟着后面的做,我对这个权限的设计还不熟悉,我打算先去学习一下,然后做点简单的练习一下,然后再来做个项目的后面部分。