目录
spring mvc是什么?
spring mvc是一种web层mvc框架, 它是spring的一个模块, 拥有spring的特性。springmvc分离 了控制器、模型对象、分派器以及处理程序对象的角色。 Spring MVC核心类是 DispatcherServlet,它是一个 Servlet,顶层是实现的Servlet接口。
什么是MVC
mvc是一种模型(model)-视图(view)-控制器(controller),三层架构的设计模式。用于实现前端页面的展现与后端业务数据处理的分离。
mvc设计模式的好处
1.分层设计,实现了业务系统各个组件之间的解耦,有利于业务系统的可扩展性,可维护性。
2.有利于系统的并行开发,提升开发效率。
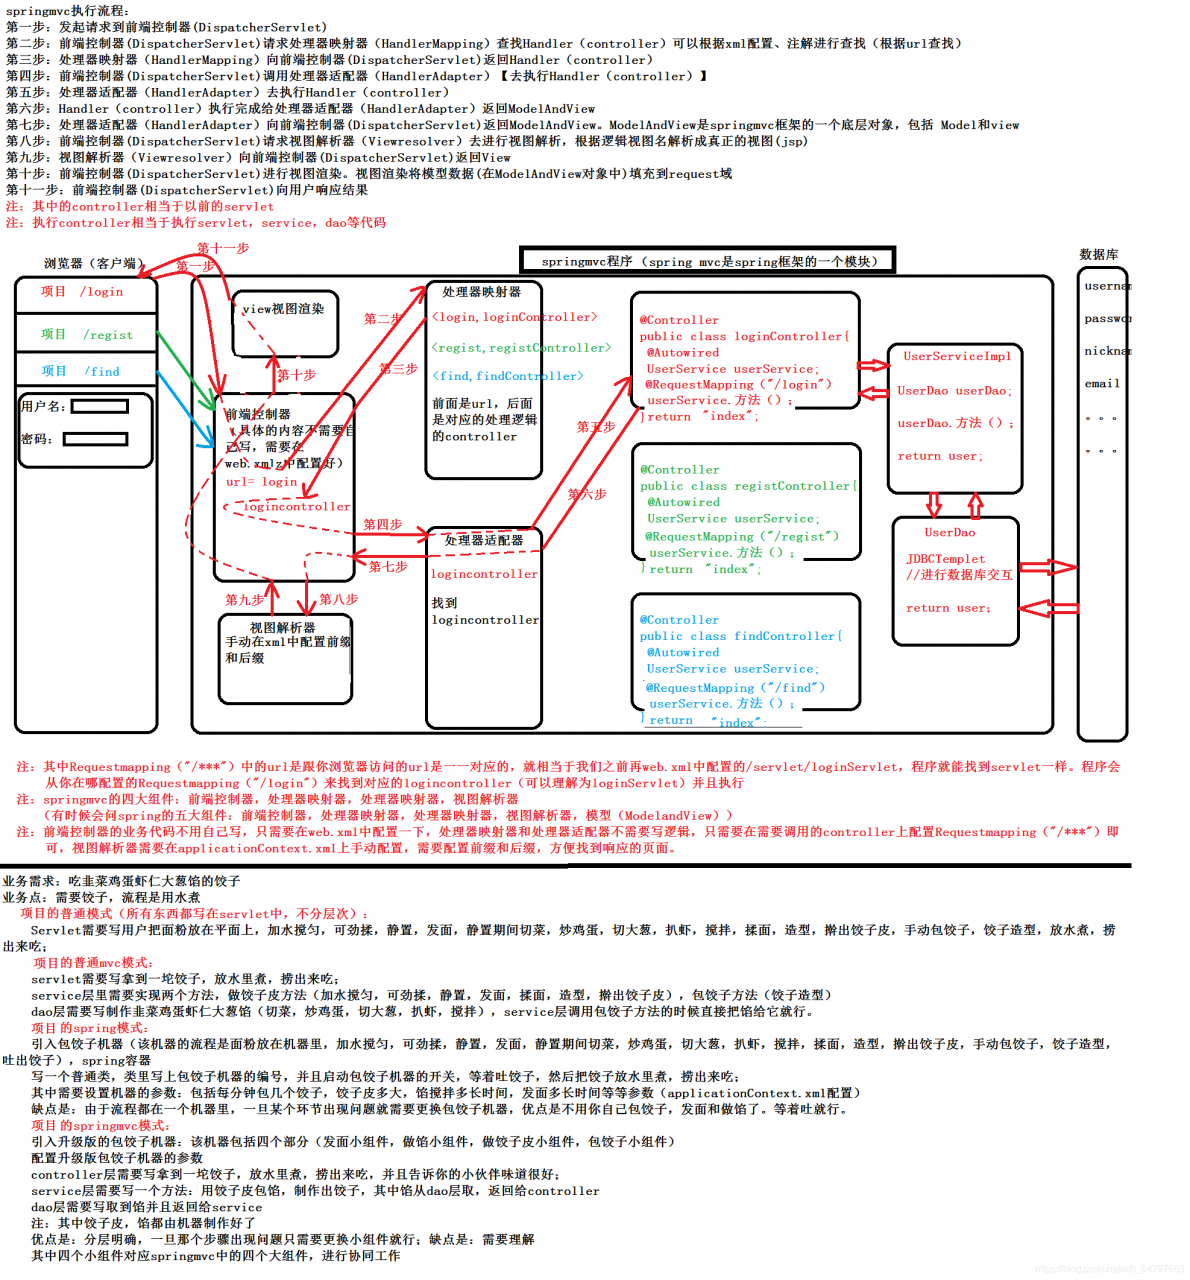
spring mvc执行流程
spring mvc实例
1.创建一个普通的maven项目(略)
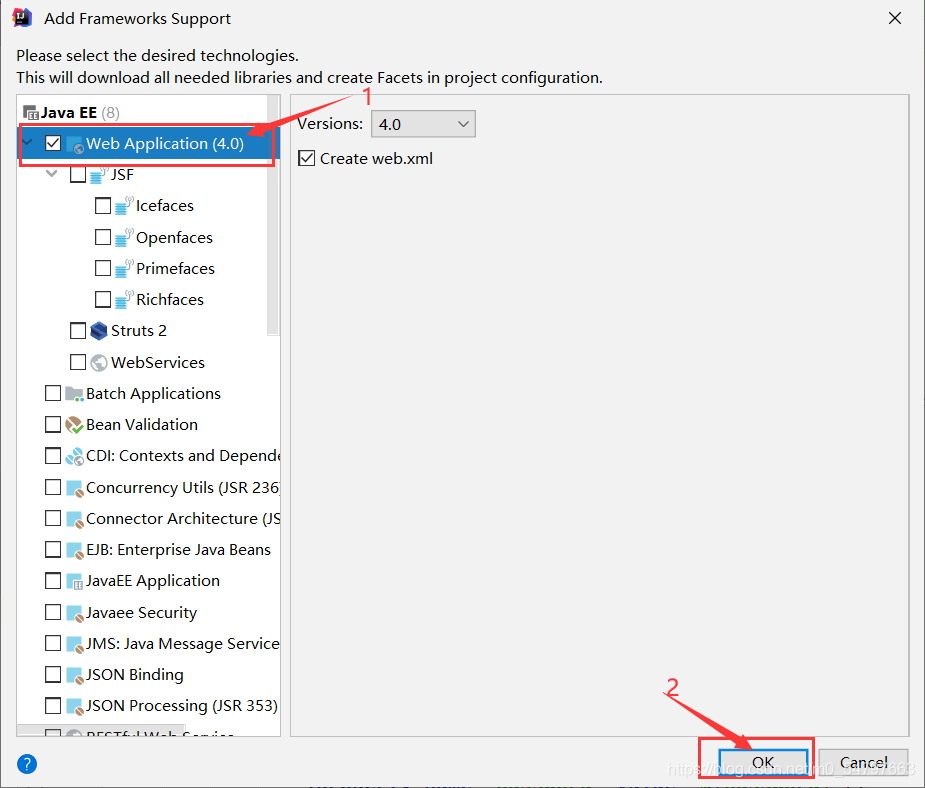
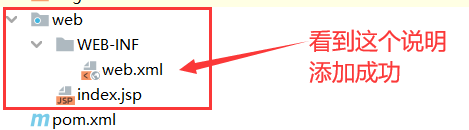
2.添加web框架

目录结构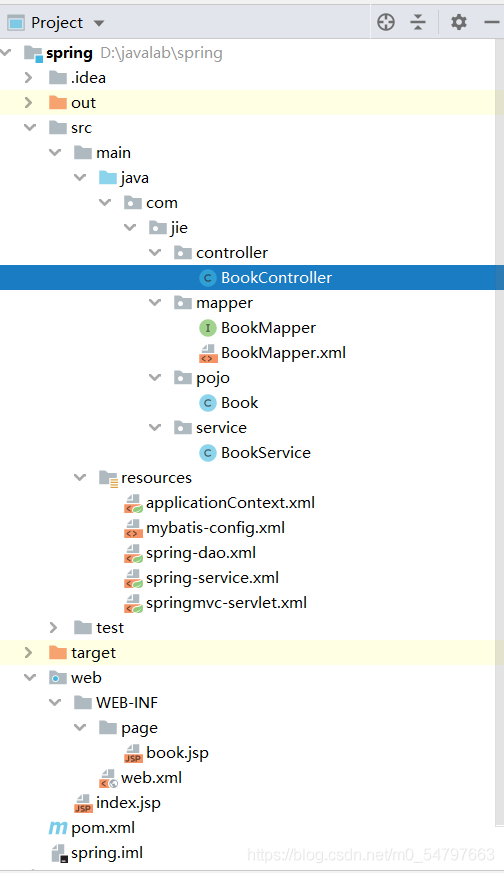
3.导入依赖(pom.xml)
mvc基本依赖
<?xml version="1.0" encoding="UTF-8"?>
<project xmlns="http://maven.apache.org/POM/4.0.0"
         xmlns:xsi="http://www.w3.org/2001/XMLSchema-instance"
         xsi:schemaLocation="http://maven.apache.org/POM/4.0.0 http://maven.apache.org/xsd/maven-4.0.0.xsd">
    <modelVersion>4.0.0</modelVersion>

    <groupId>org.example</groupId>
    <artifactId>spring</artifactId>
    <version>1.0-SNAPSHOT</version>
<dependencies>

     <!--    webmvc-->

    <!-- https://mvnrepository.com/artifact/org.springframework/spring-webmvc -->
    <dependency>
        <groupId>org.springframework</groupId>
        <artifactId>spring-webmvc</artifactId>
        <version>5.3.4</version>
    </dependency>

    <!--  单元测试依赖-->

    <!-- https://mvnrepository.com/artifact/junit/junit -->
    <dependency>
        <groupId>junit</groupId>
        <artifactId>junit</artifactId>
        <version>4.13.2</version>
        <scope>test</scope>
    </dependency>

    <!--    lombok偷懒用的-->

    <!-- https://mvnrepository.com/artifact/org.projectlombok/lombok -->
    <dependency>
        <groupId>org.projectlombok</groupId>
        <artifactId>lombok</artifactId>
        <version>1.18.18</version>
        <scope>provided</scope>
    </dependency>

              <!--    jsp-->

    <dependency>
        <groupId>javax.servlet.jsp</groupId>
        <artifactId>jsp-api</artifactId>
        <version>2.2.1-b03</version>
    </dependency>

              <!--    el标签-->

    <dependency>
        <groupId>javax.servlet</groupId>
        <artifactId>jstl</artifactId>
        <version>1.2</version>
    </dependency>

    <!--    servlet-->

    <dependency>
        <groupId>javax.servlet</groupId>
        <artifactId>servlet-api</artifactId>
        <version>3.0-alpha-1</version>
    </dependency>

  </dependencies>

</project>
整合mybatis需要的依赖
  <!--  mysql数据库驱动依赖-->

    <!-- https://mvnrepository.com/artifact/mysql/mysql-connector-java -->
    <dependency>
        <groupId>mysql</groupId>
        <artifactId>mysql-connector-java</artifactId>
        <version>8.0.23</version>
    </dependency>

<!--   mybatis依赖-->

    <!-- https://mvnrepository.com/artifact/org.mybatis/mybatis -->
    <dependency>
        <groupId>org.mybatis</groupId>
        <artifactId>mybatis</artifactId>
        <version>3.5.6</version>
    </dependency>

<!--    mybatis与spring整合的依赖-->

    <!-- https://mvnrepository.com/artifact/org.mybatis/mybatis-spring -->
    <dependency>
        <groupId>org.mybatis</groupId>
        <artifactId>mybatis-spring</artifactId>
        <version>2.0.6</version>
    </dependency>

<!--    druid数据库连接池 -->

    <!-- https://mvnrepository.com/artifact/com.alibaba/druid -->
    <dependency>
        <groupId>com.alibaba</groupId>
        <artifactId>druid</artifactId>
        <version>1.2.5</version>
    </dependency>

<!--    jdbc依赖-->

    <!-- https://mvnrepository.com/artifact/org.springframework/spring-jdbc -->
    <dependency>
        <groupId>org.springframework</groupId>
        <artifactId>spring-jdbc</artifactId>
        <version>5.3.4</version>
    </dependency>
防止src/main/java和src/main/resources路径下的资源加载不到
  <build>
        <resources>
            <resource>
                <directory>src/main/java</directory>
                <includes>
                    <include>**/*.properties</include>
                    <include>**/*.xml</include>
                </includes>
                <filtering>true</filtering>
            </resource>
            <resource>
                <directory>src/main/resources</directory>
                <includes>
                    <include>**/*.properties</include>
                    <include>**/*.xml</include>
                </includes>
                <filtering>true</filtering>
            </resource>
        </resources>
    </build>
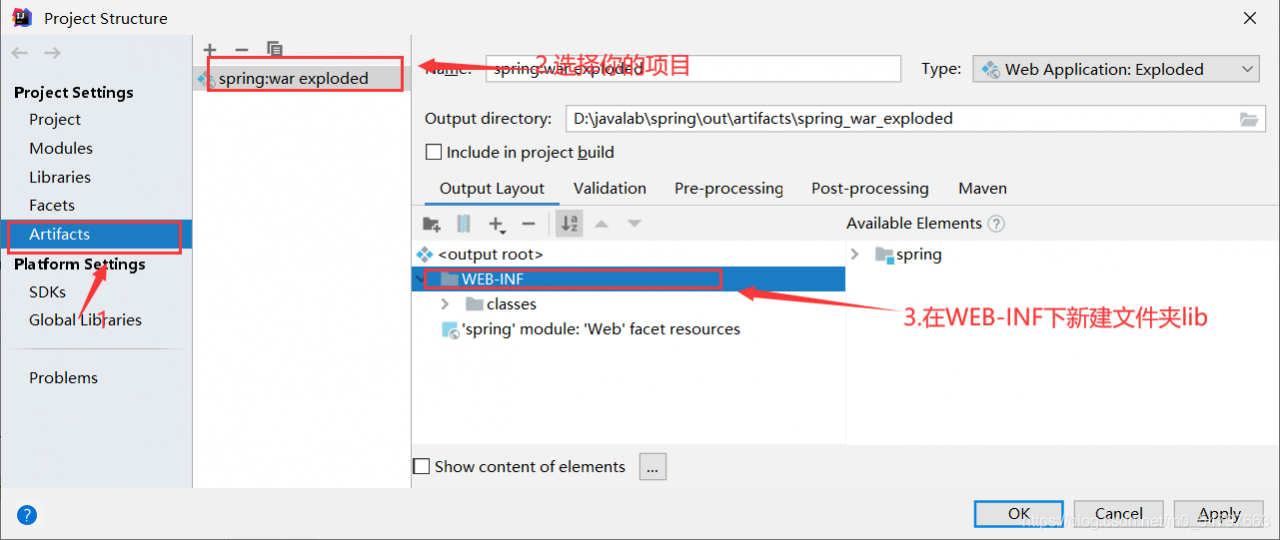
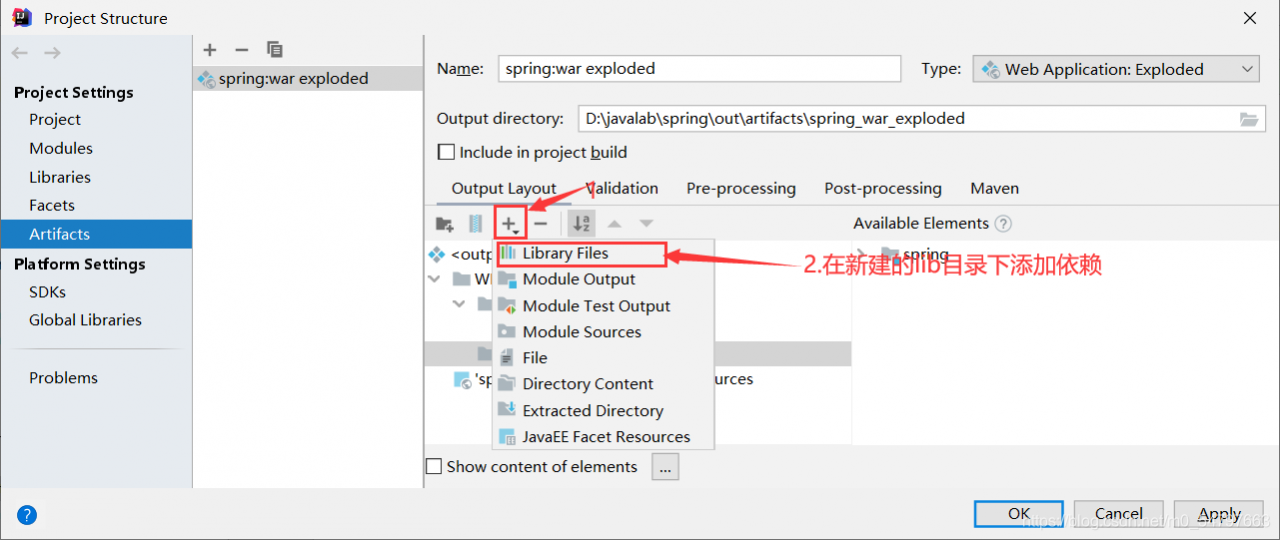
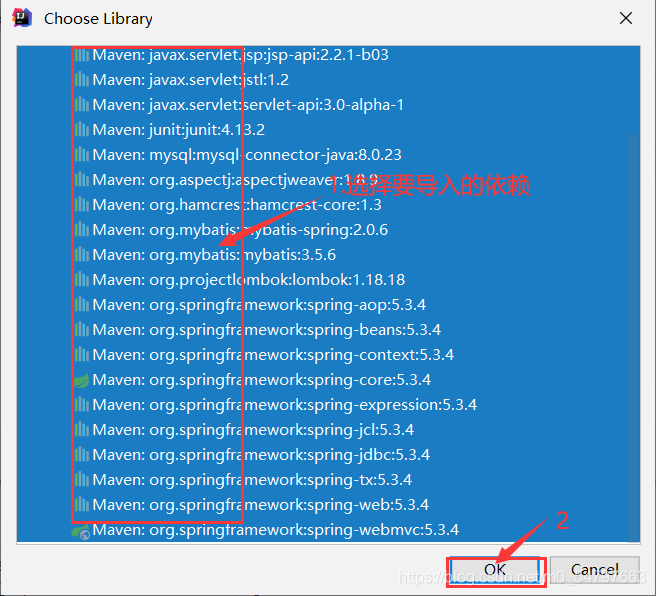
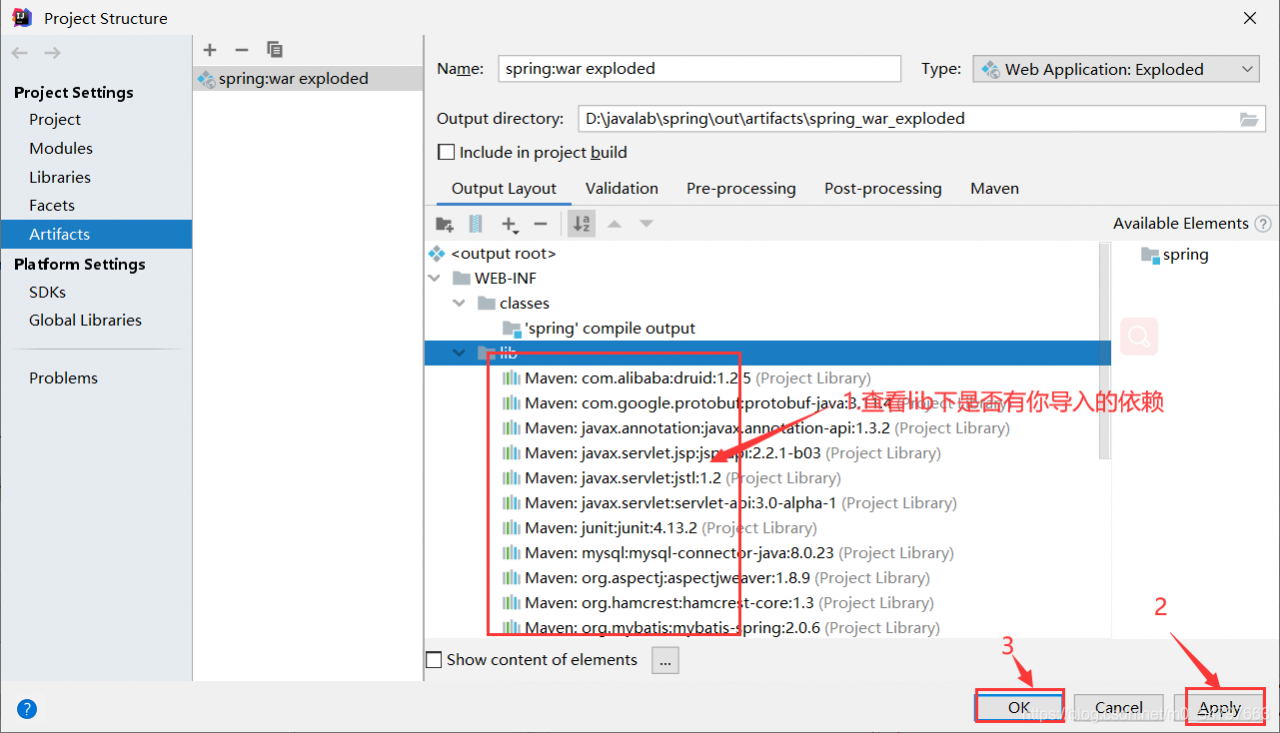
注意每次导入依赖时,都需要进行如下操作,否则导入的.jar包可能不会生效
4.编写配置文件
编写mybatis配置文件:mybatis-config.xml
<?xml version="1.0" encoding="UTF8" ?>
<!DOCTYPE configuration
        PUBLIC "-//mybatis.org//DTD Config 3.0//EN"
        "http://mybatis.org/dtd/mybatis-3-config.dtd">
<configuration>
    <!--    日志和缓存设置-->
    <settings>
        <setting name="cacheEnabled" value="true"/>
    </settings>
    <!--    指定包下的类起别名(类名首字母小写),配置后XXXMapper.xml中的类类型可以使用别名,没有配置必须使用全类名-->
    <typeAliases>
        <package name="com.jie.pojo"/>
    </typeAliases>

</configuration>
数据源配置,和Mapper注册在spring-dao.xml中配置了,其实mybatis的配置全部可以在spring-dao.xml中配置。
编写spring配置文件:spring-dao.xml
<?xml version="1.0" encoding="UTF8"?>
<beans xmlns="http://www.springframework.org/schema/beans"
xmlns:xsi="http://www.w3.org/2001/XMLSchema-instance"
xmlns:tx="http://www.springframework.org/schema/tx"
xmlns:aop="http://www.springframework.org/schema/aop"
xsi:schemaLocation="http://www.springframework.org/schema/beans
https://www.springframework.org/schema/beans/spring-beans.xsd http://www.springframework.org/schema/tx http://www.springframework.org/schema/tx/spring-tx.xsd http://www.springframework.org/schema/aop https://www.springframework.org/schema/aop/spring-aop.xsd">
<!--Druid数据库连接池-->
<bean id="dataSource" class="com.alibaba.druid.pool.DruidDataSource">
<property name="username" value="root"/>
<property name="password" value="968426"/>
<property name="url" value="jdbc:mysql://localhost:3306/mydate?useUnicode=true&characterEncoding=UTF-8&useSSL=true&serverTimezone=GMT%2B8"/>
<property name="driverClassName" value="com.mysql.cj.jdbc.Driver" />
</bean>
<!-- sqlSessionFactory,用于创建sqlSession-->
<bean id="sqlSessionFactory" class="org.mybatis.spring.SqlSessionFactoryBean">
<!-- 绑定Druid数据库连接池-->
<property name="dataSource" ref="dataSource" />
<!-- 绑定mybatis配置文件-->
<property name="configLocation" value="classpath:mybatis-config.xml"/>
</bean>
<!--配置了这个可以不用获取sqlSession来获取XXXMapper,可以直接使用XXXMapper -->
<bean class="org.mybatis.spring.mapper.MapperScannerConfigurer">
<property name="sqlSessionFactoryBeanName" value="sqlSessionFactory"/>
<!--注册XXXMapper.xml -->
<property name="basePackage" value="com.jie.mapper"/>
</bean>
</beans>
spring-dao.xml,其实就是配置mybatis,一般有开启日志和缓存,设置别名,配置数据源,注册Mapper。
spring-service.xml
<?xml version="1.0" encoding="UTF8"?>
<beans xmlns="http://www.springframework.org/schema/beans"
       xmlns:xsi="http://www.w3.org/2001/XMLSchema-instance"
       xmlns:tx="http://www.springframework.org/schema/tx"
       xmlns:aop="http://www.springframework.org/schema/aop"
       xmlns:contet="http://www.springframework.org/schema/context"
       xsi:schemaLocation="http://www.springframework.org/schema/beans
        https://www.springframework.org/schema/beans/spring-beans.xsd http://www.springframework.org/schema/tx http://www.springframework.org/schema/tx/spring-tx.xsd http://www.springframework.org/schema/aop https://www.springframework.org/schema/aop/spring-aop.xsd http://www.springframework.org/schema/context https://www.springframework.org/schema/context/spring-context.xsd">

    <contet:component-scan base-package="com.jie.service"/>

    <!--    配置声明事务 使用Druid数据源-->
    <bean id="transactionManager" class="org.springframework.jdbc.datasource.DataSourceTransactionManager">
        <property name="dataSource" ref="dataSource"/>
    </bean>

    <!--配置事务通知-->
    <tx:advice id="transactionInterceptor" transaction-manager="transactionManager">
        <!--       给哪些方法配置事务-->
        <tx:attributes>
            <tx:method name="queryBook"/>
        </tx:attributes>
    </tx:advice>

    <!--    配置事务切入-->
    <aop:config proxy-target-class="true">
        <aop:pointcut id="txPointcut" expression="execution(* com.jie.service.BookService.*(..))"/>
        <aop:advisor advice-ref="transactionInterceptor" pointcut-ref="txPointcut"/>
    </aop:config>
</beans>
事务的配置一般在这里配置
springmvc-servlet.xml
<?xml version="1.0" encoding="UTF8"?>
<beans xmlns="http://www.springframework.org/schema/beans"
       xmlns:xsi="http://www.w3.org/2001/XMLSchema-instance"
       xmlns:context="http://www.springframework.org/schema/context"
       xmlns:mvc="http://www.springframework.org/schema/mvc"
       xsi:schemaLocation="http://www.springframework.org/schema/beans
        https://www.springframework.org/schema/beans/spring-beans.xsd http://www.springframework.org/schema/context https://www.springframework.org/schema/context/spring-context.xsd http://www.springframework.org/schema/mvc https://www.springframework.org/schema/mvc/spring-mvc.xsd">
    <!--    自动扫描包-->
    <context:component-scan base-package="com.jie.controller"/>
    <!--    默认的资源过滤css,js,html ,开启后请求这些资源时就不会去寻找handler,而是直接找文件。-->
    <mvc:default-servlet-handler/>
<!--    注解驱动,开启后Spring会默认帮我们注册处理请求,参数和返回值的类。主要是实现了以下两个接口:HandlerMapping与HandlerAdapter。-->
    <mvc:annotation-driven/>

    <!--    视图解析器,controller返回的view会经过视图解析器和它的前缀和后缀拼接后,返回给 DispatcherServlet-->
    <bean class="org.springframework.web.servlet.view.InternalResourceViewResolver" id="InternalResourceViewResolver">
        <property name="prefix" value="/WEB-INF/page/"/>
        <property name="suffix" value=".jsp"/>
    </bean>

</beans>
1.< mvc:default-servlet-handler/> 使用springmvc时,会在web.xml中配置对所有请求进行拦截,但是当前端请求静态文件(如css,js)时,就会报错,因为springmvc会根据静态文件的请求路径去匹配handler,找不到对应的handler时,就会报错。 开启后请求这些资源时就不会去寻找handler,而是直接找文件。
2.< mvc:annotation-driven/>,开启后Spring会默认帮我们注册处理请求,参数和返回值的类。主要是实现了以下两个接口:HandlerMapping(处理器映射器)与HandlerAdapter(处理器适配器)。
applicationContext.xml(整合前面三个spring配置文件)
<?xml version="1.0" encoding="UTF8"?>
<beans xmlns="http://www.springframework.org/schema/beans"
       xmlns:xsi="http://www.w3.org/2001/XMLSchema-instance"
       xmlns:aop="http://www.springframework.org/schema/aop"
       xsi:schemaLocation="http://www.springframework.org/schema/beans
        https://www.springframework.org/schema/beans/spring-beans.xsd
        http://www.springframework.org/schema/aop
        https://www.springframework.org/schema/aop/spring-aop.xsd">

    <import resource="classpath:spring-dao.xml"/>
    <import resource="classpath:spring-service.xml"/>
    <import resource="classpath:springmvc-servlet.xml"/>

</beans>
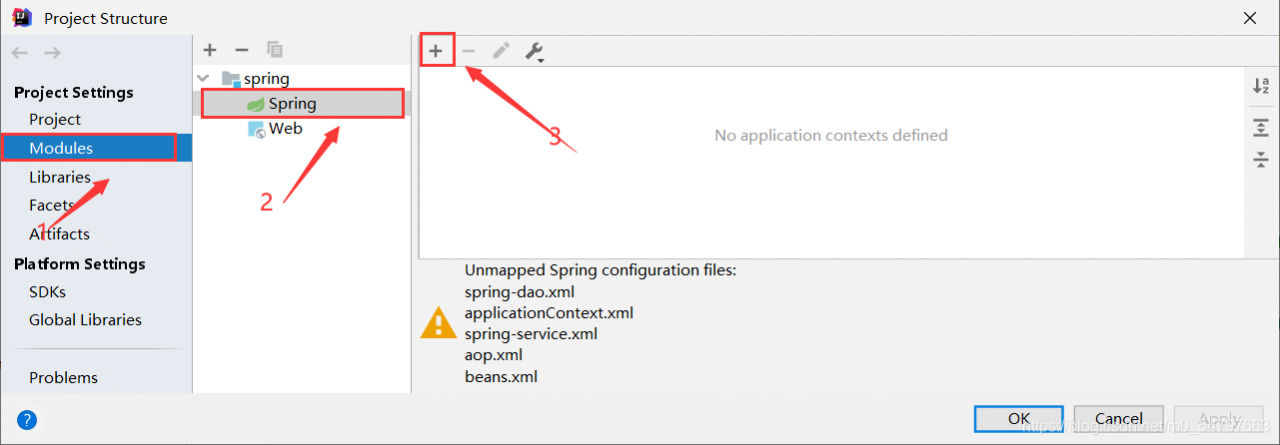
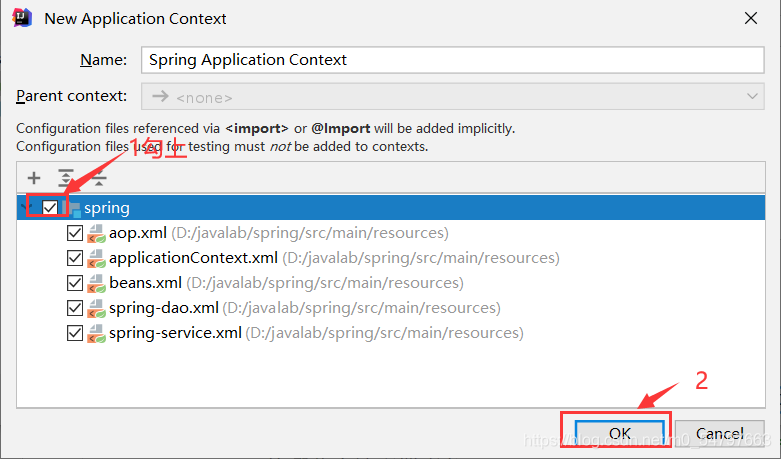
注意想要跨配置文件引用bean,必须做如下操作,不然会爆红

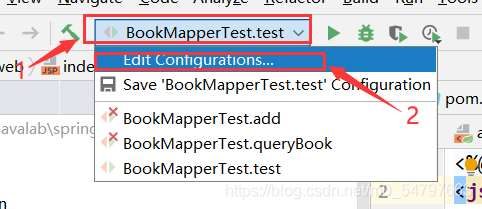
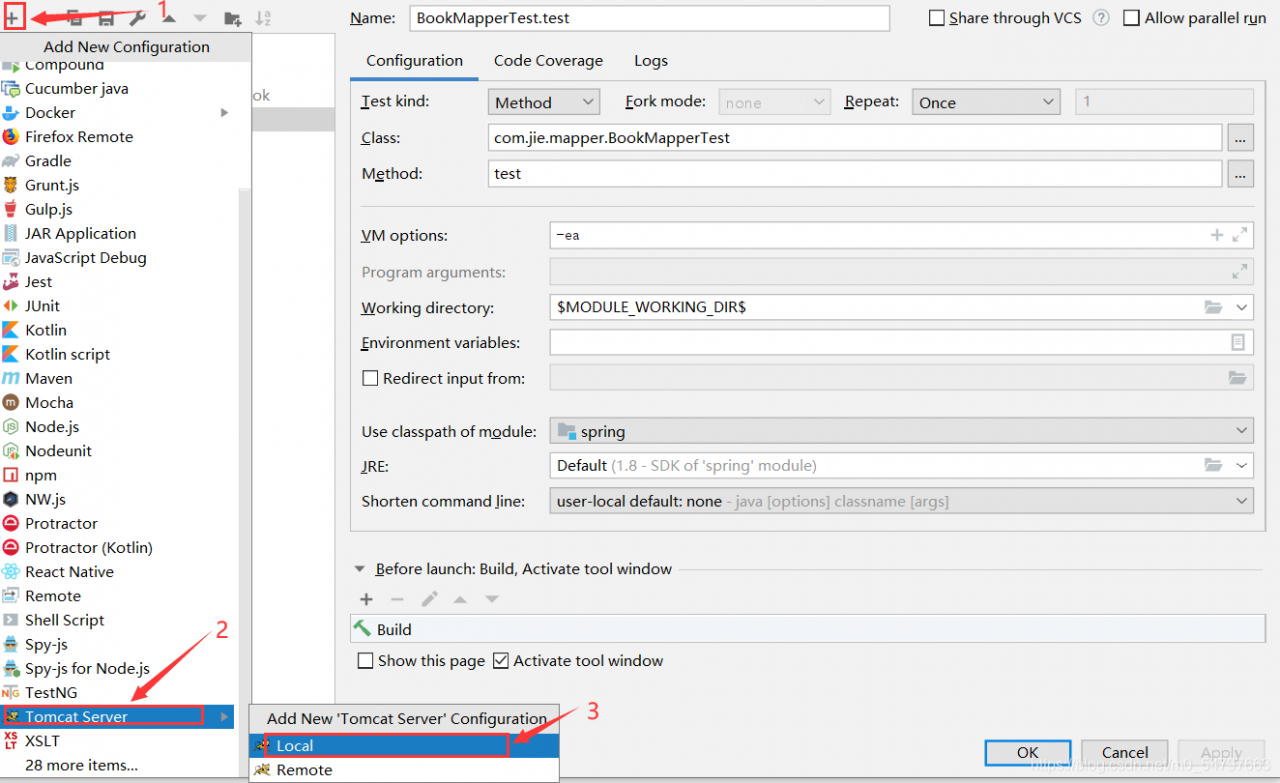
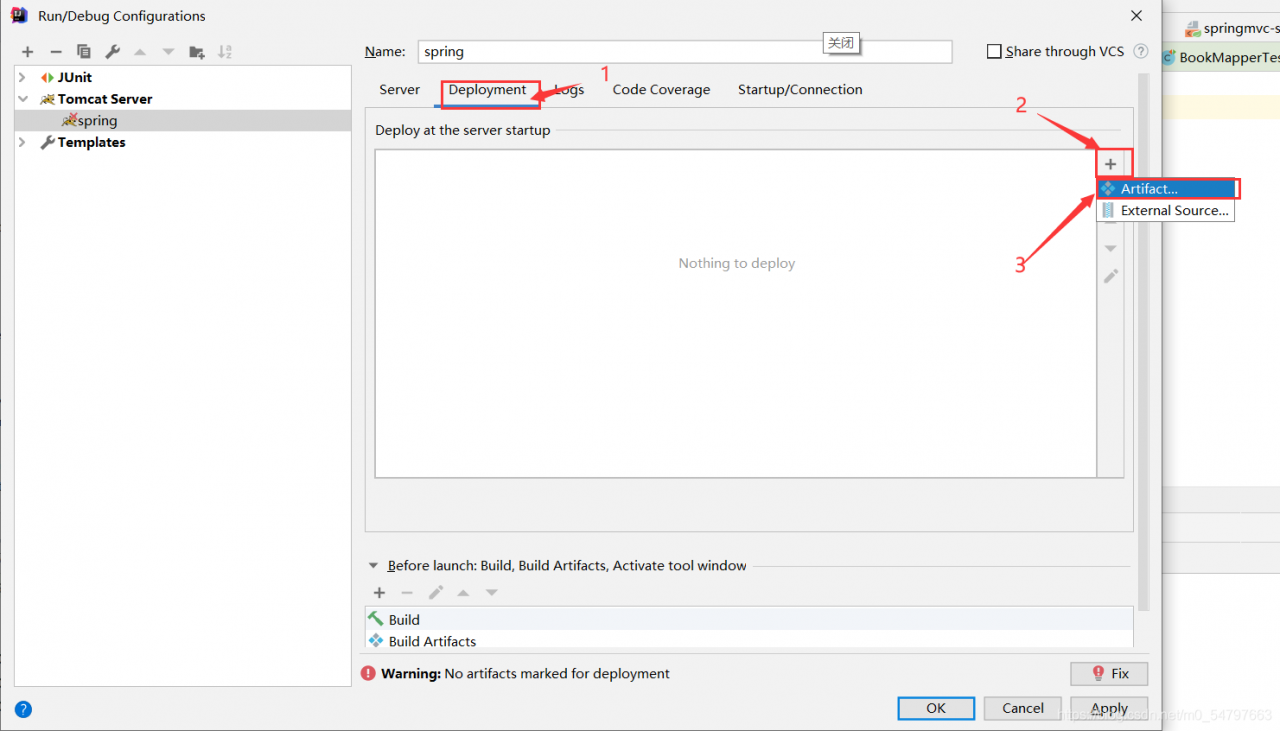
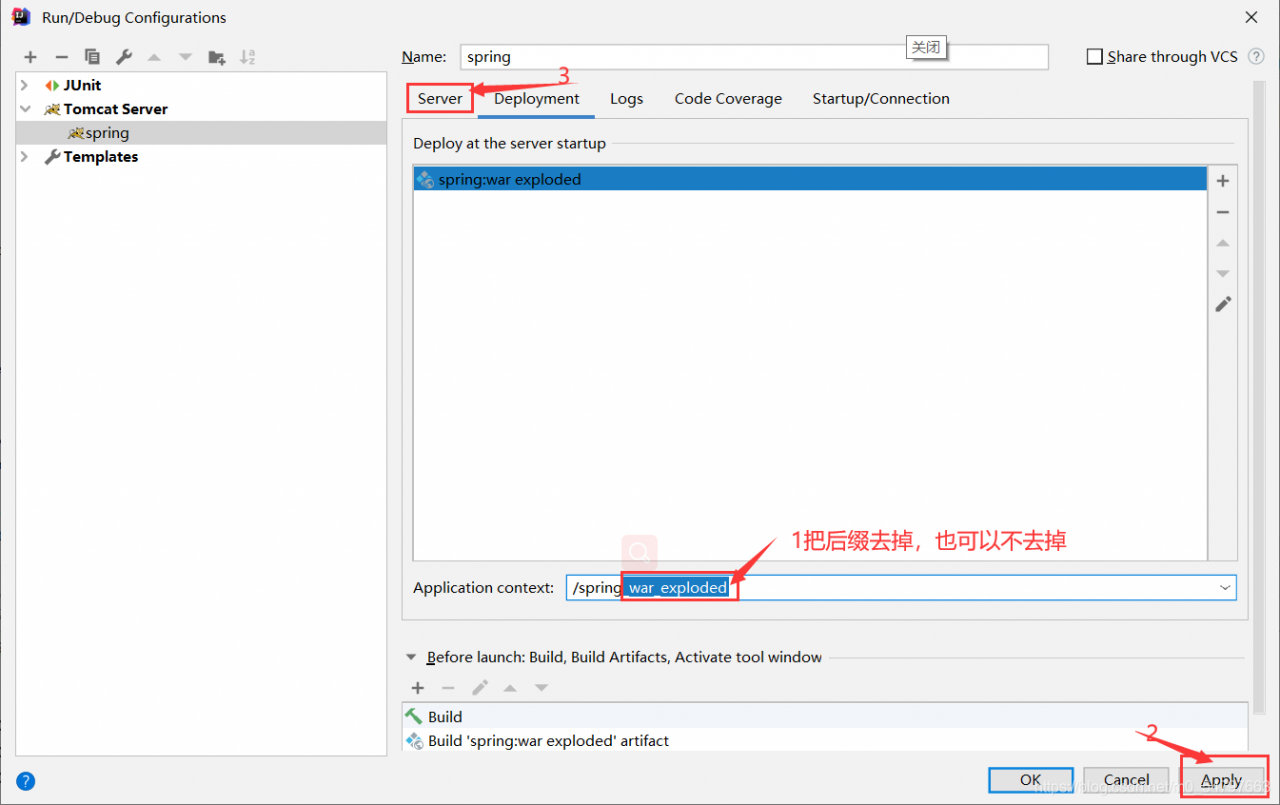
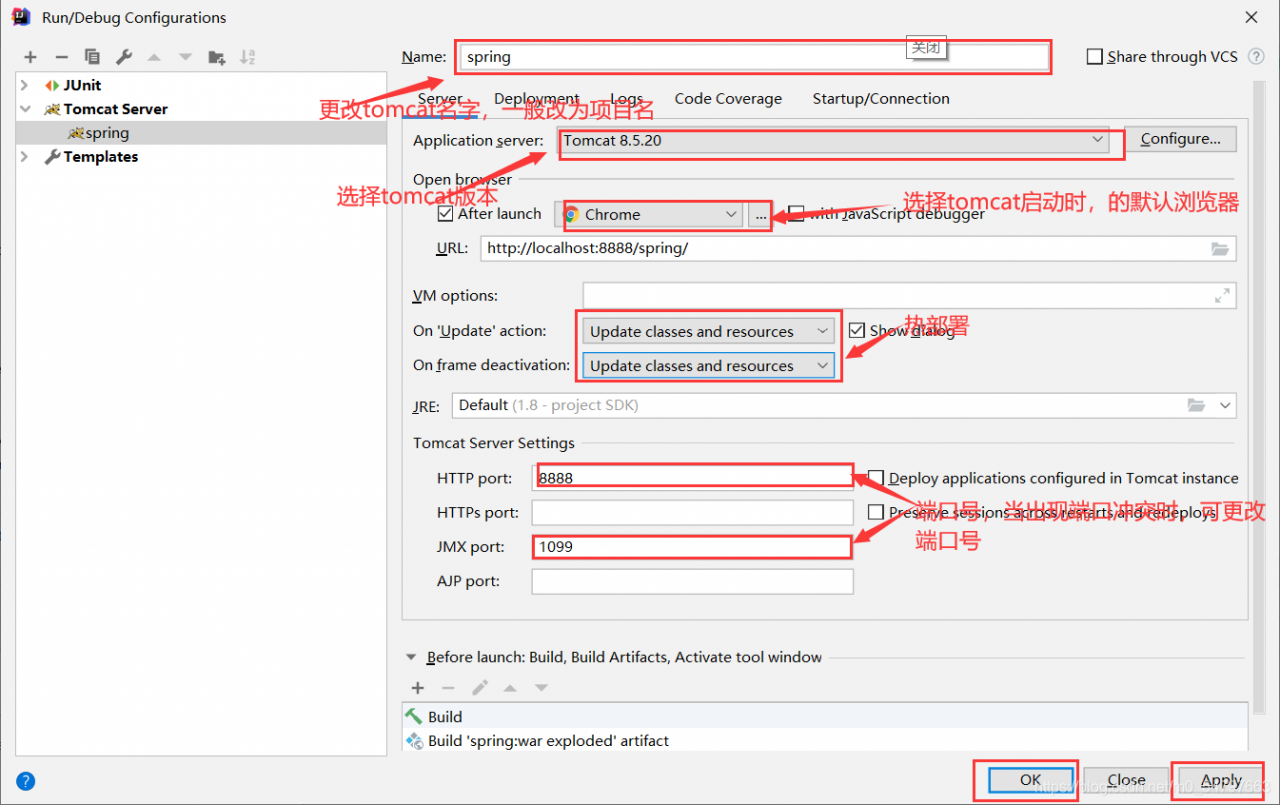
5.配置tomcat
6.编写web.xml
<?xml version="1.0" encoding="UTF-8"?>
<web-app xmlns="http://xmlns.jcp.org/xml/ns/javaee"
         xmlns:xsi="http://www.w3.org/2001/XMLSchema-instance"
         xsi:schemaLocation="http://xmlns.jcp.org/xml/ns/javaee http://xmlns.jcp.org/xml/ns/javaee/web-app_4_0.xsd"
         version="4.0">

    <!--    所有的请求都会经过这-->
    <servlet>
        <servlet-name>springmvc</servlet-name>
        <servlet-class>org.springframework.web.servlet.DispatcherServlet</servlet-class>
        <!--        绑定applicationContext.xml配置文件-->
        <init-param>
            <param-name>contextConfigLocation</param-name>
            <param-value>classpath:applicationContext.xml</param-value>
        </init-param>
        <!--        设置和tomcat一起启动-->
        <load-on-startup>1</load-on-startup>
    </servlet>

    <!--    /匹配所有请求,不包括.jsp-->
    <servlet-mapping>
        <servlet-name>springmvc</servlet-name>
        <url-pattern>/</url-pattern>
    </servlet-mapping>
</web-app>
Spring MVC核心类 DispatcherServlet,要绑定applicationContext.xml配置文件。
< url-pattern>/< /url-pattern>表示会拦截所有请求,但不包括.jsp。
< url-pattern>/*< /url-pattern>表示会拦截所有请求,包括.jsp。
上面的是环境准备。
附加: 创建数据库表
CREATE TABLE `book` (
  `bookID` int NOT NULL AUTO_INCREMENT,
  `bookName` varchar(100) NOT NULL,
  `bookCounts` int NOT NULL,
  `detail` varchar(100) DEFAULT NULL,
  PRIMARY KEY (`bookID`),
  KEY `bookID` (`bookID`)
) ENGINE=InnoDB DEFAULT CHARSET=utf8
表中的数据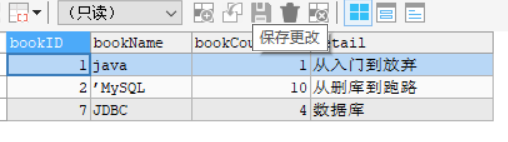
7.编写实体类(pojo)
Book类
@NoArgsConstructor
@AllArgsConstructor
@Data
@Component
public class Book {

    private int bookID;

    private String bookName;

    private int bookCounts;

    private String detail;
}
8.编写dao层
BookMapper接口
public interface BookMapper {
    //查
    List<Book> queryBook();

}
BookMapper.xml
<?xml version="1.0" encoding="UTF8" ?>
<!DOCTYPE mapper
        PUBLIC "-//mybatis.org//DTD Mapper 3.0//EN"
        "http://mybatis.org/dtd/mybatis-3-mapper.dtd">
<mapper namespace="com.jie.mapper.BookMapper">

<!--    查-->
    <select id="queryBook"  resultType="book">
        select * from  mydate.book;
    </select>

</mapper>
9.编写service层
BookService
@Service
public class BookService {
@Autowired
    private BookMapper bookMapper;

    public List<Book> queryBook() {
        return bookMapper.queryBook();
    }

}
10.编写Controller层
BookController
@Controller
@RequestMapping("/book")
public class BookController {
    @Autowired
    private BookService bookService;
    @RequestMapping("/toBookPage")
    public String toBookPage(Model model){
        List<Book> books = bookService.queryBook();
        for (Book book:books
             ) {
            System.out.println(book);
        }
        model.addAttribute("books",books);
        return "book";
    }
}
11.编写前端页面
index.jsp页面
<%@ page contentType="text/html;charset=UTF-8" language="java" %>
<jsp:forward page="/book/toBookPage"></jsp:forward>
web项目启动默认打开这个index.jsp页面,index.jsp页面很简单就是跳转到book.jsp页面
book.jsp页面
<%@ taglib prefix="c" uri="http://java.sun.com/jsp/jstl/core" %>
<%@ page contentType="text/html;charset=UTF-8" language="java" %>
<html>
<head>
    <title>图书</title>
</head>
<body>
<div>
    <h3 align="center">图书列表</h3>
  <table align="center" border="1px" >
      <tr>
          <th>bookID</th>
          <th>名称</th>
          <th>数量</th>
          <th>描述</th>
      </tr>
<c:forEach items="${books}" var="book">
    <tr>
        <th>${book.bookID}</th>
        <th>${book.bookName}</th>
        <th>${book.bookCounts}</th>
        <th>${book.detail}</th>
    </tr>
</c:forEach>

  </table>
</div>
</body>
</html>
book.jsp页面就是将数据库中的图书信息遍历出来。
运行结果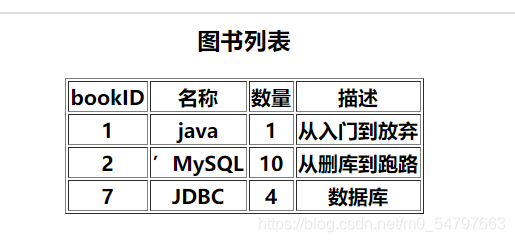
最后我们用上面的实例来梳理一下spring mvc的执行流程
- tomcat启动,打开默认的index.jsp页面,index.jsp页面发送请求/book/toBookPage。DispatcherServlet拦截到请求/book/toBookPage。
- DispatcherServlet调用对应的HandlerMapping处理器映射器(RequestMappingHandlerMapping)。
- HandlerMapping处理器映射器找到具体的处理器(BookController),并返回给DispatcherServlet。
- DispatcherServlet调用对应的HandlerAdapter处理器适配器(RequestMappingHandlerAdapter)。
- HandlerAdapter处理器适配器,调用具体的处理器(BookController)处理业务(执行toBookPage(Model model)方法)
- 处理器(BookController)执行完后返回ModelAndView给HandlerAdapter处理器适配器。(Model(数据:即图书的数据 ),View(视图,即返回值:“book”;)
- HandlerAdapter处理器适配器将ModelAndView返回给DispatcherServlet。
- DispatcherServlet将ModelAndView传给ViewReslover视图解析器。ViewReslover视图解析器。将View即 “book”,拼接前缀("/WEB-INF/page/")和后缀(".jsp"))将拼接后的结果("/WEB-INF/page/book.jsp)返回给DispatcherServlet
- DispatcherServlet根据("/WEB-INF/page/book.jsp)找到book.jsp页面,并将Model数据:即图书的数据 ,填充至book.jsp页面中。
- DispatcherServlet响应用户。
补充知识点:
HandlerMapping处理器映射器:springMVC–4种映射处理器handlerMapping
HandlerAdapter处理器适配器:SpringMVC 处理器适配器详解