目录
把项目从 GitHub 迁移到极狐 GitLab 有多种方式,可以直接在极狐 GitLab 创建项目的页面选择 import from GitHub,通过“一键式”来完成迁移,也可以使用 API 的方式通过“分步式”完成迁移。下面将分别进行展示。
通过
import(下面的“一键式”迁移) 方式来迁移的项目只适合非企业版 GitHub。企业版 GitHub 的项目迁移建议用“分步式”迁移,也就是通过 API 的方式来进行。
一键式迁移
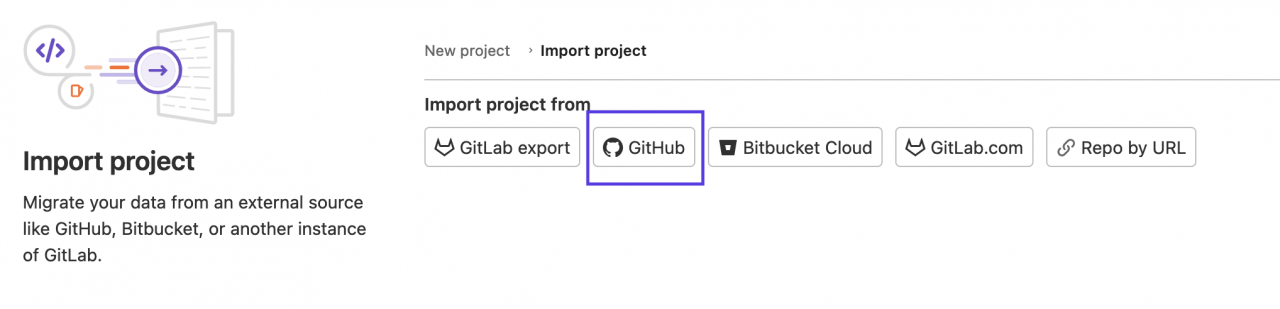
从 GitHub 到极狐 GitLab 最简单的迁移方式就是在创建项目时,选择 import project 选项:

接着选择 GitHub 即可:
随后需要输入 GitHub 的 Personal Access Token 来 list 出 GitHub 账号下面的所有 Repo,选择想要 import 的项目即可完成项目迁移。这是最简单的迁移方式。
分步式迁移
分步式迁移是利用 GitHub 与极狐 GitLab 自身的 API 来完成数据的导出(GitHub 为导出方)、导入(极狐 GitLab 为导入方)。可以分以下两种情况分别进行导入。
个人账号下的仓库迁移
个人账号下的仓库指不在任何一个 organization 下面的项目,这种情况的迁移很简单,只需要确认需要从 GitHub 导出的 Repo,找到 Repo ID,然后调用极狐 GitLab 的 import API 即可。下面进行演示。
前提条件
确认需要迁移的项目,本文演示的仓库地址为:https://github.com/majinghe/tekton-demo
获取可用的极狐 GitLab 与 GitHub Personal Access Token
极狐 GitLab 创建 Personal Access Token 的方法如下:
创建极狐GitLab Personal Access Token 的方法
GitHub 创建 Personal Access Token 的方法和极狐 GitLab 类似:右上角用户信息 –> Settings –> Developer settings –> Personal access tokens。
获取 GitHub Repo ID
获取 Demo Repo:GitHub - majinghe/tekton-demo: Tekton demo 的 Repo ID:
$ curl -ks https://api.github.com/repos/majinghe/tekton-demo
{
  "id": 374861350,
  "node_id": "MDEwOlJlcG9zaXRvcnkzNzQ4NjEzNTA=",
  "name": "tekton-demo",
  "full_name": "majinghe/tekton-demo",
  "private": false,
  "owner": {
    "login": "majinghe",
    "id": 42570491,
    "node_id": "MDQ6VXNlcjQyNTcwNDkx",
    "avatar_url": "https://avatars.githubusercontent.com/u/42570491?v=4",
    "gravatar_id": "",
    "url": "https://api.github.com/users/majinghe",
    "html_url": "https://github.com/majinghe",
    "followers_url": "https://api.github.com/users/majinghe/followers",
    "following_url": "https://api.github.com/users/majinghe/following{/other_user}",
    "gists_url": "https://api.github.com/users/majinghe/gists{/gist_id}",
    "starred_url": "https://api.github.com/users/majinghe/starred{/owner}{/repo}",
    "subscriptions_url": "https://api.github.com/users/majinghe/subscriptions",
    "organizations_url": "https://api.github.com/users/majinghe/orgs",
    "repos_url": "https://api.github.com/users/majinghe/repos",
    "events_url": "https://api.github.com/users/majinghe/events{/privacy}",
    "received_events_url": "https://api.github.com/users/majinghe/received_events",
    "type": "User",
    "site_admin": false
  },
  "html_url": "https://github.com/majinghe/tekton-demo",
  "description": "Tekton demo",
  "fork": false,
  "url": "https://api.github.com/repos/majinghe/tekton-demo",
 ......太长,只保留部分信息......
  "visibility": "public",
  "forks": 0,
  "open_issues": 2,
  "watchers": 0,
  "default_branch": "main",
  "temp_clone_token": null,
  "network_count": 0,
  "subscribers_count": 1
}
返回值的第一行 "id": 374861350, 就是该 Repo 的 Repo ID。接下来调用极狐 GitLab import API 导入即可。
导入极狐 GitLab
调用极狐 GitLab 的 import API,将上述 GitHub Repo 导入极狐 GitLab,API 为:
$ curl --request POST \
  --url "https://gitlab.example.com/api/v4/import/github" \
  --header "content-type: application/json" \
  --header "PRIVATE-TOKEN: your-jh-gitlab-personal-access-token" \
  --data '{
    "personal_access_token": "your-github-personal-access-token",
    "repo_id": "12345",
    "target_namespace": "group/subgroup",
    "new_name": "NEW-NAME",
    "github_hostname": "https://github.example.com"
}'
参数说明:
–url:极狐 GitLab 实例地址;
PRIVATE-TOKEN:极狐 GitLab Personal Access Token,参考前提环节进行获取;
personal_access_token:GitHub Personal Access Token,参考前提环节进行获取;
repo_id:上一步获取的 GitHub Repo ID;
target_namespace:极狐 GitLab 中,导入项目所在的 Group/SubGroup;
new_name:导入项目在极狐 GitLab 中的项目名称;
github_hostname:GitHub 实例地址,如果是 github.com,则可不写;
将上述获取的 Personal Access Token 以及 Repo ID 分别替换,然后执行如下命令进行导入:
$ curl --request POST \
  --url "https://gitlab.cn/api/v4/import/github" \
  --header "content-type: application/json" \
  --header "PRIVATE-TOKEN: jh-gitlab-personal-token" \
  --data '{
    "personal_access_token": "github-personal-access-token",
    "repo_id": "374861350",
    "target_namespace": "xiaomage",
    "new_name": "jh-tekton-demo"
}'
可以看到返回值:
{
  "id":13535,
  "name":"jh-tekton-demo",
  "full_path":"/xiaomage/jh-tekton-demo",
  "full_name":"xiaomage / jh-tekton-demo"
}
可以看到极狐 GitLab 中,项目的 ID 为 13535,name 为 jh-tekton-demo,所在的 Group/Subgroup 为 xiaomage。可以在极狐 GitLab 实例界面上进行查看:
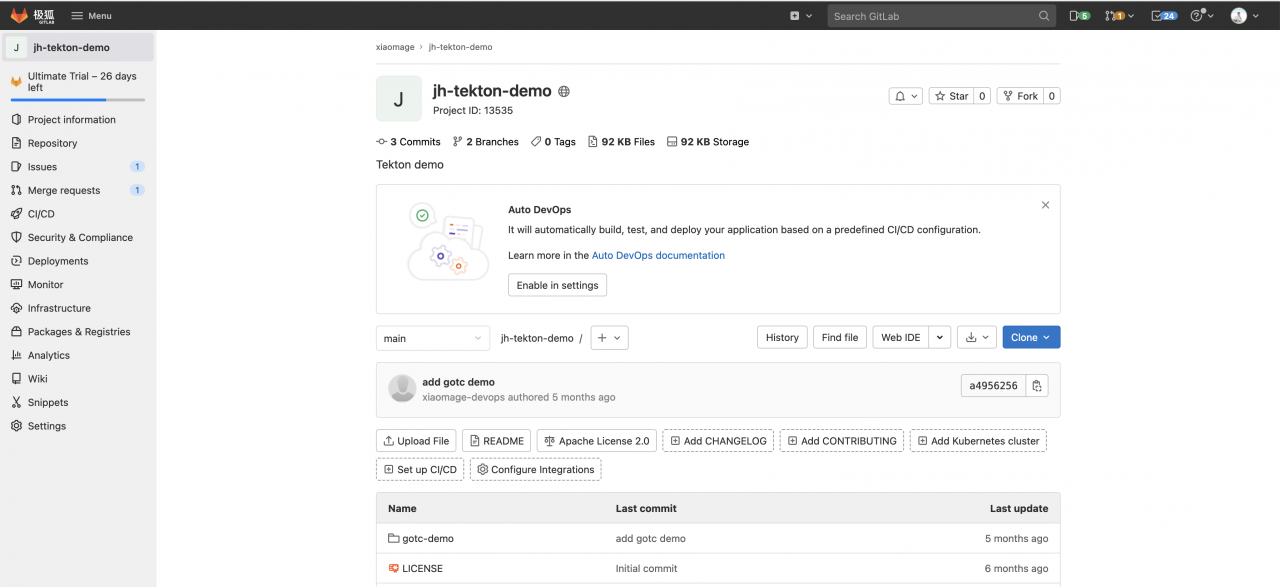
可以看到 issue,PR(极狐 GitLab 中自动转换为 MR)一并进行了导入。接下来就可以在极狐 GitLab 中进行协作开发了。
Organization 下面的仓库迁移
极狐 GitLab 没有 organization 这样的概念,但是有 Group/Subgroup 来对项目(Project)进行编排管理。GitHub organization 与极狐 GitLab Group/Subgroup 的转换示意图如下:
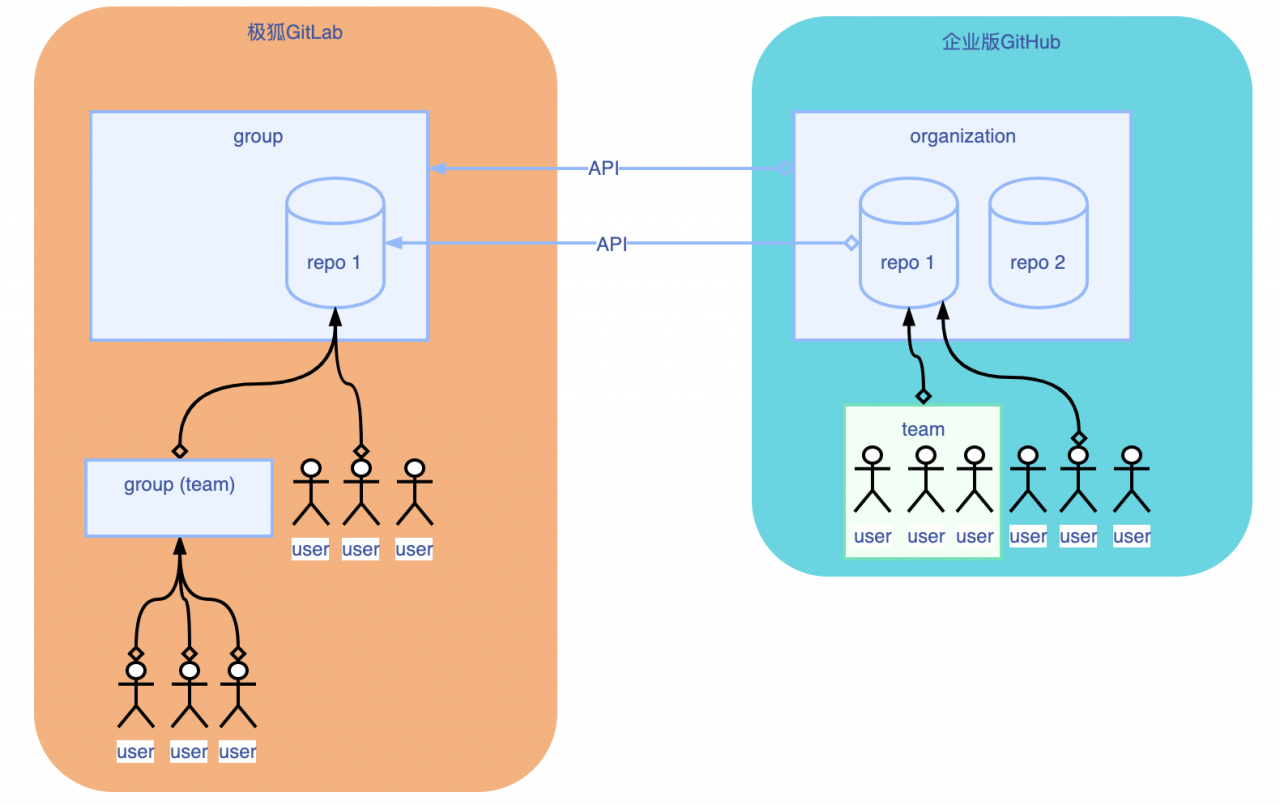
以 https://github.com/opensource-f2f/episode 为例,说明 organization 下面的仓库迁移。episode 是位于 organization opensource-f2f 下的一个 Repo。
获取 Organization 信息
可以用 API 来 list 某个账号下面的所有 organization,也可以 list 出某个具体 organization 的详细信息。两种方式都可以获取到 organization ID。比如用如何命令 list 出所有的 Organizations:
$ curl -i -H "Authorization: token your-github-personal-access-token" \
    https://api.github.com/user/orgs
可以得到如下返回结果:
[
  {
    "login": "k8smeetup",
    "id": 30145889,
    "node_id": "MDEyOk9yZ2FuaXphdGlvbjMwMTQ1ODg5",
    "url": "https://api.github.com/orgs/k8smeetup",
    "repos_url": "https://api.github.com/orgs/k8smeetup/repos",
    "events_url": "https://api.github.com/orgs/k8smeetup/events",
    "hooks_url": "https://api.github.com/orgs/k8smeetup/hooks",
    "issues_url": "https://api.github.com/orgs/k8smeetup/issues",
    "members_url": "https://api.github.com/orgs/k8smeetup/members{/member}",
    "public_members_url": "https://api.github.com/orgs/k8smeetup/public_members{/member}",
    "avatar_url": "https://avatars.githubusercontent.com/u/30145889?v=4",
    "description": ""
  },
..... 省略其他 organization 信息 ......
  {
    "login": "opensource-f2f",
    "id": 91397969,
    "node_id": "MDEyOk9yZ2FuaXphdGlvbjkxMzk3OTY5",
    "url": "https://api.github.com/orgs/opensource-f2f",
    "repos_url": "https://api.github.com/orgs/opensource-f2f/repos",
    "events_url": "https://api.github.com/orgs/opensource-f2f/events",
    "hooks_url": "https://api.github.com/orgs/opensource-f2f/hooks",
    "issues_url": "https://api.github.com/orgs/opensource-f2f/issues",
    "members_url": "https://api.github.com/orgs/opensource-f2f/members{/member}",
    "public_members_url": "https://api.github.com/orgs/opensource-f2f/public_members{/member}",
    "avatar_url": "https://avatars.githubusercontent.com/u/91397969?v=4",
    "description": ""
  }
]
可以在返回值中看到 organization opensource-f2f 的 ID 为 91397969。接下来 list 此 organization 下的 repo。
获取 Organization 下的 Repo 信息
用如下命令 list 出 organization opensource-f2f 下的 Repo 信息:
$ curl -i -H "Authorization: token your-github-personal-access-token" \
     https://api.github.com/orgs/opensource-f2f/repos
返回值为:
[
  {
    "id": 410418183,
    "node_id": "R_kgDOGHZ8Bw",
    "name": "artwork",
    "full_name": "opensource-f2f/artwork",
    "private": false,
    "owner": {
      "login": "opensource-f2f",
      "id": 91397969,
      "node_id": "MDEyOk9yZ2FuaXphdGlvbjkxMzk3OTY5",
      "avatar_url": "https://avatars.githubusercontent.com/u/91397969?v=4",
      "gravatar_id": "",
      "url": "https://api.github.com/users/opensource-f2f",
      "html_url": "https://github.com/opensource-f2f",
      "followers_url": "https://api.github.com/users/opensource-f2f/followers",
      "following_url": "https://api.github.com/users/opensource-f2f/following{/other_user}",
      "gists_url": "https://api.github.com/users/opensource-f2f/gists{/gist_id}",
      "starred_url": "https://api.github.com/users/opensource-f2f/starred{/owner}{/repo}",
      "subscriptions_url": "https://api.github.com/users/opensource-f2f/subscriptions",
      "organizations_url": "https://api.github.com/users/opensource-f2f/orgs",
      "repos_url": "https://api.github.com/users/opensource-f2f/repos",
      "events_url": "https://api.github.com/users/opensource-f2f/events{/privacy}",
      "received_events_url": "https://api.github.com/users/opensource-f2f/received_events",
      "type": "Organization",
      "site_admin": false
    }
......太长了,忽略其他信息......
  },
  {
    "id": 410540405,
    "node_id": "R_kgDOGHhZdQ",
    "name": "episode",
    "full_name": "opensource-f2f/episode",
    "private": false,
    "owner": {
      "login": "opensource-f2f",
      "id": 91397969,
      "node_id": "MDEyOk9yZ2FuaXphdGlvbjkxMzk3OTY5",
      "avatar_url": "https://avatars.githubusercontent.com/u/91397969?v=4",
      "gravatar_id": "",
      "url": "https://api.github.com/users/opensource-f2f",
      "html_url": "https://github.com/opensource-f2f",
      "followers_url": "https://api.github.com/users/opensource-f2f/followers",
      "following_url": "https://api.github.com/users/opensource-f2f/following{/other_user}",
      "gists_url": "https://api.github.com/users/opensource-f2f/gists{/gist_id}",
      "starred_url": "https://api.github.com/users/opensource-f2f/starred{/owner}{/repo}",
      "subscriptions_url": "https://api.github.com/users/opensource-f2f/subscriptions",
      "organizations_url": "https://api.github.com/users/opensource-f2f/orgs",
      "repos_url": "https://api.github.com/users/opensource-f2f/repos",
      "events_url": "https://api.github.com/users/opensource-f2f/events{/privacy}",
      "received_events_url": "https://api.github.com/users/opensource-f2f/received_events",
      "type": "Organization",
      "site_admin": false
    }
......太长了,忽略其他信息......
  },
  {
    "id": 410542067,
    "node_id": "R_kgDOGHhf8w",
    "name": ".github",
    "full_name": "opensource-f2f/.github",
    "private": false,
    "owner": {
      "login": "opensource-f2f",
      "id": 91397969,
      "node_id": "MDEyOk9yZ2FuaXphdGlvbjkxMzk3OTY5",
      "avatar_url": "https://avatars.githubusercontent.com/u/91397969?v=4",
      "gravatar_id": "",
      "url": "https://api.github.com/users/opensource-f2f",
      "html_url": "https://github.com/opensource-f2f",
      "followers_url": "https://api.github.com/users/opensource-f2f/followers",
      "following_url": "https://api.github.com/users/opensource-f2f/following{/other_user}",
      "gists_url": "https://api.github.com/users/opensource-f2f/gists{/gist_id}",
      "starred_url": "https://api.github.com/users/opensource-f2f/starred{/owner}{/repo}",
      "subscriptions_url": "https://api.github.com/users/opensource-f2f/subscriptions",
      "organizations_url": "https://api.github.com/users/opensource-f2f/orgs",
      "repos_url": "https://api.github.com/users/opensource-f2f/repos",
      "events_url": "https://api.github.com/users/opensource-f2f/events{/privacy}",
      "received_events_url": "https://api.github.com/users/opensource-f2f/received_events",
      "type": "Organization",
      "site_admin": false
    },
    "license": {
      "key": "apache-2.0",
      "name": "Apache License 2.0",
      "spdx_id": "Apache-2.0",
      "url": "https://api.github.com/licenses/apache-2.0",
      "node_id": "MDc6TGljZW5zZTI="
    },
    "allow_forking": true,
    "is_template": false,
    "topics": [

    ],
    "visibility": "public",
    "forks": 0,
    "open_issues": 0,
    "watchers": 0,
    "default_branch": "master",
    "permissions": {
      "admin": true,
      "maintain": true,
      "push": true,
      "triage": true,
      "pull": true
    }
  }
]
从返回值可以看到,organization opensource-f2f 下面有三个 Repo,ID 分别为 410418183(artwork Repo),410540405(episode Repo),410542067(.github Repo)。这些 ID 在后面导入的时候要用到。
获取 Organization 下的 team 信息
用如下命令 list 出 organization opensource-f2f 下面的 teams:
$ curl -i -H "Authorization: token your-github-personal-access-token" \
    https://api.github.com/orgs/opensource-f2f/teams
返回值为:
[
  {
    "name": "admin",
    "id": 5157920,
    "node_id": "T_kwDOBXKfUc4ATrQg",
    "slug": "admin",
    "description": "",
    "privacy": "closed",
    "url": "https://api.github.com/organizations/91397969/team/5157920",
    "html_url": "https://github.com/orgs/opensource-f2f/teams/admin",
    "members_url": "https://api.github.com/organizations/91397969/team/5157920/members{/member}",
    "repositories_url": "https://api.github.com/organizations/91397969/team/5157920/repos",
    "permission": "pull",
    "parent": null
  },
  {
    "name": "guest",
    "id": 5158284,
    "node_id": "T_kwDOBXKfUc4ATrWM",
    "slug": "guest",
    "description": "The guests of the open-source talk",
    "privacy": "closed",
    "url": "https://api.github.com/organizations/91397969/team/5158284",
    "html_url": "https://github.com/orgs/opensource-f2f/teams/guest",
    "members_url": "https://api.github.com/organizations/91397969/team/5158284/members{/member}",
    "repositories_url": "https://api.github.com/organizations/91397969/team/5158284/repos",
    "permission": "pull",
    "parent": null
  }
]
可以看到有两个 team:admin 和 guest。ID 分别为 5157920 和 5158284。
获取 Organization team 下面的 user 信息
用如下命令 list organization pensource-f2f 下面 admin team 下的 user:
$ curl -i -H "Authorization: token your-github-personal-access-token" \
    https://api.github.com/orgs/opensource-f2f/teams/admin/members
返回值如下:
[
  {
    "login": "LinuxSuRen",
    "id": 1450685,
    "node_id": "MDQ6VXNlcjE0NTA2ODU=",
    "avatar_url": "https://avatars.githubusercontent.com/u/1450685?u=9ebd4373578a82540f97f204317df40a852265af&v=4",
    "gravatar_id": "",
    "url": "https://api.github.com/users/LinuxSuRen",
    "html_url": "https://github.com/LinuxSuRen",
    "followers_url": "https://api.github.com/users/LinuxSuRen/followers",
    "following_url": "https://api.github.com/users/LinuxSuRen/following{/other_user}",
    "gists_url": "https://api.github.com/users/LinuxSuRen/gists{/gist_id}",
    "starred_url": "https://api.github.com/users/LinuxSuRen/starred{/owner}{/repo}",
    "subscriptions_url": "https://api.github.com/users/LinuxSuRen/subscriptions",
    "organizations_url": "https://api.github.com/users/LinuxSuRen/orgs",
    "repos_url": "https://api.github.com/users/LinuxSuRen/repos",
    "events_url": "https://api.github.com/users/LinuxSuRen/events{/privacy}",
    "received_events_url": "https://api.github.com/users/LinuxSuRen/received_events",
    "type": "User",
    "site_admin": false
  },
  {
    "login": "wey-gu",
    "id": 1651790,
    "node_id": "MDQ6VXNlcjE2NTE3OTA=",
    "avatar_url": "https://avatars.githubusercontent.com/u/1651790?u=5a5ea37c495f7787f35172f0f86569daf5a5a65e&v=4",
    "gravatar_id": "",
    "url": "https://api.github.com/users/wey-gu",
    "html_url": "https://github.com/wey-gu",
    "followers_url": "https://api.github.com/users/wey-gu/followers",
    "following_url": "https://api.github.com/users/wey-gu/following{/other_user}",
    "gists_url": "https://api.github.com/users/wey-gu/gists{/gist_id}",
    "starred_url": "https://api.github.com/users/wey-gu/starred{/owner}{/repo}",
    "subscriptions_url": "https://api.github.com/users/wey-gu/subscriptions",
    "organizations_url": "https://api.github.com/users/wey-gu/orgs",
    "repos_url": "https://api.github.com/users/wey-gu/repos",
    "events_url": "https://api.github.com/users/wey-gu/events{/privacy}",
    "received_events_url": "https://api.github.com/users/wey-gu/received_events",
    "type": "User",
    "site_admin": false
  },
  {
    "login": "majinghe",
    "id": 42570491,
    "node_id": "MDQ6VXNlcjQyNTcwNDkx",
    "avatar_url": "https://avatars.githubusercontent.com/u/42570491?u=6d018892fca0c602704d6b46b6bd7ca4966c7009&v=4",
    "gravatar_id": "",
    "url": "https://api.github.com/users/majinghe",
    "html_url": "https://github.com/majinghe",
    "followers_url": "https://api.github.com/users/majinghe/followers",
    "following_url": "https://api.github.com/users/majinghe/following{/other_user}",
    "gists_url": "https://api.github.com/users/majinghe/gists{/gist_id}",
    "starred_url": "https://api.github.com/users/majinghe/starred{/owner}{/repo}",
    "subscriptions_url": "https://api.github.com/users/majinghe/subscriptions",
    "organizations_url": "https://api.github.com/users/majinghe/orgs",
    "repos_url": "https://api.github.com/users/majinghe/repos",
    "events_url": "https://api.github.com/users/majinghe/events{/privacy}",
    "received_events_url": "https://api.github.com/users/majinghe/received_events",
    "type": "User",
    "site_admin": false
  }
]
可以看到该 team 下面有三个 user 并显示了详细信息。
将 user 导入极狐 GitLab
将上述 list 出的 user 信息作信息匹配(如果需要,比如为了方便识别用户,确定对应用户的 email 等),然后可以将用户加入到极狐 GitLab 中。可以找 Admin 人员在极狐 GitLab 界面上添加 user,也可以利用下面的 API 直接调用 API 添加。不管是哪种方法,都需要确定有 Admin 权限或者找 Admin 人员完成。
$ curl --request POST --header "PRIVATE-TOKEN: jh-gitlab-personal-acess-token" \
       "https://your-jh-gitlab-url/api/v4/users?email=devops008@sina.com&password=user-pasword&username=username&name=name"
返回值为:
{
  "id": 4,
  "username": "xiaomage",
  "name": "xiaomage",
  "state": "active",
  "avatar_url": "https://secure.gravatar.com/avatar/784477b59c09d7731bd613f1c9a5555a?s=80&d=identicon",
  "web_url": "https://your-jh-gitlab-url/xiaomage",
  "created_at": "2021-12-30T07:44:24.241Z",
 ...... 太长,删除其他信息......
}
可以看到 user 添加成功,ID 为 4,username 和 name 都是 xiaomage。可以在极狐 GitLab 界面上看到:
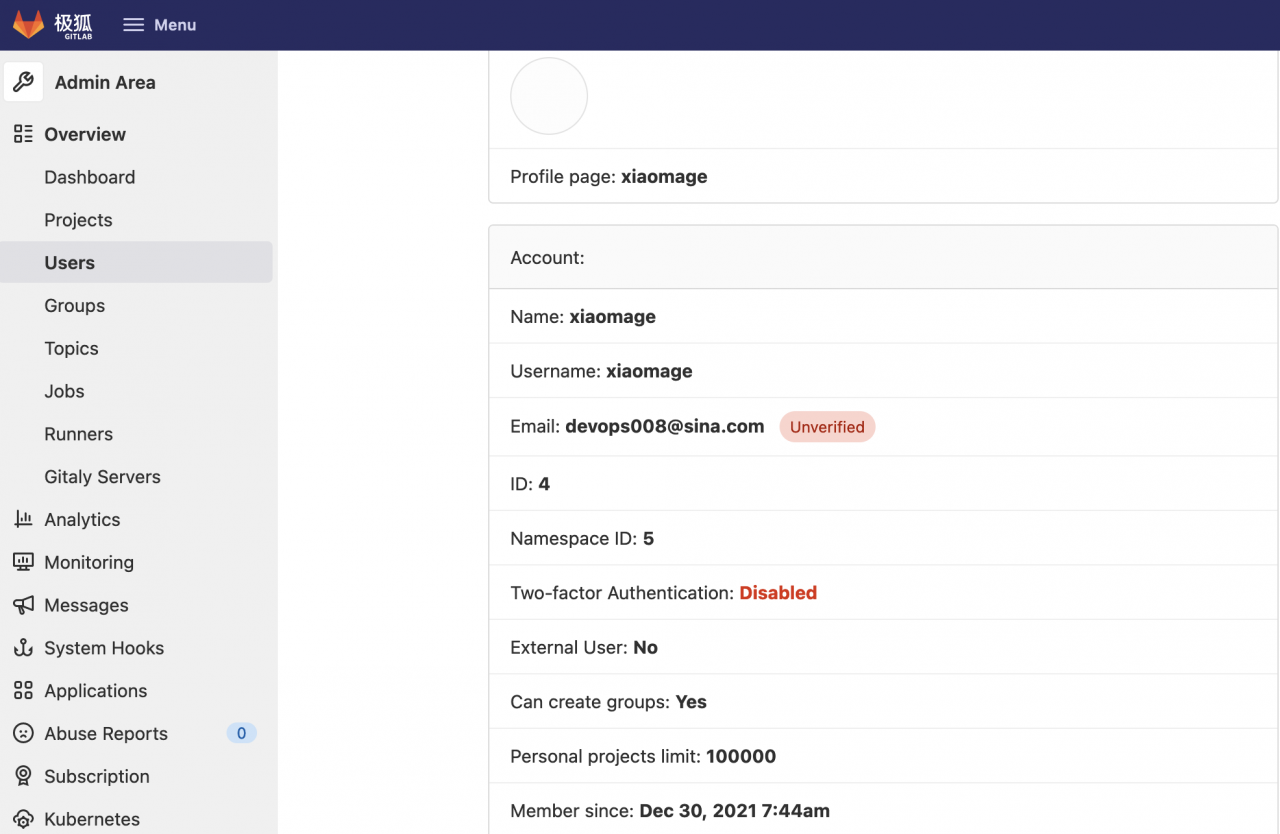
可以用如上方法将 user 都导入极狐 GitLab。
将项目导入极狐 GitLab
由于极狐 GitLab 里面是用 Group 来对项目做管理,先创建一个 Group:
$ curl --request POST \
--url "https://gitlab.cn/api/v4/groups" \
--header "PRIVATE-TOKEN: jh-personal-access-token" \
--header "Content-Type: application/json" \
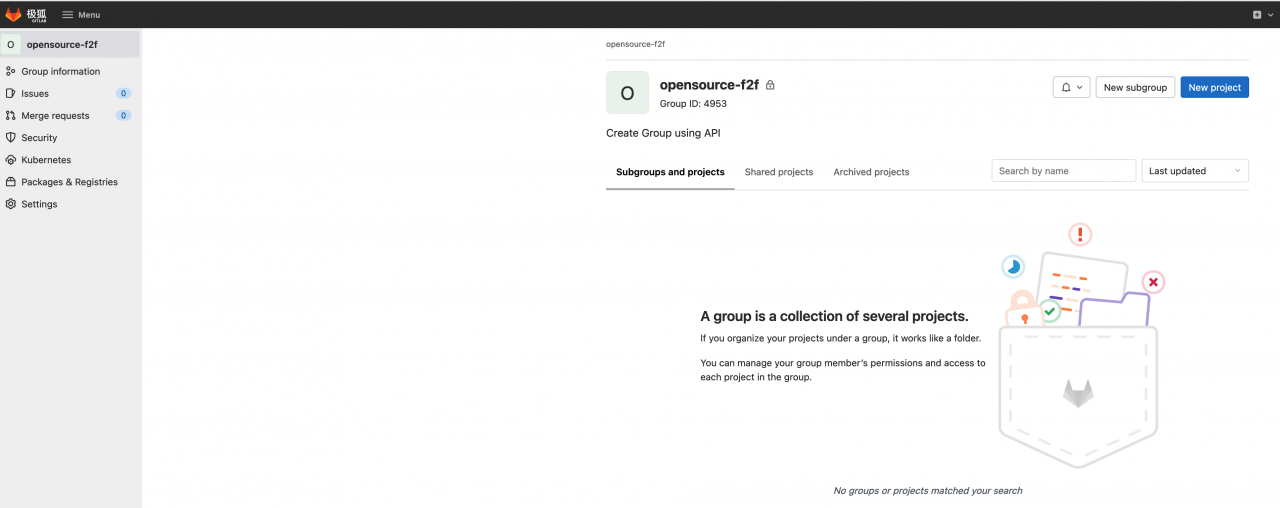
--data '{"name": "opensource-f2f", "path": "opensource-f2f", "description": "Create Group using API" }'返回值如下:
{
  "id":4948,
  "web_url":"https://gitlab.cn/groups/opensource-f2f",
  "name":"opensource-f2f",
  "path":"opensource-f2f",
  "description":"Create Group using API",
......太长,省略其他信息......
}
名为 opensource-f2f 的 Group 已经创建起来了,在极狐 GitLab 实例界面上可以看到:
接下来,将 user 添加到 Group 中,可以在极狐 GitLab 界面上,直接添加:
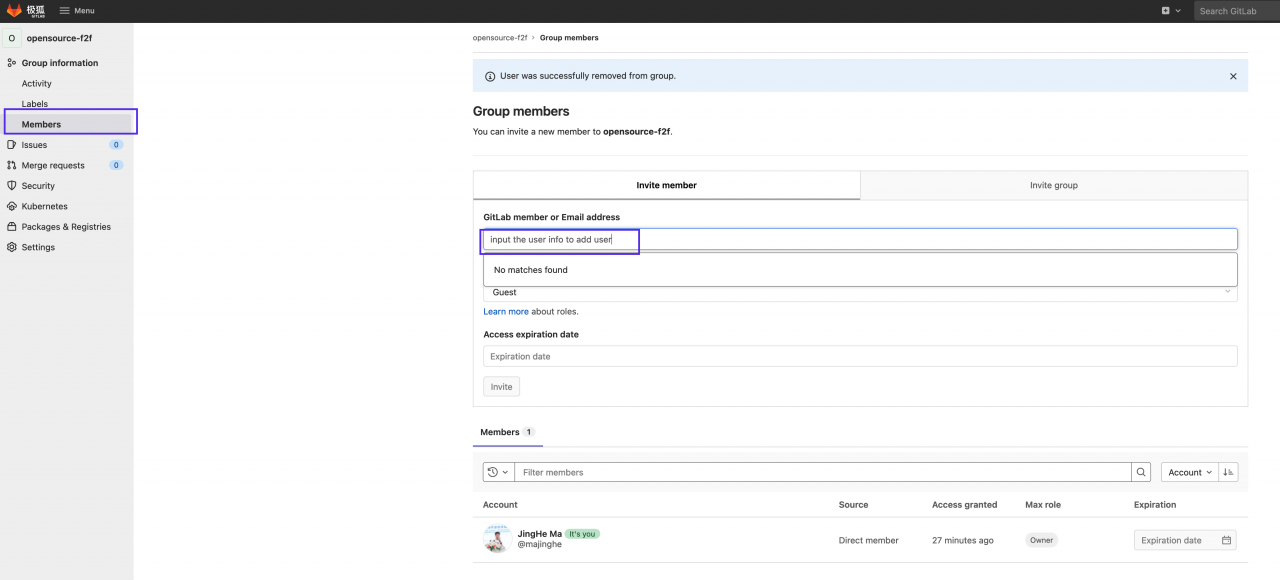
也可以用如下的 API 进行添加:
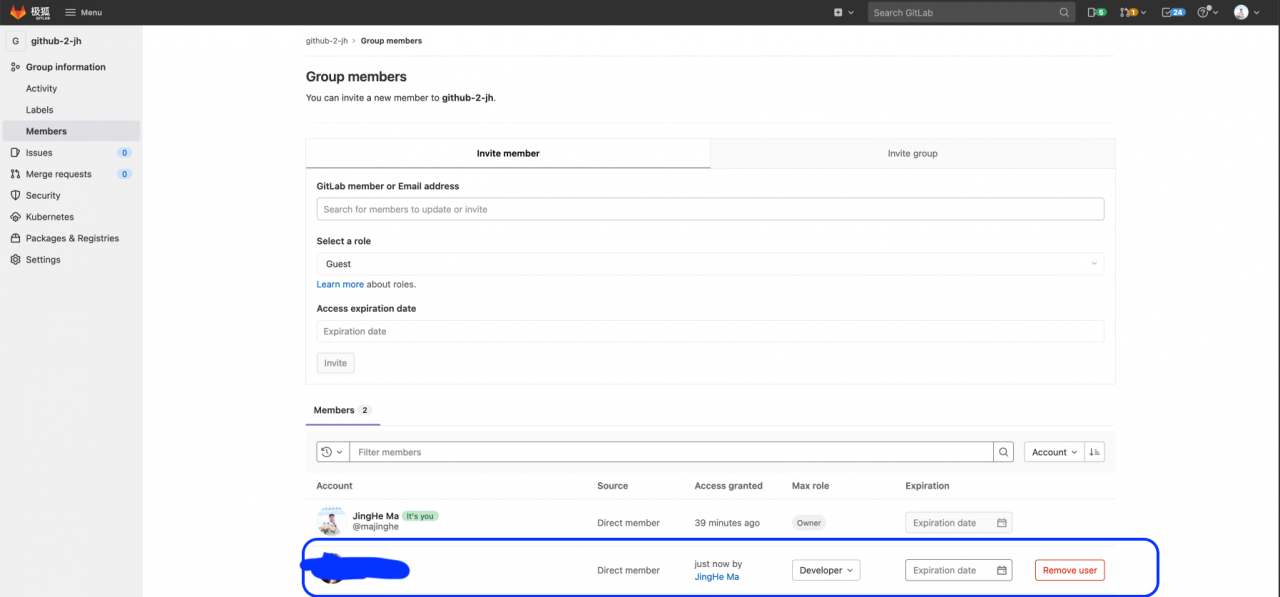
$ curl --request POST --header "PRIVATE-TOKEN: jh-personal-access-token" \
     --data "user_id=user-id&access_level=30" "https://gitlab.cn/api/v4/groups/your-group-id/members"
将需要添加的 user 的 user-id 以及极狐 GitLab token、目的 Group 替换完毕,执行命令即可。可在极狐 GitLab 界面上,看到新增了一个用户:
最后导入 GitHub Repo,比如 ID 为 410540405 的 episode:
$ curl --request POST \
  --url "https://gitlab.cn/api/v4/import/github" \
  --header "content-type: application/json" \
  --header "PRIVATE-TOKEN: your-jh-personal-access-token" \
  --data '{
    "personal_access_token": "your-github-personal-access-token",
    "repo_id": "410540405",
    "target_namespace": "opensource-f2f",
    "new_name": "jh-episode"
}'
返回值如下:
{
  "id":13544,
  "name":"jh-episode",
  "full_path":"/opensource-f2f/jh-episode",
  "full_name":"opensource-f2f / jh-episode"
}
在极狐 GitLab 界面查看导入的项目:

接下来可以根据需要,给此项目添加 user,方法和给 Group 添加 user 的类似。可以将其他 GitHub 如法炮制般的全部迁移到极狐 GitLab 下面,开启极狐 GitLab 之旅。