本文使用 Zhihu On VSCode 创作并发布
tmux
打开一个终端窗口,在里面输入命令,这种用户与计算机的临时交互,称为一次会话(session)。
由于我们使用的是ssh登录linux服务器,为了断电断网能够继续执行命令,则可以使用tmux来运行命令。
tmux就是会话与窗口的解绑工具,窗口关闭后会话并不终止,会继续允许,还允许在单个串口同时访问多个会话,方便多命令行的操作。
tmux的主要命令
# 新建会话
tmux new -s <session-name>
#命令可以查看当前所有的 Tmux 会话。
tmux ls
# 重新接入某个已存在的会话
tmux attach -t <session-name>
#杀死某个会话
tmux kill-session -t <session-name>
主要快捷键:
-
Ctrl+b d:分离当前会话。 -
Ctrl+b s:列出所有会话。 -
Ctrl+b $:重命名当前会话。
Tmux 的最简操作流程:
- 新建会话
tmux new -s my_session。 - 在 Tmux 窗口运行所需的程序。
- 按下快捷键
Ctrl+b d将会话分离。 - 下次使用时,重新连接到会话
tmux attach-session -t my_session。
资料:Tmux 使用教程 by 阮一峰
RNA-seq (HISAT - SAMtools- StringTie - ballgown)
使用的软件介绍
-
HISAT介绍 HISAT官网
HISAT全称为Hierarchical Indexing for Spliced Alignment of Transcripts,由约翰霍普金斯大学Steven Salzberg团队开发。它取代Bowtie/TopHat程序,能够将RNA-Seq的读取与基因组进行快速比对,该软件应用了两类不同的索引类型:代表全基因组的全局FM索引和大量的局部小索引,每个索引代表64000bp。以人类基因组为例,创建了48000个局部索引,每一个覆盖1024bp,最终可以覆盖这个3 billion 的碱基的基因组。这种存在交叉(overlap)的边界可以轻松的比对那些跨区域的read(可变剪切体)。尽管有很多索引,但是hisat会把他们使用合适方法压缩,最终只占4gb左右的内存。本次实验使用的是hisat2版本。
-
SAMtools
SAMtools是一个用于操作sam和bam文件的工具合集。能够实现二进制查看、格式转换、排序及合并等功能,结合sam格式中的flag、tag等信息,还可以完成比对结果的统计汇总。同时利用linux中的grep、awk等操作命令,还可以大大扩展samtools的使用范围与功能。
-
StringTie StringTie官网
能够应用流神经网络算法和可选的de novo组装进行转录本组装并预计表达水平。与Cufflinks等程序相比,StringTie实现了更完整、更准确的基因重建,并更好地预测了表达水平。
-
Ballgown
ballgown是组装转录组的统计分析工具的R包,用于、差异表达分析,转录本结构的可视化以及组装转录本与注释的匹配。
1.准备工作,运行RNA_seq_pipeline.sh
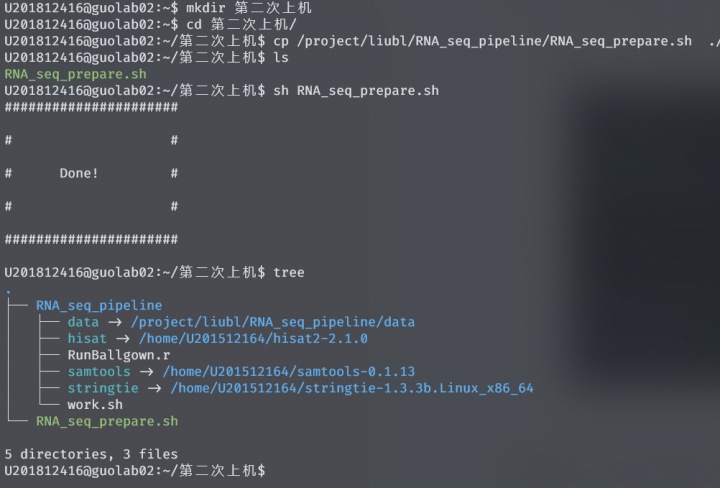
mkdir 第二次上机 创建文件夹, cp /project/liubl/RNA_seq_pipeline/RNA_seq_prepare.sh ./ 将RNA_seq_pipeline.sh 移动到此文件夹中,然后 sh RNA_seq_prepare.sh 运行脚本,以创建软件、数据的软链接,拷贝work.sh脚本到当前文件夹
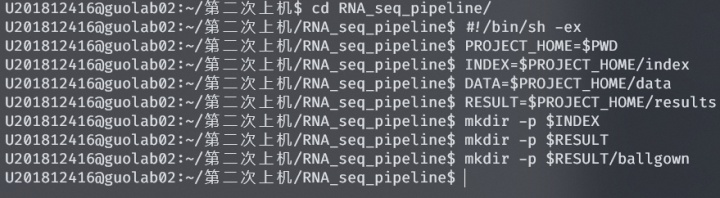
2. 命名变量,方便之后的命令输入,同时创建文件夹
在第二次上机文件夹中使用 cd RNA_seq_pipeline/ 进入RNA_seq_pipeline文件夹
#!/bin/sh -ex
# 是指此脚本使用/bin/sh 来执行
-x 调试用加脚本每条命令执行情况打印
-e,一个命令在执行后返回一个非0状态值时 即error时,就退出
对变量命名,并创建文件夹
#设置当前文件夹
PROJECT_HOME=$PWD
#设置INDEX,DATA,RESULT
INDEX=$PROJECT_HOME/index
DATA=$PROJECT_HOME/data
RESULT=$PROJECT_HOME/results
#创建文件夹
mkdir -p $INDEX
mkdir -p $RESULT
mkdir -p $RESULT/ballgown
3. 创建索引
# build hisat2 index
hisat/hisat2-build $DATA/chrX.fa $INDEX/chr_index
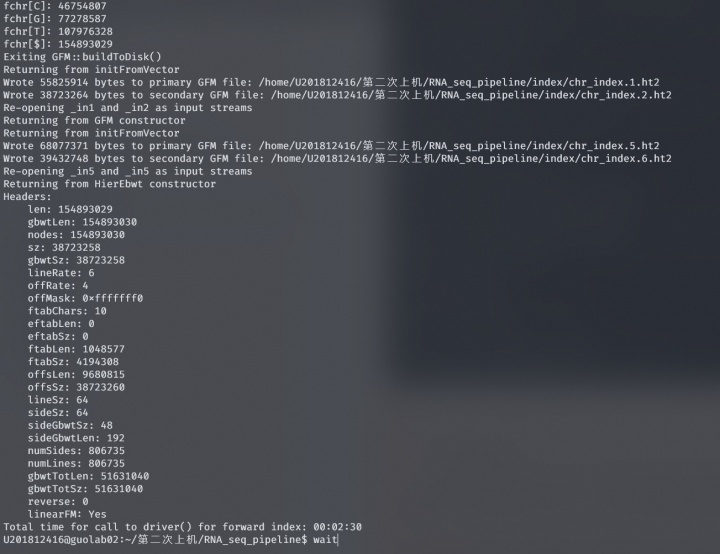
wait
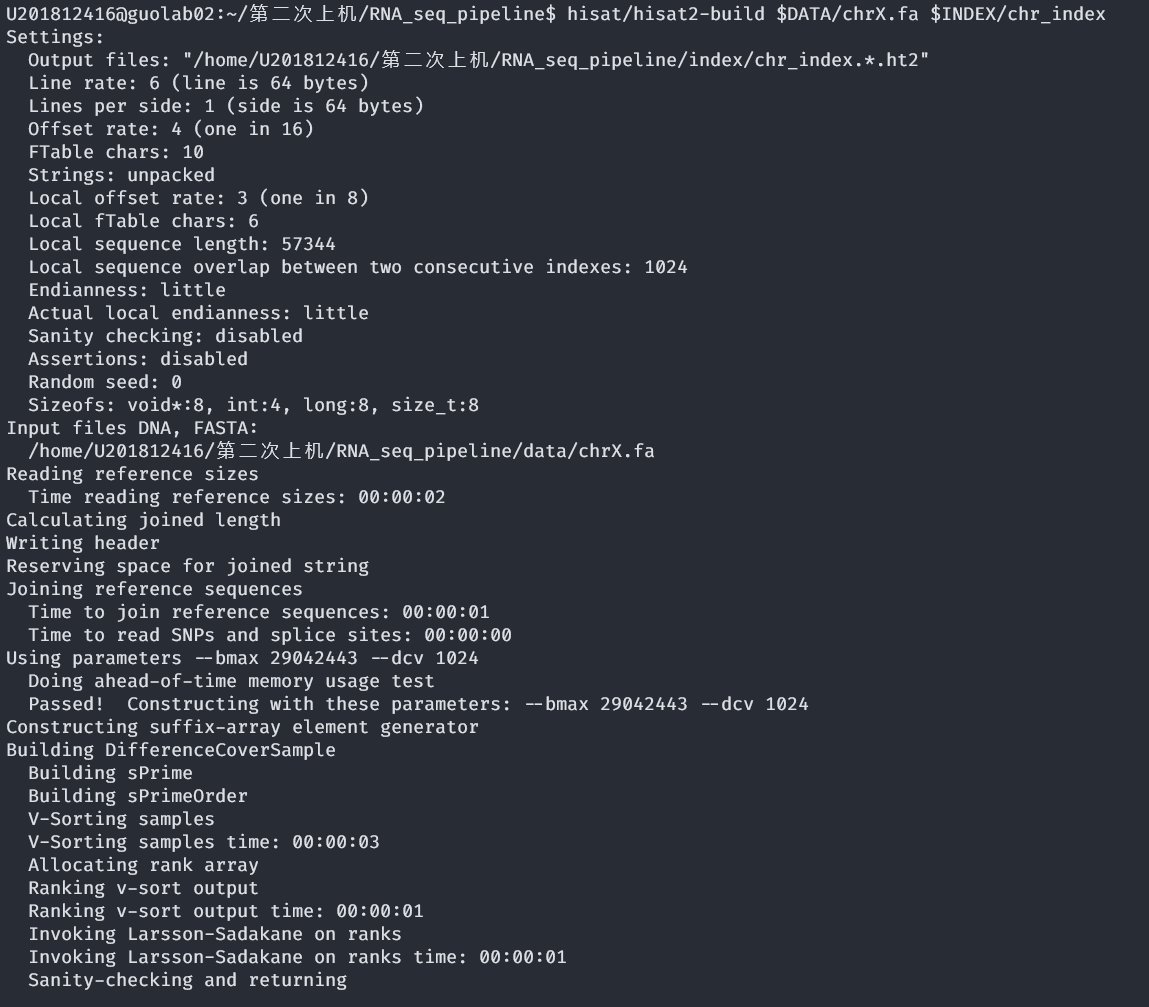
运行结束
为什么要用index?
hisat的index使用的是FM索引,FM 索引基于BWT算法,FM-index,包括三部分,①BWT(T),②checkpoint data,③一个简化了的SA[]数组,相比其他构建索引方式(后缀树等)占用内存更小,有利于短读段快速回帖参考基因组上
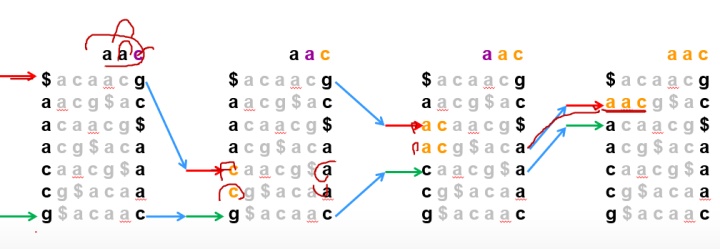
image-20201023123809621
4.使用hisat将reads比对到基因组
hisat/hisat2 -x $INDEX/chr_index -1  $DATA/ERR188044_chrX_1.fastq -2 $DATA/ERR188044_chrX_2.fastq -S $RESULT/ERR188044_chrX_reads.sam &
hisat/hisat2 -x $INDEX/chr_index -1  $DATA/ERR188104_chrX_1.fastq -2 $DATA/ERR188104_chrX_2.fastq -S $RESULT/ERR188104_chrX_reads.sam &
hisat/hisat2 -x $INDEX/chr_index -1  $DATA/ERR188234_chrX_1.fastq -2 $DATA/ERR188234_chrX_2.fastq -S $RESULT/ERR188234_chrX_reads.sam &
hisat/hisat2 -x $INDEX/chr_index -1  $DATA/ERR188245_chrX_1.fastq -2 $DATA/ERR188245_chrX_2.fastq -S $RESULT/ERR188245_chrX_reads.sam &
hisat/hisat2 -x $INDEX/chr_index -1  $DATA/ERR188257_chrX_1.fastq -2 $DATA/ERR188257_chrX_2.fastq -S $RESULT/ERR188257_chrX_reads.sam &
hisat/hisat2 -x $INDEX/chr_index -1  $DATA/ERR188273_chrX_1.fastq -2 $DATA/ERR188273_chrX_2.fastq -S $RESULT/ERR188273_chrX_reads.sam &
wait
输入命令
-x 是指我们之前构建的参考基因组的位置和前缀 -1 是指样本的R1文件 -2 是指样本的R2文件 -S 是指输出文件的名字和格式,一般使用sam格式
后面加&是为了能够并行
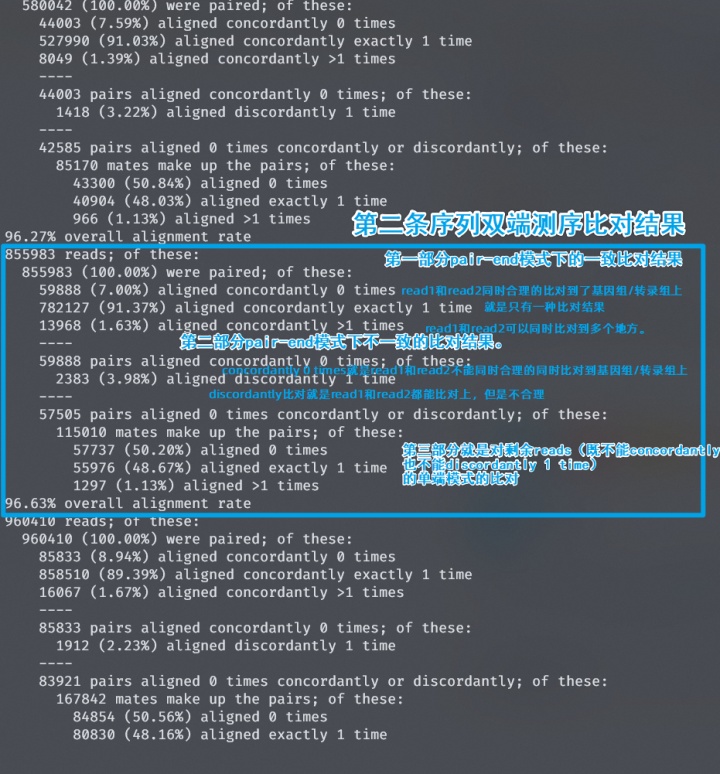
比对结果,共六个,以第二个为例
第一部分描述的是pair-end模式下的一致比对结果:
-
aligned concordantly就是read1和read2同时合理的比对到了基因组/转录组上。
-
aligned concordantly exactly 1 time,exactly 1 time 就是只有一种比对结果。
-
1 times 就是read1和read2可以同时比对到多个地方。
第二部分,pair-end模式下不一致的比对结果。
- concordantly 0 times就是read1和read2不能同时合理的同时比对到基因组/转录组上
- aligned discordantly 1 time,discordantly比对就是read1和read2都能比对上,但是不合理(比对方向不对,read1和read2的插入片段长度是有限的)
第三部分就是对剩余reads(既不能concordantly,也不能discordantly 1 time)的单端模式的比对
5. 使用samtools进行排序和格式转换
samtools sort -@ 8 -o $RESULT/ERR188044_chrX_reads.bam $RESULT/ERR188044_chrX_reads.sam &
samtools sort -@ 8 -o $RESULT/ERR188104_chrX_reads.bam $RESULT/ERR188104_chrX_reads.sam &
samtools sort -@ 8 -o $RESULT/ERR188234_chrX_reads.bam $RESULT/ERR188234_chrX_reads.sam &
samtools sort -@ 8 -o $RESULT/ERR188245_chrX_reads.bam $RESULT/ERR188245_chrX_reads.sam &
samtools sort -@ 8 -o $RESULT/ERR188257_chrX_reads.bam $RESULT/ERR188257_chrX_reads.sam &
samtools sort -@ 8 -o $RESULT/ERR188273_chrX_reads.bam $RESULT/ERR188273_chrX_reads.sam &
输入命令

sort命令格式
samtools sort [-l level] [-m maxMem] [-o out.bam] [-O format] [-n] [-T tmpprefix] [-@ threads] [in.sam|in.bam|in.cram]sort进行排序
-@ 8 设置排序和压缩是的线程数量,默认是单线程。这里设置为8线程
-o 输出文件夹
$RESULT/ERR188273_chrX_reads.sam 输入sam文件
& 允许运行
将sam文件进行排序,并输出为bam文件
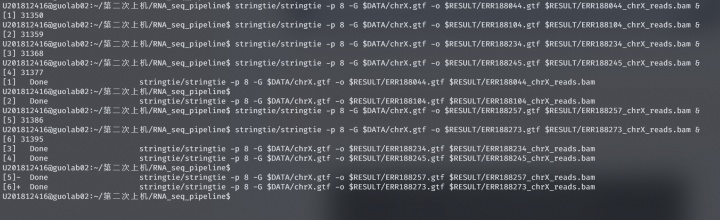
6. 使用stringtie对每个样本进行转录本组装
比对上的reads将会被呈递给StringTie进行 转录本组装 ,会针对每个bam文件生成一个gtf文件,它主要记录了转录本的组装信息
输入命令
stringtie/stringtie -p 8 -G $DATA/chrX.gtf -o $RESULT/ERR188044.gtf $RESULT/ERR188044_chrX_reads.bam &
stringtie/stringtie -p 8 -G $DATA/chrX.gtf -o $RESULT/ERR188104.gtf $RESULT/ERR188104_chrX_reads.bam &
stringtie/stringtie -p 8 -G $DATA/chrX.gtf -o $RESULT/ERR188234.gtf $RESULT/ERR188234_chrX_reads.bam &
stringtie/stringtie -p 8 -G $DATA/chrX.gtf -o $RESULT/ERR188245.gtf $RESULT/ERR188245_chrX_reads.bam &
stringtie/stringtie -p 8 -G $DATA/chrX.gtf -o $RESULT/ERR188257.gtf $RESULT/ERR188257_chrX_reads.bam &
stringtie/stringtie -p 8 -G $DATA/chrX.gtf -o $RESULT/ERR188273.gtf $RESULT/ERR188273_chrX_reads.bam &
-p 8 指定组装转录本的线程数(CPU)。默认值是1, 这里指定为1
-G 参数指定基因组注释文件,
-o 输出的 gtf 路径
$RESULT/ERR188273_chrX_reads.bam & : 输入bam文件
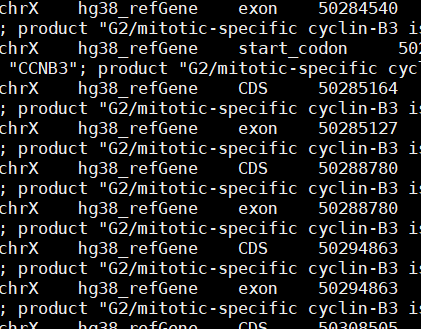
使用 head -10 ERR188234.gtf 查看GTF文件
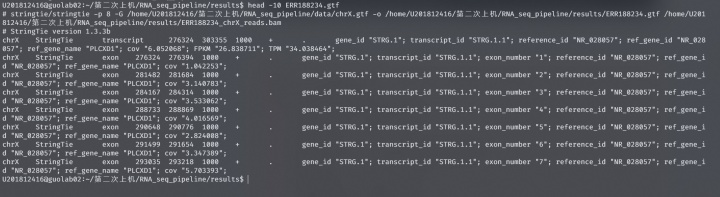
GTF文件:记录组装的转录本信息
seqname : 染色体,contig, 或 scaffold
source : GTF文件的源文件。
feature : 特征类型;如:exon, transcript, mRNA, 5'UTR。
start : 开始位置,使用基于1的索引
end : 结束位置,使用基于1的索引
score : 组装的转录本的可信度分数。目前这个字段没有被使用,并且如果转录本 与a read alignment bundle
有连接,则StringTie输出常数值1000。
strand : 正向链: '+'; 反向链: '-'.
frame : CDS特征的 Frame or phase 。 StringTie不使用该字段,只记录一个“.”。
attributes :
- gene_id : A unique identifier for a single gene and its child transcript and exons based on the alignments' file name.
- transcript_id : A unique identifier for a single transcript and its child exons based on the alignments' file name.
- exon_number : A unique identifier for a single exon, starting from 1, within a given transcript.
- reference_id : The transcript_id in the reference annotation (optional) that the instance matched.
- ref_gene_id : The gene_id in the reference annotation (optional) that the instance matched.
- ref_gene_name : The gene_name in the reference annotation (optional) that the instance matched.
- cov : The average per-base coverage for the transcript or exon.
- FPKM : Fragments per kilobase of transcript per million read pairs . This is the number of pairs of reads aligning to this feature, normalized by the total number of fragments sequenced (in millions) and the length of the transcript (in kilobases).
- TPM : Transcripts per million . This is the number of transcripts from this particular gene normalized first by gene length, and then by sequencing depth (in millions) in the sample. A detailed explanation and a comparison of TPM and FPKM can be found here, and TPM was defined by B. Li and C. Dewey here.
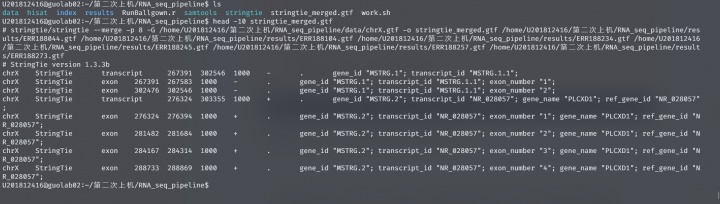
7.stringtie合并转录本
因为有些样本的转录本可能仅仅被部分reads覆盖,无法被第二步的StringTie组装出来。merge步骤可以创建出所有样本里面都有的转录本,方便下一步的对比。在合并模式下,stringtie将所有样品的GTF为文件作为输入,并将这些转录本组装成非冗余的转录本集合,用以生成一个跨多个RNA-seq样品的全局的、统一的转录本。
输入命令
stringtie/stringtie --merge -p 8 -G $DATA/chrX.gtf -o stringtie_merged.gtf $RESULT/*.gtf
– merge 合并
-p 线程
-G 注释文件
-o 输出
$RESULT/*.gtf 输入上一步每个样本的转录文件

查看结果,得到的 stringtie_merged.gtf 就在RNA_seq_pipeline目录下,使用 head -10 stringtie_merged.gtf 预览
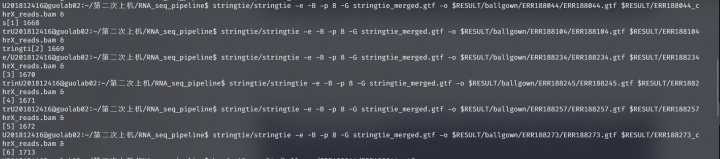
8.使用stringle计算表达量并且为Ballgown包提供输入文件
stringtie/stringtie -e -B -p 8 -G stringtie_merged.gtf -o $RESULT/ballgown/ERR188044/ERR188044.gtf $RESULT/ERR188044_chrX_reads.bam &
stringtie/stringtie -e -B -p 8 -G stringtie_merged.gtf -o $RESULT/ballgown/ERR188104/ERR188104.gtf $RESULT/ERR188104_chrX_reads.bam &
stringtie/stringtie -e -B -p 8 -G stringtie_merged.gtf -o $RESULT/ballgown/ERR188234/ERR188234.gtf $RESULT/ERR188234_chrX_reads.bam &
stringtie/stringtie -e -B -p 8 -G stringtie_merged.gtf -o $RESULT/ballgown/ERR188245/ERR188245.gtf $RESULT/ERR188245_chrX_reads.bam &
stringtie/stringtie -e -B -p 8 -G stringtie_merged.gtf -o $RESULT/ballgown/ERR188257/ERR188257.gtf $RESULT/ERR188257_chrX_reads.bam &
stringtie/stringtie -e -B -p 8 -G stringtie_merged.gtf -o $RESULT/ballgown/ERR188273/ERR188273.gtf $RESULT/ERR188273_chrX_reads.bam &
-e:用于指定是否仅为参考转录本估计表达丰度;
-B:用于指定是否输出 Ballgown table 文件;
-p: 用于指定线程数;
-G :用于指定已组装的注释文件;
-o:用于指定输出结果的文件名;
运行命令

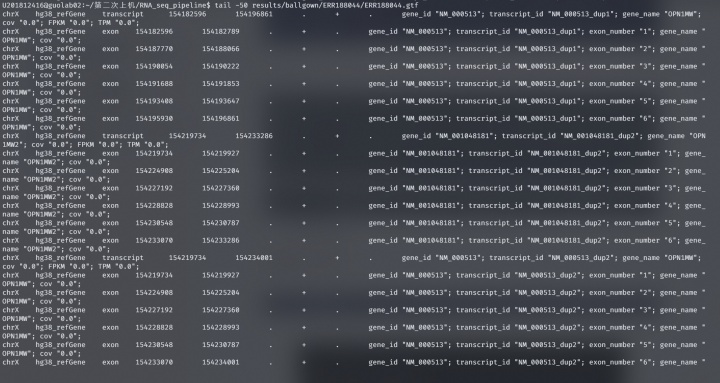
查看ERR188044.gtf
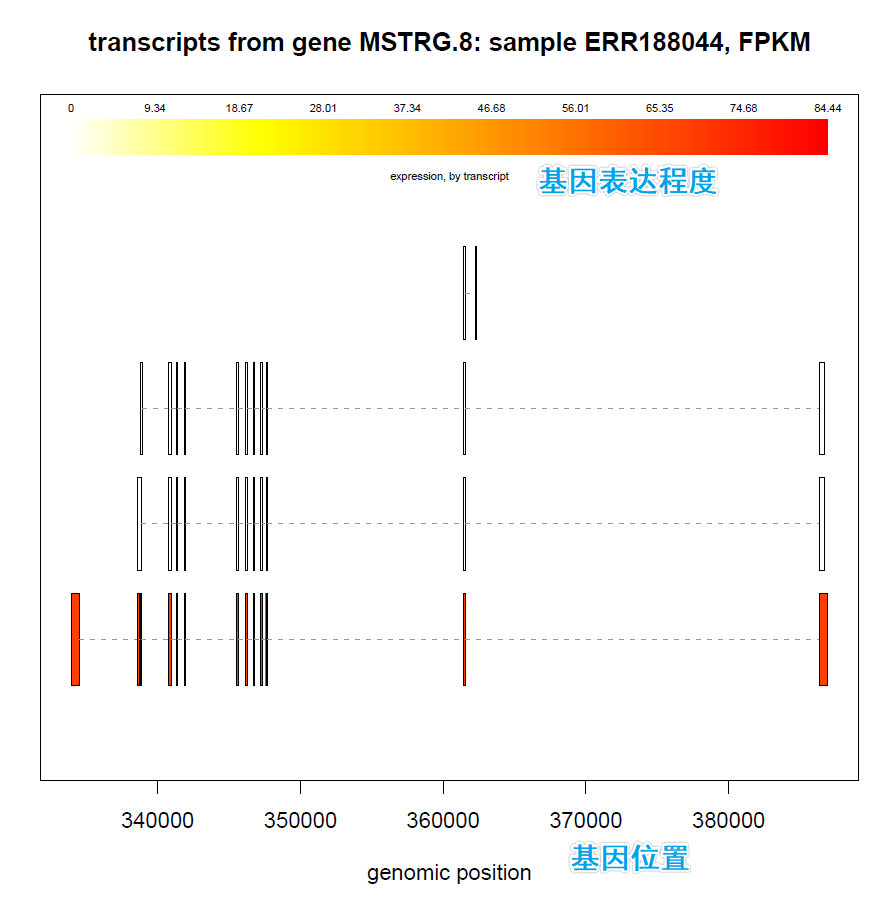
9. Ballgown表达量分析
Rscript ./RunBallgown.r
输入命令
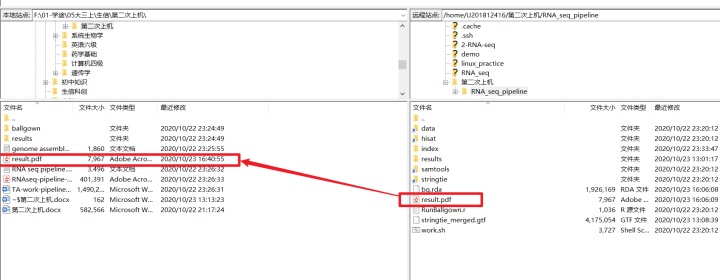
使用 ls 命令,发现多了一个result文件,将文件通过FileZilla软件传输到个人电脑上,查看result.pdf文件

10. 使用IGV查看比对情况
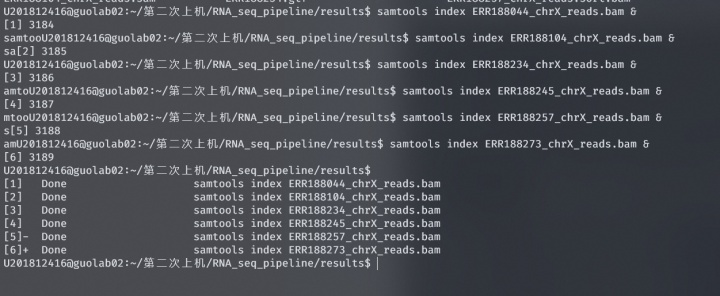
输入下面命令,使用samtools对bam建立索引,得到bai文件
#samtools 对BAM文件建立索引
samtools index ERR188044_chrX_reads.bam &
samtools index ERR188104_chrX_reads.bam &
samtools index ERR188234_chrX_reads.bam &
samtools index ERR188245_chrX_reads.bam &
samtools index ERR188257_chrX_reads.bam &
samtools index ERR188273_chrX_reads.bam &
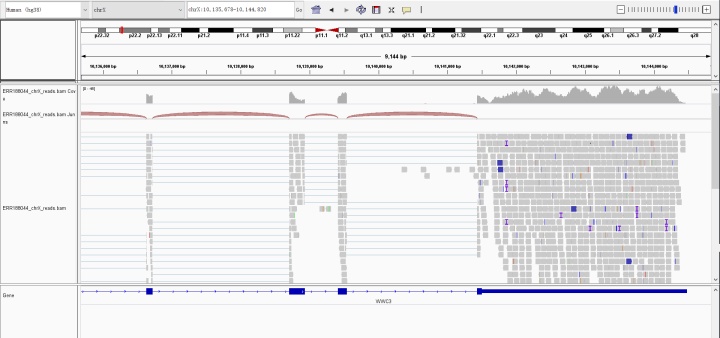
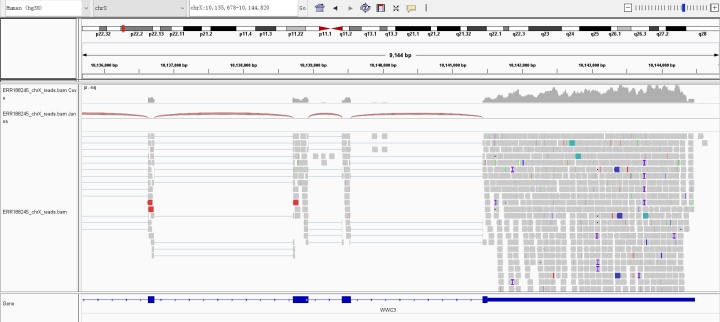
导入ERR188004_chr_reads.bam,选择参考基因组hg19 chrX,位置chrX:10,143,411-10,143,552,得到如下图结果
绿红蓝棕色分别代表A、T、C、G,灰色代表序列和参考序列一致,若不一致coverage将以ATCG对应颜色显示
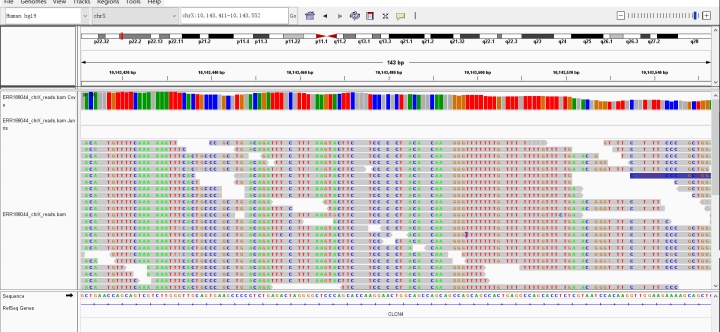
发现大部分读段没有mapping到外显子上,才知道这次参考基因组使用的hg38,于是改为hg38
然后导入ERR188004_chr_reads.bam,选择参考基因组hg38 chrX,位置chrX:10,135,678-10,144,820,接下来查看其他样本同一位置的比对情况
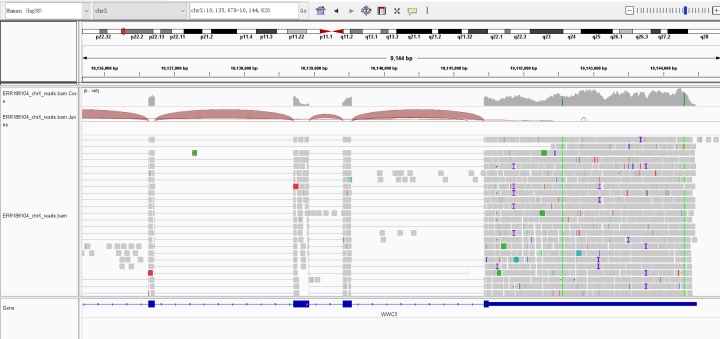
导入ERR188104_chr_reads.bam
导入ERR188234_chr_reads.bam ,位置chrX:70,680,371-70,680,442
导入ERR188245_chr_reads.bam
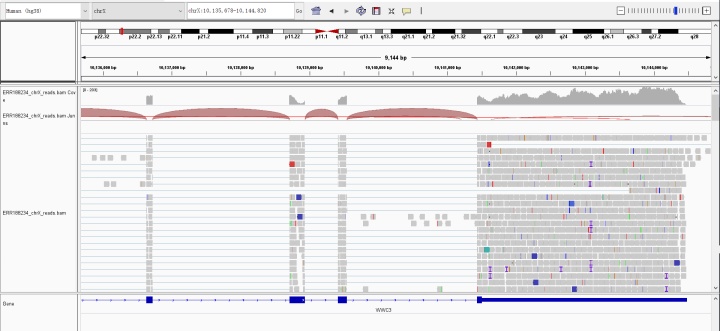
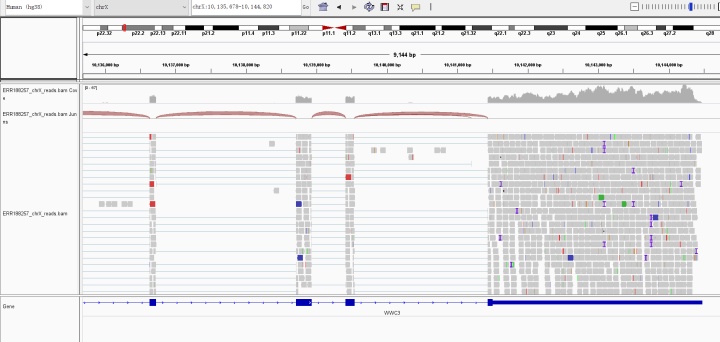
导入ERR188257_chr_reads.bam
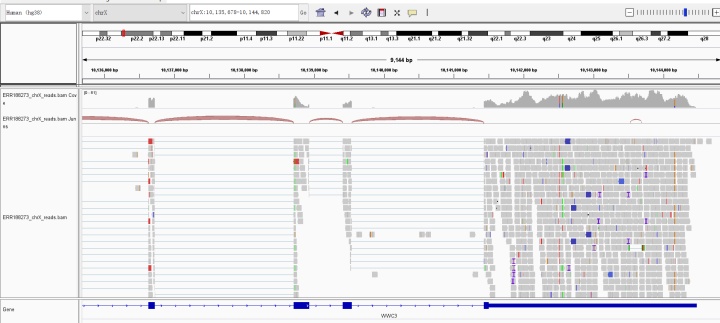
导入ERR188273_chr_reads.bam
Gene Assembly
1. 环境变量配置
#before using allpath, you have add /project/hts-demo/genome_assembly/bin/gcc-4.9.1/bin/bin/
# and /project/hts-demo/genome_assembly/bin/allpathslg/bin/ to you local profile, because allpath relies on one gcc that this ubuntu version can not support.
#so you have to add gcc to your local profile
export LD_LIBRARY_PATH=/project/hts-demo/genome_assembly/bin/gcc-4.9.1/bin/lib64/:$LD_LIBRARY_PATH
PATH="/project/hts-demo/genome_assembly/bin/gcc-4.9.1/bin/bin/:/project/hts-demo/genome_assembly/bin/allpathslg/bin/:$PATH"

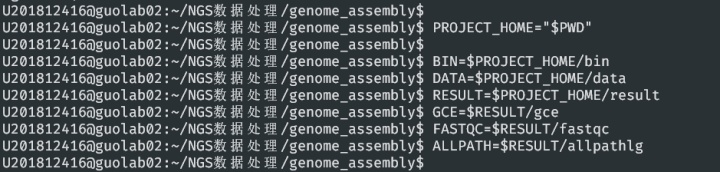
2.变量命名
PROJECT_HOME="$PWD"

BIN=$PROJECT_HOME/bin
DATA=$PROJECT_HOME/data
RESULT=$PROJECT_HOME/result
GCE=$RESULT/gce
FASTQC=$RESULT/fastqc
ALLPATH=$RESULT/allpathlg
3. GCE估计基因组大小和kmer分布
$BIN/kmer_freq_pread -k 17 -l $DATA/frags.list -q 33 -m 1 -p $GCE/frags.17-kmer 2> $GCE/kmer_freq_pread &>>/dev/null
-k 17 设置kmer大小, 默认值为17
-l frags.list 设置我们制作好的输入文件
-q 33 设置ASSCII码偏移值,默认是64,我们的数据是illumina1.8+所以是33

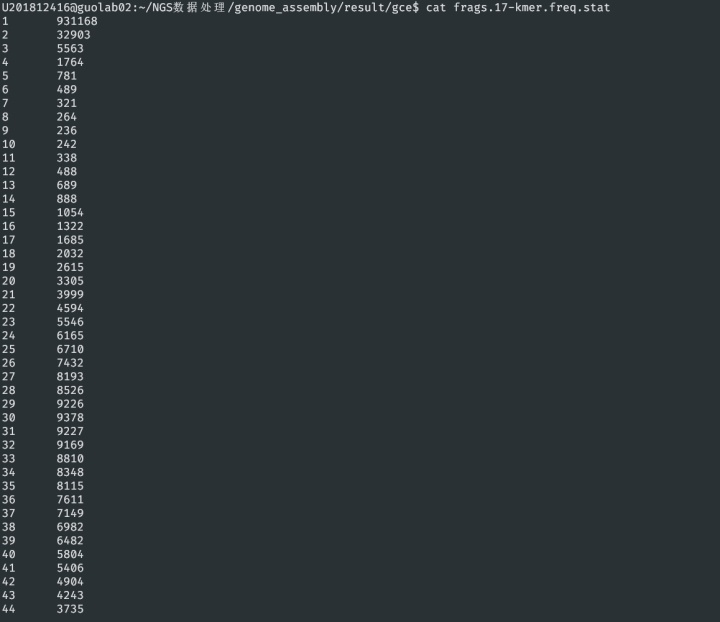
结果为result/gce/kmer_freq_pread,直接看最下面的结果
1 -p $GCE/frags.17-kmer
2> $GCE/kmer_freq_pread 代表重定向操作错误提示信息,会把错误信息输出到这个文件中
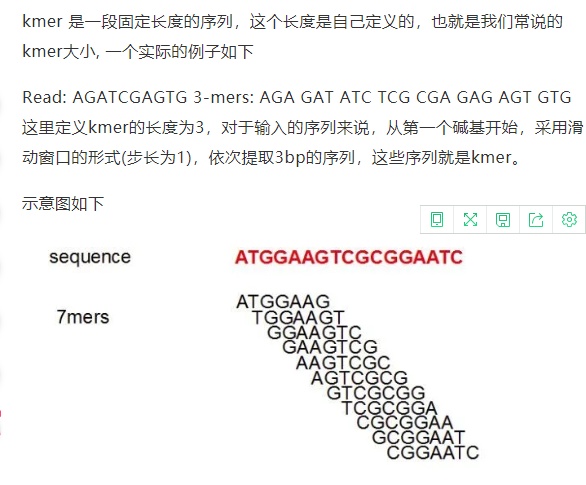
cat frags.17-kmer.freq.stat
kmer的数量和基因序列有数量关系从而评估基因组的大小

4. 质量控制
$BIN/fastqc/fastqc -o $FASTQC -f fastq $DATA/frags.A.fastq $DATA/frags.B.fastq & >>/dev/null
运行 kmer_freq_pread 查看参数
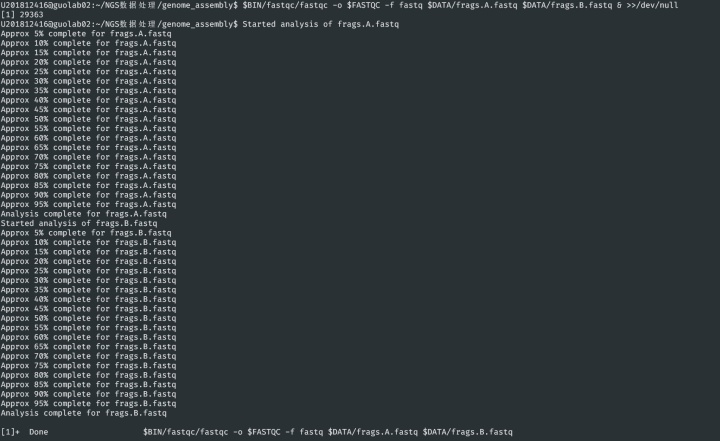
结果为result/fastqc/*.html文件,下载下来用browser打开,平均分布在黄色区域的结果比较好。
打开fileZilla,将html文件传到个人电脑用浏览器打开
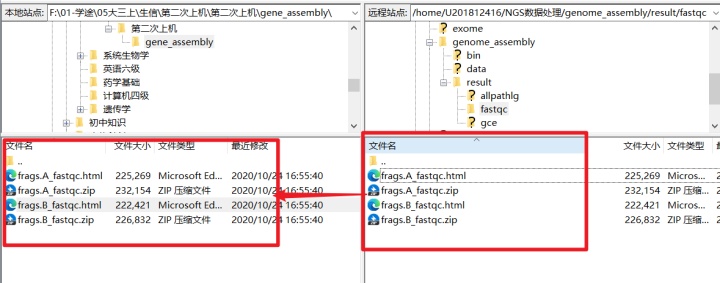
两个fastqc文件 是因为双端测序
参考资料:用FastQC检查二代测序原始数据的质量
Basic Statistics
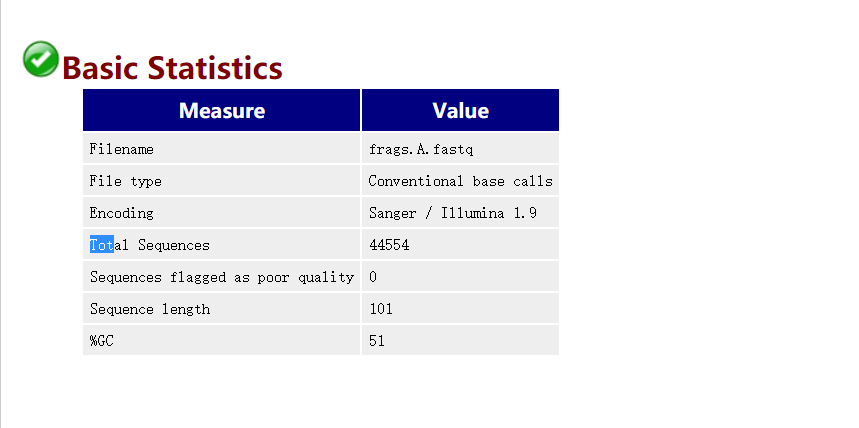
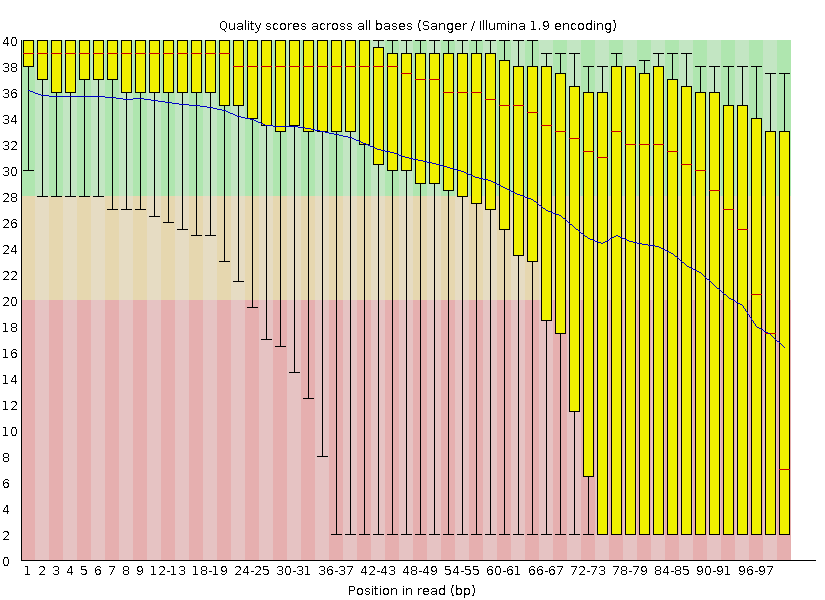
横轴代表位置,纵轴quality。红色表示中位数,黄色是25%-75%区间,==触须是10%-90%区间==,蓝线是平均数。 若任一位置的下四分位数低于10或中位数低于25,报"WARN";若任一位置的下四分位数低于5或中位数低于20,报"FAIL".
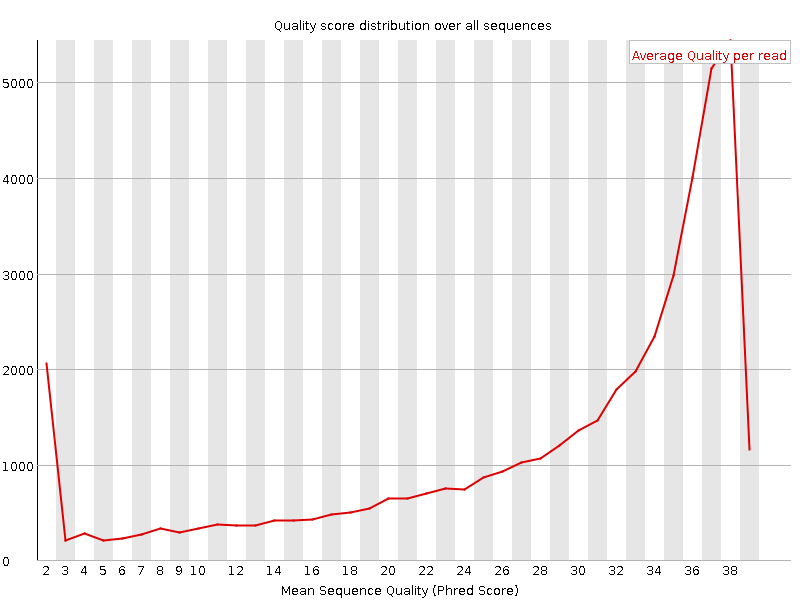
Per sequence quality scores
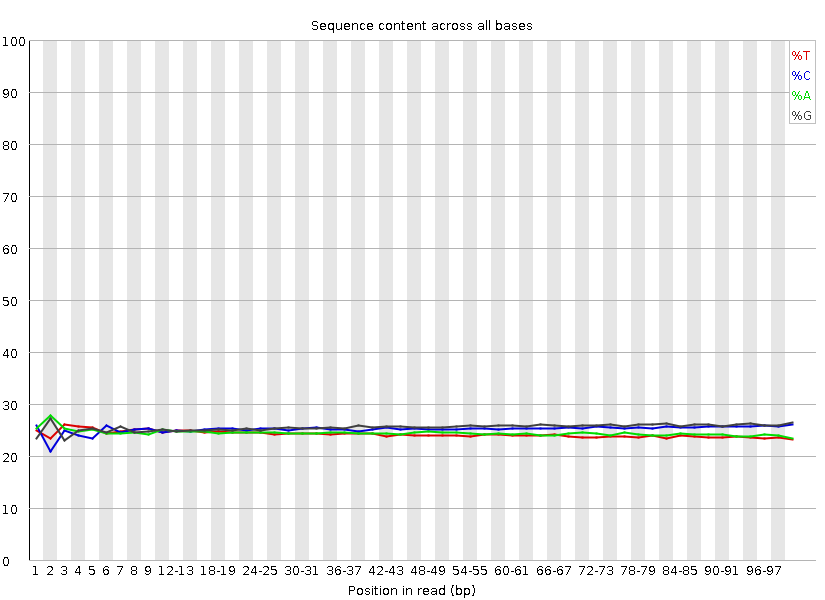
Per base sequence content
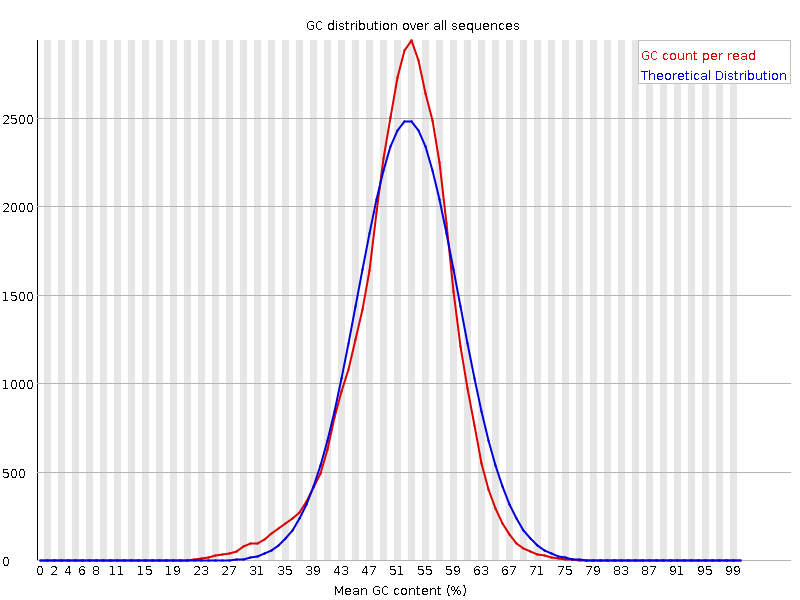
Per sequence GC content
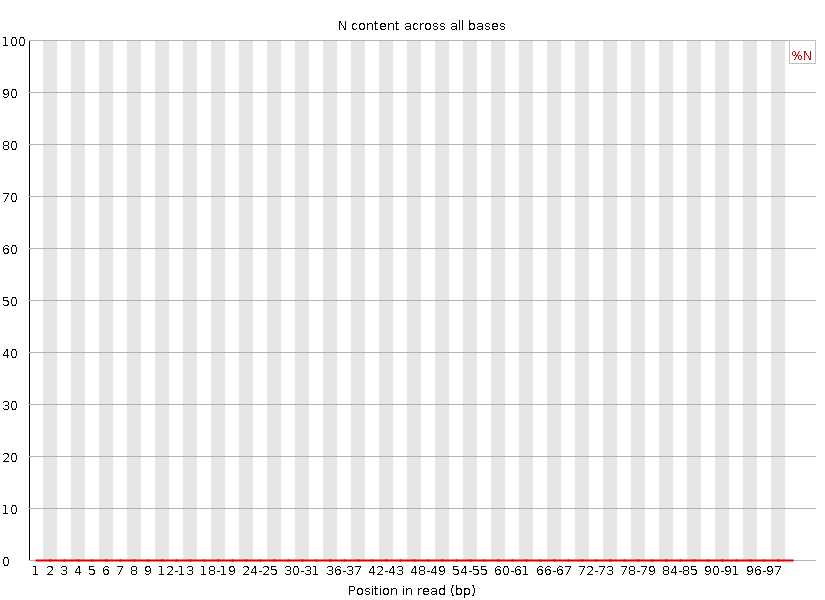
Per base N content
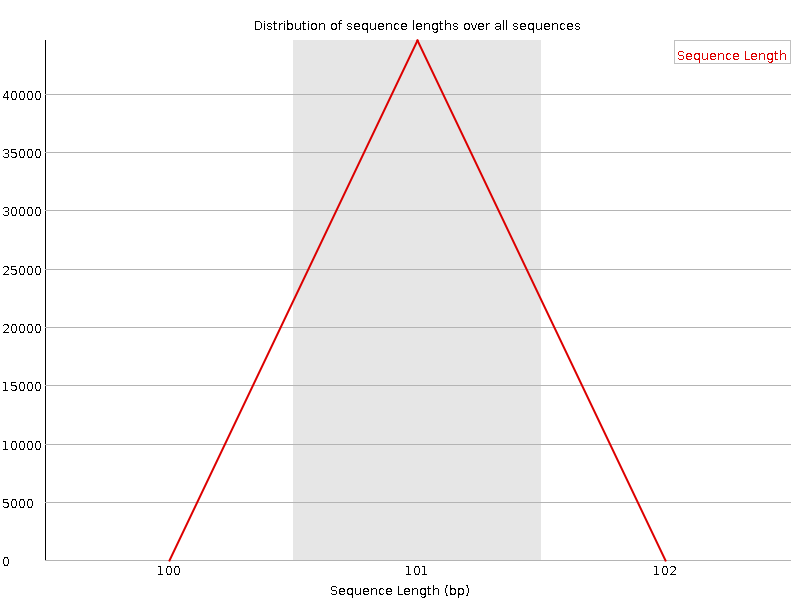
Sequence Length Distribution
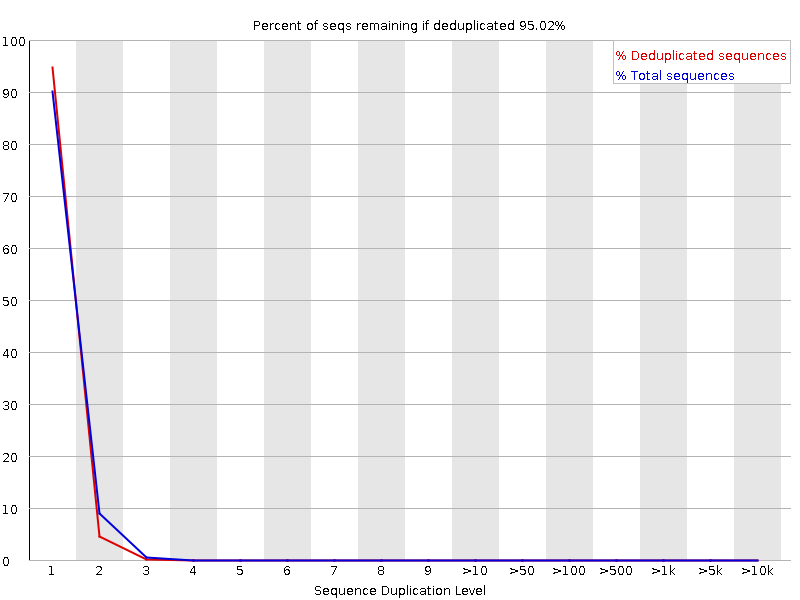
Sequence Duplication Levels
Overrepresented sequences
No overrepresented sequences
Adapter Content
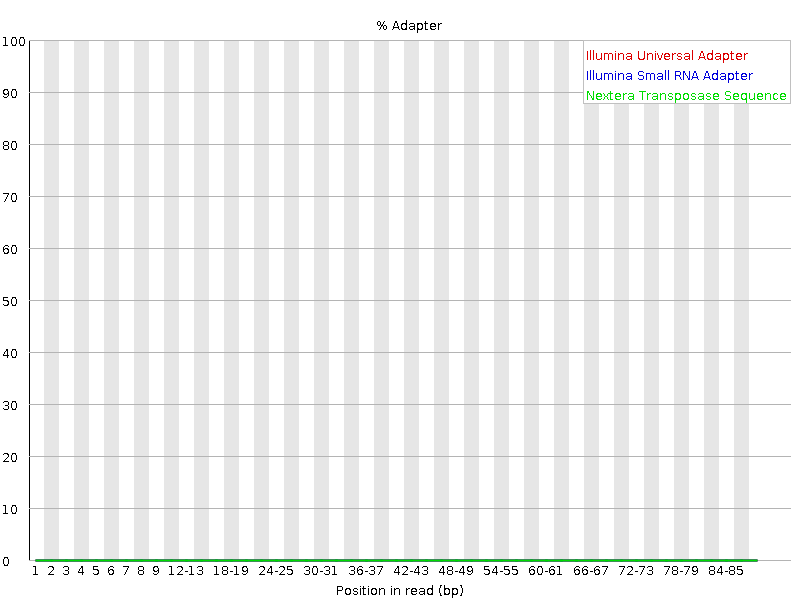
Kmer Content
No overrepresented Kmers
5. AllPath
#assembly
mkdir -p $ALLPATH/result.genome/data
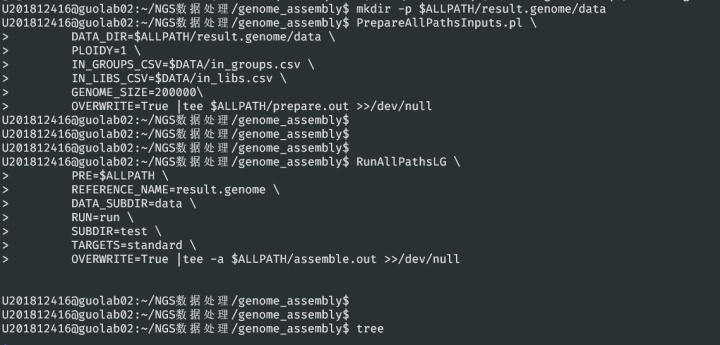
#inputs preparation
PrepareAllPathsInputs.pl
DATA_DIR=$ALLPATH/result.genome/data
PLOIDY=1
IN_GROUPS_CSV=$DATA/in_groups.csv
IN_LIBS_CSV=$DATA/in_libs.csv
GENOME_SIZE=200000
OVERWRITE=True |tee $ALLPATH/prepare.out >>/dev/null
RunAllPathsLG
PRE=$ALLPATH
REFERENCE_NAME=result.genome
DATA_SUBDIR=data
RUN=run
SUBDIR=test
TARGETS=standard
OVERWRITE=True |tee -a $ALLPATH/assemble.out >>/dev/null
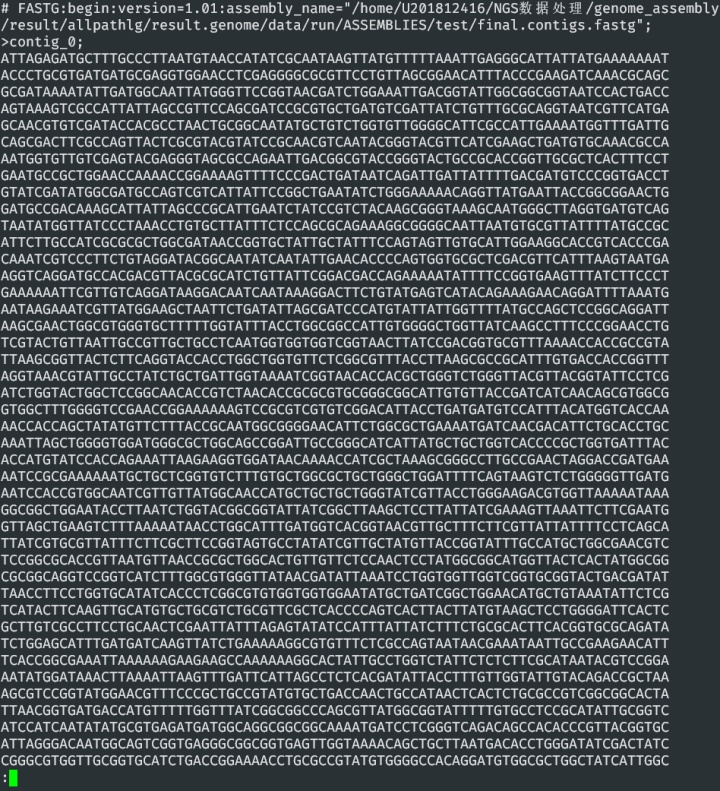
less final.assembly.fastg 查看/NGS数据处理/genome_assembly/result/allpathlg/result.genome/data/run/ASSEMBLIES/test$ less final.assembly.fastg
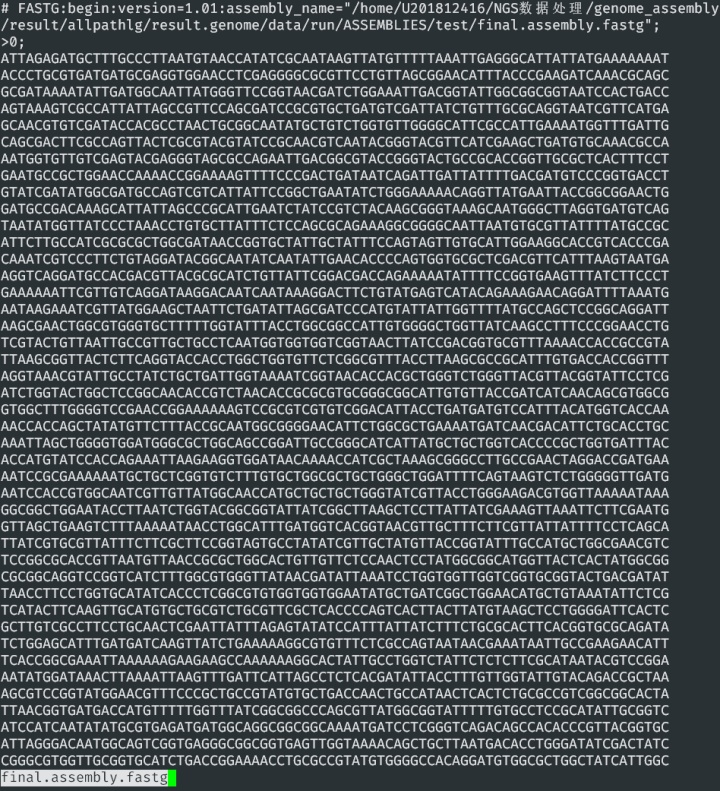
less final.contigs.fastg