GitLab介绍
GitLab:是一个基于Git实现的在线代码仓库托管软件,你可以用gitlab自己搭建一个类似于Github一样的系统,一般用于在企业、学校等内部网络搭建git私服。
功能:Gitlab 是一个提供代码托管、提交审核和问题跟踪的代码管理平台。对于软件工程质量管理非常重要。 版本:GitLab
分为社区版(CE) 和企业版(EE)。 配置:建议CPU2核,内存2G以上。
一:git的优点
- git是分布式的,svn不是
git分布式本地就可以用,可以随便保存各种历史痕迹,不用担心污染服务器,连不上服务器也能提交代码、查看log。- GIT分支和SVN的分支不同
分支在SVN中实际上是版本库中的一份copy,而git一个仓库是一个快照,所以git 切换、合并分支等操作更快速。- git有一个强大的代码仓库管理系统 - gitlab
可以很方便的管理权限、代码review,创建、管理project
1.1:GitLab与GitHub的不同
- Github分布式在线代码托管仓库,个人版本可直接在线免费使用,企业版本收费且需要服务器安装
- Gitlab 分布式在线代码仓库托管软件,分社区免费版本与企业收费版本,都需要服务器安装.
1.2:Gitlab的优势和应用场景
开源免费,适合中小型公司将代码放置在该系统中
品差异化的版本管理,离线同步以及强大分支管理功能
便捷的GUI操作界面以及强大账户权限管理功能
集成度很高,能够集成绝大多数的开发工具 支持内置HA,保证在高并发下仍旧实现高可用性
1.3:GitLab主要服务构成
- Nginx静态Web服务器
- Gitlab-workhorse 轻量级的反向代理服务器
- Gitlab-shell 用于处理Git命令和修改authorized keys列表
- Logrotate 日志文件管理工具
- Postgresql数据库
- Redis 缓存服务器
1.4:GitLab的工作流程
创建并克隆项目
创建项目某Feature分支
编写代码并提交至该分支
推送改项目分支至远程Gitlab服务器
进行代码检查并提交Master主分支合并申请
项目领导审查代码并确认合并申请
一:安装ssh
'要切换root用户'
sudo yum install -y curl policycoreutils-pythonopenssh-server
1.1将ssh服务器设置成开机启动
sudo systemctl enable sshd
1.2:关闭防火墙
systemctl stop firewalld
1.3:安装Postfix以发送邮件通知
sudo yum install postfix

'设置开机启动'
sudo systemctl start postfix

在安装Postfix期间,可能会出现配置屏幕。选择“Internet Site”并按enter键。使用您的服务器的外部DNS以“mail name”并按enter。如果出现额外的屏幕,继续按enter键接受默认值。
1.4:wget用于外网下载插件
检查系统中是否已经安装wget,使用命令若出现下图wget相关版本描述则说明系统中已经安装wget 若报系统找不到命令说明wget未安装
[root@localhost ~]# wget -V
GNU Wget 1.14 在 linux-gnu 上编译。

+digest +https +ipv6 +iri +large-file +nls +ntlm +opie +ssl/openssl

Wgetrc:
    /etc/wgetrc (系统)
字符集: /usr/share/locale
编译: gcc -DHAVE_CONFIG_H -DSYSTEM_WGETRC="/etc/wgetrc"
    -DLOCALEDIR="/usr/share/locale" -I. -I../lib -I../lib -O2 -g -pipe
    -Wall -Wp,-D_FORTIFY_SOURCE=2 -fexceptions -fstack-protector-strong
    --param=ssp-buffer-size=4 -grecord-gcc-switches -m64 -mtune=generic
链接程序: gcc -O2 -g -pipe -Wall -Wp,-D_FORTIFY_SOURCE=2 -fexceptions
    -fstack-protector-strong --param=ssp-buffer-size=4
    -grecord-gcc-switches -m64 -mtune=generic -lssl -lcrypto
    /usr/lib64/libssl.so /usr/lib64/libcrypto.so /usr/lib64/libz.so
    -ldl -lz -lz -lidn -luuid -lpcre ftp-opie.o openssl.o http-ntlm.o
    ../lib/libgnu.a

'如果没有没有则安装'
yum -y install wget
1.5:配置域名
vim /var/opt/gitlab/nginx/conf/gitlab-http.conf

    # 外网访问的端口,如果服务器已经有服务器占用了80,那么这里可以改成其它
    listen *:8888;
    server_name gitlab.test.domain.com;

    set $http_host_with_default "gitlab.test.domain.com:8888";
补充说明:因为编译gitlab的配置 /etc/gitlab/gitlab.rb 时会重新生成这个自定义nginx 配置,所以只要 gitlab 的配置配得好,上面的nginx其实不需要自定义的。
二:添加GitLab镜像源并安装gitlab服务器
2.1:添加gitlab镜像
wget https://mirrors.tuna.tsinghua.edu.cn/gitlab-ce/yum/el7/gitlab-ce-10.0.0-ce.0.el7.x86_64.rpm
2.2:安装gitlab
rpm -i gitlab-ce-10.0.0-ce.0.el7.x86_64.rpm


警告:gitlab-ce-10.0.0-ce.0.el7.x86_64.rpm: 头V4 RSA/SHA1 Signature, 密钥 ID f27eab47: NOKEY
It looks like GitLab has not been configured yet; skipping the upgrade script.

       *.                  *.
      ***                 ***
     *****               *****
    .******             *******
    ********            ********
   ,,,,,,,,,***********,,,,,,,,,
  ,,,,,,,,,,,*********,,,,,,,,,,,
  .,,,,,,,,,,,*******,,,,,,,,,,,,
      ,,,,,,,,,*****,,,,,,,,,.
         ,,,,,,,****,,,,,,
            .,,,***,,,,
                ,*,.


     _______ __  __          __
    / ____(_) /_/ /   ____ _/ /_
   / / __/ / __/ /   / __ \`/ __ \
  / /_/ / / /_/ /___/ /_/ / /_/ /
  \____/_/\__/_____/\__,_/_.___/


Thank you for installing GitLab!
GitLab was unable to detect a valid hostname for your instance.
Please configure a URL for your GitLab instance by setting `external_url`
configuration in /etc/gitlab/gitlab.rb file.
Then, you can start your GitLab instance by running the following command:
  sudo gitlab-ctl reconfigure

For a comprehensive list of configuration options please see the Omnibus GitLab readme
https://gitlab.com/gitlab-org/omnibus-gitlab/blob/master/README.md


注意:虚拟机  centos7.0  使用rpm -i gitlab-ce-10.0.0-ce.0.el7.x86_64.rpm安装时提示无效依赖使用rpm -i gitlab-ce-10.0.0-ce.0.el7.x86_64.rpm --nodeps --force命令就可以了。加后面两个参数意义,安装时不再分析包之间的依赖关系而直接安装。
2.3:修改gitlab配置文件指定服务器IP和自定义端口
vim /etc/gitlab/gitlab.rb

'修改服务器IP'
external_url 'http://gitlab.test.domain.com:8888'
2.4:重启Gitlab
gitlab-ctl reconfigure

[root@localhost ~]# gitlab-ctl restart
ok: run: gitaly: (pid 90905) 1s
ok: run: gitlab-monitor: (pid 90923) 0s
ok: run: gitlab-workhorse: (pid 90962) 1s
ok: run: logrotate: (pid 90973) 0s
ok: run: nginx: (pid 90985) 0s
ok: run: node-exporter: (pid 90994) 1s
ok: run: postgres-exporter: (pid 91000) 0s
ok: run: postgresql: (pid 91013) 1s
ok: run: prometheus: (pid 91021) 0s
ok: run: redis: (pid 91032) 1s
ok: run: redis-exporter: (pid 91036) 0s
ok: run: sidekiq: (pid 91050) 0s
ok: run: unicorn: (pid 91059) 0s

ok:run安装完毕
2.5:Gitlab常用命令
    gitlab-ctl start                 # 启动所有 gitlab 组件;
    gitlab-ctl stop                  # 停止所有 gitlab 组件;
    gitlab-ctl restart               # 重启所有 gitlab 组件;
    gitlab-ctl status                # 查看服务状态;
    vim /etc/gitlab/gitlab.rb        # 修改gitlab配置文件;
    gitlab-ctl reconfigure           # 重新编译gitlab的配置;
    gitlab-rake gitlab:check SANITIZE=true --trace    # 检查gitlab;
    gitlab-ctl tail                  # 查看日志;
    gitlab-ctl tail nginx/gitlab_access.log
2.6:查看Gitlab版本
[root@localhost ~]# cat /opt/gitlab/embedded/service/gitlab-rails/VERSION
10.0.0
2.7:访问Gitlab页面
[外链图片转存失败,源站可能有防盗链机制,建议将图片保存下来直接上传(img-q8I3vRvz-1604847030638)(C:\Users\liu\AppData\Roaming\Typora\typora-user-images\image-20201108220546379.png)]
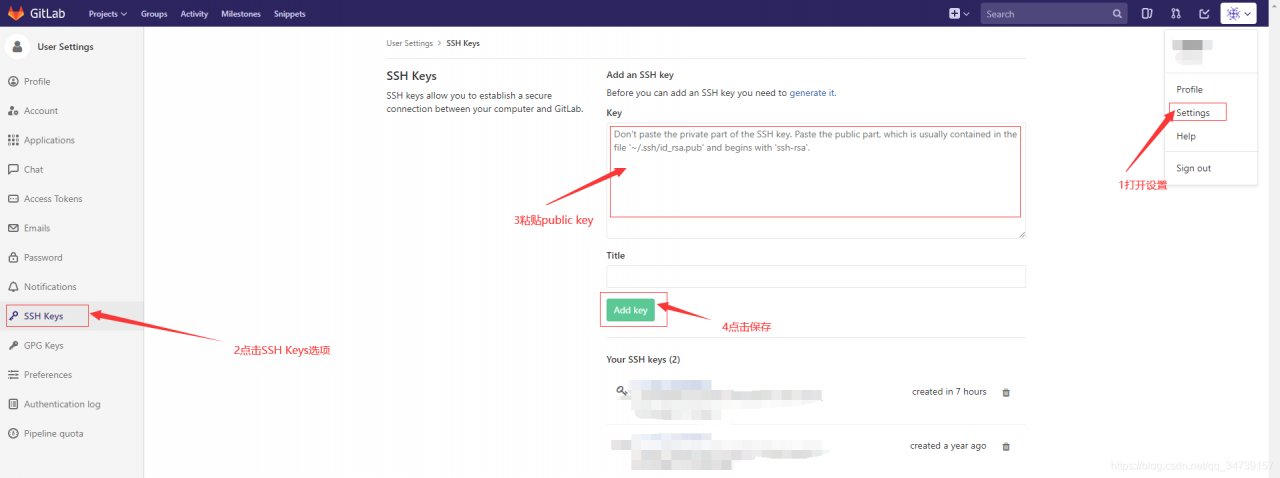
2.8:为了安全考虑,需要创建public key认证
[root@localhost ~]# ssh-keygen         '一直回车即可'
Generating public/private rsa key pair.
Enter file in which to save the key (/root/.ssh/id_rsa):
Created directory '/root/.ssh'.
Enter passphrase (empty for no passphrase):
Enter same passphrase again:
Your identification has been saved in /root/.ssh/id_rsa.
Your public key has been saved in /root/.ssh/id_rsa.pub.
The key fingerprint is:
SHA256:2GhfkwCeGlrVv3agg8GCwR4P/MpAvQmUqxkCsgGHeJc root@localhost.localdomain
The key's randomart image is:
+---[RSA 2048]----+
|==+  .o.         |
|*=B.Eo o.        |
|+=oO=.o ..       |
|=.o=+oo+ .o.     |
|o=....+oS.+o     |
|o o  ...o.o..    |
|        .o .     |
|                 |
|                 |
+----[SHA256]-----+
2.81:复制id_rsa.pub公钥
[root@localhost ~]# cat .ssh/id_rsa.pub

ssh-rsa AAAAB3NzaC1yc2EAAAADAQABAAABAQDSFM9UWIvl6JVfvsy6gsHwUYPdK4osBXnAUjD+XEbARs7PIigVFzkCCw+BwL3cIZlNQNcOTZQ+lhhSmptBdXQsjsHL5ya5RRNoPm7d4RosXoiGxdGPQu3mxUi99RT8rjOWyljjou5UcuDA0SoHgpYZo8qJxgNUl/5F/71DHkwUTd4VDR2LLoLQhbRLOFrjywQPurjfMe0kZ8dlmFfYud6W4IMfX/BOiLmma3MXO7Iugw5A5QIdVNRGR+RPuIC0wz/O4kZ5elyrIFgX5miWRSTvx3hENbpWgRYO05uZXCJ2ImJ7MsB0t6z2KxRP4HevPNDJ623G+gqgr4CiFYXgitL3 root@localhost.localdomain
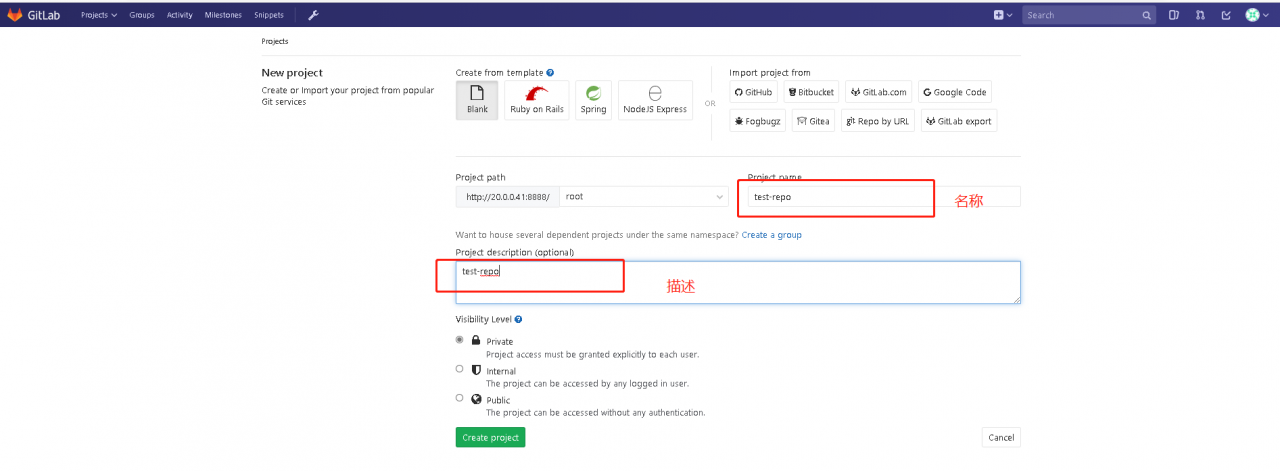
2.9:在Gitlab的主页新建一个Project

本次安装已结束
版权声明:本文为weixin_47151643原创文章,遵循CC 4.0 BY-SA版权协议,转载请附上原文出处链接和本声明。