摘要这一篇文章简单介绍关于词云(wordcloud)的简单使用. 主要介绍以下生成基本的词云和加上蒙版之后的词云的图片.
简介
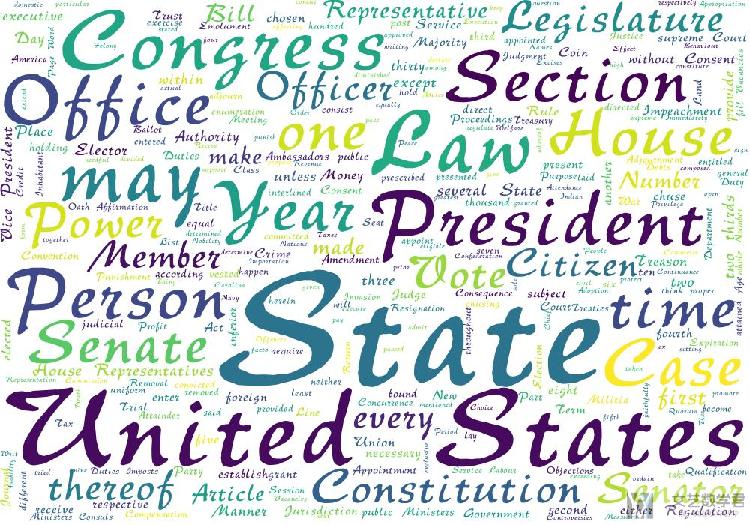
这一篇介绍关于词云的生成. 生成的结果如下所示. 会简单介绍一些参考资料和简单的使用方式.
参考链接
简单使用方式介绍
关于字体说明
使用wordcloud可以指定使用的字体, 在windows中, 字体在以下的文件夹中: C:\Windows\Fonts, 可以将其中的字体文件拷贝到当前的文件夹内.
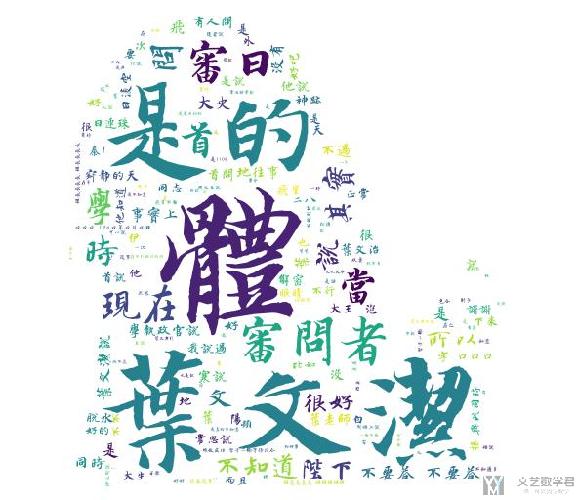
我们指定字体可以使得其能生成中文的词云. 我下面放一张图, 具体生成过程是和下面的方法是一样的.
使用前准备
from os import path
from wordcloud import WordCloud
from PIL import Image
import numpy as np
d = path.dirname(__file__)
# Read the whole text.
text = open(path.join(d, 'constitution.txt'), encoding='utf8').read()
# 导入字体文件
font_path = path.join(d, 'HYC6GFM.TTF')
生成普通的wordcloud
我们可以指定使用的字体, 图像的大小和颜色等.
# 生成普通的wordcloud
wordcloud = WordCloud(font_path=font_path, margin=1, random_state=1, max_words=300, width=1000, height=700, background_color='white').generate(text)
wordcloud.to_file('wordcloud.jpg')
最终的生成效果如下所示:
使用蒙版来生成图片
我们想要使得生成图片能与蒙版相符, 我们使用下面的蒙版(如果想要使用自己的蒙版,可以使用关键词「剪影」或是「轮廓」,这样主要的图像是黑色的,我们主要就是突出一个轮廓):
# 生成带有mask的图片
mask = np.array(Image.open(path.join(d, "62.jpg")))
wordcloud = WordCloud(font_path=font_path, mask=mask, margin=1, random_state=1, background_color='white').generate(text)
wordcloud.to_file('wordcloud_mask.jpg')
最终生成的效果如下所示:

源代码
将上面的测试代码放在了github上, 链接为: wordcloud测试脚本
关于中文文档的词云生成(例子)
因为中文文档与外文不同,字符之间没有空格,所以我们需要首先对中文的文本进行分词。我们使用 jieba 库来对中文进行分词。这一部分参考自,中文文本的词云生成(以《三体》为例)。这一篇文章的代码可能有点问题,我在这里做一下简单的修改。
中文句子分词
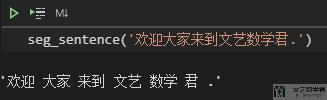
首先我们对一句完整的句子进行分词,使用 jieba 来完成。
# 对句子进行分词
def seg_sentence(sentence):
sentence_seged = jieba.cut(sentence.strip()) #strip()用来消除前后的空格
outstr = ''
for word in sentence_seged:
if word != '\t':
outstr += word
outstr += " " #去掉制表符并用空格分隔各词
return outstr.strip()
最终的效果如下所示:
停用词的处理
我们看到,上面句子中包含一些「停用词」,例如标点符号等,我们需要将其去掉。关于停用词表,可以直接在 github 上搜索「停用词」即可。我这里随便选择了其中的一个停用词来作为例子。
下面的函数可以读入停用词表,并将其转换为一个 list。
# 创建停用词list
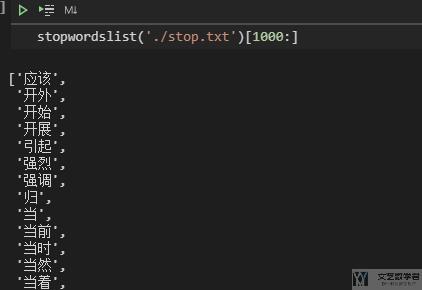
def stopwordslist(filepath):
stopwords = [line.strip() for line in open(filepath, 'r', encoding='utf-8').readlines()]
return stopwords
大致的效果如下所示:
中文句子分词与停用词
我们把上面的两个步骤结合起来。对中文句子进行分词,同时去掉其中的「停用词」。
def seg_sentence(sentence):
sentence_seged = jieba.cut(sentence.strip())
stopwords = stopwordslist('./stop.txt') # 这里加载停用词的路径
outstr = ''
for word in sentence_seged:
if word not in stopwords: # 判断如果不是停用词
if word != '\t':
outstr += word
outstr += " "
return outstr
对中文文档绘制 wordcloud
在有了上面的铺垫之后,我们就可以对一个中文的文档绘制 wordcloud 了。整体的代码如下所示:
import jieba
from wordcloud import WordCloud
import matplotlib.pyplot as plt
import numpy as np
from PIL import Image
inputs = open('./example.txt', 'r', encoding='utf-8') # 原始的中文文档
outputs = open('./output.txt', 'w', encoding='utf-8') # 分词过后的中文文档
for line in inputs:
line_seg = seg_sentence(line) # 对每个句子进行分词
outputs.write(line_seg + '\n') # 将处理过后的文件进行保存
outputs.close()
inputs.close()
mask = np.array(Image.open("./66.jpg")) # 模板图片
inputs = open('output.txt', 'r', encoding='utf-8')
mytext=inputs.read()
wordcloud=WordCloud(mask=mask, width=3000, height=3000, background_color="white", margin=1,
max_words=300, min_font_size=10, max_font_size=None, repeat=False,
font_path="./FZKaTong-M19S.ttf").generate(mytext) #生成云图
wordcloud.to_file('wordcloud.jpg')
inputs.close()
最终生成的图像的效果如下所示:

指定颜色风格
在生成词云的时候,有一个参数是 colormap,我们可以指定需要的颜色风格。关于详细的 colormap 的内容,可以查看链接,Matplotlib Colormap reference。我们想要 colormap 起作用,需要设置 mode='RGBA'。
wordcloud=WordCloud(mask=mask, width=800, height=800, background_color="white", margin=1, max_words=10000, min_font_size=10, max_font_size=None, repeat=True,collocations=False, mode='RGBA', colormap='Reds',font_path="./FZKaTong-M19S.ttf").generate(mytext)
关键词显示重复
如果我们不想要出现的内容重复,我们可以参数,collocations=False,即可。
词云与原图融合
有的时候,我们希望我们生成的词云与原图可以有融合的效果,这样最终生成的图像可以看出我们的原图。我们可以使用 pillow 来对两张图片进行融合。如下有两张图片,分别是一头牛的轮廓:
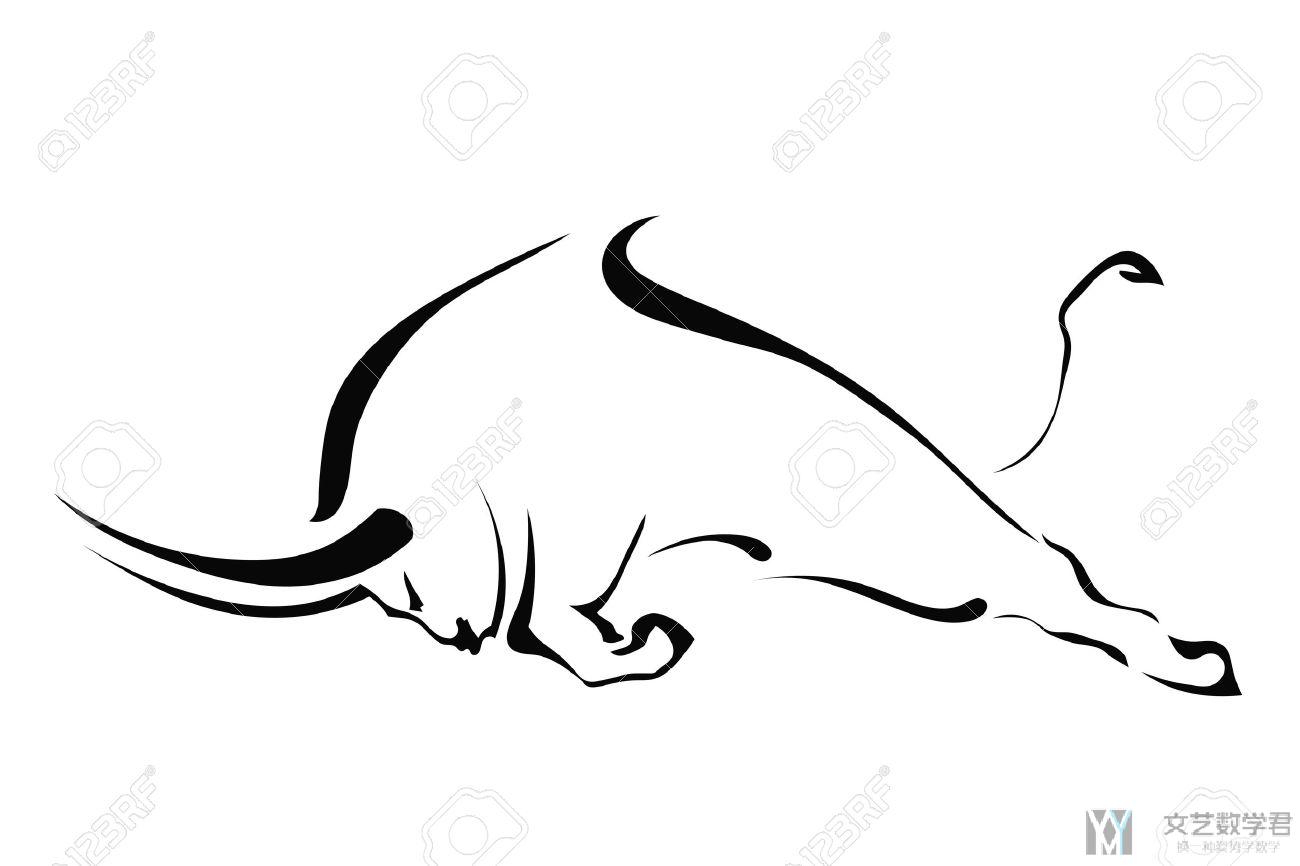
和按照这个牛生成的字符画。这里我们生成的时候,需要把牛的轮廓里面也涂成黑色的,不然只有一个轮廓是无法绘制出图云的。
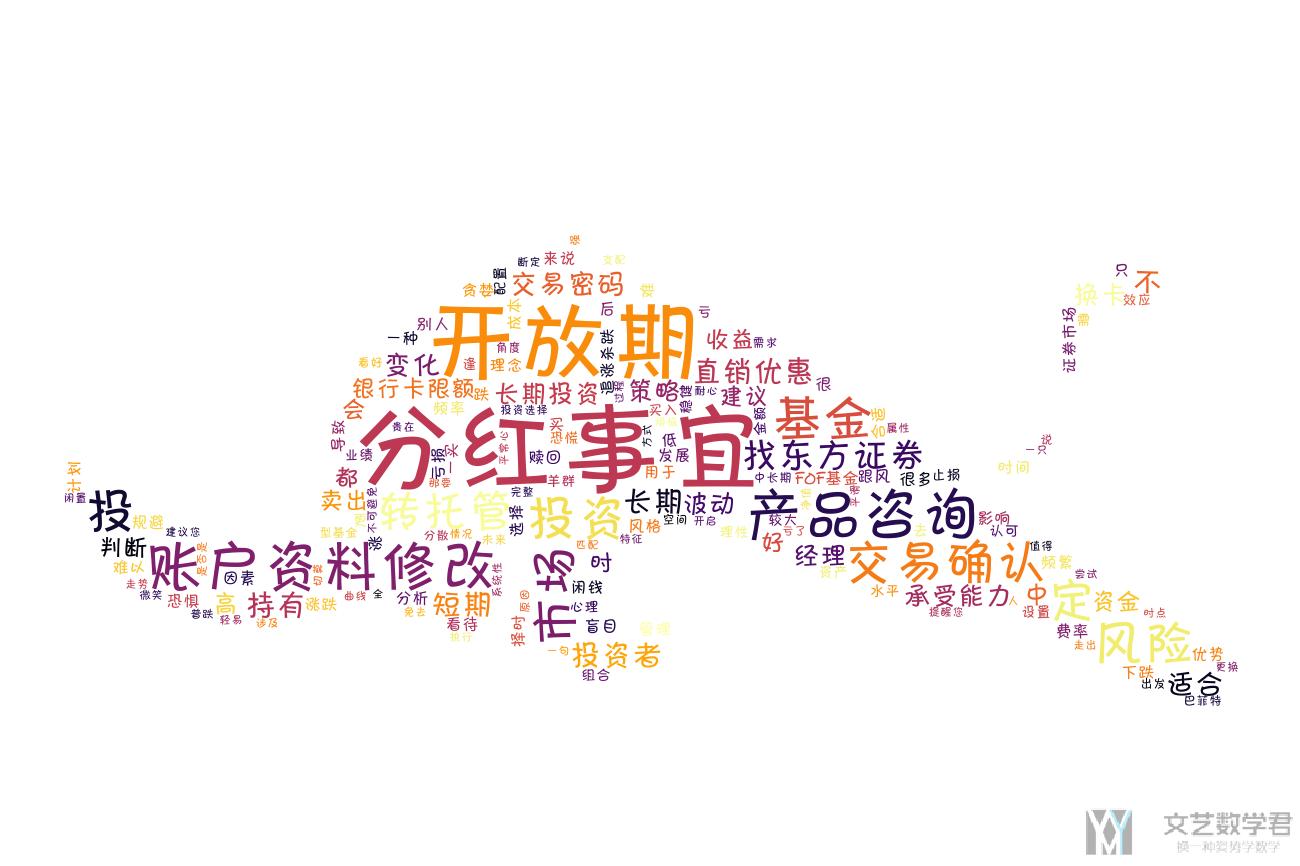
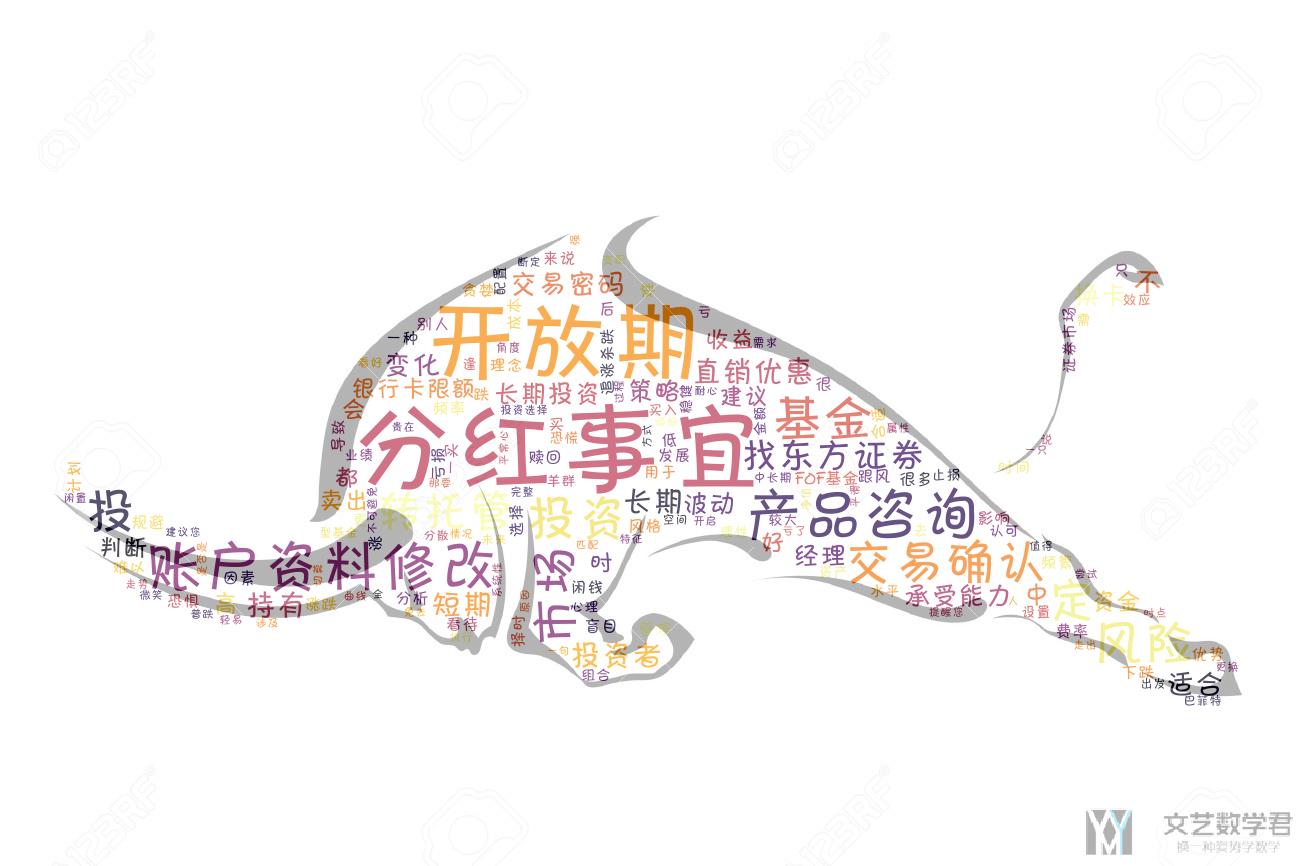
我们将上面的两张图融合在一起,这样可以更好看出字符画是什么动物,使用 blend 来进行融合,如下所示:
img = Image.open('./niu_2.png')
background = Image.open('niu_1.jpg')
background = background.convert('RGBA') # 两个图片的格式需要相同
img = Image.blend(background, img, 0.7)
img.save('out_with_background.png')
最终的效果如下所示,可以看出这个时候效果会更加明显:
词云与遮罩-进一步说明
上面我们简单介绍了 mask 的使用。但是实际情况下很可能因为图片的选择不当,造成不能生成我们想要的形状的词云。这里我们进一步来说明一下 mask 与词云的使用。这一篇的内容主要参考自,[Python] wordcloud 模組使用 mask 生成特定形狀、顏色(这一篇写得非常不错)
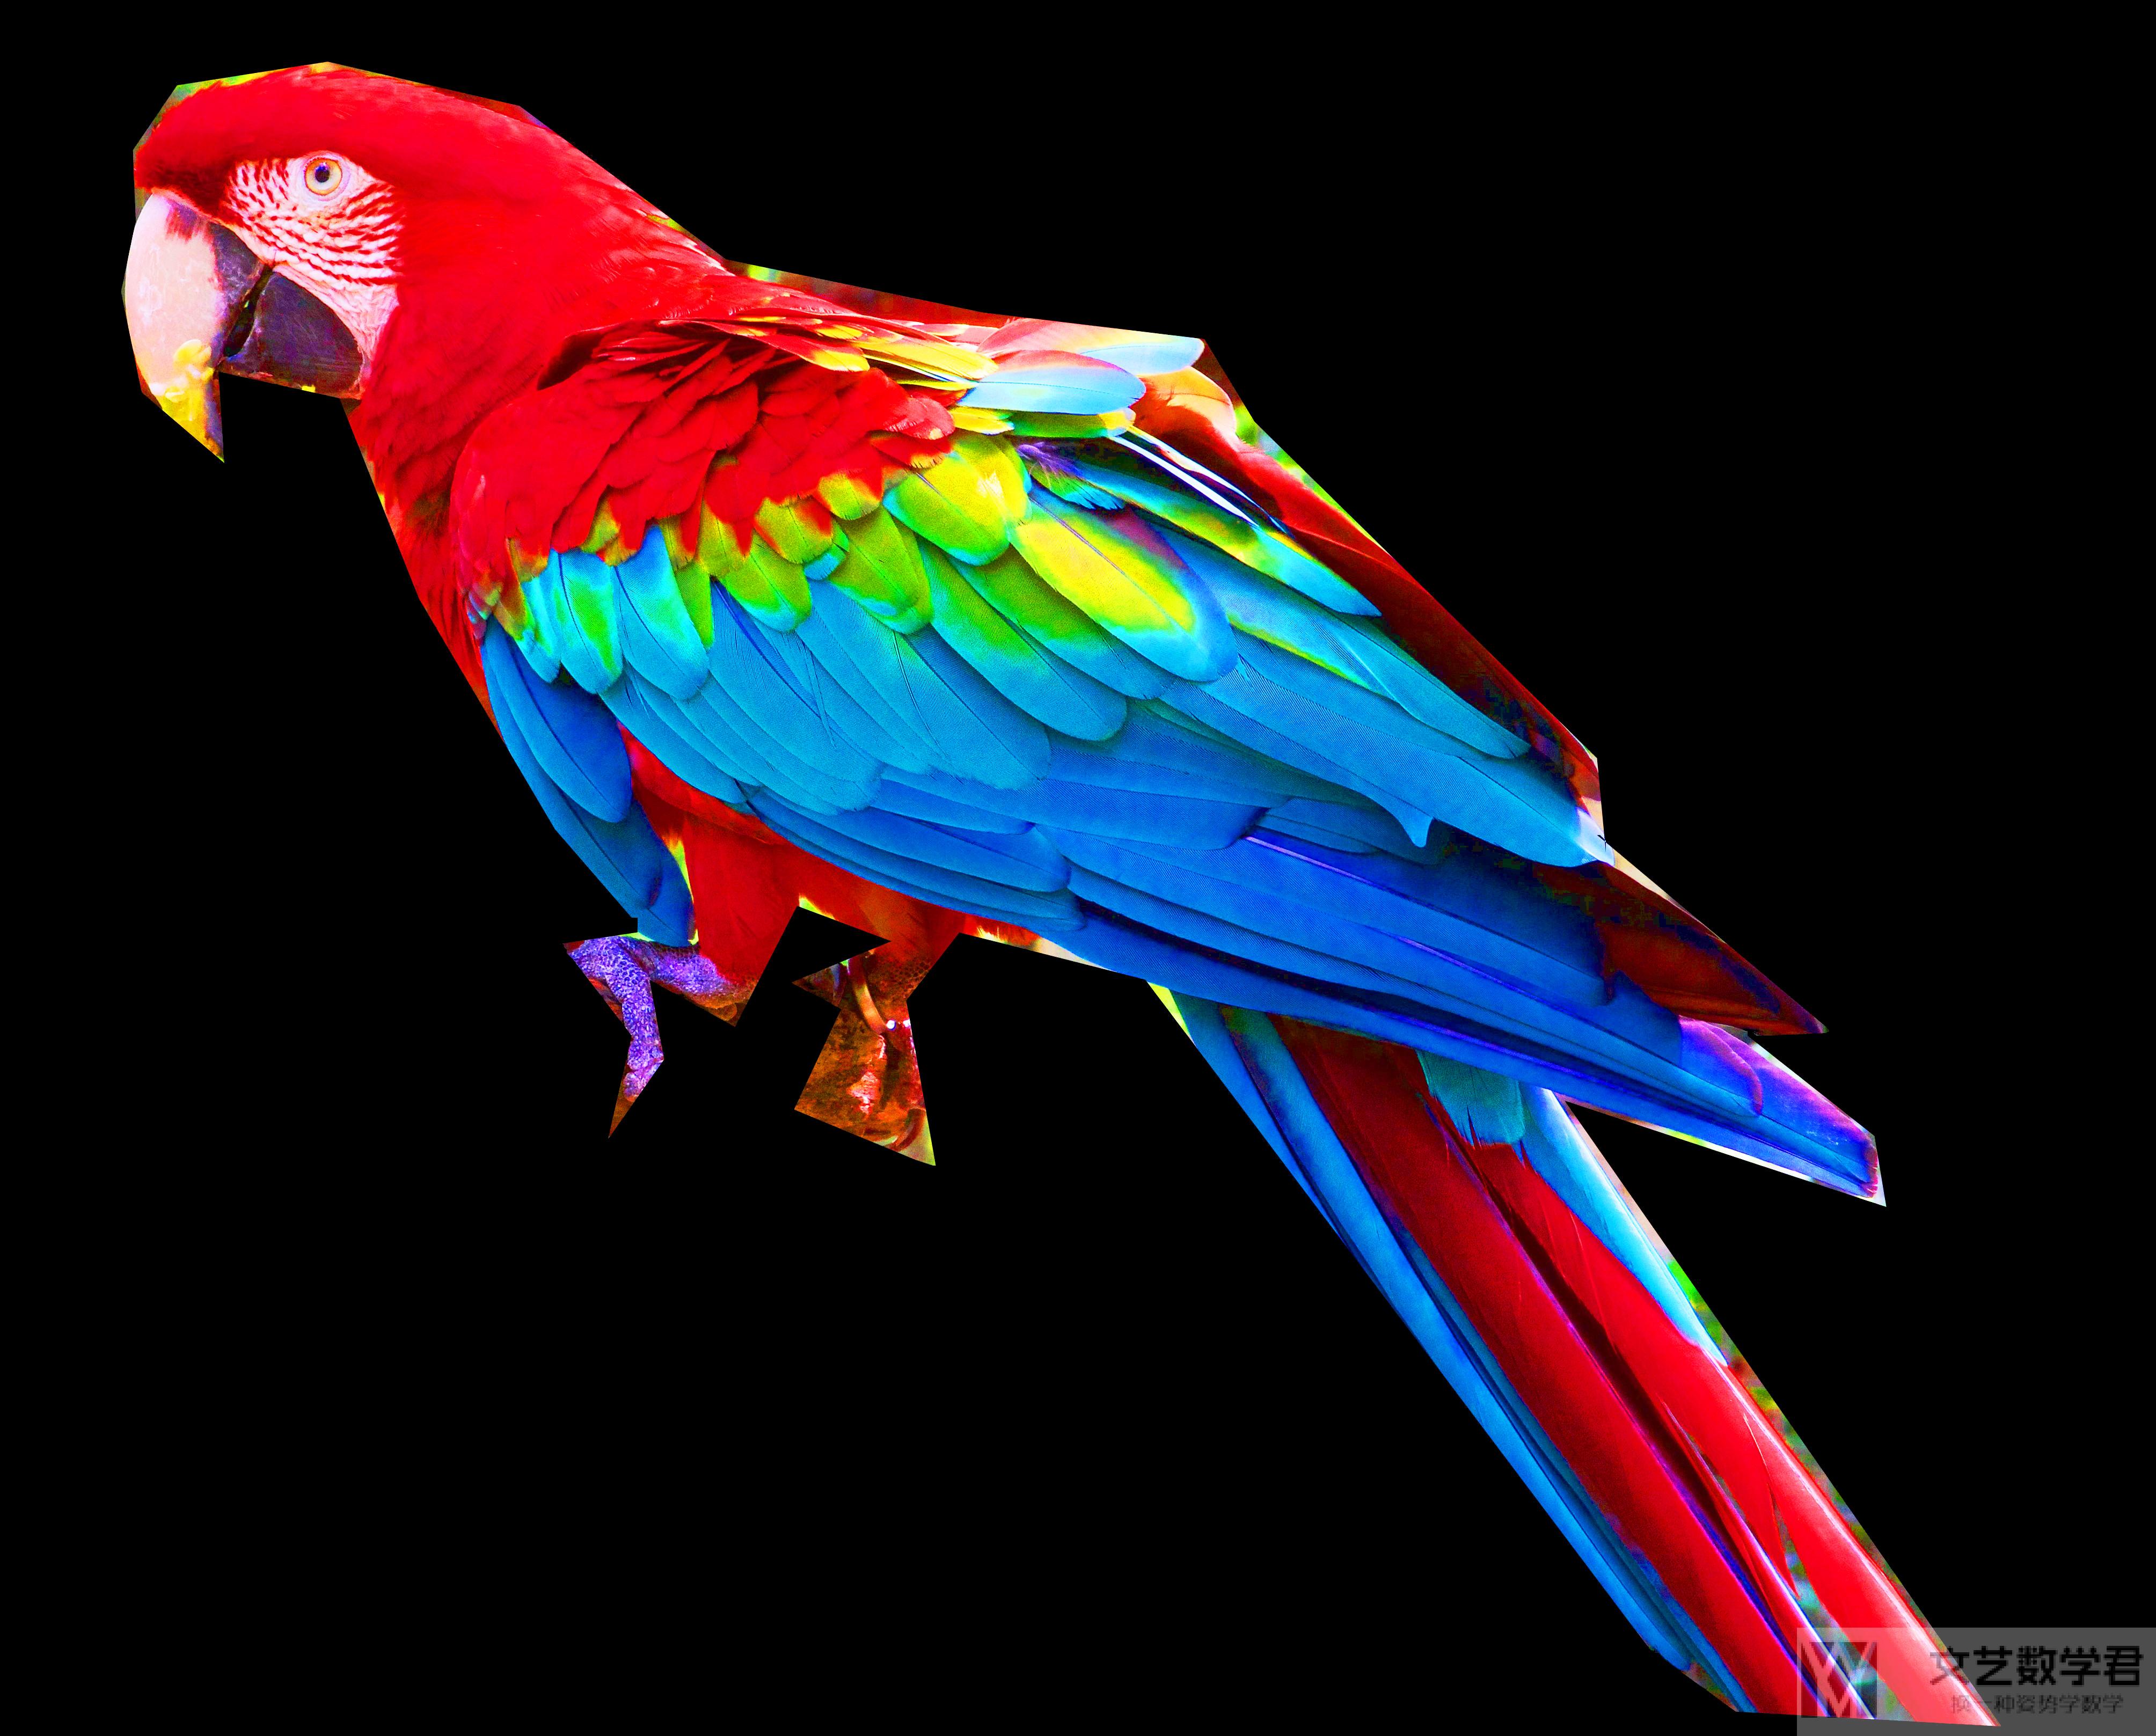
为了进行说明,我们从 GitHub 商获得范例图片,链接如下所示:词云范例图片-鹦鹉。图片是下面的样子,非常好看。
图片的处理
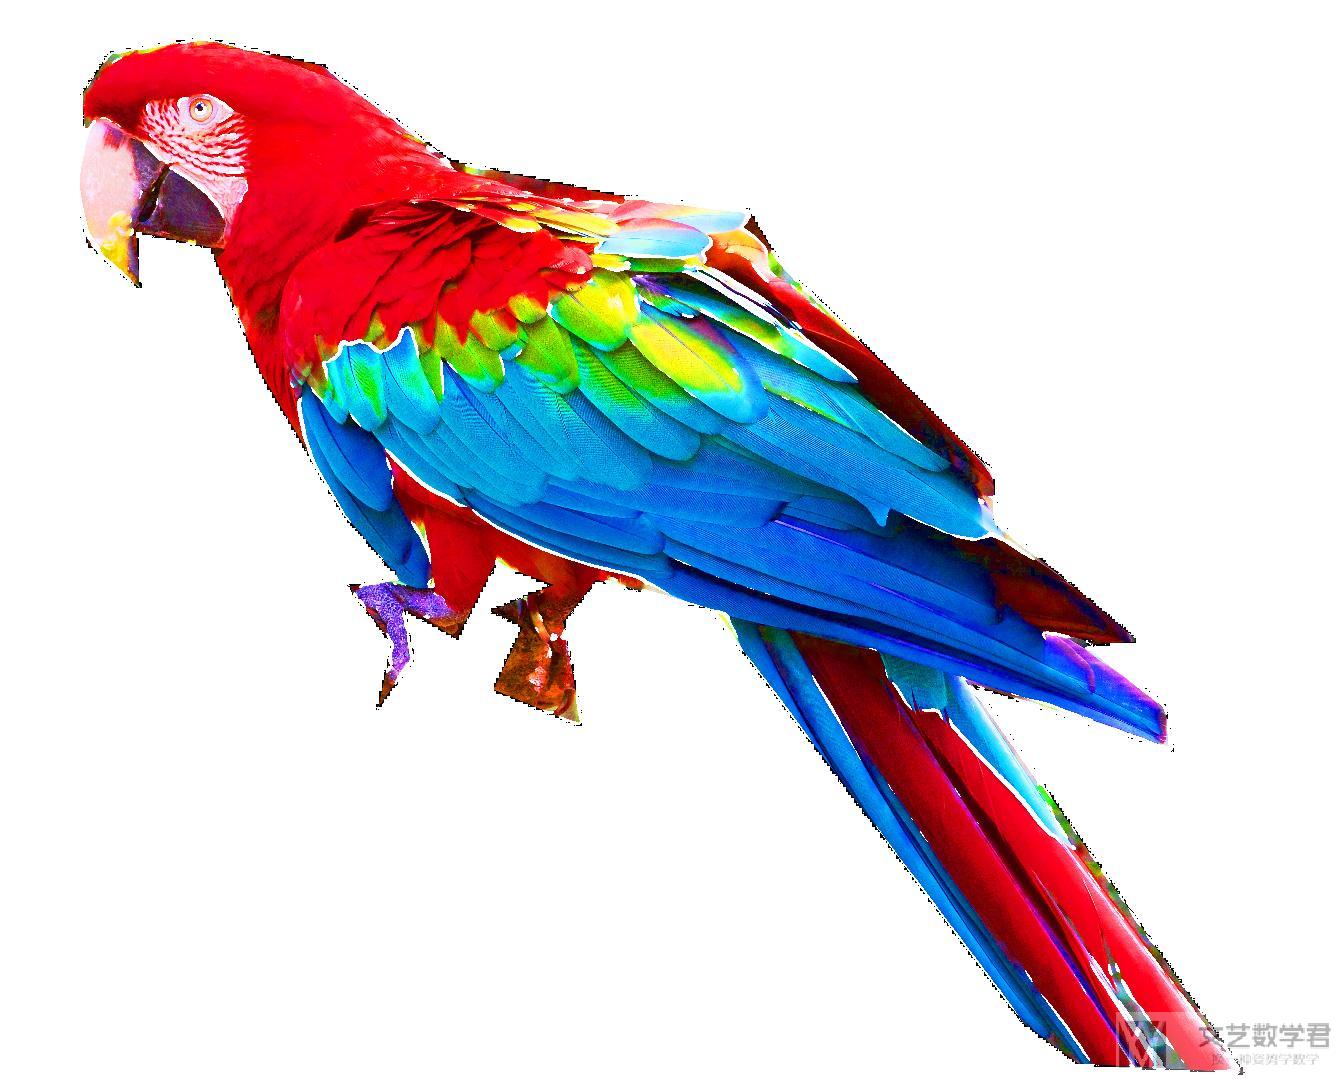
上面图片背景是黑色的,我们需要首先将黑色背景转换为白色(一些其他颜色的变化,可以参考下面的代码),同时我们我们需要检测出物体的边缘。可以使用下面的代码来进行图像的处理(如果有的时候图片比较小,我们可以使用 pillow 中的 resize 对图像进行放大):
from scipy.ndimage import gaussian_gradient_magnitude
# 图片的处理
img = Image.open("./parrot-by-jose-mari-gimenez2.jpg")
mask_color = np.array(img)
mask_color = mask_color[::3, ::3]
mask_image = mask_color.copycopy()
mask_image[mask_image.sum(axis=2) == 0] = 255 # 把黑色都转换为白色
# Edge detection
edges = np.mean([gaussian_gradient_magnitude(mask_color[:, :, i]/255., 2) for i in range(3)], axis=0)
mask_image[edges > .08] = 255
im = Image.fromarray(mask_image)
im.save("./your_file.jpeg")
处理完毕之后图像如下所示,黑色背景变为了白色:
简单的词云图像生成
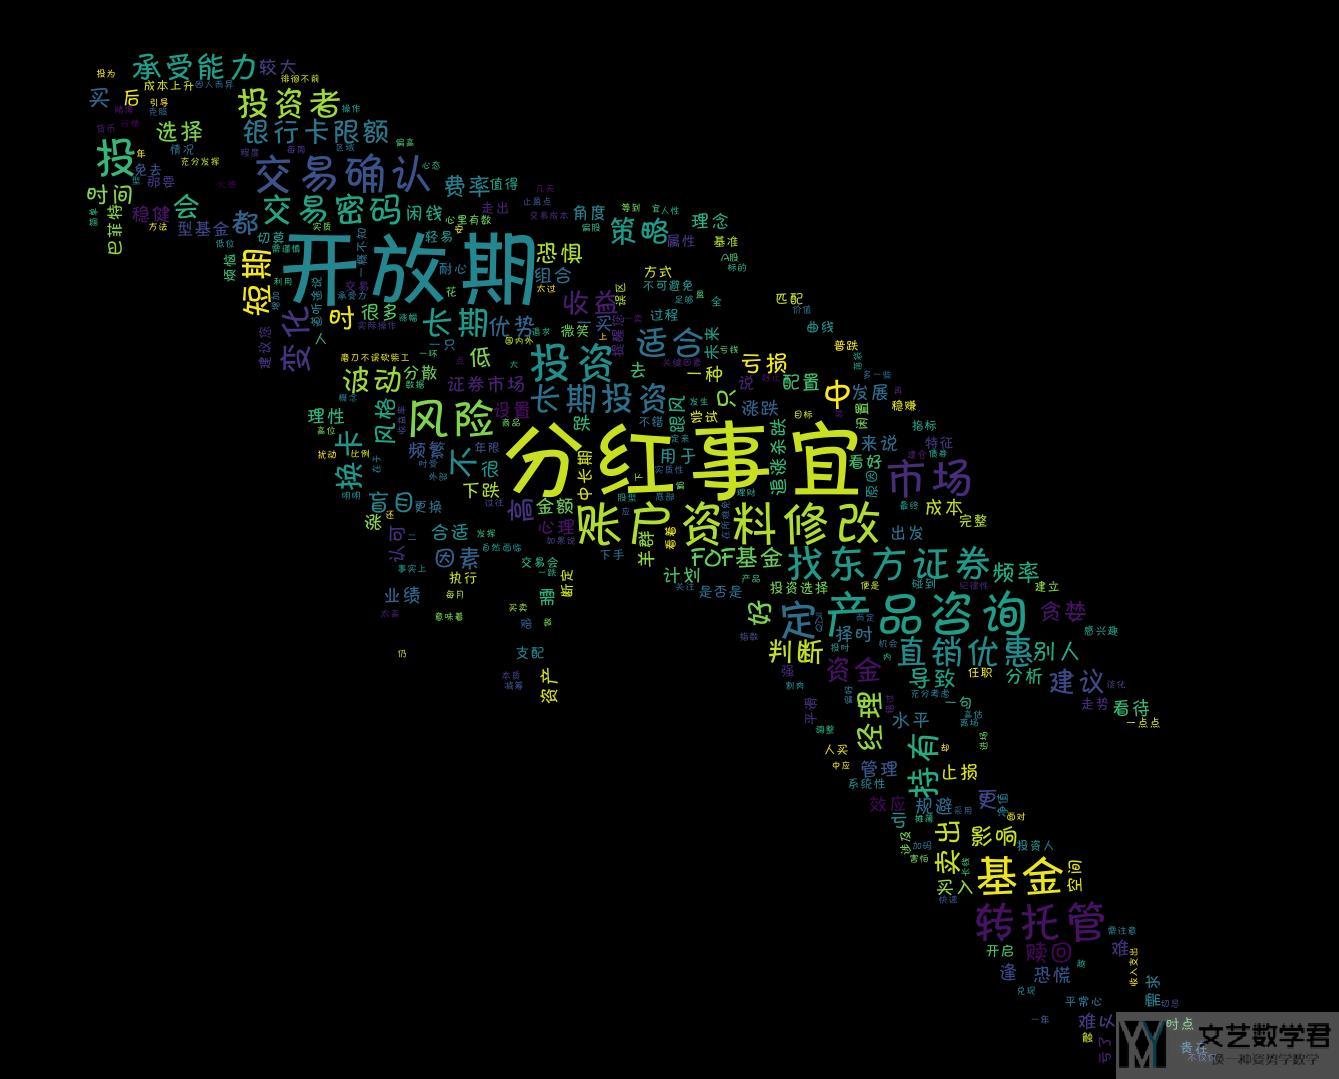
首先我们只利用上面图像的形状,让最终的效果是一只鹦鹉:
# 绘制词云
inputs = open('./output.txt', 'r', encoding='utf-8')
mytext=inputs.read()
wordcloud=WordCloud(mask=mask_image, margin=1, relative_scaling=0,
max_words=10000, min_font_size=10, max_font_size=None, repeat=True,collocations=False,
mode='RGB',font_path="./FZKaTong-M19S.ttf").generate(mytext) #生成云图
wordcloud.to_file('wordcloud.jpg')
inputs.close()
最终的生成的效果如下所示:
产生特点颜色和形状的图云
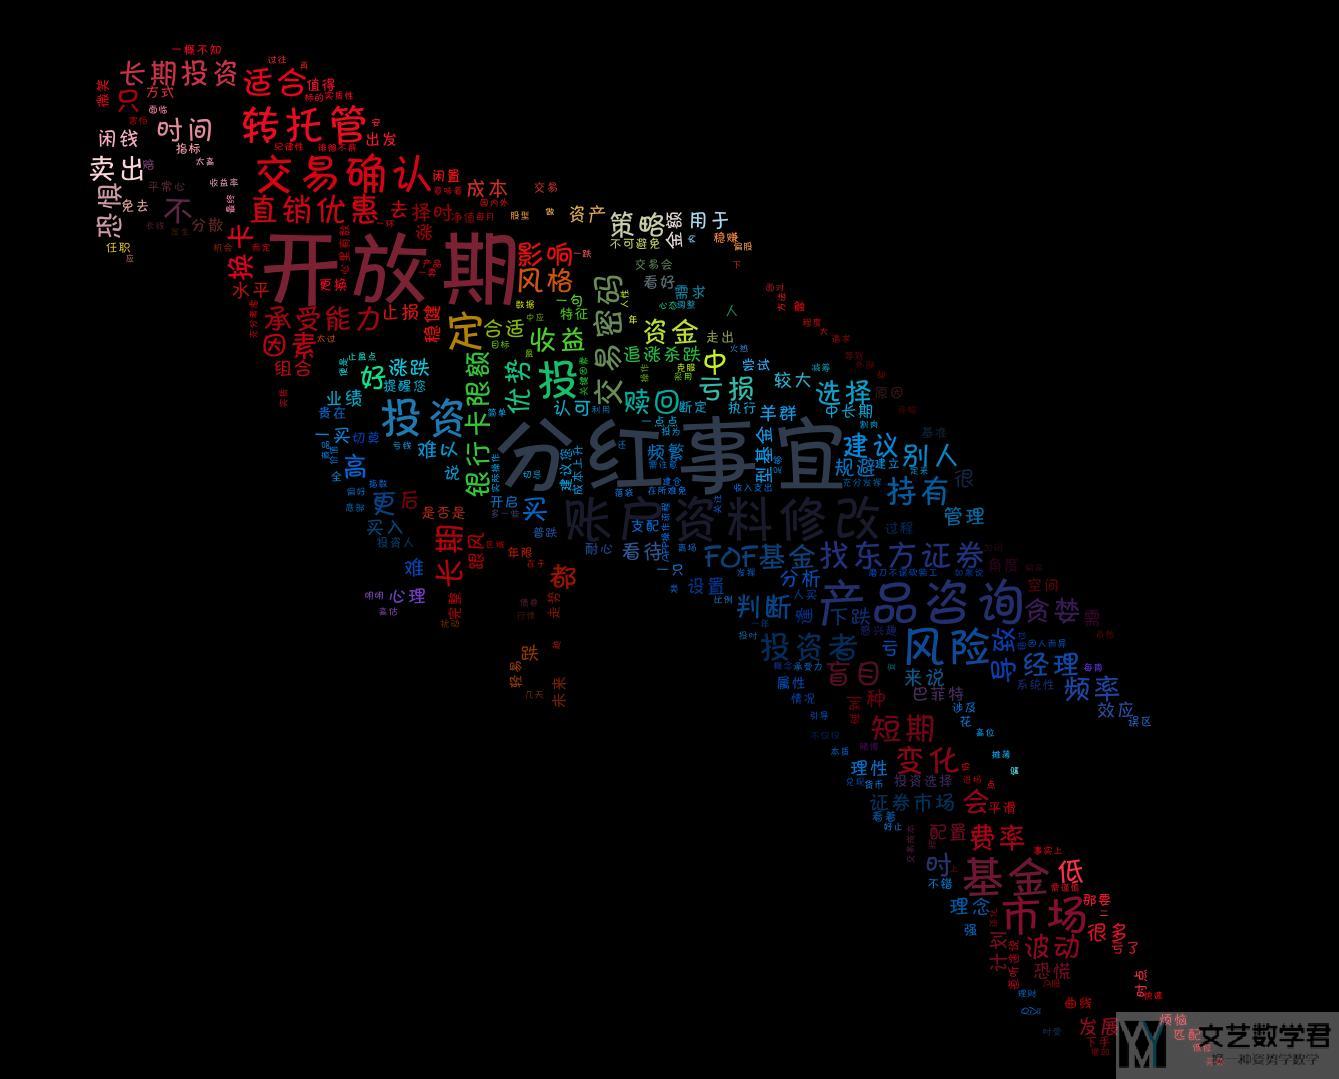
上面我们可以看到原始图片中鹦鹉的颜色很好看,我们希望生成的图片的颜色也和原始图像接近。这里我们只需要在上面代码后面加上重新着色即可。下面看一下简单的说明:
# 绘制词云
inputs = open('./output.txt', 'r', encoding='utf-8')
mytext=inputs.read()
wordcloud=WordCloud(mask=mask_image, margin=1, relative_scaling=0,
max_words=10000, min_font_size=10, max_font_size=None, repeat=True,collocations=False,
mode='RGB',font_path="./FZKaTong-M19S.ttf").generate(mytext) #生成云图
# Create coloring from image
image_colors = ImageColorGenerator(mask_color)
wordcloud.recolor(color_func=image_colors)
# 保存至图片
wordcloud.to_file('wordcloud.jpg')
inputs.close()
可以看到在 generate 之后,有一个步骤是重新着色。最终的生成的图像如下所示,此时生成图片的颜色和原始图片的颜色也是想接近的。
下面是生成部分的完整的代码,文本随便找一个文本即可。关于中文文本的处理,可以参考上面第二部分的内容。
import numpy as np
from PIL import Image
from wordcloud import WordCloud, ImageColorGenerator
from scipy.ndimage import gaussian_gradient_magnitude
# 图片的处理
img = Image.open("./parrot-by-jose-mari-gimenez2.jpg")
mask_color = np.array(img)
mask_color = mask_color[::3, ::3]
mask_image = mask_color.copycopy()
mask_image[mask_image.sum(axis=2) == 0] = 255 # 把黑色都转换为白色
# Edge detection
edges = np.mean([gaussian_gradient_magnitude(mask_color[:, :, i]/255., 2) for i in range(3)], axis=0)
mask_image[edges > .08] = 255
# 绘制词云
inputs = open('./output.txt', 'r', encoding='utf-8')
mytext=inputs.read()
wordcloud=WordCloud(mask=mask_image, margin=1, relative_scaling=0,
max_words=10000, min_font_size=10, max_font_size=None, repeat=True,collocations=False,
mode='RGB',font_path="./FZKaTong-M19S.ttf").generate(mytext) #生成云图
# Create coloring from image
image_colors = ImageColorGenerator(mask_color)
wordcloud.recolor(color_func=image_colors)
# 保存至图片
wordcloud.to_file('wordcloud.jpg')
inputs.close()