容器功能
该文章是为了后边理解SpringBoot的自动配置原理 平时开发中经常用到@Autowired注解注入Bean,以及学习Spring框架(这里指的是微观上的Spring Framework)中提到的IOC控制反转中的容器工厂。使用SSM时候大家是通过bean标签或者@Component等注解进行注入相应的Bean的那么在当下SpringBoot场景下又该如何导入所需要的Bean组件呢?Bean的装配方式
1. @Configuration
- 作用:声明标注该注解的类是配置类,AnnotationConfigWebApplicationContext类会对该注解进行扫描,从而构建出该类中@Bean对应的Bean并添加到IOC容器中。
注意:该配置类也是一个Bean组件,会加载到IOC容器中去。 - 使用:
分为两种模式,通过proxyBeanMethods属性的值来控制。默认为true,即Full模式
- Full模式:重量级模式。
该模式适合Bean组件之间有依赖关系的情况,该情况下被依赖的Bean会保持一致性(即该Bean先从IOC中进行查找和使用)(每次获取该Bean,他里边的依赖的Bean始终保持同一个)。
保证每个@Bean方法被调用多少次返回的组件都是单实例的
实践场景:快速创建一个SpringBoot项目。
两个自定义实体类,后续会用到。用户、账户。用户拥有账户。
//省略get、set、toString方法
//User用户类
public class User {
    private String name;
    private Account account;
	private String password;
    public User() {
    }
    public User(String name, String password) 											{
        this.name = name;
        this.password = password;
    }
}
//Account账户类
public class Account {
    private String name;
    private String password;

    public Account() {
    }
}
自定义配置类。
@Configuration
//@Configuration(proxyBeanMethods = true)两者等同
public class MyBeanConfig {
    @Bean
    public Account account(){
        return new Account("payCard1","123");
    }

    @Bean
    public User user(){
        User user = new User("zhangsan", "zs");
        user.setAccount(account());
        return user;
    }
}
启动类中进行测试
@SpringBootApplication
public class BootApp {
    public static void main(String[] args) {
        //1.return IOC container.
        ConfigurableApplicationContext run = SpringApplication.run(BootApp.class, args);
        //2.get User Bean and Account Bean ,observing whether Account is same
        User user = run.getBean("user", User.class);
        System.out.println(user);
        Account account = run.getBean("account", Account.class);
        System.out.println(account);
        //User{name='zhangsan', account=com.yh.redistemplateitem.pojo.Account@e0847a9, password='zs'}
        //com.yh.redistemplateitem.pojo.Account@e0847a9
//container start time is  3898 ms
//3. get MyBeanConfig Bean ,use it method to create object.observing whether object is same

        MyBeanConfig myBeanConfig = run.getBean(MyBeanConfig.class);
        Account account1 = myBeanConfig.account();
        Account account2 = myBeanConfig.account();
        System.out.println(account1==account2);
        //true
    }
}
结论:
发现User中的Account就是IOC容器中的Account对象。使用配置类本身的Bean对象执行方法创建的Account是同一个,取得还是IOC中的
- Lite模式:轻量级模式
适合组件之间没有依赖关系的情况,该模式不会多出Full模式下的额外的判断和查找过程,会加速容器的启动速度。可用于调优。
每个@Bean方法被调用多少次返回的组件都是新创建的
实践场景:快速创建一个SpringBoot项目。
自定义配置类。
@Configuration(proxyBeanMethods = false)
public class MyBeanConfig {
    @Bean
    public Account account(){
        return new Account("payCard1","123");
    }

    @Bean
    public User user(){
        User user = new User("zhangsan", "zs");
        user.setAccount(account());
        return user;
    }
}
启动类中进行测试
@SpringBootApplication
public class BootApp {
    public static void main(String[] args) {
        //1.return IOC container.
        ConfigurableApplicationContext run = SpringApplication.run(BootApp.class, args);
        //2.get User Bean and Account Bean ,observing whether Account is same
        User user = run.getBean("user", User.class);
        System.out.println(user);//User{name='zhangsan', account=com.yh.redistemplateitem.pojo.Account@4348fa35, password='zs'}
        Account account = run.getBean("account", Account.class);
        System.out.println(account);//com.yh.redistemplateitem.pojo.Account@563843f1
  //container start time is  3854 ms
  //3. get MyBeanConfig Bean ,use it method to create object.observing whether object is same

        MyBeanConfig myBeanConfig = run.getBean(MyBeanConfig.class);
        Account account1 = myBeanConfig.account();
        Account account2 = myBeanConfig.account();
        System.out.println(account1==account2);
        //false
    }
}
结论:
Lite模式下容器启动速度快于Full模式3854<3898ms。发现User中的Account并不是IOC容器中的Account对象。用配置类本身的Bean对象执行方法创建的Account不是同一个
2. @Bean、@Component、@Controller、@Service、@Repository
该注解方式注册Bean在Spring中经常用到,不做叙述。创建的Bean也为单例模式。
实践:
//User实体类
@Component
public class User {
    private String name;
    private Account account;
    private String password;
    public User() {
    }
    public User(String name, String password) {
        this.name = name;
        this.password = password;
    }
}
启动类中使用IOC容器获取该Bean
@SpringBootApplication
public class BootApp {
    public static void main(String[] args) {
        long start = System.currentTimeMillis();
        //1.return IOC container.
        ConfigurableApplicationContext run = SpringApplication.run(BootApp.class, args);
         //2. checking loaded Bean whether have named by user1 Bean
        boolean exist = run.containsBean("user1");
        System.out.println(exist);
        //true
结论:该Bean已添加到了IOC容器中
3.@ComponentScan、@Import
@Import注解,导入指定Class数组的Bean,其Bean的名称为其全限定类名.
该注解可以在自定义配置类或者引导类(实质上也是一个配置类)进行使用或者配置在标题2中的注解标注的类上也可以生效。
@ComponentScan注解用于指定扫描哪个包路径下的Bean。SpringBoot启动类默认扫描的是其包路径以及子包下的路径。可以使用该注解扫描该路径之外的包。
实际使用:
在引导类包外创建一个Person类
@Component("person")
public class Person {
    private String name;
    private String password;
    public Person() {
    }
    public Person(String name, String password) {
        this.name = name;
        this.password = password;
    }
}
@SpringBootApplication
@ComponentScan("com.yh")
public class ImportApp {
    public static void main(String[] args) {
        long start = System.currentTimeMillis();
        //1.return IOC container.
        ConfigurableApplicationContext run = SpringApplication.run(ImportApp.class, args);
        //2.by Class type to get beans
        Map<String, User> users = run.getBeansOfType(User.class);
        System.out.println(users);
        Map<String, Account> accounts = run.getBeansOfType(Account.class);
        System.out.println(accounts);
        //{com.yh.redistemplateitem.pojo.User=com.yh.redistemplateitem.pojo.User@5d5574c7}
        //{com.yh.redistemplateitem.pojo.Account=com.yh.redistemplateitem.pojo.Account@5a7a6d34}

        Person person = run.getBean("person", Person.class);
        System.out.println(person);
        //com.yh.Person@391d28ea
    }
}
4. @Conditional
条件装配:该注解有很多子类型。可以在类和方法上使用。
满足指定的条件,则进行Bean组件的注入。
其中子类型注解的实际意义通过名称即可判断大部分常用的。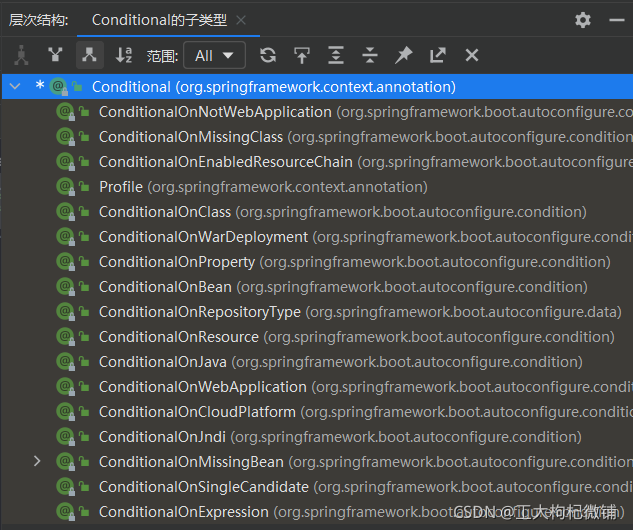
在标题1中使用Full模式时User依赖于Account,正确场景应该为,只有当Account的Bean存在,才会创建User的Bean。那么就可以通过@ConditionalOnBean(Account.class)注解实现该效果。当Account的Bean不存在时不会创建UserBean
实践:
去除自定义配置类中的Account的@Bean注解,尝试获取User对象,结果为失败。
原生配置文件的引入@ImportResource
在使用SSM时候,有些组件的配置时使用XML文件进行配置的,进行项目升级时候可以是使用@ImportResource注解引入必要的原生xml配置文件
实践:
@SpringBootApplication
@ImportResource("classpath:beans.xml")//导入原生xml配置文件
public class BootApp {
    public static void main(String[] args) {
        long start = System.currentTimeMillis();
        //1.return IOC container.
        ConfigurableApplicationContext run = SpringApplication.run(BootApp.class, args);
        //2.get Bean in XML
        User user = run.getBean("user5", User.class);
        System.out.println(user);
        Account account = run.getBean("account5", Account.class);
        System.out.println(account);
        //com.yh.redistemplateitem.pojo.User@31f5b923
        //com.yh.redistemplateitem.pojo.Account@79e2606f
      }
}
配置绑定
以前的文章中写过了,再次写一次将配置文件的值绑定为java对象的实现方式,以供理解
- 使用@Component+@ConfigurationProperties
只有在IOC容器中的Bean组件(即需要@Component注解),才会拥有SpringBoot提供的绑定功能(即@ConfigurationProperties注解)
实践:
yaml中自定义配置
person:
  my:
   height: 100
   weight: 60kg
编写对应的实体类
@Component
@ConfigurationProperties(prefix = "person.my")
public class My {
    private int height;
    private String weight;
}
启动类中获取该Bean并输出
@SpringBootApplication
public class BootApp {
    public static void main(String[] args) {
        long start = System.currentTimeMillis();
        //1.return IOC container.
        ConfigurableApplicationContext run = SpringApplication.run(BootApp.class, args);
        //2.get Bean in pojo and yaml
        My my = run.getBean("my", My.class);
        System.out.println(my);
        //My{heigth=100, weight='60kg'}
- 使用@EnableConfigurationProperties + @ConfigurationProperties
使用该方式只需要实体类中去除@Component注解即可,然后在自定义配置类或者启动类或者有@Component注解的类上添加@EnableConfigurationProperties(My.class)注解即可.
该注解的作用有两个:
//1、开启My配置绑定功能
//2、把这个My这个组件自动注册到IOC容器中