1.准备工作
因为我们要用到redis ,就先下载个redis的windows版本
redis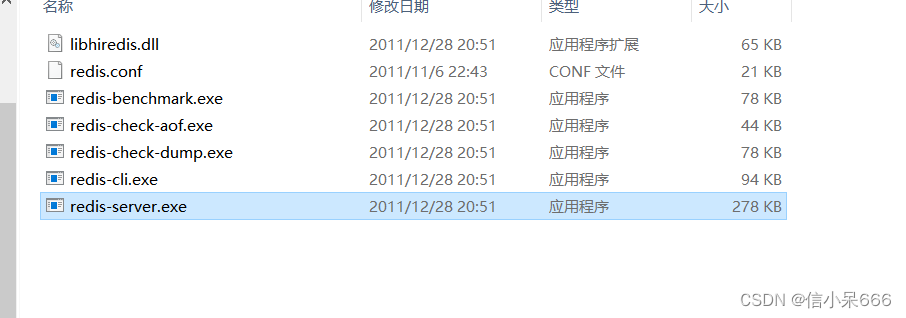
前端代码直接复制即可
<!DOCTYPE html>
<html>
<head>
<!-- 页面meta -->
<meta charset="utf-8">
<meta http-equiv="X-UA-Compatible" content="IE=edge">
<title>传智健康</title>
<meta name="description" content="传智健康">
<meta name="keywords" content="传智健康">
<meta content="width=device-width,initial-scale=1,maximum-scale=1,user-scalable=no" name="viewport">
<!-- 引入样式 -->
<link rel="stylesheet" href="../plugins/elementui/index.css">
<link rel="stylesheet" href="../plugins/font-awesome/css/font-awesome.min.css">
<link rel="stylesheet" href="../css/style.css">
<!-- 引入组件库 -->
<script type="text/javascript" src="../js/jquery.min.js"></script>
<script src="../js/vue.js"></script>
<script src="../plugins/elementui/index.js"></script>
<script src="../js/axios-0.18.0.js"></script>
<style>
.avatar-uploader .el-upload {
border: 1px dashed #d9d9d9;
border-radius: 6px;
cursor: pointer;
position: relative;
overflow: hidden;
}
.avatar-uploader .el-upload:hover {
border-color: #409EFF;
}
.avatar-uploader-icon {
font-size: 28px;
color: #8c939d;
width: 178px;
height: 178px;
line-height: 178px;
text-align: center;
}
.avatar {
width: 178px;
height: 178px;
display: block;
}
.datatable {
position: relative;
box-sizing: border-box;
-webkit-box-flex: 1;
width: 100%;
max-width: 100%;
font-size: 14px;
color: rgb(96, 98, 102);
overflow: hidden;
flex: 1 1 0%;
}
.datatable td, .datatable th {
padding: 12px 0;
min-width: 0;
-webkit-box-sizing: border-box;
box-sizing: border-box;
text-overflow: ellipsis;
vertical-align: middle;
position: relative;
text-align: left;
}
</style>
</head>
<body class="hold-transition">
<div id="app">
<div class="content-header">
<h1>预约管理<small>套餐管理</small></h1>
<el-breadcrumb separator-class="el-icon-arrow-right" class="breadcrumb">
<el-breadcrumb-item :to="{ path: '/' }">首页</el-breadcrumb-item>
<el-breadcrumb-item>预约管理</el-breadcrumb-item>
<el-breadcrumb-item>套餐管理</el-breadcrumb-item>
</el-breadcrumb>
</div>
<div class="app-container">
<div class="box">
<div class="filter-container">
<el-input placeholder="编码/名称/助记码" v-model="pagination.queryString" style="width: 200px;" class="filter-item" @keyup.enter.native="handleFilter"></el-input>
<el-button @click="findPage()" class="dalfBut">查询</el-button>
<el-button type="primary" class="butT" @click="handleCreate()">新建</el-button>
</div>
<el-table size="small" current-row-key="id" :data="dataList" stripe highlight-current-row>
<el-table-column type="index" align="center" label="序号"></el-table-column>
<el-table-column prop="code" label="套餐编码" align="center"></el-table-column>
<el-table-column prop="name" label="套餐名称" align="center"></el-table-column>
<el-table-column label="适用性别" align="center">
<template slot-scope="scope">
<span>{{ scope.row.sex == '0' ? '不限' : scope.row.sex == '1' ? '男' : '女'}}</span>
</template>
</el-table-column>
<el-table-column prop="age" label="适用年龄" align="center"></el-table-column>
<el-table-column prop="helpCode" label="助记码" align="center"></el-table-column>
<el-table-column prop="remark" label="说明" align="center"></el-table-column>
<el-table-column label="操作" align="center">
<template slot-scope="scope">
<el-button type="primary" size="mini">编辑</el-button>
<el-button size="mini" type="danger">删除</el-button>
</template>
</el-table-column>
</el-table>
<div class="pagination-container">
<el-pagination
class="pagiantion"
@current-change="handleCurrentChange"
:current-page="pagination.currentPage"
:page-size="pagination.pageSize"
layout="total, prev, pager, next, jumper"
:total="pagination.total">
</el-pagination>
</div>
<!-- 新增标签弹层 -->
<div class="add-form">
<el-dialog title="新增套餐" :visible.sync="dialogFormVisible">
<template>
<el-tabs v-model="activeName" type="card">
<el-tab-pane label="基本信息" name="first">
<el-form label-position="right" label-width="100px">
<el-row>
<el-col :span="12">
<el-form-item label="编码">
<el-input v-model="formData.code"/>
</el-form-item>
</el-col>
<el-col :span="12">
<el-form-item label="名称">
<el-input v-model="formData.name"/>
</el-form-item>
</el-col>
</el-row>
<el-row>
<el-col :span="12">
<el-form-item label="适用性别">
<el-select v-model="formData.sex">
<el-option label="不限" value="0"></el-option>
<el-option label="男" value="1"></el-option>
<el-option label="女" value="2"></el-option>
</el-select>
</el-form-item>
</el-col>
<el-col :span="12">
<el-form-item label="助记码">
<el-input v-model="formData.helpCode"/>
</el-form-item>
</el-col>
</el-row>
<el-row>
<el-col :span="12">
<el-form-item label="套餐价格">
<el-input v-model="formData.price"/>
</el-form-item>
</el-col>
<el-col :span="12">
<el-form-item label="适用年龄">
<el-input v-model="formData.age"/>
</el-form-item>
</el-col>
</el-row>
<el-row>
<el-col :span="24">
<el-form-item label="上传图片">
<el-upload
class="avatar-uploader"
action="/setmeal/upload.do"
:auto-upload="autoUpload"
name="imgFile"
:show-file-list="false"
:on-success="handleAvatarSuccess"
:before-upload="beforeAvatarUpload">
<img v-if="imageUrl" :src="imageUrl" class="avatar">
<i v-else class="el-icon-plus avatar-uploader-icon"></i>
</el-upload>
</el-form-item>
</el-col>
</el-row>
<el-row>
<el-col :span="24">
<el-form-item label="说明">
<el-input v-model="formData.remark" type="textarea"></el-input>
</el-form-item>
</el-col>
</el-row>
<el-row>
<el-col :span="24">
<el-form-item label="注意事项">
<el-input v-model="formData.attention" type="textarea"></el-input>
</el-form-item>
</el-col>
</el-row>
</el-form>
</el-tab-pane>
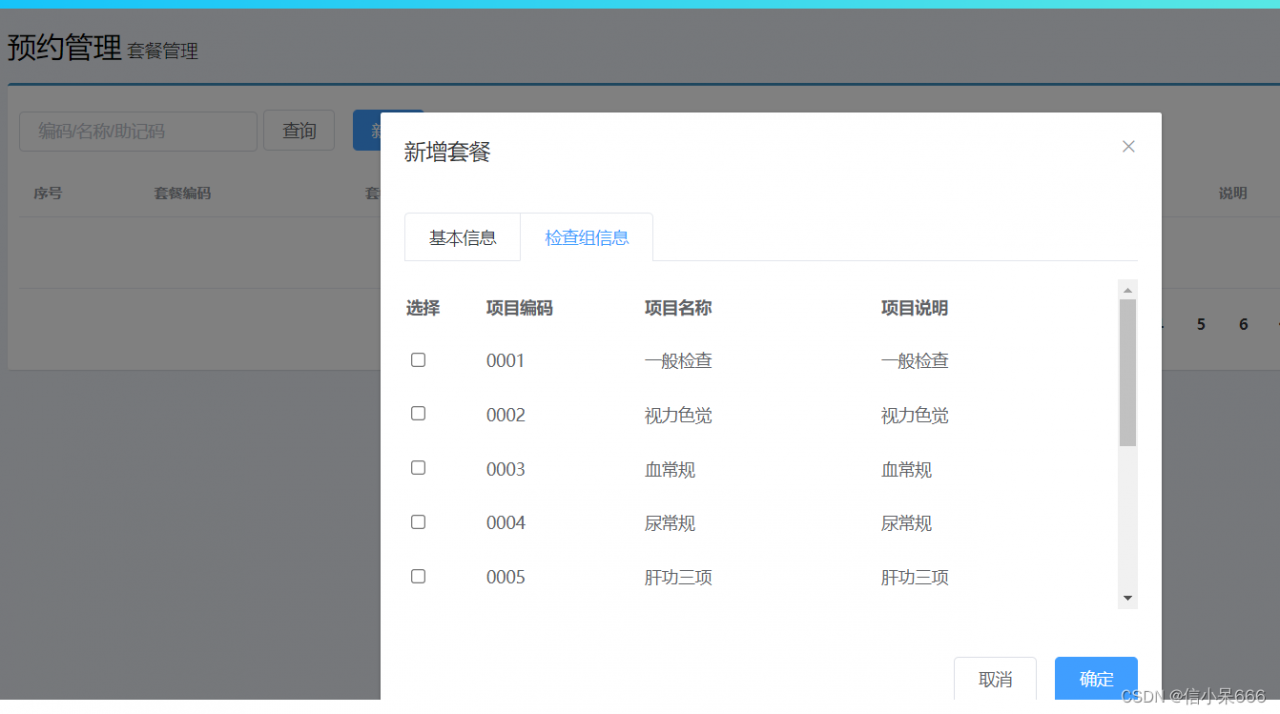
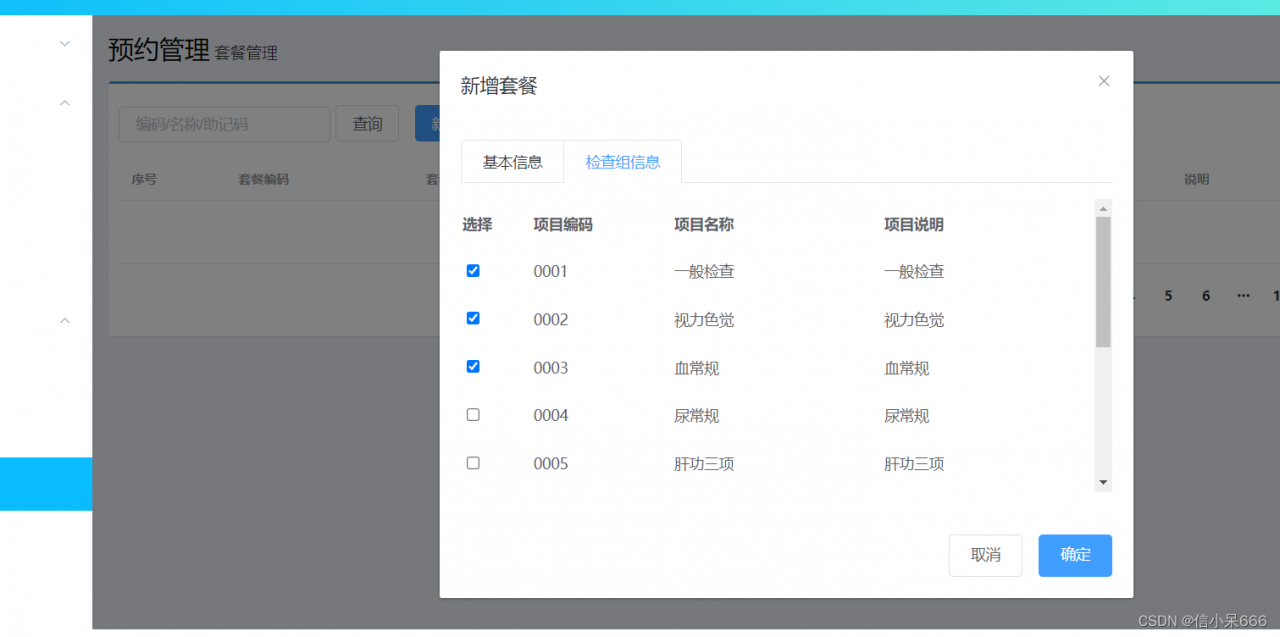
<el-tab-pane label="检查组信息" name="second">
<div class="checkScrol">
<table class="datatable">
<thead>
<tr>
<th>选择</th>
<th>项目编码</th>
<th>项目名称</th>
<th>项目说明</th>
</tr>
</thead>
<tbody>
<tr v-for="c in tableData">
<td>
<input :id="c.id" v-model="checkgroupIds" type="checkbox" :value="c.id">
</td>
<td><label :for="c.id">{{c.code}}</label></td>
<td><label :for="c.id">{{c.name}}</label></td>
<td><label :for="c.id">{{c.remark}}</label></td>
</tr>
</tbody>
</table>
</div>
</el-tab-pane>
</el-tabs>
</template>
<div slot="footer" class="dialog-footer">
<el-button @click="dialogFormVisible = false">取消</el-button>
<el-button type="primary" @click="handleAdd()">确定</el-button>
</div>
</el-dialog>
</div>
</div>
</div>
</div>
</body>
<script>
var vue = new Vue({
el: '#app',
data:{
autoUpload:true,//自动上传
imageUrl:null,//模型数据,用于上传图片完成后图片预览
activeName:'first',//添加/编辑窗口Tab标签名称
pagination: {//分页相关属性
currentPage: 1,
pageSize:10,
total:100,
queryString:null,
},
dataList: [],//列表数据
formData: {},//表单数据
tableData:[],//添加表单窗口中检查组列表数据
checkgroupIds:[],//添加表单窗口中检查组复选框对应id
dialogFormVisible: false//控制添加窗口显示/隐藏
},
created() {
this.findPage();
},
methods: {
//文件上传成功后的钩子,response为服务端返回的值,file为当前上传的文件封装成的js对象
handleAvatarSuccess(response, file) {
//为模型数据imageUrl赋值,用于页面图片预览
this.imageUrl = 'http://psyrcmf27.bkt.clouddn.com/' + response.data;
this.$message({
type:response.flag ? 'success':'error',
message:response.message
});
//设置模型数据(图片名称),后续提交ajax请求时会提交到后台最终保存到数据库
this.formData.img = response.data;
},
//上传图片之前执行
beforeAvatarUpload(file) {
const isJPG = file.type === 'image/jpeg';
const isLt2M = file.size / 1024 / 1024 < 2;
if (!isJPG) {
this.$message.error('上传套餐图片只能是 JPG 格式!');
}
if (!isLt2M) {
this.$message.error('上传套餐图片大小不能超过 2MB!');
}
return isJPG && isLt2M;
},
//添加
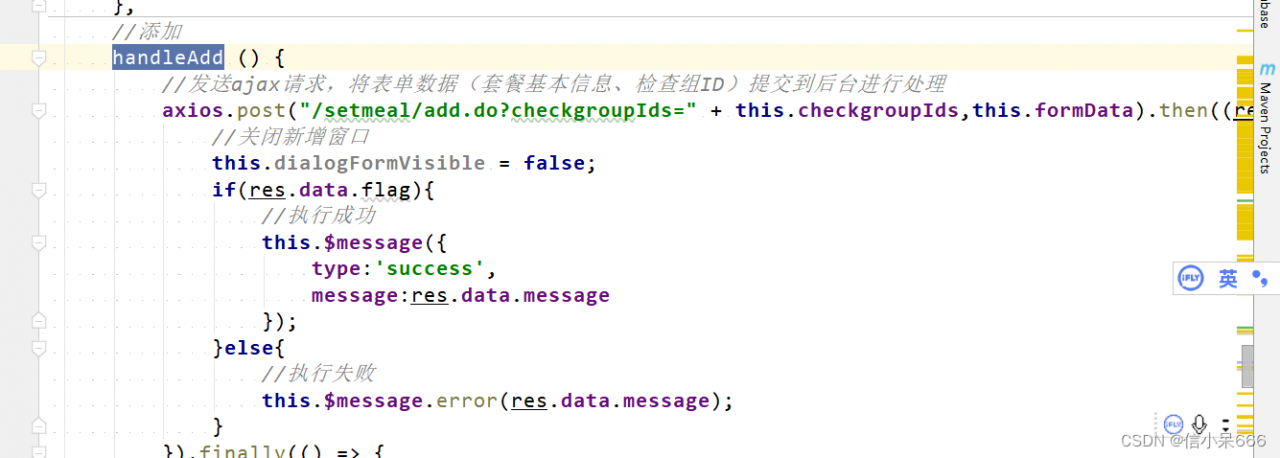
handleAdd () {
//发送ajax请求,将表单数据(套餐基本信息、检查组ID)提交到后台进行处理
axios.post("/setmeal/add.do?checkgroupIds=" + this.checkgroupIds,this.formData).then((res) => {
//关闭新增窗口
this.dialogFormVisible = false;
if(res.data.flag){
//执行成功
this.$message({
type:'success',
message:res.data.message
});
}else{
//执行失败
this.$message.error(res.data.message);
}
}).finally(() => {
this.findPage();
});
},
//分页查询
findPage() {
//分页参数
var param = {
currentPage:this.pagination.currentPage,//页码
pageSize:this.pagination.pageSize,//每页显示的记录数
queryString:this.pagination.queryString//查询条件
};
//请求后台
axios.post("/setmeal/findPage.do",param).then((response)=> {
//为模型数据赋值,基于VUE的双向绑定展示到页面
this.dataList = response.data.rows;
this.pagination.total = response.data.total;
});
},
// 重置表单
resetForm() {
this.formData = {};
this.activeName = 'first';
this.imageUrl = null;
this.checkgroupIds = [];
},
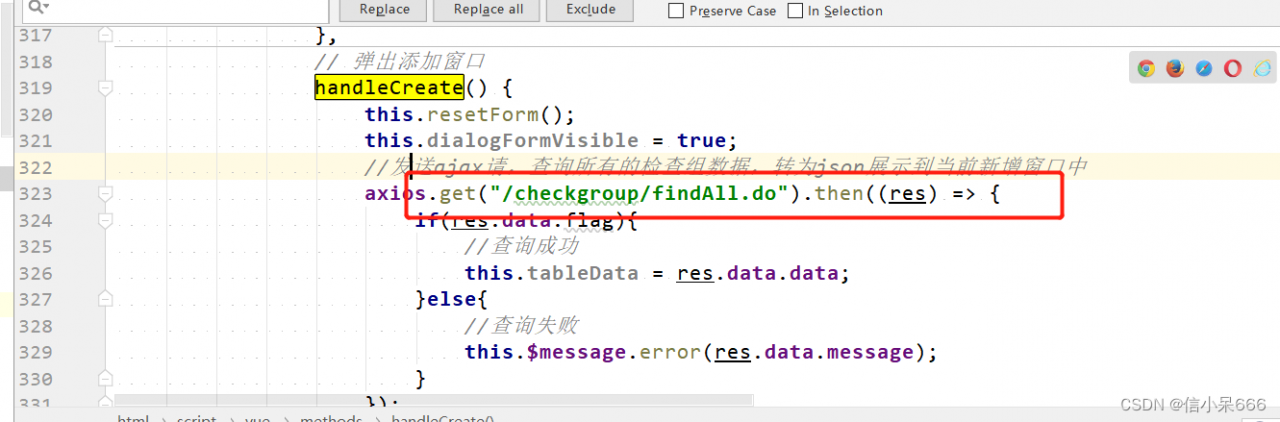
// 弹出添加窗口
handleCreate() {
this.resetForm();
this.dialogFormVisible = true;
//发送ajax请,查询所有的检查组数据,转为json展示到当前新增窗口中
axios.get("/checkgroup/findAll.do").then((res) => {
if(res.data.flag){
//查询成功
this.tableData = res.data.data;
}else{
//查询失败
this.$message.error(res.data.message);
}
});
},
//切换页码
handleCurrentChange(currentPage) {
this.pagination.currentPage = currentPage;
this.findPage();
}
}
})
</script>
</html>
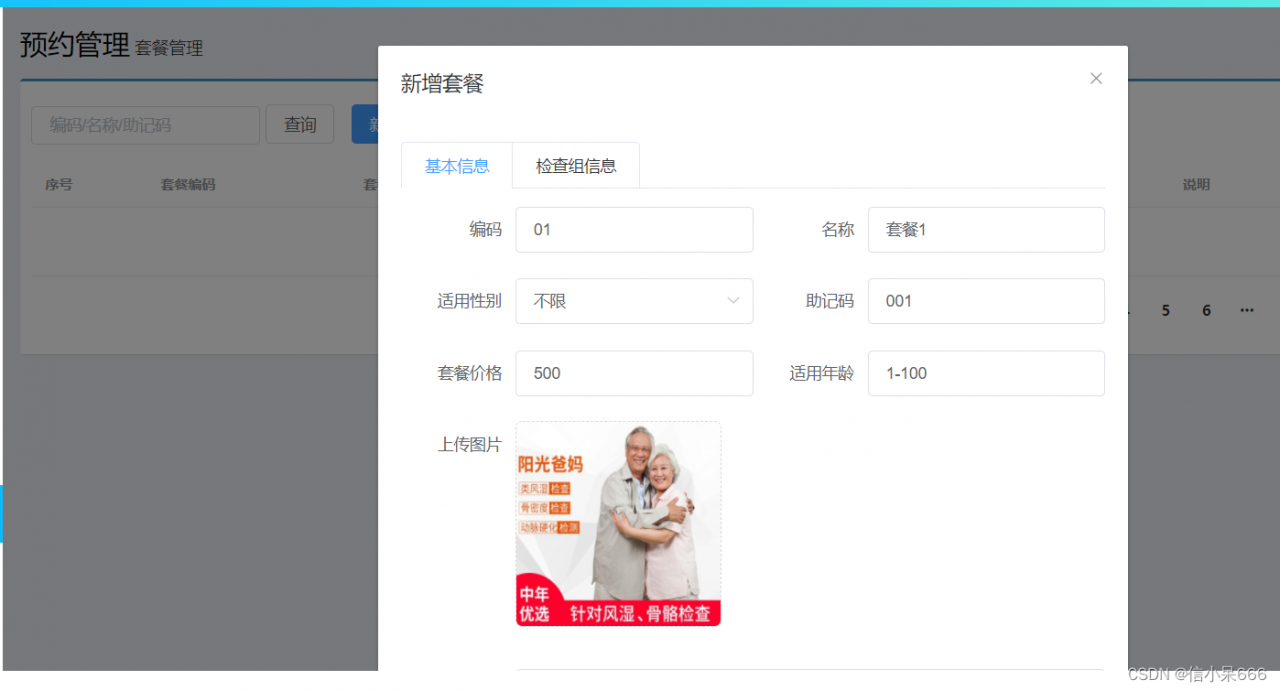
2.新增套餐
2.1 新增页面检查项管理回显
前端页面已经写好,我们需要在原来的检查项模块新增findAll.do
2.1.1 Controller
在CheckGroupController新增findAll
    //查询所有
    @RequestMapping("/findAll")
    public Result findAll(){
        List<CheckGroup> checkGroupList = checkGroupService.findAll();
        if(checkGroupList != null && checkGroupList.size() > 0){
            Result result = new Result(true, MessageConstant.QUERY_CHECKGROUP_SUCCESS);
            result.setData(checkGroupList);
            return result;
        }
        return new Result(false,MessageConstant.QUERY_CHECKGROUP_FAIL);
    }
2.1.2 接口和实现类
public List<CheckGroup> findAll();
实现类
    @Override
    public List<CheckGroup> findAll() {
        return checkGroupDao.findAll();
    }
2.1.3 Dao
List<CheckGroup> findAll();
    <select id="findAll" resultType="com.liu.pojo.CheckGroup">
         select * from t_checkgroup
    </select>
2.1.4 测试
2.2 新增页面图片回显
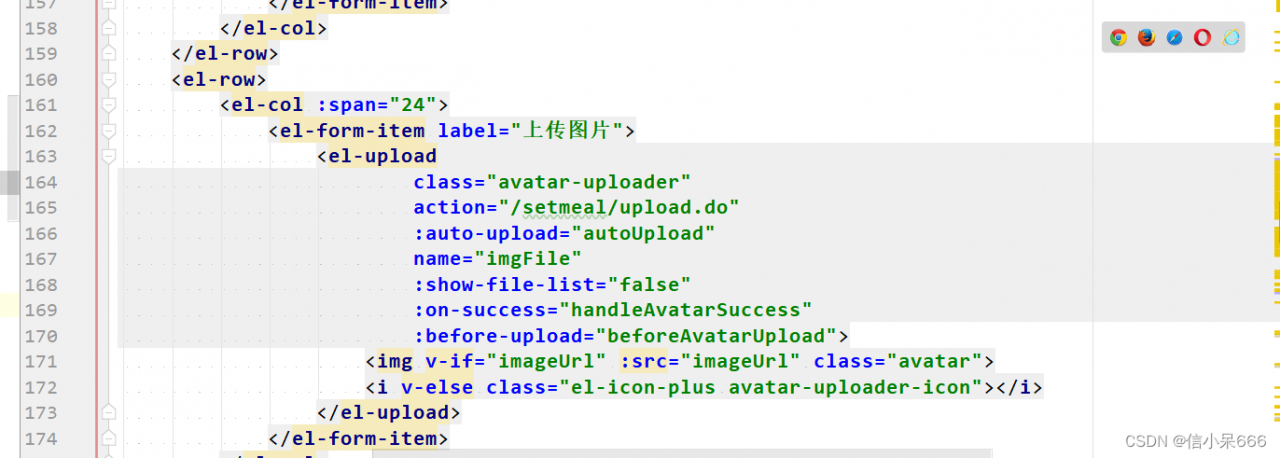
el-upload:上传组件
action:上传的提交地址
auto-upload:选中文件后是否自动上传
name:上传文件的名称,服务端可以根据名称获得上传的文件对象
show-file-list:是否显示已上传文件列表
on-success:文件上传成功时的钩子
before-upload:上传文件之前的钩子
我们点击上传,运行upload.do后台方法
上传成功后,运行handleAvatarSuccess方法
2.1 上传图片到青牛云
之前先把之前的青牛云工具类放进去,导入pom之前环境搭建已经引入了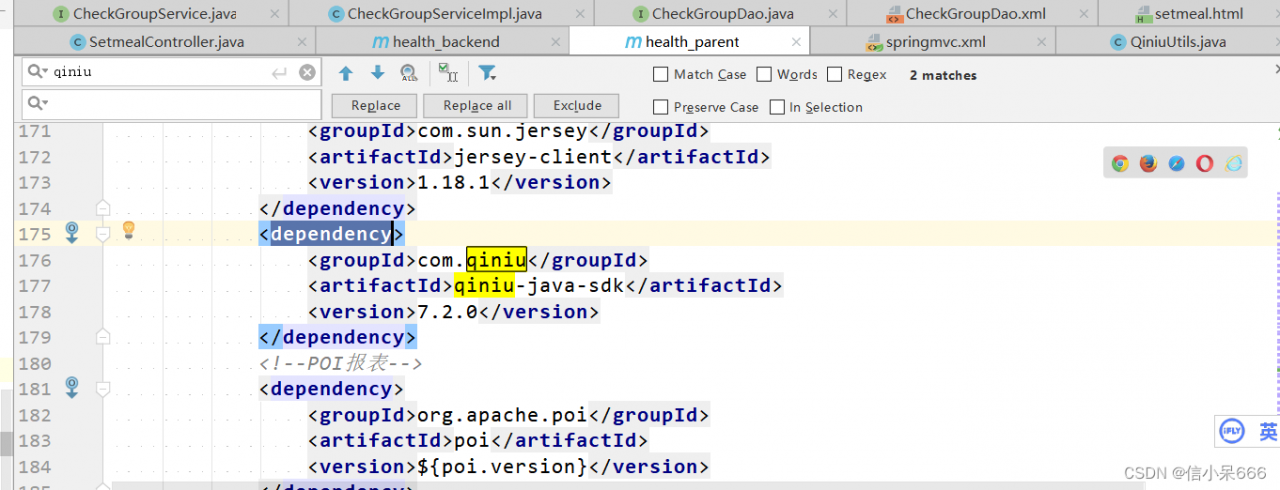
青牛云存储的简单入门
新增SetmealController
package com.liu.controller;

import com.alibaba.dubbo.config.annotation.Reference;
import com.liu.constant.MessageConstant;
import com.liu.core.QiniuUtils;
import com.liu.entity.Result;
import org.springframework.web.bind.annotation.RequestMapping;
import org.springframework.web.bind.annotation.RequestParam;
import org.springframework.web.bind.annotation.RestController;
import org.springframework.web.multipart.MultipartFile;

import java.util.UUID;

/**
 * @author liu
 * @create 2022-07-19 16:40
 */
@RestController
@RequestMapping("/setmeal")
public class SetmealController {

    //图片上传
    @RequestMapping("/upload")
    public Result upload(@RequestParam("imgFile")MultipartFile imgFile){
        try{
            //获取原始文件名
            String originalFilename = imgFile.getOriginalFilename();
            int lastIndexOf = originalFilename.lastIndexOf(".");
            //获取文件后缀
            String suffix = originalFilename.substring(lastIndexOf - 1);
            //使用UUID随机产生文件名称,防止同名文件覆盖
            String fileName = UUID.randomUUID().toString() + suffix;
            QiniuUtils.upload2Qiniu(imgFile.getBytes(),fileName);
            //图片上传成功
            Result result = new Result(true, MessageConstant.PIC_UPLOAD_SUCCESS);
            result.setData(fileName);
            return result;
        }catch (Exception e){
            e.printStackTrace();
            //图片上传失败
            return new Result(false,MessageConstant.PIC_UPLOAD_FAIL);
        }
    }
}
注意:别忘了在spring配置文件中配置文件上传组件
<!--文件上传组件-->
<bean id="multipartResolver"
      class="org.springframework.web.multipart.commons.CommonsMultipartResolver">
  <property name="maxUploadSize" value="104857600" />
  <property name="maxInMemorySize" value="4096" />
  <property name="defaultEncoding" value="UTF-8"/>
</bean>
测试,上传完去青牛云能看到图片。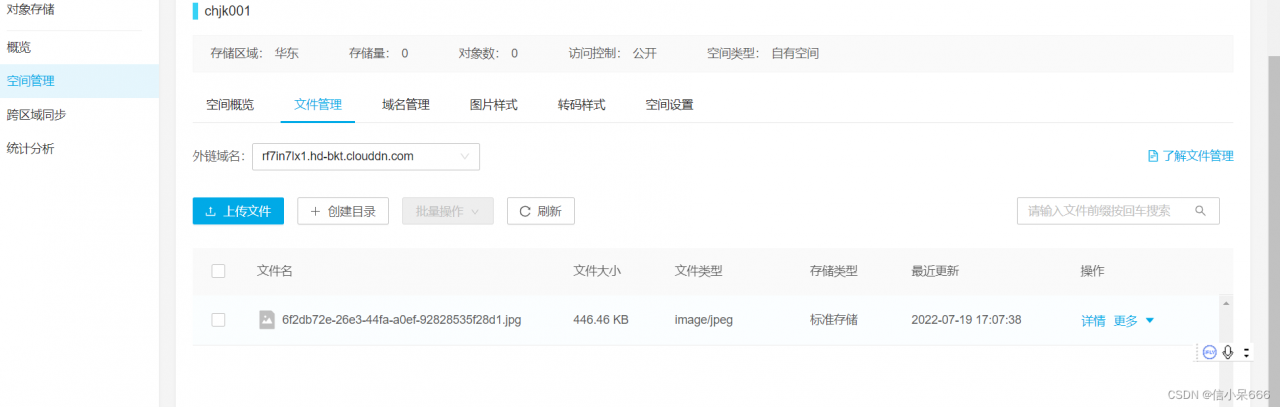
2.2.2 上传完图片页面回显
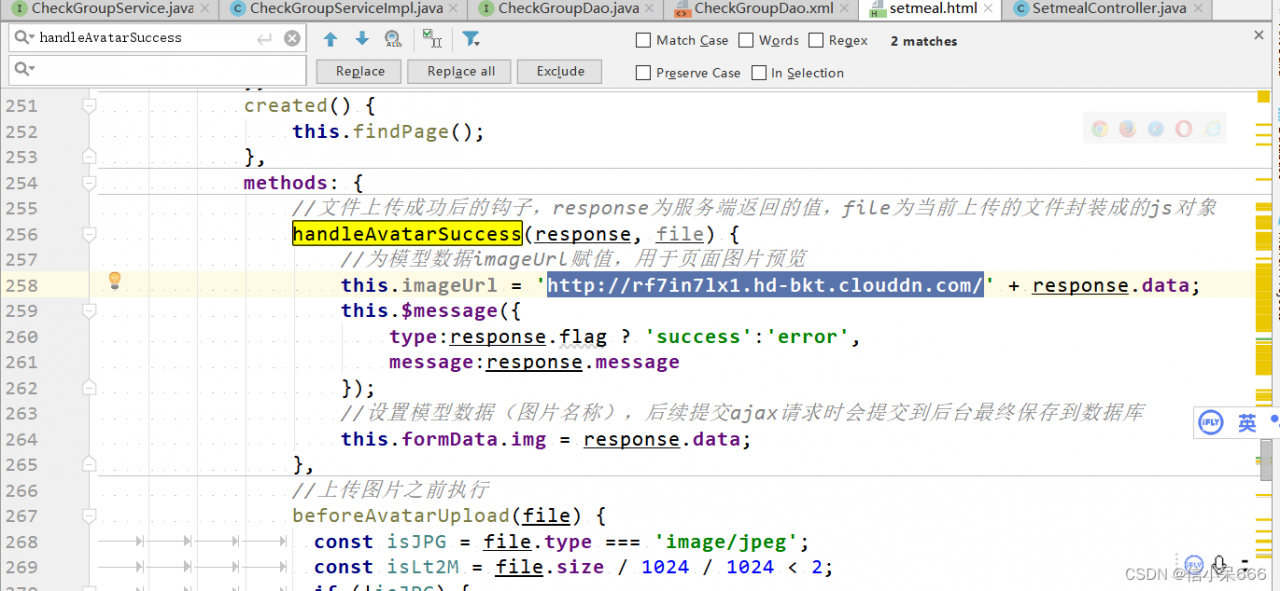
上传完成后,前端辉县,url前面是青牛云的域名,后面是回掉的图片名。
2.3 套餐新增
这里就和新增检查组相同了,传递两个参数,一个是套餐基本信息,一个是中间关系表存储的检查组信息。
2.3.1 Controller
    @Reference
    private SetmealService setmealService;
    //新增
    @RequestMapping("/add")
    public Result add(@RequestBody Setmeal setmeal, Integer[] checkgroupIds){
        try {
            setmealService.add(setmeal,checkgroupIds);
        }catch (Exception e){
            //新增套餐失败
            return new Result(false,MessageConstant.ADD_SETMEAL_FAIL);
        }
        //新增套餐成功
        return new Result(true,MessageConstant.ADD_SETMEAL_SUCCESS);
    }
2.3.2 接口和实现类
创建SetmealService接口并提供新增方法
package com.liu.service;

import com.liu.pojo.Setmeal;

/**
 * @author liu
 * @create 2022-07-20 9:40
 */

public interface SetmealService  {
    public void add(Setmeal setmeal, Integer[] checkgroupIds);

}
实现类
package com.liu.service;

/**
 * @author liu
 * @create 2022-07-20 9:42
 * 体检套餐服务实现类
 */

import com.alibaba.dubbo.config.annotation.Service;
import com.liu.dao.SetmealDao;
import com.liu.pojo.Setmeal;
import org.springframework.beans.factory.annotation.Autowired;
import org.springframework.transaction.annotation.Transactional;

import java.util.HashMap;
import java.util.Map;


@Service(interfaceClass = SetmealService.class)
@Transactional
public class SetmealServiceImpl implements SetmealService {
    @Autowired
    private SetmealDao setmealDao;


    @Override
    public void add(Setmeal setmeal, Integer[] checkgroupIds) {
        setmealDao.add(setmeal);
        if(checkgroupIds != null && checkgroupIds.length > 0){
            //绑定套餐和检查组的多对多关系
            setSetmealAndCheckGroup(setmeal.getId(),checkgroupIds);
        }
    }

    //绑定套餐和检查组的多对多关系
    private void setSetmealAndCheckGroup(Integer id, Integer[] checkgroupIds) {
        for (Integer checkgroupId : checkgroupIds) {
            Map<String,Integer> map = new HashMap<>();
            map.put("setmeal_id",id);
            map.put("checkgroup_id",checkgroupId);
            setmealDao.setSetmealAndCheckGroup(map);
        }
    }
}
2.3.3 Dao层
创建SetmealDao接口并提供相关方法
package com.liu.dao;

import com.liu.pojo.Setmeal;
import org.apache.ibatis.annotations.Mapper;
import org.springframework.stereotype.Repository;

import java.util.Map;

/**
 * @author liu
 * @create 2022-07-20 10:01
 */
@Repository
@Mapper
public interface SetmealDao {
    void add(Setmeal setmeal);

    void setSetmealAndCheckGroup(Map<String,Integer> map);
}
创建SetmealDao.xml文件并定义相关SQL语句
<?xml version="1.0" encoding="UTF-8" ?>
<!DOCTYPE mapper PUBLIC "-//mybatis.org//DTD Mapper 3.0//EN"
"http://mybatis.org/dtd/mybatis-3-mapper.dtd" >
<mapper namespace="com.liu.dao.SetmealDao" >
<!--新增-->
<insert id="add" parameterType="com.liu.pojo.Setmeal">
<selectKey resultType="java.lang.Integer" order="AFTER" keyProperty="id">
SELECT LAST_INSERT_ID()
</selectKey>
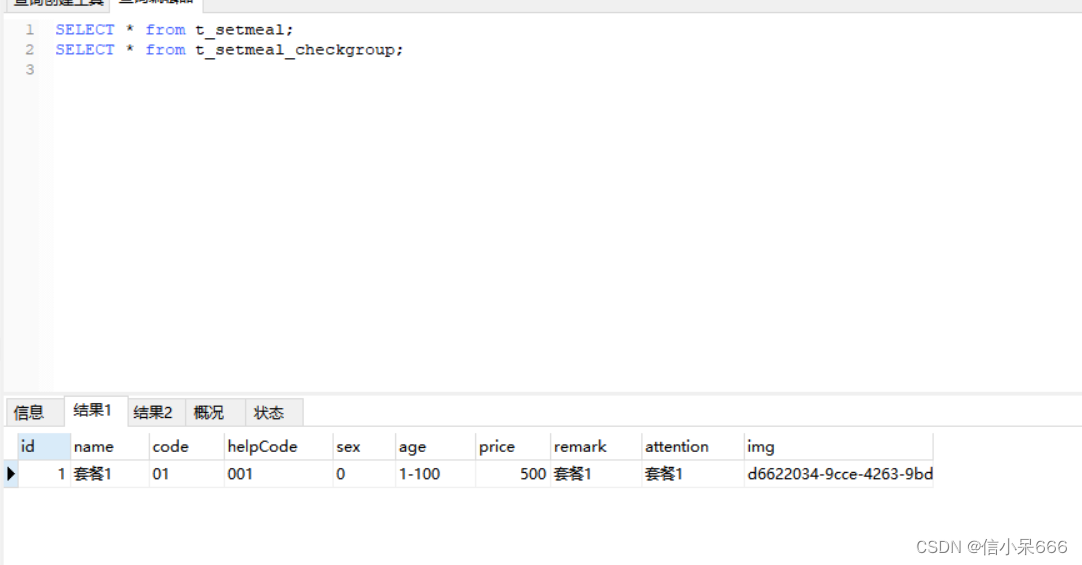
insert into t_setmeal
(code,name,sex,age,helpCode,price,remark,attention,img)
values
(#{code},#{name},#{sex},#{age},#{helpCode},#{price},#{remark},#{attention},#{img})
</insert>
<!--绑定套餐和检查组多对多关系-->
<insert id="setSetmealAndCheckGroup" parameterType="hashmap">
insert into t_setmeal_checkgroup
(setmeal_id,checkgroup_id)
values
(#{setmeal_id},#{checkgroup_id})
</insert>
</mapper>
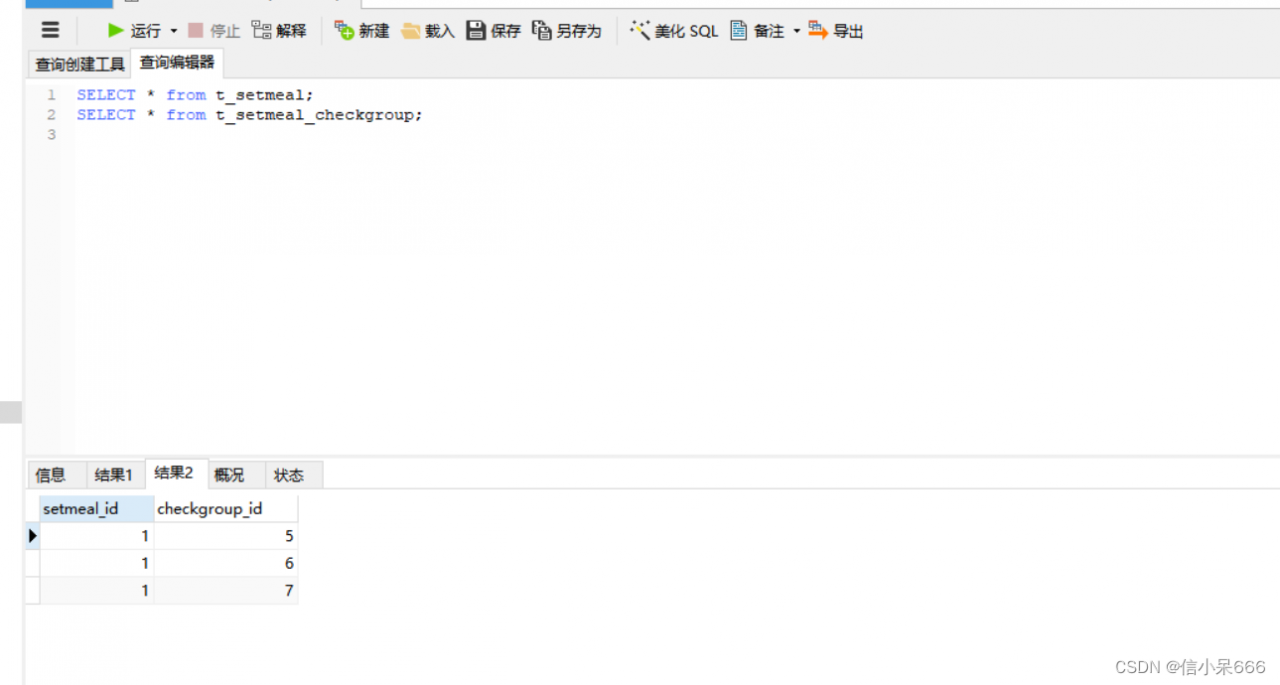
2.3.4 测试
3 体检套餐分页
3.1 Controller
在SetmealController中新增方法
    //分页查询
    @RequestMapping("/findPage")
    public PageResult findPage(@RequestBody QueryPageBean queryPageBean){
        PageResult pageResult = setmealService.pageQuery(
                queryPageBean.getCurrentPage(),
                queryPageBean.getPageSize(),
                queryPageBean.getQueryString()
        );
        return pageResult;
    }
3.2 接口和实现类
public PageResult pageQuery(Integer currentPage, Integer pageSize, String queryString);
   //绑定套餐和检查组的多对多关系
    private void setSetmealAndCheckGroup(Integer id, Integer[] checkgroupIds) {
        for (Integer checkgroupId : checkgroupIds) {
            Map<String,Integer> map = new HashMap<>();
            map.put("setmeal_id",id);
            map.put("checkgroup_id",checkgroupId);
            setmealDao.setSetmealAndCheckGroup(map);
        }
    }
3.3 Dao
Page<CheckItem> selectByCondition(String queryString);
    <!--根据条件查询-->
    <select id="selectByCondition" parameterType="string" resultType="com.liu.pojo.Setmeal">
        select * from t_setmeal
        <if test="value != null and value.length > 0">
            where code = #{value} or name = #{value} or helpCode = #{value}
        </if>
    </select>
3.4 测试

4,编辑和删除
和检查项一样
版权声明:本文为weixin_44480609原创文章,遵循CC 4.0 BY-SA版权协议,转载请附上原文出处链接和本声明。