AOP (概念)
1 、什么是 AOP ( 1 )面向切面编程(方面),利用 AOP 可以对业务逻辑的各个部分进行隔离,从而使得业务逻辑各部分之间的耦合度降低,提高程序的可重用性,同时提高了开发的效率。 ( 2 )通俗描述:不通过修改源代码方式,在主干功能里面添加新功能 ( 3 )使用登录例子说明 AOP 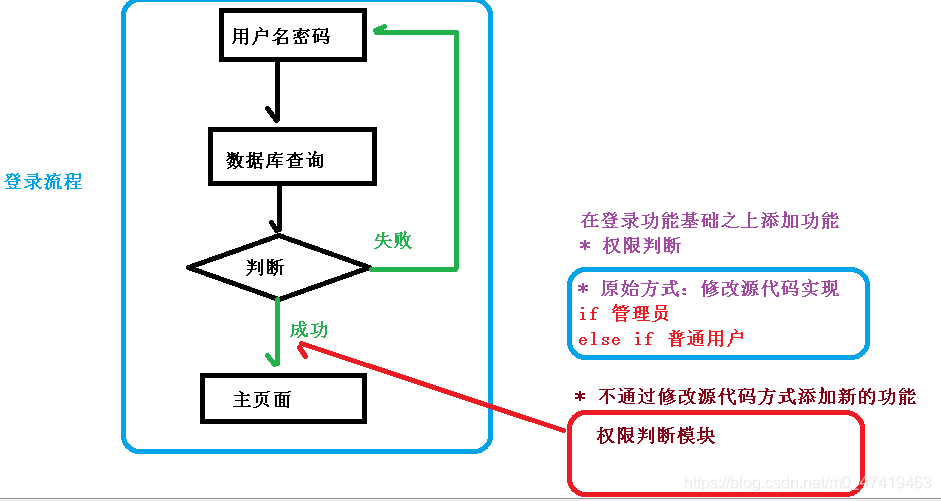 |
AOP (底层原理)
1.创建UserDao实现类的代理对象、通过代理对象来增强类的方法
2.创建子类的代理对象,增强类的方法
1 、 AOP 底层使用动态代理 ( 1 )有两种情况动态代理 第一种 有接口情况,使用 JDK 动态代理 创建接口实现类代理对象,增强类的方法  第二种 没有接口情况,使用 CGLIB 动态代理 创建子类的代理对象,增强类的方法 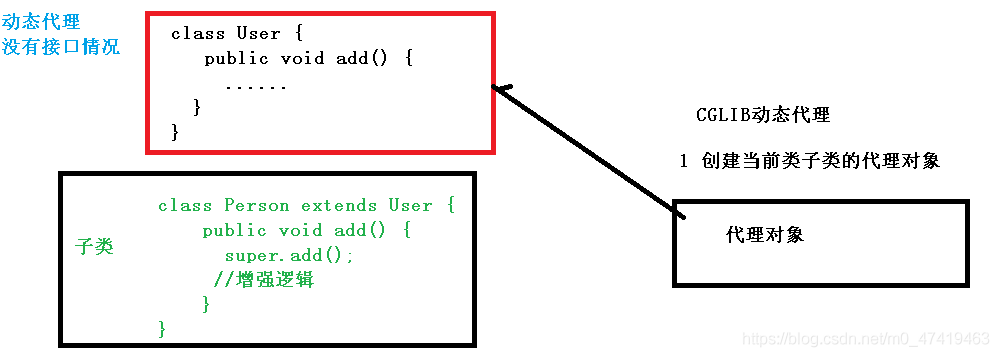 |
AOP ( JDK 动态代理)
1 、使用 JDK 动态代理,使用 Proxy 类里面的方法创建代理对象 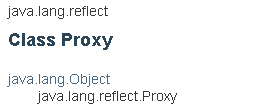 ( 1 )调用 newProxyInstance 方法 创建接口代理类的实现对象  方法有三个参数: 第一参数,类加载器 第二参数,增强方法所在的类,这个类实现的接口,支持多个接口 第三参数,实现这个接口 InvocationHandler ,创建代理对象,写增强的部分 2 、编写 JDK 动态代理代码 ( 1 )创建接口,定义方法 public interface UserDao { public int add( int a, int b); public String update(String id); } ( 2 )创建接口实现类,实现方法 public class UserDaoImpl implements UserDao { @Override public int add( int a, int b) { return a+b; } @Override public String update(String id) { return id; } } ( 3 )使用 Proxy 类创建接口代理对象 |
AOP (术语)
1 、连接点  2 、切入点  3 、通知(增强)   4 、切面  |
AOP 操作(准备工作)
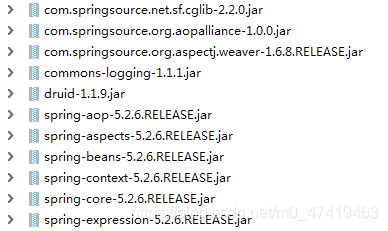
1 、 Spring 框架一般都是基于 AspectJ 实现 AOP 操作 ( 1 ) AspectJ 不是 Spring 组成部分,独立AOP 框架,一般把 AspectJ 和 Spirng 框架一起使用,进行 AOP 操作 2 、基于 AspectJ 实现 AOP 操作 ( 1 )基于 xml 配置文件实现 ( 2 )基于注解方式实现(使用) 3 、在项目工程里面引入 AOP 相关依赖
4 、切入点表达式 ( 1 )切入点表达式作用:知道对哪个类里面的哪个方法进行增强 ( 2 )语法结构: execution([ 权限修饰符 ] [ 返回类型 ] [ 类全路径 ] [ 方法名称 ]([ 参数列表 ]) ) 举例 1 :对 com.atguigu.dao.BookDao 类里面的 add 进行增强 execution(* com.atguigu.dao.BookDao.add(..)) 举例 2 :对 com.atguigu.dao.BookDao 类里面的所有的方法进行增强 execution(* com.atguigu.dao.BookDao.* (..)) 举例 3 :对 com.atguigu.dao 包里面所有类,类里面所有方法进行增强 execution(* com.atguigu.dao.*.* (..)) |
AOP 操作( AspectJ 注解)
1 、创建类,在类里面定义方法 public class User { public void add() { System. out .println( "add......." ); } } 2 、创建增强类(编写增强逻辑) ( 1 )在增强类里面,创建方法,让不同方法代表不同通知类型 //增强的类 public class UserProxy { public void before() { //前置通知 System. out .println( "before......" ); } } 3 、进行通知的配置 ( 1 )在 spring 配置文件中,开启注解扫描 <? xml version= "1.0" encoding= "UTF-8" ?> < beans xmlns= "http://www.springframework.org/schema/beans" xmlns: xsi = "http://www.w3.org/2001/XMLSchema-instance" xmlns: context = "http://www.springframework.org/schema/context" xmlns: aop = "http://www.springframework.org/schema/aop" xsi :schemaLocation= "http://www.springframework.org/schema/beans http://www.springframework.org/schema/beans/spring-beans.xsd http://www.springframework.org/schema/context http://www.springframework.org/schema/context/spring-context.xsd http://www.springframework.org/schema/aop http://www.springframework.org/schema/aop/spring-aop.xsd" > <!-- 开启注解扫描 --> < context :component-scan base- package= "com.atguigu.spring5.aopanno" ></ context :component-scan > ( 2 )使用注解创建 User 和 UserProxy 对象   ( 3 )在增强类上面添加注解 @Aspect //增强的类 @Component @Aspect //生成代理对象 public class UserProxy { ( 4 )在 spring 配置文件中开启生成代理对象 <!-- 开启 Aspect 生成代理对象--> < aop :aspectj-autoproxy ></ aop :aspectj-autoproxy > 4 、配置不同类型的通知 ( 1 )在增强类的里面,在作为通知方法上面添加通知类型注解,使用切入点表达式配置 //增强的类 @Component @Aspect //生成代理对象 public class UserProxy { //前置通知 //@Before 注解表示作为前置通知 @Before (value = "execution(* com.atguigu.spring5.aopanno.User.add(..))" ) public void before() { System. out .println( "before........." ); } //后置通知(返回通知) @AfterReturning (value = "execution(* com.atguigu.spring5.aopanno.User.add(..))" ) public void afterReturning() { System. out .println( "afterReturning........." ); } //最终通知 @After (value = "execution(* com.atguigu.spring5.aopanno.User.add(..))" ) public void after() { System. out .println( "after........." ); } //异常通知 @AfterThrowing (value = "execution(* com.atguigu.spring5.aopanno.User.add(..))" ) public void afterThrowing() { System. out .println( "afterThrowing........." ); } //环绕通知 @Around (value = "execution(* com.atguigu.spring5.aopanno.User.add(..))" ) public void around(ProceedingJoinPoint proceedingJoinPoint) throws Throwable { System. out .println( "环绕之前........." ); //被增强的方法执行 proceedingJoinPoint.proceed(); System. out .println( "环绕之后........." ); } } 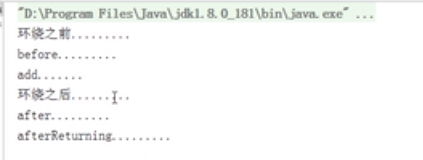 after:方法执行之后执行 afterReturning:方法返回之后再执行 afterThrowing:方法有异常时执行,且不在执行afterReturning。 5 、相同的切入点抽取 //相同切入点抽取 @Pointcut (value = "execution(* com.atguigu.spring5.aopanno.User.add(..))" ) public void pointdemo() { } //前置通知 //@Before 注解表示作为前置通知 @Before (value = "pointdemo()" ) public void before() { System. out .println( "before........." ); } 6 、有多个增强类对同一个方法进行增强,设置增强类优先级 ( 1 )在增强类上面添加注解 @Order( 数字类型值 ) ,数字类型值越小优先级越高 @Component @Aspect @Order ( 1 ) public class PersonProxy 7、完全使用注解开发 (1)创建配置类,不需要创建 xml 配置文件 @Configuration @ComponentScan (basePackages = { "com.atguigu" }) @EnableAspectJAutoProxy (proxyTargetClass = true ) public class ConfigAop { } |
AOP 操作( AspectJ 配置文件)
1 、创建两个类,增强类和被增强类,创建方法 2 、在 spring 配置文件中创建两个类对象 <!--创建对象--> < bean id= "book" class= "com.atguigu.spring5.aopxml.Book" ></ bean > < bean id= "bookProxy" class= "com.atguigu.spring5.aopxml.BookProxy" ></ bean > 3 、在 spring 配置文件中配置切入点 <!--配置 aop 增强--> < aop :config > <!--切入点--> < aop :pointcut id= "p" expression= "execution(* com.atguigu.spring5.aopxml.Book.buy(..))" /> <!--配置切面--> < aop :aspect ref= "bookProxy" > <!--增强作用在具体的方法上--> < aop :before method= "before" pointcut-ref= "p" /> </ aop :aspect > </ aop :config > |
版权声明:本文为m0_47419463原创文章,遵循CC 4.0 BY-SA版权协议,转载请附上原文出处链接和本声明。