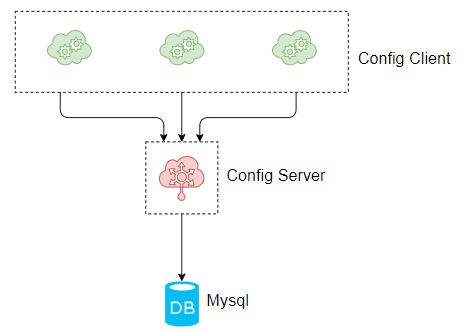
cloud config将配置存储在数据库中
本文讲述spring cloud config如何使用数据库存储配置。
Spring Cloud Config Server最常见是将配置文件放在本地或者远程Git仓库,
- 放在本地是将将所有的配置文件统一写在Config Server工程目录下,如果需要修改配置,需要重启config server;
- 放在Git仓库,是将配置统一放在Git仓库,可以利用Git仓库的版本控制。
- 本文将介绍使用另外一种方式存放配置信息,即将配置存放在Mysql中。
- 整个流程:Config Sever暴露Http API接口,
- Config Client 通过调用Config Sever的Http API接口来读取配置Config Server的配置信息,
- Config Server从数据中读取具体的应用的配置。流程图如下:
案例实战
在本案例中需要由2个工程,分为config-server和config-client,
其中config-server工程需要连接Mysql数据库,读取配置;
config-client则在启动的时候从config-server工程读取。
- 本案例Spring Cloud版本为Greenwich.RELEASE,
- Spring Boot版本为2.1.0.RELEASE。
| 工程 | 描述 |
|---|---|
| config-server | 端口8769,从数据库中读取配置 |
| config-client | 端口8083,从config-server读取配置 |
搭建config-server工程
创建工程config-server,在工程的pom文件引入config-server的起步依赖,mysql的连接器,jdbc的起步依赖,代码如下:
引入pom
<dependency>
	<groupId>org.springframework.cloud</groupId>
	<artifactId>spring-cloud-config-server</artifactId>
</dependency>
<dependency>
	<groupId>mysql</groupId>
	<artifactId>mysql-connector-java</artifactId>
</dependency>
<dependency>
	<groupId>org.springframework.boot</groupId>
	<artifactId>spring-boot-starter-jdbc</artifactId>
</dependency>
在工程的配置文件application.yml下做以下的配置:
yml配置
spring:
  profiles:
     active: jdbc
  application:
     name: config-jdbc-server

  datasource: #url username password driver-class
     url: jdbc:mysql://127.0.0.1:3306/config-jdbc?useUnicode=true&characterEncoding=utf8&characterSetResults=utf8&serverTimezone=GMT%2B8
     username: root
     password: 123456
     driver-class-name: com.mysql.jdbc.Driver
  cloud:
     config:
       label: master #主分支
       server:
         jdbc: true #jbc
server:
  port: 8769 #查询数据库的sql语句
spring.cloud.config.server.jdbc.sql: SELECT key1, value1 from config_properties where APPLICATION=? and PROFILE=? and LABEL=?
jdbc:mysql://127.0.0.1:3306/config-jdbc?
useUnicode=true #使用unicode
&characterEncoding=utf8 #编码utf8
&characterSetResults=utf8 #字符集utf8
&serverTimezone=GMT%2B8 #时间zone,京八区
SELECT key1, value1
from config_properties
where APPLICATION=? and PROFILE=? and LABEL=?
其中,spring.profiles.active为 spring读取的配置文件名,
- 从数据库中读取,必须为jdbc。
- spring.datasource配置了数据库相关的信息,
spring.cloud.config.label读取的配置的分支,
- 这个需要在数据库中数据对应。
spring.cloud.config.server.jdbc.sql为查询数据库的sql语句,
- 该语句的字段必须与数据库的表字段一致。
在程序的启动文件ConfigServerApplication加上@EnableConfigServer注解,开启ConfigServer的功能,代码如下:
开启configServer
@SpringBootApplication
@EnableConfigServer
public class ConfigServerApplication {

	public static void main(String[] args) {
		SpringApplication.run(ConfigServerApplication.class, args);
	}
}
初始化数据库
由于Config-server需要从数据库中读取,所以读者需要先安装MySQL数据库,安装成功后,创建config-jdbc数据库,数据库编码为utf-8,
- 然后在config-jdbc数据库下,执行以下的数据库脚本:
CREATE TABLE `config_properties` (
  `id` bigint(20) NOT NULL AUTO_INCREMENT,
  `key1` varchar(50) COLLATE utf8_bin NOT NULL,
  `value1` varchar(500) COLLATE utf8_bin DEFAULT NULL,
  `application` varchar(50) COLLATE utf8_bin NOT NULL,
  `profile` varchar(50) COLLATE utf8_bin NOT NULL,
  `label` varchar(50) COLLATE utf8_bin DEFAULT NULL,
  PRIMARY KEY (`id`)
) ENGINE=InnoDB AUTO_INCREMENT=3 DEFAULT CHARSET=utf8 COLLATE=utf8_bin
其中key1字段为配置的key,value1字段为配置的值,application字段对应于应用名,profile对应于环境,label对应于读取的分支,一般为master。
插入数据config-client 的2条数据,包括server.port和foo两个配置,具体数据库脚本如下:
insert into `config_properties` (`id`, `key1`, `value1`, `application`, `profile`, `label`) values('1','server.port','8083','config-client','dev','master');
insert into `config_properties` (`id`, `key1`, `value1`, `application`, `profile`, `label`) values('2','foo','bar-jdbc','config-client','dev','master');
搭建config-client
在 config-client工程的pom文件,引入web和config的起步依赖,代码如下:
导入starter-config
<dependency>
	<groupId>org.springframework.boot</groupId>
	<artifactId>spring-boot-starter-web</artifactId>
</dependency>

<dependency>
	<groupId>org.springframework.cloud</groupId>
	<artifactId>spring-cloud-starter-config</artifactId>
</dependency>
在程序的启动配置文件 bootstrap.yml做程序的相关配置,一定要是bootstrap.yml,不可以是application.yml,bootstrap.yml的读取优先级更高,配置如下:
配置config-servier的位置
spring:
  application:
    name: config-client
  cloud:
    config:
      uri: http://localhost:8769
      fail-fast: true
  profiles:
    active: dev
其中spring.cloud.config.uri配置的config-server的地址,spring.cloud.config.fail-fast配置的是读取配置失败后,执行快速失败。spring.profiles.active配置的是spring读取配置文件的环境。
在程序的启动文件ConfigClientApplication,写一个RestAPI,读取配置文件的foo配置,返回给浏览器,代码如下:
进行测试读取
@SpringBootApplication
@RestController
public class ConfigClientApplication {

	public static void main(String[] args) {
		SpringApplication.run(ConfigClientApplication.class, args);
	}

	@Value("${foo}")
	String foo;
	@RequestMapping(value = "/foo")
	public String hi(){
		return foo;
	}
}
依次启动2个工程,其中config-client的启动端口为8083,这个是在数据库中的,可见config-client从 config-server中读取了配置。
在浏览器上访问http://localhost:8083/foo,浏览器显示bar-jdbc,这个是在数据库中的,可见config-client从 config-server中读取了配置。
- 源码下载
https://github.com/forezp/SpringCloudLearning/tree/master/chapter10-5-jdbc
限流源码解析
- https://www.fangzhipeng.com/springcloud/2019/08/20/ratelimit-guava-sentinel.html
Sentinel 中的流控
Sentinel 是阿里开源的流控、熔断工具,这里不做过多的介绍,感兴趣的读者请自行了解。
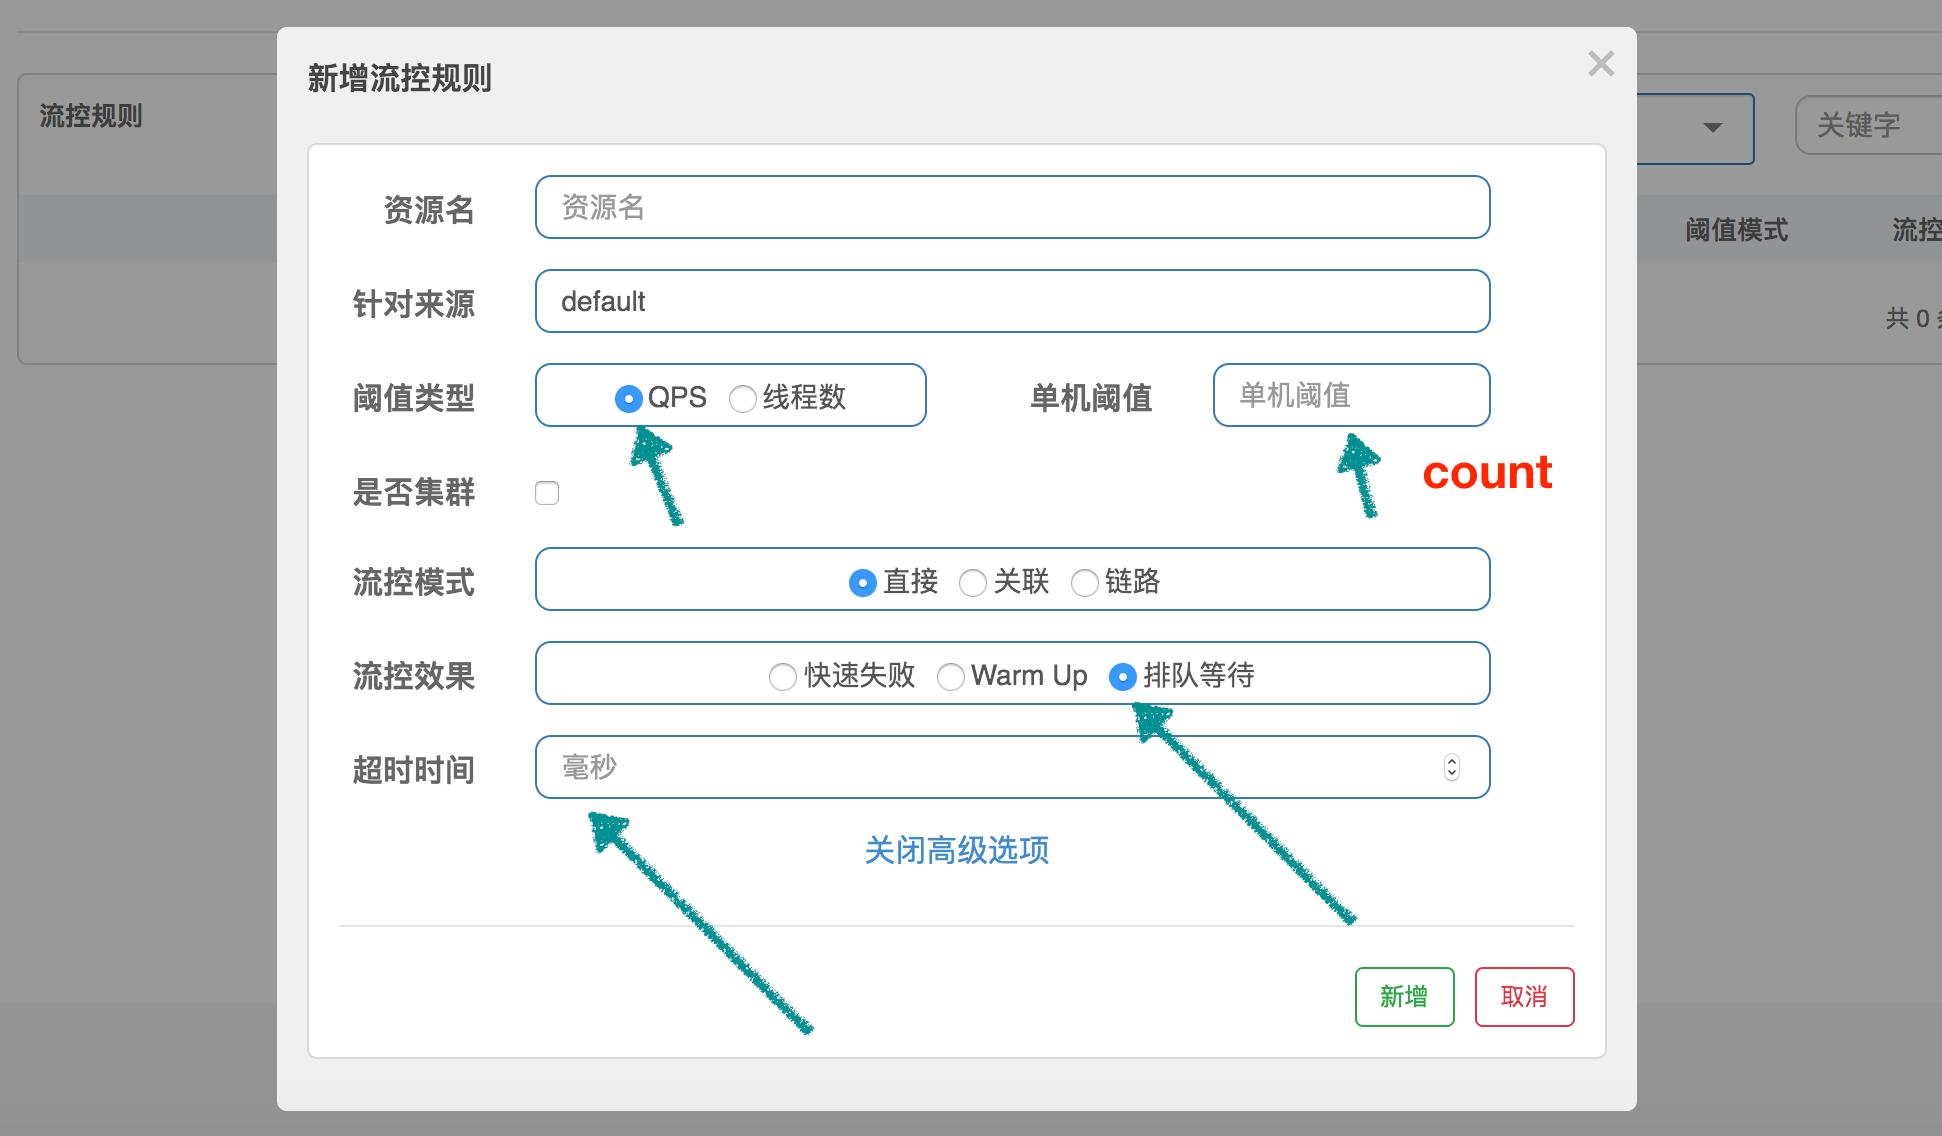
在 Sentinel 的流控中,我们可以配置流控规则,
- 主要是控制 QPS 和线程数,
- 这里我们不讨论控制线程数,控制线程数的代码不在我们这里的讨论范围内,下面的介绍都是指控制 QPS。
RateLimiterController
RateLimiterController 非常简单,它通过使用 latestPassedTime
- 属性来记录最后一次通过的时间,然后根据规则中 QPS 的限制,计算当前请求是否可以通过。
举个非常简单的例子:
- 设置 QPS 为 10,那么每 100 毫秒允许通过一个,通过计算当前时间是否已经过了上一个请求的通过时间 latestPassedTime 之后的 100 毫秒,
- 来判断是否可以通过。假设才过了 50ms,那么需要当前线程再 sleep 50ms,然后才可以通过。
- 如果同时有另一个请求呢?那需要 sleep 150ms 才行。
public class RateLimiterController implements TrafficShapingController {

    // 排队最大时长,默认 500ms
    private final int maxQueueingTimeMs;
    // QPS 设置的值
    private final double count;
        // 上一次请求通过的时间
    private final AtomicLong latestPassedTime = new AtomicLong(-1);

    public RateLimiterController(int timeOut, double count) {
        this.maxQueueingTimeMs = timeOut;
        this.count = count;
    }

    @Override
    public boolean canPass(Node node, int acquireCount) {
        return canPass(node, acquireCount, false);
    }

    // 通常 acquireCount 为 1,这里不用关心参数 prioritized
    @Override
    public boolean canPass(Node node, int acquireCount, boolean prioritized) {
        // Pass when acquire count is less or equal than 0.
        if (acquireCount <= 0) {
            return true;
        }
        //
        if (count <= 0) {
            return false;
        }

        long currentTime = TimeUtil.currentTimeMillis();
        // 计算每 2 个请求之间的间隔,比如 QPS 限制为 10,那么间隔就是 100ms
        long costTime = Math.round(1.0 * (acquireCount) / count * 1000);

        // Expected pass time of this request.
        long expectedTime = costTime + latestPassedTime.get();

        // 可以通过,设置 latestPassedTime 然后就返回 true 了
        if (expectedTime <= currentTime) {
            // Contention may exist here, but it's okay.
            latestPassedTime.set(currentTime);
            return true;
        } else {
            // 不可以通过,需要等待
            long waitTime = costTime + latestPassedTime.get() - TimeUtil.currentTimeMillis();
            // 等待时长大于最大值,返回 false
            if (waitTime > maxQueueingTimeMs) {
                return false;
            } else {
                // 将 latestPassedTime 往前推
                long oldTime = latestPassedTime.addAndGet(costTime);
                try {
                    // 需要 sleep 的时间
                    waitTime = oldTime - TimeUtil.currentTimeMillis();
                    if (waitTime > maxQueueingTimeMs) {
                        latestPassedTime.addAndGet(-costTime);
                        return false;
                    }
                    // in race condition waitTime may <= 0
                    if (waitTime > 0) {
                        Thread.sleep(waitTime);
                    }
                    return true;
                } catch (InterruptedException e) {
                }
            }
        }
        return false;
    }

}
这个策略还是非常好理解的,简单粗暴,快速失败。
WarmUpController
WarmUpController 用来防止突发流量迅速上升,导致系统负载严重过高,
- 本来系统在稳定状态下能处理的,但是由于许多资源没有预热,导致这个时候处理不了了。
- 比如,数据库需要建立连接、需要连接到远程服务等,这就是为什么我们需要预热。
啰嗦一句,这里不仅仅指系统刚刚启动需要预热,对于长时间处于低负载的系统,突发流量也需要重新预热。
Guava 的 SmoothWarmingUp 是用来控制获取令牌的速率的,和这里的控制 QPS 还是有一点区别,但是中心思想是一样的。我们在看完源码以后再讨论它们的区别。
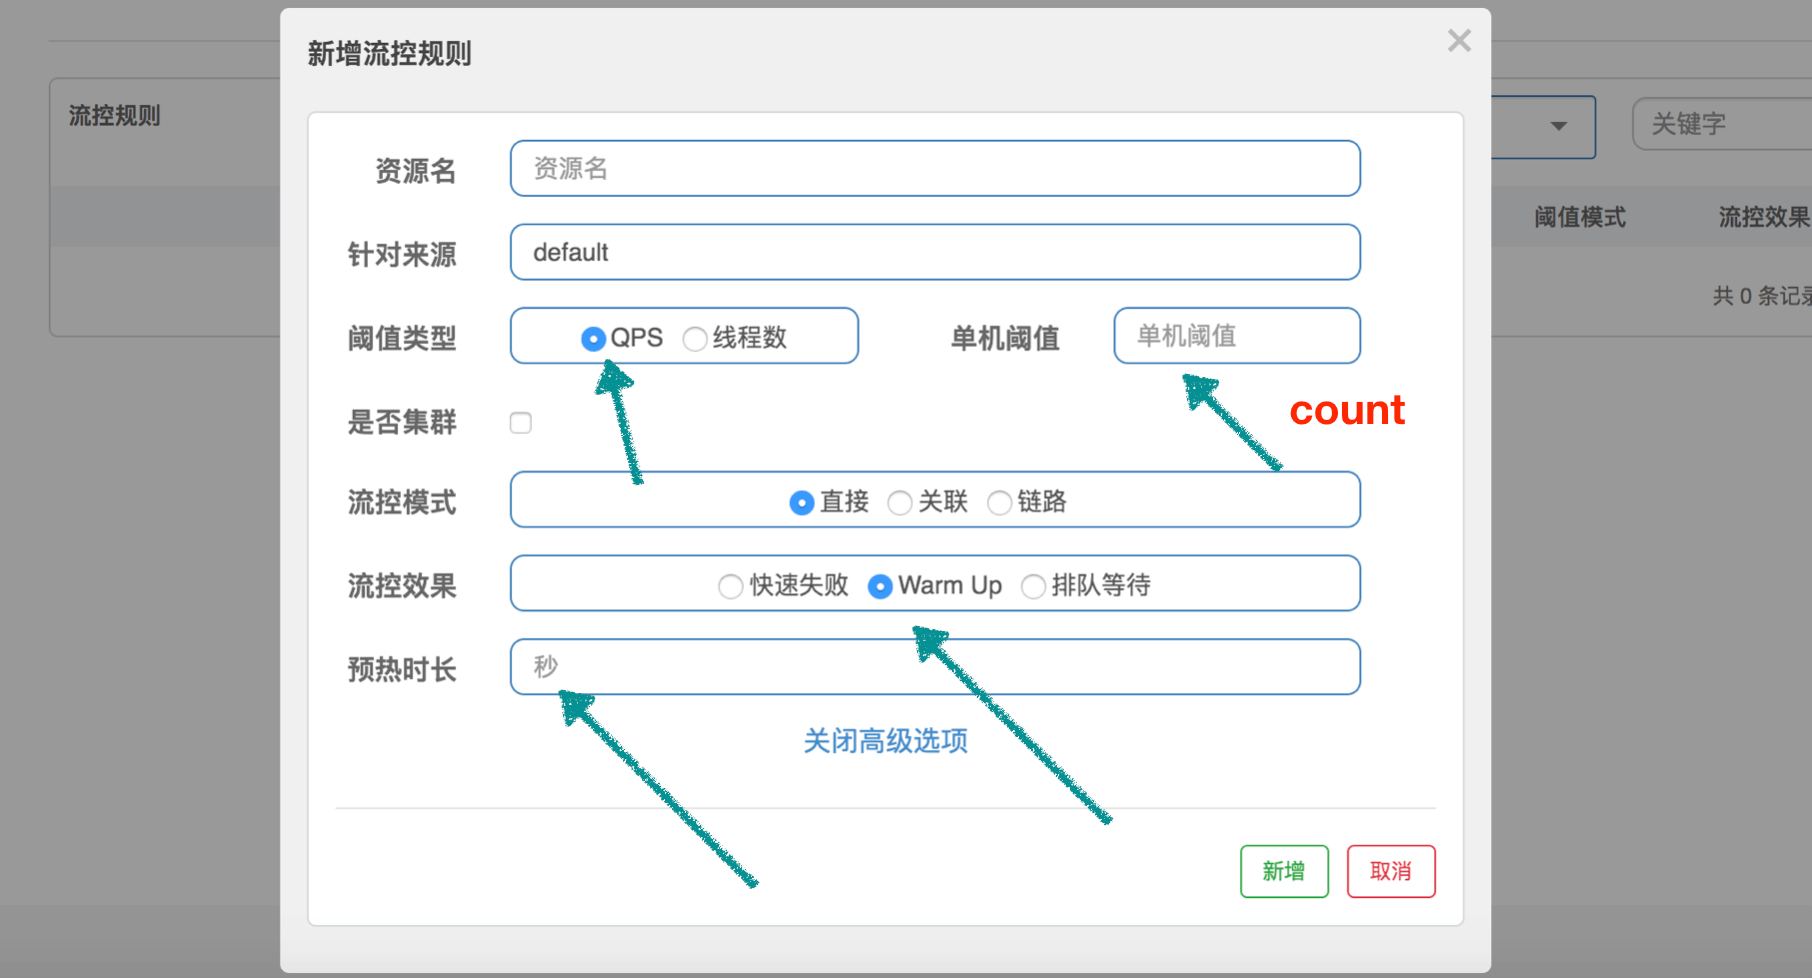
为了帮助大家理解源码,我们这边先设定一个场景:QPS 设置为 100,预热时间设置为 10 秒。代码中使用 “【】” 代表根据这个场景计算出来的值。
public class WarmUpController implements TrafficShapingController {

    // 阈值
    protected double count;
    // 3
    private int coldFactor;
    // 转折点的令牌数,和 Guava 的 thresholdPermits 一个意思
    // [500]
    protected int warningToken = 0;
    // 最大的令牌数,和 Guava 的 maxPermits 一个意思
    // [1000]
    private int maxToken;
    // 斜线斜率
    // [1/25000]
    protected double slope;

    // 累积的令牌数,和 Guava 的 storedPermits 一个意思
    protected AtomicLong storedTokens = new AtomicLong(0);
    // 最后更新令牌的时间
    protected AtomicLong lastFilledTime = new AtomicLong(0);

    public WarmUpController(double count, int warmUpPeriodInSec, int coldFactor) {
        construct(count, warmUpPeriodInSec, coldFactor);
    }

    public WarmUpController(double count, int warmUpPeriodInSec) {
        construct(count, warmUpPeriodInSec, 3);
    }

    // 下面的构造方法,和 Guava 中是差不多的,只不过 thresholdPermits 和 maxPermits 都换了个名字
    private void construct(double count, int warmUpPeriodInSec, int coldFactor) {

        if (coldFactor <= 1) {
            throw new IllegalArgumentException("Cold factor should be larger than 1");
        }

        this.count = count;

        this.coldFactor = coldFactor;

        // warningToken 和 thresholdPermits 是一样的意思,计算结果其实是一样的
        // thresholdPermits = 0.5 * warmupPeriod / stableInterval.
        // 【warningToken = (10*100)/(3-1) = 500】
        warningToken = (int)(warmUpPeriodInSec * count) / (coldFactor - 1);

        // maxToken 和 maxPermits 是一样的意思,计算结果其实是一样的
        // maxPermits = thresholdPermits + 2*warmupPeriod/(stableInterval+coldInterval)
        // 【maxToken = 500 + (2*10*100)/(1.0+3) = 1000】
        maxToken = warningToken + (int)(2 * warmUpPeriodInSec * count / (1.0 + coldFactor));

        // 斜率计算
        // slope
        // slope = (coldIntervalMicros-stableIntervalMicros)/(maxPermits-thresholdPermits);
        // 【slope = (3-1.0) / 100 / (1000-500) = 1/25000】
        slope = (coldFactor - 1.0) / count / (maxToken - warningToken);

    }

    @Override
    public boolean canPass(Node node, int acquireCount) {
        return canPass(node, acquireCount, false);
    }

    @Override
    public boolean canPass(Node node, int acquireCount, boolean prioritized) {

        // Sentinel 的 QPS 统计使用的是滑动窗口

        // 当前时间窗口的 QPS
        long passQps = (long) node.passQps();

        // 这里是上一个时间窗口的 QPS,这里的一个窗口跨度是1分钟
        long previousQps = (long) node.previousPassQps();

        // 同步。设置 storedTokens 和 lastFilledTime 到正确的值
        syncToken(previousQps);

        long restToken = storedTokens.get();
        // 令牌数超过 warningToken,进入梯形区域
        if (restToken >= warningToken) {

            // 这里简单说一句,因为当前的令牌数超过了 warningToken 这个阈值,系统处于需要预热的阶段
            // 通过计算当前获取一个令牌所需时间,计算其倒数即是当前系统的最大 QPS 容量

            long aboveToken = restToken - warningToken;

            // 这里计算警戒 QPS 值,就是当前状态下能达到的最高 QPS。
            // (aboveToken * slope + 1.0 / count) 其实就是在当前状态下获取一个令牌所需要的时间
            double warningQps = Math.nextUp(1.0 / (aboveToken * slope + 1.0 / count));
            // 如果不会超过,那么通过,否则不通过
            if (passQps + acquireCount <= warningQps) {
                return true;
            }
        } else {
            // count 是最高能达到的 QPS
            if (passQps + acquireCount <= count) {
                return true;
            }
        }

        return false;
    }

    protected void syncToken(long passQps) {
        // 下面几行代码,说明在第一次进入新的 1 秒钟的时候,做同步
        // 题外话:Sentinel 默认地,1 秒钟分为 2 个时间窗口,分别 500ms
        long currentTime = TimeUtil.currentTimeMillis();
        currentTime = currentTime - currentTime % 1000;
        long oldLastFillTime = lastFilledTime.get();
        if (currentTime <= oldLastFillTime) {
            return;
        }

        // 令牌数量的旧值
        long oldValue = storedTokens.get();
        // 计算新的令牌数量,往下看
        long newValue = coolDownTokens(currentTime, passQps);

        if (storedTokens.compareAndSet(oldValue, newValue)) {
            // 令牌数量上,减去上一分钟的 QPS,然后设置新值
            long currentValue = storedTokens.addAndGet(0 - passQps);
            if (currentValue < 0) {
                storedTokens.set(0L);
            }
            lastFilledTime.set(currentTime);
        }

    }

    // 更新令牌数
    private long coolDownTokens(long currentTime, long passQps) {
        long oldValue = storedTokens.get();
        long newValue = oldValue;

        // 当前令牌数小于 warningToken,添加令牌
        if (oldValue < warningToken) {
            newValue = (long)(oldValue + (currentTime - lastFilledTime.get()) * count / 1000);
        } else if (oldValue > warningToken) {
            // 当前令牌数量处于梯形阶段,
            // 如果当前通过的 QPS 大于 count/coldFactor,说明系统消耗令牌的速度,大于冷却速度
            //    那么不需要添加令牌,否则需要添加令牌
            if (passQps < (int)count / coldFactor) {
                newValue = (long)(oldValue + (currentTime - lastFilledTime.get()) * count / 1000);
            }
        }
        return Math.min(newValue, maxToken);
    }

}
coolDownTokens 这个方法用来计算新的 token 数量,其实我也没有完全理解作者的设计:
- 第一、对于令牌的增加,在 Guava 中,使用 warmupPeriodMicros / maxPermits 作为增长率,因为它实现的是 storedPermits 从 0 到 maxPermits 花费的时间为 warmupPeriod。而这里是以每秒 count 个作为增长率,为什么?
- 第二、else if 分支中的决定我没有理解,为什么用 passQps 和 count / coldFactor 进行对比来决定是否继续添加令牌?
- 我自己的理解是,count/coldFactor 就是指冷却速度,那么就是说得通的。欢迎大家一起探讨。
最后,我们再简单说说 Guava 的 SmoothWarmingUp 和 Sentinel 的 WarmupController 的区别。
Guava 在于控制获取令牌的速率,它关心的是,获取 permits 需要多少时间,包括从 storedPermits 中获取,以及获取 freshPermits,以此推进 nextFreeTicketMicros 到未来的某个时间点。
而 Sentinel 在于控制 QPS,它用令牌数来标识当前系统处于什么状态,根据时间推进一直增加令牌,根据通过的 QPS 一直减少令牌。如果 QPS 持续下降,根据推演,可以发现 storedTokens 越来越多,然后越过 warningTokens 这个阈值,之后只有当 QPS 下降到 count/3 以后,令牌才会继续往上增长,一直到 maxTokens。
storedTokens 是以 “count 每秒”的增长率增长的,减少是以 前一分钟的 QPS 来减少的。其实这里我也有个疑问,为什么增加令牌的时候考虑了时间,而减少的时候却不考虑时间因素,提了 issue,似乎没人搭理。
WarmUpRateLimiterController
注意,这个类继承自刚刚介绍的 WarmUpController,它的流控效果定义为排队等待。它的代码其实就是前面介绍的 RateLimiterController 加上 WarmUpController。
public class WarmUpRateLimiterController extends WarmUpController {

    private final int timeoutInMs;
    private final AtomicLong latestPassedTime = new AtomicLong(-1);

    public WarmUpRateLimiterController(double count, int warmUpPeriodSec, int timeOutMs, int coldFactor) {
        super(count, warmUpPeriodSec, coldFactor);
        this.timeoutInMs = timeOutMs;
    }

    @Override
    public boolean canPass(Node node, int acquireCount) {
        return canPass(node, acquireCount, false);
    }

    @Override
    public boolean canPass(Node node, int acquireCount, boolean prioritized) {
        long previousQps = (long) node.previousPassQps();
        syncToken(previousQps);

        long currentTime = TimeUtil.currentTimeMillis();

        long restToken = storedTokens.get();
        long costTime = 0;
        long expectedTime = 0;

        // 和 RateLimiterController 比较,区别主要就是这块代码

        if (restToken >= warningToken) {
            long aboveToken = restToken - warningToken;

            // current interval = restToken*slope+1/count
            double warmingQps = Math.nextUp(1.0 / (aboveToken * slope + 1.0 / count));
            costTime = Math.round(1.0 * (acquireCount) / warmingQps * 1000);
        } else {
            costTime = Math.round(1.0 * (acquireCount) / count * 1000);
        }
        expectedTime = costTime + latestPassedTime.get();

        if (expectedTime <= currentTime) {
            latestPassedTime.set(currentTime);
            return true;
        } else {
            long waitTime = costTime + latestPassedTime.get() - currentTime;
            if (waitTime > timeoutInMs) {
                return false;
            } else {
                long oldTime = latestPassedTime.addAndGet(costTime);
                try {
                    waitTime = oldTime - TimeUtil.currentTimeMillis();
                    if (waitTime > timeoutInMs) {
                        latestPassedTime.addAndGet(-costTime);
                        return false;
                    }
                    if (waitTime > 0) {
                        Thread.sleep(waitTime);
                    }
                    return true;
                } catch (InterruptedException e) {
                }
            }
        }
        return false;
    }
}
这个代码很简单,就是 RateLimiter 中的代码,然后加入了预热的内容。
在 RateLimiter 中,单个请求的 costTime 是固定的,就是 1/count,比如设置 100 qps,那么 costTime 就是 10ms。
但是这边,加入了 WarmUp 的内容,就是说,通过令牌数量,来判断当前系统的 QPS 应该是多少,如果当前令牌数超过 warningTokens,那么系统的 QPS 容量已经低于我们预设的 QPS,相应的,costTime 就会延长。