在验证用户名和密码之前,引入辅助验证可有效防范暴力试错,图形验证码就是简单且行有效的一种辅助验证方式。下面将使用过滤器和自定义认证两种方式实现图形验证码功能。
验证码(CAPTCHA)的全称是Completely Automated Public Turing test to tell Computers and Humans Apart,翻译过来就是“全自动区分计算机和人类的图灵测试”。通俗地讲,验证码就是为了防止恶意用户暴力重试而设置的。不管是用户注册、用户登录,还是论坛发帖,如果不加以限制,一旦某些恶意用户利用计算机发起无限重试,就很容易使系统遭受破坏。
1.自定义过滤器
在Spring Security中,实现验证码校验的方式有很多种,最简单的方式就是自定义一个专门处理验证码逻辑的过滤器,将其添加到Spring Security过滤器链的合适位置。当匹配到登录请求时,立刻对验证码进行校验,成功则放行,失败则提前结束整个验证请求。
说到Spring Security的过滤器,我们先回顾一下前面使用过的配置。
@EnableWebSecurity
public class WebSecurityConfig extends WebSecurityConfigurerAdapter {
    @Override
    protected void configure(HttpSecurity http) throws Exception {
        http.authorizeRequests()
                .antMatchers("/admin/api/**").hasRole("ADMIN")
                .antMatchers("/user/api/**").hasRole("USER")
                .antMatchers("/app/api/**").permitAll()
                .anyRequest().authenticated()
                .and()
            .csrf().disable()
            .formLogin()
                .and()
            .sessionManagement()
                .maximumSessions(1);
    }
}
HttpSecurity实际上就是在配置Spring Security的过滤器链,诸如CSRF、CORS、表单登录等,每个配置器对应一个过滤器。我们可以通过 HttpSecurity配置过滤器的行为,甚至可以像CRSF一样直接关闭过滤器。例如,SessionManagement。
public SessionManagementConfigurer<HttpSecurity> sessionManagement() throws Exception {
	return getOrApply(new SessionManagementConfigurer<>());
}
Spring Security通过SessionManagementConfigurer来配置SessionManagement的行为。与 SessionManagementConfigurer类似的配置器还有 CorsConfigurer、RememberMeConfigurer等,它们都实现了SecurityConfigurer的标准接口。
public interface SecurityConfigurer<O, B extends SecurityBuilder<O>> {
	// 各个配置器初始化的方法
	void init(B builder) throws Exception;

	// 各个配置器被统一调用的方法
	void configure(B builder) throws Exception;
}
SessionManagementConfigurer是在configure方法中将最终的SessionManagementFilter插入过滤器链来实现会话管理的,除Spring Security提供的过滤器外,我们还可以添加自己的过滤器以实现更多的安全功能,这些都可以在HttpSecurity中实现。
// 将自定义过滤器加在指定过滤器之后
public HttpSecurity addFilterAfter(Filter filter, Class<? extends Filter> afterFilter) {
	comparator.registerAfter(filter.getClass(), afterFilter);
	return addFilter(filter);
}
// 将自定义过滤器加在指定过滤器之前 public HttpSecurity addFilterBefore(Filter filter, Class<? extends Filter> beforeFilter) { comparator.registerBefore(filter.getClass(), beforeFilter); return addFilter(filter); }/** * 添加一个过滤器,但必须是Spring Security自身提供的过滤器实例或其继承过滤器 */ public HttpSecurity addFilter(Filter filter) { Class<? extends Filter> filterClass = filter.getClass(); if (!comparator.isRegistered(filterClass)) { throw new IllegalArgumentException( "The Filter class " + filterClass.getName() + " does not have a registered order and cannot be added without a specified order. Consider using addFilterBefore or addFilterAfter instead."); } this.filters.add(filter); return this; }// 添加一个自定义过滤器在指定过滤器位置 public HttpSecurity addFilterAt(Filter filter, Class<? extends Filter> atFilter) { this.comparator.registerAt(filter.getClass(), atFilter); return addFilter(filter); }
2.图形验证码过滤器
引入图形验证码API kaptcha,添加maven依赖
<dependency>
	<groupId>com.github.penggle</groupId>
	<artifactId>kaptcha</artifactId>
	<version>2.3.2</version>
</dependency>
配置一个kaptcha实例
/**
 * 图形验证码配置类
 */
@Configuration
public class CaptchaConfig {
    @Bean
    public Producer captcha() {
        // 配置图片验证码的基本参数
        Properties properties = new Properties();
        properties.setProperty("kaptcha.image.width", "150"); // 图片宽度
        properties.setProperty("kaptcha.image.height", "50"); // 图片长度
        properties.setProperty("kaptcha.textproducer.char.string", "0123456789qwertyuiopasdfghjklzxcvbnm"); // 字符集
        properties.setProperty("kaptcha.textproducer.char.length", "4"); // 字符状态

        Config config = new Config(properties);
        // 使用默认的图形验证码实心,也可以自己实现
        DefaultKaptcha defaultKaptcha = new DefaultKaptcha();
        defaultKaptcha.setConfig(config);

        return defaultKaptcha;
    }
}
创建一个CaptchaController,用于获取图形验证码。
@Controller
public class CaptchaController {
    @Autowired
    private Producer producer;

    @GetMapping("/captcha.jpg")
    public void getCaptcha(HttpServletRequest request, HttpServletResponse response) throws IOException {
        ServletOutputStream out = response.getOutputStream();
        try {
            response.setContentType("image/jpeg"); // 设置内容类型
            String capText = producer.createText(); // 创建验证码文本
            request.getSession().setAttribute("captcha", capText); // 将验证码文本设置到session
            BufferedImage bufferedImage = producer.createImage(capText); // 创建验证码图片

            ImageIO.write(bufferedImage, "jpg", out); // 推送响应流
            out.flush();
        }
        finally {
            if (out != null) {
                out.close();
            }
        }
    }
}当用户访问/captcha.jpg时,即可得到一张携带验证码的图片,验证码文本则被存放到session中,用于后续的校验。 有了图形验证码的API之后,就可以自定义验证码校验过滤器了。虽然Spring Security的过滤器链对过滤器没有特殊要求,只要继承了 Filter即可,但是在Spring体系中,推荐使用OncePerRequestFilter来实现,它可以确保一次请求只会通过一次该过滤器(Filter实际上并不能保证这一点)。
新建验证码校验失败异常类
public class VertifyCodeException extends AuthenticationException {
    public VertifyCodeException() {
        super("图形验证码校验失败");
    }
}
添加校验验证码的过滤器
/**
 * 专门用于校验验证码的过滤器
 */
public class VertifyCodeFilter extends OncePerRequestFilter {
    @Override
    protected void doFilterInternal(HttpServletRequest request, HttpServletResponse response, FilterChain chain) throws ServletException, IOException {
        // 非登录请求不校验验证码
        if (!"/auth/form".equals(request.getRequestURI())) {
            chain.doFilter(request, response);
        }
        else {
            try {
                vertifyCode(request);
                chain.doFilter(request, response);
            }
            catch (VertifyCodeException e) {
                e.printStackTrace();
            }
        }
    }

    /**
     * 校验验证码是否正确
     *
     * @param request HttpServletRequest
     * @throws VertifyCodeException VertifyCodeException
     */
    private void vertifyCode(HttpServletRequest request) throws VertifyCodeException {
        String code = request.getParameter("captcha");
        String saveCode = (String) request.getAttribute("captcha");
        HttpSession session = request.getSession();
        if (!StringUtils.isEmpty(saveCode)) {
            session.removeAttribute("cathcha");
        }
        if (StringUtils.isEmpty(code) || StringUtils.isEmpty(saveCode) || !code.equals(saveCode)) {
            throw new VertifyCodeException();
        }
    }
}验证码仅仅核对session中保存的验证码与用户提交的验证码是否一致,逻辑并不复杂,只需将该过滤器添加到Spring Security的过滤器链中即可生效。
修改Spring Security配置类
@EnableWebSecurity
public class WebSecurityConfig extends WebSecurityConfigurerAdapter {
    @Override
    protected void configure(HttpSecurity http) throws Exception {
        http.authorizeRequests()
                .antMatchers("/admin/api/**").hasAuthority("ROLE_ADMIN")
                .antMatchers("/user/api/**").hasRole("USER")
                .antMatchers("app/api/**", "/captcha.jpg").permitAll() // 开放验证码的访问权限
                .anyRequest().authenticated()
                .and()
                .csrf().disable()
            .formLogin()
                .loginPage("/myLogin.html")
                .loginProcessingUrl("/auth/form").permitAll()
                .failureHandler((request, response, e) -> {
                    // todo
                });

        // 将VertifyCodeFilter过滤器加在UsernamePasswordAuthenticationFilter过滤器之前
        http.addFilterBefore(new VertifyCodeFilter(), UsernamePasswordAuthenticationFilter.class);
    }
}
修改自定义表单登录页
<!DOCTYPE html>
<html>
<head>
    <meta charset="UTF-8">
    <title>登录</title>
    <link rel="stylesheet" type="text/css" href="css/login.css">
    <style>
        body{
            background: #353f42;
        }

        *{
            padding: 0;
            margin: 0;
        }

        .main {
            margin: 0 auto;
            padding-left: 25px;
            padding-right: 25px;
            padding-top: 15px;
            width: 350px;
            height: 410px;
            background: #FFFFFF;
            /*以下css用于让登录表单垂直居中在界面,可删除*/
            position: absolute;
            top: 50%;
            left: 50%;
            margin-top: -175px;
            margin-left: -175px;
        }

        .title {
            width: 100%;
            height: 40px;
            line-height: 40px;
        }

        .title span {
            font-size: 18px;
            color: #353f42;
        }

        .title-msg {
            width: 100%;
            height: 64px;
            line-height: 64px;
        }

        .title:hover{
            cursor: default	;
        }

        .title-msg:hover{
            cursor: default	;
        }

        .title-msg span {
            font-size: 12px;
            color: #707472;
        }

        .input-content {
            width: 100%;
            height: 200px;
        }

        .input-content input {
            width: 330px;
            height: 40px;
            border: 1px solid #dad9d6;
            background: #ffffff;
            padding-left: 10px;
            padding-right: 10px;
        }

        .enter-btn {
            width: 350px;
            height: 40px;
            color: #fff;
            background: #0bc5de;
            line-height: 40px;
            text-align: center;
            border: 0px;
        }

        .foor{
            width: 100%;
            height: auto;
            color: #9b9c98;
            font-size: 12px;
            margin-top: 20px;
        }

        .enter-btn:hover {
            cursor:pointer;
            background: #1db5c9;
        }

        .foor div:hover {
            cursor:pointer;
            color: #484847;
            font-weight: 600;
        }

        .left{
            float: left;
        }
        .right{
            float: right;
        }
    </style>
</head>
<body>
<div class="main">
    <div class="title">
        <span>密码登录</span>
    </div>
    <div class="title-msg">
        <span>请输入登录账户和密码</span>
    </div>
    <form class="login-form" action="/auth/form" method="post" novalidate>
        <div class="input-content">
            <div>
                <input type="text" autocomplete="off" placeholder="用户名" name="username" required/>
            </div>
            <div style="margin-top: 16px">
                <input type="password" autocomplete="off" placeholder="登录密码" name="password" required maxlength="32"/>
            </div>
            <div style="margin-top: 16px">
                <div>
                    <input type="text" autocomplete="off" placeholder="验证码" name="captcha" required/>
                </div>
                <div>
                    <img src="/captcha.jpg" alt="验证码" width="150px" height="50px" />
                </div>
            </div>
        </div>
        <div style="text-align: center;margin-top:10px;">
            <button type="submit" class="enter-btn" >登录</button>
        </div>
    </form>
</div>
</body>
</html>
重启服务,访问任意一个受保护的资源即可看到带验证码的登录页面
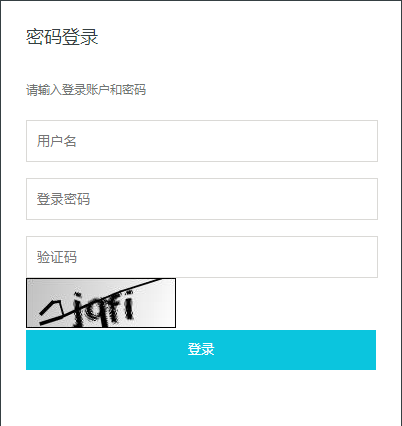
当正确输入验证码时,可以正常访问对应资源。只要输入的验证码有误,就会返回一个401页面,至此,验证码登录功能就粗略实现了,而定制验证码的尺寸、验证码的失效属性、配置验证码的字符取值范围等,可以在此基础上集成。