#从Activity开始(二)——加载布局
本文也发布于本人的知乎文章:https://zhuanlan.zhihu.com/p/393862142
(注:源代码为android-8.1)
0. 前言
本篇文章主要讲解了当Activity创建后,如何加载布局。
如果想了解Activity是如何被启动起来的,可以参考我之前的文章:Android源码阅读分析:从Activity开始(一)——启动流程。
1. 代码分析
通常情况下,我们在Android Studio里新建一个Activity时,会自动生成如下代码:
public class MainActivity extends Activity {
	@Override
	protected void onCreate(@Nullable Bundle savedInstanceState) {
		super.onCreate(savedInstanceState);
		setContentView(R.layout.activity_main);
	}
}
在Activity创建后,通常情况会调用setContentView方法。查看Activity的源码时,我们发现,setContentView有三个同名重载方法,分别是
- setContentView(@LayoutRes int layoutResID)
- setContentView(View view)
- setContentView(View view, ViewGroup.LayoutParams params)
通常情况下,我们会使用第一个方法。下面对该方法进行跟踪。
(frameworks/base/core/java/android/app/Activity.java)

public void setContentView(@LayoutRes int layoutResID) {
	getWindow().setContentView(layoutResID);
	initWindowDecorActionBar();
}
getWindow方法返回一个Window类的对象。Window类是一个抽象类。从上一篇文章中可知,Activity创建时调用了attach方法,在attach方法中创建了一个PhoneWindow对象。下面就查看PhoneWindow类中的setContentView方法。
(frameworks/base/core/java/com/android/internal/policy/PhoneWindow.java)

@Override
public void setContentView(int layoutResID) {
	// 创建或清空顶层容器
	if (mContentParent == null) {
		installDecor();
    } else if (!hasFeature(FEATURE_CONTENT_TRANSITIONS)) {
        mContentParent.removeAllViews();
    }

    if (hasFeature(FEATURE_CONTENT_TRANSITIONS)) {
		final Scene newScene = Scene.getSceneForLayout(mContentParent, layoutResID, getContext());
        transitionTo(newScene);
    } else {
	    // 将用户定义的布局载入到mContentParent中
        mLayoutInflater.inflate(layoutResID, mContentParent);
    }
    mContentParent.requestApplyInsets();
    final Callback cb = getCallback();
    if (cb != null && !isDestroyed()) {
		cb.onContentChanged();
    }
    mContentParentExplicitlySet = true;
}
对于新建的Activity,顶层容器肯定是空的,那么就会调用installDecor方法。而后将用户定义的布局载入到mContentParent中。这个mContentParent是如何被创建的,我们在下文探讨。这里先看一下installDecor方法的实现。
(frameworks/base/core/java/com/android/internal/policy/PhoneWindow.java)

private void installDecor() {
	...
	if (mDecor == null) {
		// 产生新的DecorView
		mDecor = generateDecor(-1);
        mDecor.setDescendantFocusability(ViewGroup.FOCUS_AFTER_DESCENDANTS);
        mDecor.setIsRootNamespace(true);
        if (!mInvalidatePanelMenuPosted && mInvalidatePanelMenuFeatures != 0) {
			mDecor.postOnAnimation(mInvalidatePanelMenuRunnable);
        }
	} else {
        mDecor.setWindow(this);
    }
    if (mContentParent == null) {
	    // 产生新的顶层容器
		mContentParent = generateLayout(mDecor);
		...
	}
}
DecorView类继承自FrameLayout,而frameLayout则是ViewGroup的子类。也就是说,DecorView是布局的根节点,顾名思义,这个根节点的作用是对界面做一些装饰性布局。
而mContentParent则通过方法则生成。下面跟踪generateLayout方法。
(frameworks/base/core/java/com/android/internal/policy/PhoneWindow.java)

protected ViewGroup generateLayout(DecorView decor) {
	TypedArray a = getWindowStyle();
	// 设置一系列PhoneWindow特征
	...
	int layoutResource;
    int features = getLocalFeatures();
    // 通过判断features来决定需要载入的layoutResource
	...
    mDecor.onResourcesLoaded(mLayoutInflater, layoutResource);

	// 这里的findViewById会调用DecorView的findViewById
	// 也就是说,此处会获取DecorView加载布局内的Id为content的ViewGroup
	ViewGroup contentParent = (ViewGroup)findViewById(ID_ANDROID_CONTENT);
	...
	return contentParent;
}
该方法主要的作用是应用现有主题数据,根据各个style进行设置,首先是对PhoneWindow的特征进行设置,之后调用了mDecor.onResourcesLoaded方法,从这个方法的名字来看,应该是在DecorView中做了一些有关于资源加载的操作。最后,该方法返回的contentParent则是DecorView加载布局内的Id为ID_ANDROID_CONTENT的ViewGroup。
下面我们跟踪一下mDecor.onResourcesLoaded方法的代码看一看。
(frameworks/base/core/java/com/android/internal/policy/DecorView.java)

void onResourcesLoaded(LayoutInflater inflater, int layoutResource) {
	...
	final View root = inflater.inflate(layoutResource, null);
	if (mDecorCaptionView != null) {
		if (mDecorCaptionView.getParent() == null) {
			addView(mDecorCaptionView, new ViewGroup.LayoutParams(MATCH_PARENT, MATCH_PARENT));
        }
        mDecorCaptionView.addView(root, new ViewGroup.MarginLayoutParams(MATCH_PARENT, MATCH_PARENT));
    } else {
		// Put it below the color views.
        addView(root, 0, new ViewGroup.LayoutParams(MATCH_PARENT, MATCH_PARENT));
    }
    mContentRoot = (ViewGroup) root;
	...
}
在这个方法中,通过载入布局资源,构建出DecorView的根View。
现在我们再来看一下所载入的布局资源。需要载入的布局资源在PhoneWindow.generateLayout方法中,根据style的不同,选择了不同的布局文件。这里选择最简单的R.layout.screen_simple作为例子,该资源对应的布局文件为frameworks/base/core/res/res/layout/screen_simple.xml。
(frameworks/base/core/res/res/layout)

<LinearLayout xmlns:android="http://schemas.android.com/apk/res/android"
    android:layout_width="match_parent"
    android:layout_height="match_parent"
    android:fitsSystemWindows="true"
    android:orientation="vertical">
    <ViewStub android:id="@+id/action_mode_bar_stub"
              android:inflatedId="@+id/action_mode_bar"
              android:layout="@layout/action_mode_bar"
              android:layout_width="match_parent"
              android:layout_height="wrap_content"
              android:theme="?attr/actionBarTheme" />
    <FrameLayout
         android:id="@android:id/content"
         android:layout_width="match_parent"
         android:layout_height="match_parent"
         android:foregroundInsidePadding="false"
         android:foregroundGravity="fill_horizontal|top"
         android:foreground="?android:attr/windowContentOverlay" />
</LinearLayout>
这个布局的根节点是一个LinearLayout,这意味着DecorView的根View是一个LinearLayout。而Id为content的View是一个FrameLayout,而从上文的分析中可以知道,这个FrameLayout就是承载用户定义布局的容器。
2. 总结
本文简单的分析了一下Activity的布局加载逻辑。
Activity加载布局的方法调用逻辑比较简单。如下图所示:
![从Activity开始(二)——加载布局_方法调用逻辑] (https://raw.githubusercontent.com/dongzhong/ImageAndVideoStore/master/Activity/Android%E6%BA%90%E7%A0%81%E9%98%85%E8%AF%BB%E5%88%86%E6%9E%90%EF%BC%9A%E4%BB%8EActivity%E5%BC%80%E5%A7%8B%EF%BC%88%E4%BA%8C%EF%BC%89%E2%80%94%E2%80%94%E5%8A%A0%E8%BD%BD%E5%B8%83%E5%B1%80.png)
布局的加载主要是在Activity、PhoneWindow、DecorView这三个类中进行的。通过分析源码,我们可以清晰的看出,在Activity中的布局结构如下图所示。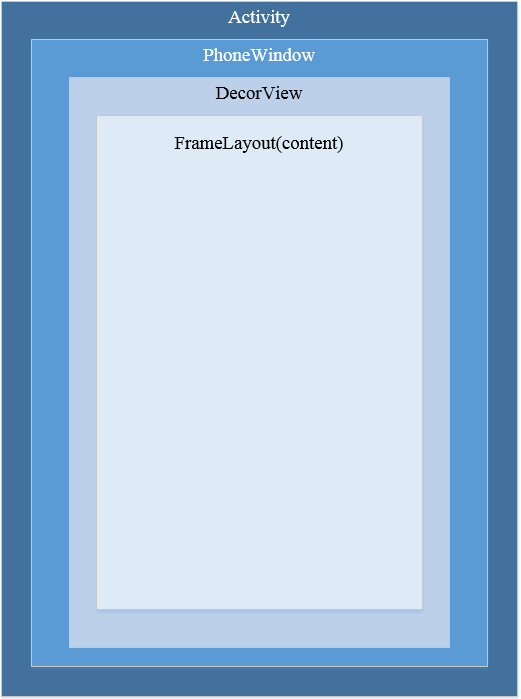
界面的一些装饰性布局,比如ActionBar等,也是在DecorView中,与content同级。
在布局加载的调用逻辑中,最终将资源文件转换为布局的方法是LayoutInflater.inflate方法。我会在后续文章中详细分析该方法是如何实现的:《Android源码阅读分析:从资源文件到控件布局——LayoutInflater分析》