Hive
Hive概述
本质:将sql装换成MapReduce任务进行运算,可以理解为hive就是一个MapReduce的客户端。Hive处理的数据存储在HDFS,执行程序在yarn上,底层实现是MapReduce
特点
- 可扩展:Hive可以自由的扩展集群的规模,一般情况下不需要重启服务
- 延展性:Hive支持用户自定义函数,用户可以根据自己的需求来实现自己的函数。
- 容错:良好的容错性,节点出现问题SQL仍可完成执行
缺点
- HQL的表达能力有限
- Hive的效率比较低,自动生成的MR不够智能化,hive调优比较困难
Hive架构
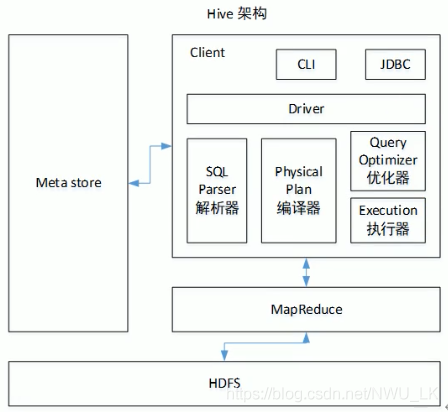
hive元数据库
默认的元数据库为derby,但问题是开启hive之后就会占用元数据库,且不与其他客户端共享数据,因此需要将derby换为其他数据库——mysql
- 将mysql驱动拷贝到hive的lib目录下
- 安装mysql,先卸载linux自带的mysql,创建metaStore数据库
- 修改conf目录下的hive-site.xml文件
<?xml version="1.0" encoding="UTF-8" standalone="no"?>
<?xml-stylesheet type="text/xsl" href="configuration.xsl"?>
<configuration>
<!--连接数据库的用户名-->
<property>
<name>javax.jdo.option.ConnectionUserName</name>
<value>root</value>
</property>
<!--连接数据库的密码-->
<property>
<name>javax.jdo.option.ConnectionPassword</name>
<value>123456</value>
</property>
<!--mysql数据库的访问路径,没有路径则自动创建-->
<property>
<name>javax.jdo.option.ConnectionURL</name>
<value>jdbc:mysql://node03:3306/hive?createDatabaseIfNotExist=true&useSSL=false</value>
</property>
<!--连接数据库的驱动-->
<property>
<name>javax.jdo.option.ConnectionDriverName</name>
<value>com.mysql.jdbc.Driver</value>
</property>
<!--元数据是否校验-->
<property>
<name>hive.metastore.schema.verification</name>
<value>false</value>
</property>
<!--是否自动创建核心文件-->
<property>
<name>datanucleus.schema.autoCreateAll</name>
<value>true</value>
</property>
<!--thrift服务器绑定的主机-->
<property>
<name>hive.server2.thrift.bind.host</name>
<value>hadoop104</value>
</property>
<!--默认的存储地址-->
<property>
<name>hive.metastore.warehouse.dir</name>
<value>hdfs://hadoop102:9000/user/hive/warehouse</value>
<description>location of default database for the warehouse</description>
</property>
<!--设置显示表头字段名-->
<property>
<name>hive.cli.print.header</name>
<value>true</value>
</property>
<property>
<name>hive.cli.print.current.db</name>
<value>true</value>
</property>
</configuration>
- hive目录下初始化hive元数据库:
schematool -initSchema -dbType mysql -verbose - 启动hive:
bin/hive
使用元数据服务访问hive
- 在hive-site.xml文件中添加配置
<!--元数据是否校验-->
  <property>
      <name>hive.metastore.uris</name>
      <value>thrift://hive所在服务器:9083</value>
  </property>
- 此时查表的话则要先开启元数据服务:
bin/hive --service metastore
使用jdbc方式访问hive
- 修改配置
<property>
   <name>hive.server2.thrift.bind.host</name>
   <value>当前主机</value>
 </property>
 <property>
   <name>hive.server2.thrift.port</name>
   <value>10000</value>
 </property>
- 启动hiveserver2:
bin/hive --server hiveserver2 - 通过jdbc去链接:
bin/beeline -u jdbc:hive2://当前主机:10000 -n 用户名
常用脚本
- 不进入交互窗口直接执行sql:
bin/hive -e "sql" [--hiveconf hive.exec.compress.output=true] - 不进入交互窗口执行文件的sql:
bin/hive -f "path" - 交互窗口查看hdfs:
dfs -ls /
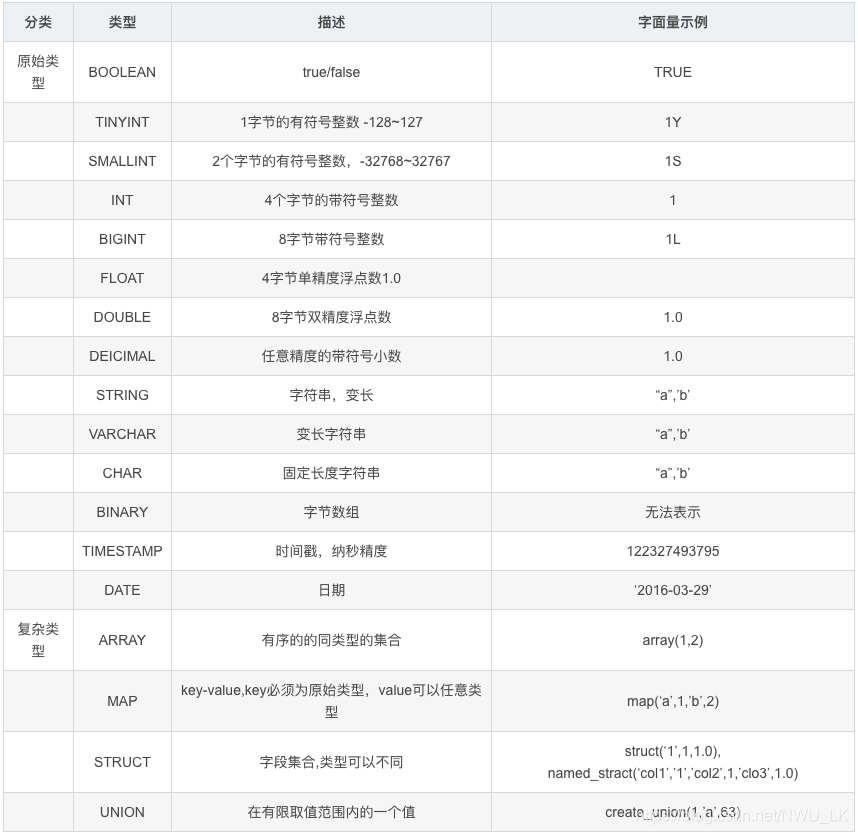
数据类型
数据类型转化
- 任何整数类型可以转换为范围更广的类型,如TINYINT可以转换为INT
- 所有整数类型、FLOAT、String都可以转换为double
- 整数类型可以转换为float
- BOOLEAN可以转换为其他任何类型
- 强转用CAST,比如CAST(‘1’ AS INT),成功则返回对应的值,失败则返回NULL
分区表
分区表是指在创建表时指定的partition的分区空间。一个表可以拥有一个或者多个分区,每个分区以文件夹的形式单独存在文件夹目录下。表和列名不区分大小写。分区是以字段的形式在表结构中存在。查询数据时只需要在where中以分区去查找。
注意:分区字段不能是建表字段之一,并且分区字段是个虚拟字段,分区字段的数据在是装载数据的时候指定的。
分桶表
首先需要配置hive开启分桶:set hive.enforce.bucketing=true
设置桶的个数:set mapreduce.job.reduces=4
分桶按照表的字段分桶仅仅使用load命令不能实现,需要配合insert+select
load data local inpath 路径 into table tableNameinsert overwirte table tableName select * from tableName cluster by(分桶字段)
分桶表也是把表所映射的结构化数据文件分成几个部分,提高了join查询效率,只需要把join的字段分桶
Hive的DDL语言
数据库操作
- 创建数据库:
create database if not exists tableName; - 显示所有数据库:
show databases; - 显示数据库详细信息:
desc database [extended] dbname; - 查看正在使用哪个库:
select current_database(); - 查看创建库的详细语句:
show create database t3; - 删除库:
drop database if exists dbname; - 切换数据库:
use database_name
数据表操作
- 创建表
CREATE [EXTERNAL] TABLE [IF NOT EXISTS] table_name
	[(col_name data_type [COMMENT col_comment], ...)]
	[COMMENT table_comment]
	[PARTITIONED BY (col_name data_type [COMMENT col_comment], ...)]   //分区表
	[CLUSTERED BY (col_name, col_name, ...)。                          //分桶表
	[SORTED BY (col_name [ASC|DESC], ...)] INTO num_buckets BUCKETS]  //按什么字段分桶
	[ROW FORMAT row_format]                       //定义行的格式
	[STORED AS file_format]                       //指定文件格式,默认文本文件
	[LOCATION hdfs_path]                          //指定表的存储位置
建表可以为managed_table和external_table,hive在删除管理表时同时会删除数据,而删除外部表时,删除数据的话只会删除元数据,真正的数据不会删除。row_format就是对行的限定,比如可以为row format delimited fields terminated by ','delimited 仅仅支持单字符的分隔符,多字符可以使用serDo来替换,具体操作略
- 复制表结构:
create table tableName like tableName - 修改表的类型:
alter table tableName set tblproperties('EXTERNAL'='FALSE') - 查询表的信息:
desc tableName - 查询表的详细信息:
desc formatted tableName - 查看数据库中有哪些表:
show tables; - 删除表:
drop table tableName - 查看分区信息:
show partitions tableName - 查看详细建表语句:
show create table tableName - 修改表名:
alter table student rename to new_student; - 修改字段:
alter table new_student change name new_name string; - 增加一个字段:
alter table new_student add columns (score int); - 删除一个字段:不支持
- 替换所有字段类型:
alter table new_student replace columns (id int, name string, address string); - 添加分区:
alter table student_ptn add partition(city="chongqing2") partition(city="chongqing3") partition(city="chongqing4"); - 修改分区:
alter table tabelName partition (dt="") rename to partition(dt="") - 显示表分区信息:
show partitions tableName - 显示当前hive支持的所有方法:
show functions - 查看表信息:
desc extended tableName
Hive的DML语言
- 从文件系统加载数据入库:
load data [local] inpath 'filepath' [OVERWRITE] into table tablename [PARTITION (partcol1=val1, partcol2=val2 ...)] - 基本插入数据:
insert into table student_par values(1,"andy"),(2,"tom"); - 从其他表插入数据:
insert into tableName select * from otherTable - 用其他表数据覆盖当前表数据:
INSERT OVERWRITE TABLE tablename1 select_statement1 FROM from_statement;
多重插入:
//将source_table的name数据插入到table2,id数据插入到table1
from source_table
insert overwrite table tableName1
select id
insert overwrite table tableName2
select name
动态插入:
首先开启动态分区:set hive.exec.dynamic.partition=true;
指定分区的模式:set hive.exec.dynamic
insert overwrite table tableName partition(month,day)
select ip,month,day
from sourceTABLE;
将hive表数据导入指定路径:INSERT OVERWRITE [local] directory '路径' select * from tableName
select语句详解
- cluster by 字段:根据某个字段分桶并排序
- distribute by 字段:按照字段将数据分到不同的reducer中,分发算法是hash散列
- sort by 字段:进入reduce前完成排序,保证每个reducer有序,跟distribute by结合等于cluster by
- order by 字段:全局排序,必须保证只有一个reduce
hive join
hive只支持等值连接,不支持非等值连接。inner join、left join、right join都支持。其次还支持full outer join(结合内、左、右)、semi join(只显示左边表的字段)、cross join(笛卡尔积)
hive 内置函数和内置运算符
使用到官网查
hive自定义函数
- 创建maven项目,引入依赖
hive-exec-本和hadoop-common - 编写类继承UDF类,重载evaluate方法
- 将工程打包,上传到hive的classpath下
- 在hive控制台用命令:
add jar jar的path - 给jar包创建函数名:
create temporary function 函数名 as '类所在路径' - 调用函数
自定义函数命名以后只对当前用户可用