流程是加载权重,输入图片,将图片resize到模型输入的shape,并且除255归一化,像素点需要按照chw顺序排放,然后输入模型进行预测,预测完了之后解析 25200*85,根据置信度、nms等阈值进行过滤,然后将过滤剩下的框将坐标按照缩放比例转换到原始图像坐标系中,最后标注即可。
开放神经网络交换ONNX(Open Neural Network Exchange)是一套表示深度神经网络模型的开放格式,由微软和Facebook于2017推出,然后迅速得到了各大厂商和框架的支持。通过短短几年的发展,已经成为表示深度学习模型的实际标准,并且通过ONNX-ML,可以支持传统非神经网络机器学习模型,大有一统整个AI模型交换标准。ONNX定义了一组与环境和平台无关的标准格式,为AI模型的互操作性提供了基础,使AI模型可以在不同框架和环境下交互使用。硬件和软件厂商可以基于ONNX标准优化模型性能,让所有兼容ONNX标准的框架受益,简单来说,ONNX就是模型转换的中间人。

opset_version 的值会影响哪些 PyTorch 运算符可以被导出到 ONNX 格式。如果模型中使用了 ONNX 运算符集合中不支持的运算符,那么将无法导出模型。此外,导出的模型也只能在支持相应 ONNX 版本的平台上运行。完整代码如下:
package tool.yolo.onnxruntime;
import ai.onnxruntime.*;
import com.alibaba.fastjson.JSONArray;
import com.alibaba.fastjson.JSONObject;
import org.bytedeco.javacv.CanvasFrame;
import org.bytedeco.javacv.OpenCVFrameConverter;
import org.opencv.core.*;
import org.opencv.core.Point;
import org.opencv.imgcodecs.Imgcodecs;
import org.opencv.imgproc.Imgproc;
import javax.imageio.ImageIO;
import javax.swing.*;
import java.awt.*;
import java.awt.image.BufferedImage;
import java.io.File;
import java.nio.FloatBuffer;
import java.text.DecimalFormat;
import java.text.NumberFormat;
import java.util.*;
/**
* @desc : 使用 com.microsoft.onnxruntime 加载 yolov5 onnx 进行推理
* @auth : tyf
* @date : 2023-03-21 09:31:31
*/
public class predictTest {
// onnxruntime 环境
public static OrtEnvironment env;
public static OrtSession session;
// 模型的类别信息,从权重读取
public static JSONObject names;
// 模型的输入shape,从权重读取
public static long count;//1 模型每次处理一张图片
public static long channels;//3 模型通道数
public static long netHeight;//640 模型高
public static long netWidth;//640 模型宽
// 检测框筛选阈值,参考 detect.py 中的设置
public static float confThreshold = 0.25f;
public static float nmsThreshold = 0.45f;
// onnxruntime 环境初始化
static {
// 权重导出时目前 com.microsoft.onnxruntime 这个库只支持到 opset<=16 所以在导出模型时需要设置 --opset 16
String weight = "C:\\Users\\tyf\\Desktop\\yolov5s.onnx";
try{
env = OrtEnvironment.getEnvironment();
session = env.createSession(weight, new OrtSession.SessionOptions());
// 保存一些模型信息 例如输入宽高、类别等
// 3.打印模型,getCustomMetadata 里面有类别信息、模型输入宽高等
OnnxModelMetadata metadata = session.getMetadata();
Map<String, NodeInfo> infoMap = session.getInputInfo();
TensorInfo nodeInfo = (TensorInfo)infoMap.get("images").getInfo();
String nameClass = metadata.getCustomMetadata().get("names");
System.out.println("-------打印模型信息开始--------");
System.out.println("getProducerName="+metadata.getProducerName());
System.out.println("getGraphName="+metadata.getGraphName());
System.out.println("getDescription="+metadata.getDescription());
System.out.println("getDomain="+metadata.getDomain());
System.out.println("getVersion="+metadata.getVersion());
System.out.println("getCustomMetadata="+metadata.getCustomMetadata());
System.out.println("getInputInfo="+infoMap);
System.out.println("nodeInfo="+nodeInfo);
System.out.println("-------打印模型信息结束--------");
// 4.从里面读取类别信息 {0: 'person', 1: 'bicycle', 2: 'car'}
names = JSONObject.parseObject(nameClass.replace("\"","\"\""));
System.out.println("类别信息:"+names);
// 5.需要从模型信息中读出输入张量的shape,任意图片都需要转换到这个尺寸之后才能输入模型,并且模型输出得到的检测框坐标还需要反变换回去,yolov5是 640*640
count = nodeInfo.getShape()[0];//1 模型每次处理一张图片
channels = nodeInfo.getShape()[1];//3 模型通道数
netHeight = nodeInfo.getShape()[2];//640 模型高
netWidth = nodeInfo.getShape()[3];//640 模型宽
System.out.println("模型通道数="+channels+",网络输入高度="+netHeight+",网络输入宽度="+netWidth);
// opencv 库,将 opencv\build\java\x64\opencv_java455.dll 复制到 Java JDK安装的bin目录下
// 从 org.openpnp.opencv 的依赖中获取
System.loadLibrary(Core.NATIVE_LIBRARY_NAME);
}
catch (Exception e){
e.printStackTrace();
System.exit(0);
}
}
// 使用 opencv 读取图片到 mat
public static Mat readImg(String path){
Mat img = Imgcodecs.imread(path);
return img;
}
// 将一个 src_mat 修改尺寸后存储到 dst_mat 中
public static Mat resizeWithPadding(Mat src) {
Mat dst = new Mat();
int oldW = src.width();
int oldH = src.height();
double r = Math.min((double) netWidth / oldW, (double) netHeight / oldH);
int newUnpadW = (int) Math.round(oldW * r);
int newUnpadH = (int) Math.round(oldH * r);
int dw = (Long.valueOf(netWidth).intValue() - newUnpadW) / 2;
int dh = (Long.valueOf(netHeight).intValue() - newUnpadH) / 2;
int top = (int) Math.round(dh - 0.1);
int bottom = (int) Math.round(dh + 0.1);
int left = (int) Math.round(dw - 0.1);
int right = (int) Math.round(dw + 0.1);
Imgproc.resize(src, dst, new Size(newUnpadW, newUnpadH));
Core.copyMakeBorder(dst, dst, top, bottom, left, right, Core.BORDER_CONSTANT);
return dst;
}
// 将图片矩阵转化为 onnxruntime 需要的 tensor
// 根据yolo的输入张量的预处理,需要进行归一化、BGR -> RGB 等超做 具体可以看 detect.py 脚本
public static OnnxTensor transferTensor(Mat dst){
// BGR -> RGB
Imgproc.cvtColor(dst, dst, Imgproc.COLOR_BGR2RGB);
// 归一化 0-255 转 0-1
dst.convertTo(dst, CvType.CV_32FC1, 1. / 255);
// 初始化一个输入数组 channels * netWidth * netHeight
float[] whc = new float[ Long.valueOf(channels).intValue() * Long.valueOf(netWidth).intValue() * Long.valueOf(netHeight).intValue() ];
dst.get(0, 0, whc);
// 得到最终的图片转 float 数组
float[] chw = whc2cwh(whc);
// 创建 onnxruntime 需要的 tensor
// 传入输入的图片 float 数组并指定数组shape
OnnxTensor tensor = null;
try {
tensor = OnnxTensor.createTensor(env, FloatBuffer.wrap(chw), new long[]{count,channels,netWidth,netHeight});
}
catch (Exception e){
e.printStackTrace();
System.exit(0);
}
return tensor;
}
public static float[] whc2cwh(float[] src) {
float[] chw = new float[src.length];
int j = 0;
for (int ch = 0; ch < 3; ++ch) {
for (int i = ch; i < src.length; i += 3) {
chw[j] = src[i];
j++;
}
}
return chw;
}
// 获取数组中最大值所在的下标,求 80个类别中概率最大的类别
public static int getMaxIndex(float[] array) {
int maxIndex = 0;
float maxVal = array[0];
for (int i = 1; i < array.length; i++) {
if (array[i] > maxVal) {
maxVal = array[i];
maxIndex = i;
}
}
return maxIndex;
}
// 中心点坐标转 xin xmax ymin ymax
public static float[] xywh2xyxy(float[] bbox) {
// 中心点坐标
float x = bbox[0];
float y = bbox[1];
float w = bbox[2];
float h = bbox[3];
// 计算
float x1 = x - w * 0.5f;
float y1 = y - h * 0.5f;
float x2 = x + w * 0.5f;
float y2 = y + h * 0.5f;
// 限制在图片区域内
return new float[]{
x1 < 0 ? 0 : x1,
y1 < 0 ? 0 : y1,
x2 > netWidth ? netWidth:x2,
y2 > netHeight? netHeight:y2};
}
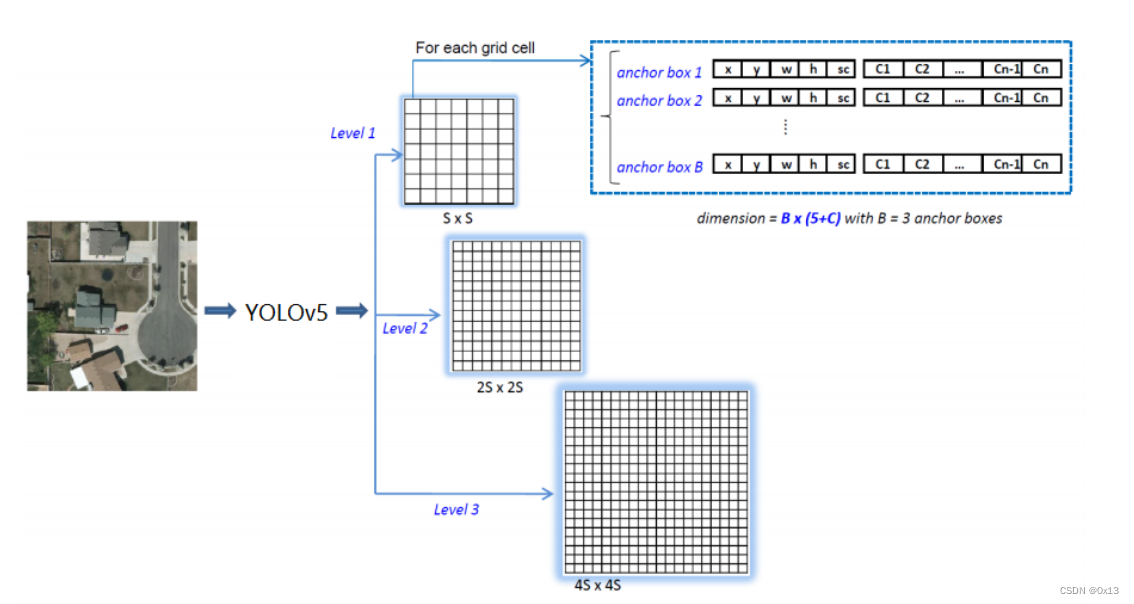
// 对模型输出 25200*85 进行处理,根据置信度阈值
public static JSONArray filterRec1(float[][] data){
JSONArray recList = new JSONArray();
// 遍历25200个框图
// 遍历 25200 检测框
// 25200 = 80 * 80 + 40 * 40 + 20 * 20
// 也就是按照8、16、32像素的宏块进行划分
for (float[] bbox : data){
// 每个检测框使用 85 位的数组来保存中心点、置信度、类别概率等信息,具体如下:
// 0~3 四个位置是 x y w h 定位信息(中心点坐标和宽高) 需要转换为 xyxy 也就是左上角坐标和右下角坐标,同时限定在图片最大宽高以内
float[] xywh = new float[] {bbox[0],bbox[1],bbox[2],bbox[3]};
float[] xyxy = xywh2xyxy(xywh);
// 4 这个位置表示检测框置信度得分
float confidence = bbox[4];
// 5~85 为所有类别(80个)的概率得分,需要找出最大值以及所在索引
float[] classInfo = Arrays.copyOfRange(bbox, 5, 85);
int maxIndex = getMaxIndex(classInfo);// 概率最高的类被的索引
float maxValue = classInfo[maxIndex];// 概率最高的类被的概率
String maxClass = (String)names.get(Integer.valueOf(maxIndex));// 概率最高的类别的label
// 首先根据框图置信度粗选
if(confidence>=confThreshold){
// 过滤的方式是根据框图置信度阈值去掉置信度低的,剩下的就是置信度高的框图
// 剩下的框图基本上是重复的框图也就是一个目标就行了多次的框选,根据nms计算内积进行过滤 算法参考 detect.py
JSONObject detect = new JSONObject();
detect.put("name",maxClass);// 类别
detect.put("percentage",maxValue);// 概率
detect.put("xmin",xyxy[0]);
detect.put("ymin",xyxy[1]);
detect.put("xmax",xyxy[2]);
detect.put("ymax",xyxy[3]);
recList.add(detect);
}
}
return recList;
}
// 再根据类别重叠进行 nms 筛选
public static JSONArray filterRec2(JSONArray data){
// 保存结果
JSONArray res = new JSONArray();
// 按概率从高到低排序
data.sort(Comparator.comparing(obj->((JSONObject)obj).getString("percentage")).reversed());
// 进行nms处理
while (!data.isEmpty()){
JSONObject max = data.getJSONObject(0);// 每次取概率最高的一个检测框,保存到结果目录
res.add(max);
Iterator<Object> it = data.iterator();
// 计算这个检测框和其他所有检测框的iou,如果超过阈值也就是重叠过大则从原集合中去除
while (it.hasNext()) {
JSONObject obj = (JSONObject)it.next();
double iou = calculateIoU(max, obj);
if (iou > nmsThreshold) {
it.remove();
}
}
}
return res;
}
// 计算两个框的交并比
private static double calculateIoU(JSONObject box1, JSONObject box2) {
double x1 = Math.max(box1.getDouble("xmin"), box2.getDouble("xmin"));
double y1 = Math.max(box1.getDouble("ymin"), box2.getDouble("ymin"));
double x2 = Math.min(box1.getDouble("xmax"), box2.getDouble("xmax"));
double y2 = Math.min(box1.getDouble("ymax"), box2.getDouble("ymax"));
double intersectionArea = Math.max(0, x2 - x1 + 1) * Math.max(0, y2 - y1 + 1);
double box1Area = (box1.getDouble("xmax") - box1.getDouble("xmin") + 1) * (box1.getDouble("ymax") - box1.getDouble("ymin") + 1);
double box2Area = (box2.getDouble("xmax") - box2.getDouble("xmin") + 1) * (box2.getDouble("ymax") - box2.getDouble("ymin") + 1);
double unionArea = box1Area + box2Area - intersectionArea;
return intersectionArea / unionArea;
}
// 将网络输出的两个点坐标转换到原始图片的坐标 根据原始宽高和网络输入宽高确定缩放比
// xmin, ymin, xmax, ymax -> (xmin_org, ymin_org, xmax_org, ymax_org)
public static JSONArray transferSrc2Dst(JSONArray data,int srcw,int srch){
JSONArray res = new JSONArray();
System.out.println("-------坐标转换--------");
/*
具体来说,代码中的 srcw 和 srch 分别表示原始图片的宽度和高度,
gain 是缩放比例,计算方式为将原始图片缩放到指定大小所需的缩放比例和按原始图片宽高比缩放所需的缩放比例中的最小值。
padW 和 padH 分别表示在水平和竖直方向上留白的大小,计算方式为将指定大小减去缩放后的图片的大小(即缩放前的大小乘以缩放比例)再除以2。
这段代码的作用在于计算出留白大小,使得在将原始图片缩放到指定大小后,缩放后的图片与指定大小具有相同的宽高比,同时留白大小也可以用于将缩放后的图片放置在指定大小的画布上的正确位置。
*/
float gain = Math.min((float) netWidth / srcw, (float) netHeight / srch);
float padW = (netWidth - srcw * gain) * 0.5f;
float padH = (netHeight - srch * gain) * 0.5f;
data.stream().forEach(n->{
JSONObject obj = JSONObject.parseObject(n.toString());
float xmin = obj.getFloat("xmin");
float ymin = obj.getFloat("ymin");
float xmax = obj.getFloat("xmax");
float ymax = obj.getFloat("ymax");
// 缩放过后的坐标
float xmin_ = Math.max(0, Math.min(srcw - 1, (xmin - padW) / gain));
float ymin_ = Math.max(0, Math.min(srch - 1, (ymin - padH) / gain));
float xmax_ = Math.max(0, Math.min(srcw - 1, (xmax - padW) / gain));
float ymax_ = Math.max(0, Math.min(srch - 1, (ymax - padH) / gain));
obj.put("xmin",xmin_);
obj.put("ymin",ymin_);
obj.put("xmax",xmax_);
obj.put("ymax",ymax_);
System.out.println("net输出坐标:("+xmin+","+ymin+")"+",转换后坐标:("+xmax_+","+ymax_+")");
res.add(obj);
});
return res;
}
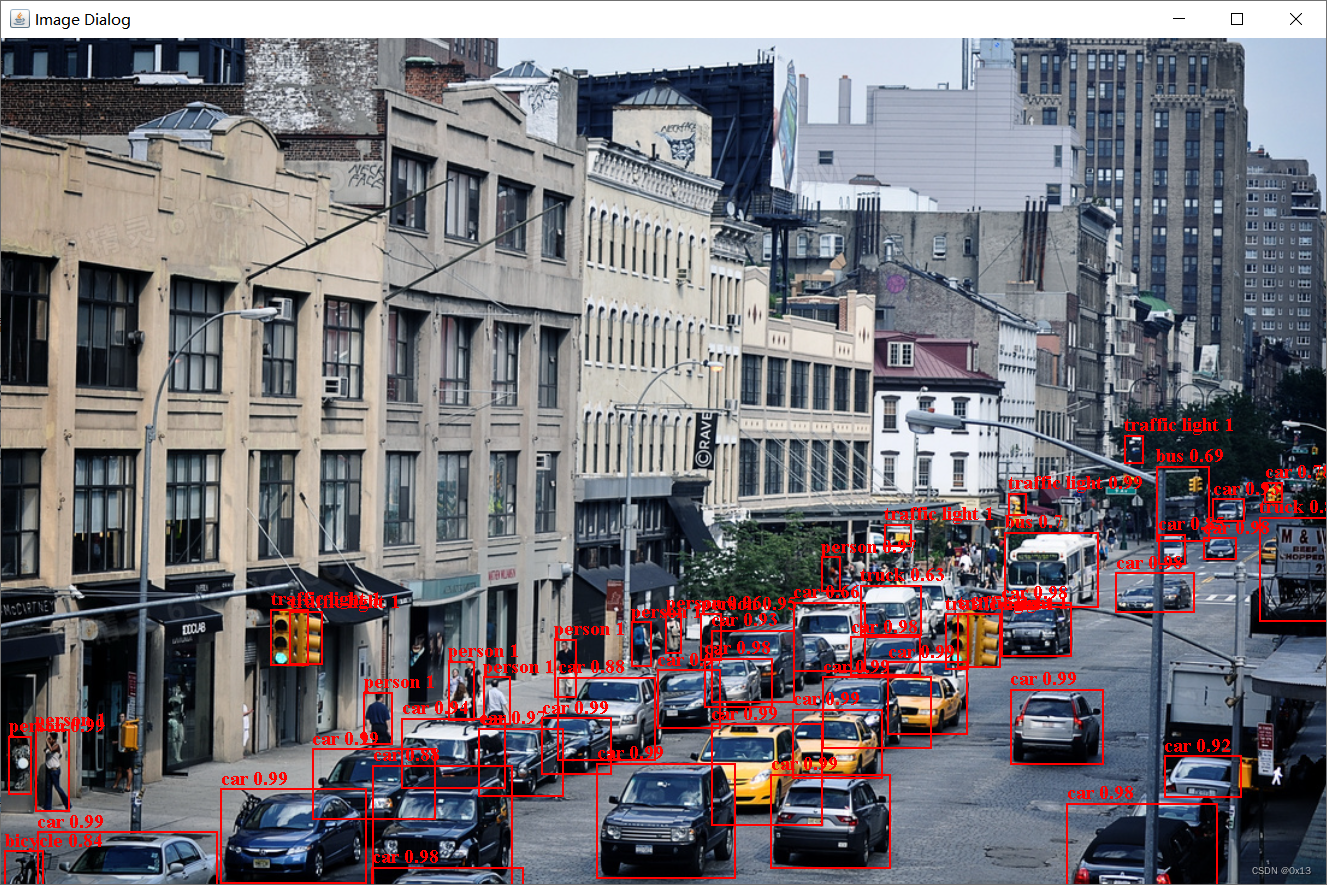
// 在原始图片上面标出框图然后弹窗显示
public static void pointBox(String pic,JSONArray box){
if(box.size()==0){
System.out.println("暂无识别目标");
return;
}
try {
// 图片
File imageFile = new File(pic);
BufferedImage img = ImageIO.read(imageFile);
Graphics2D graph = img.createGraphics();
graph.setStroke(new BasicStroke(2));// 线粗细
graph.setFont(new Font("Serif", Font.BOLD, 20));// 文字
graph.setColor(Color.RED);
// 框信息
box.stream().forEach(n->{
JSONObject obj = JSONObject.parseObject(n.toString());
String name = obj.getString("name");
float percentage = obj.getFloat("percentage");// 概率转两位小数
float xmin = obj.getFloat("xmin");
float ymin = obj.getFloat("ymin");
float xmax = obj.getFloat("xmax");
float ymax = obj.getFloat("ymax");
float w = xmax - xmin;
float h = ymax - ymin;
// 画矩形
graph.drawRect(
Float.valueOf(xmin).intValue(), //注意坐标系,左上角的点应该是 xmin ymin
Float.valueOf(ymin).intValue(),
Float.valueOf(w).intValue(),
Float.valueOf(h).intValue());
// 画类别和概率
DecimalFormat decimalFormat = new DecimalFormat("#.##");
String percentString = decimalFormat.format(percentage);
graph.drawString(name+" "+percentString, xmin-1, ymin-5);
});
// 提交画框
graph.dispose();
// 弹窗显示
JFrame frame = new JFrame("Image Dialog");
frame.setSize(img.getWidth(), img.getHeight());
JLabel label = new JLabel(new ImageIcon(img));
frame.getContentPane().add(label);
frame.setVisible(true);
frame.setDefaultCloseOperation(JFrame.EXIT_ON_CLOSE);
}
catch (Exception e){
e.printStackTrace();
System.exit(0);
}
}
public static void main(String[] args) throws Exception{
// 读取图片,保存原始宽高
String pic = "C:\\Users\\tyf\\Desktop\\img.png";
Mat src = readImg(pic);
int srcw = src.width();
int srch = src.height();
// 重写修改为网络输入的宽高
Mat dst = resizeWithPadding(src);
// 输入图片预处理并转为 tensor 根据yolo的输入张量的预处理,需要进行归一化、BGR -> RGB 等超做 具体可以看 detect.py 脚本
OnnxTensor tensor = transferTensor(dst);
// 进行推理
OrtSession.Result result = session.run(Collections.singletonMap("images", tensor));
// 获取模型输出也就是 1*25200*85 的矩阵
OnnxTensor res = (OnnxTensor)result.get(0);
float[][][] dataRes = (float[][][])res.getValue();
// 取 25200*85 矩阵
// 这个就是yolov5模型的最终输出结果,这里面包含了25200个检测框,每个检测框用85的数组来记录检测框信息
float[][] data = dataRes[0];
// 根据框图置信度粗略过滤
JSONArray srcRec = filterRec1(data);// 过滤后每个json保存目标的类别、概率、左上右下坐标
// 根据 nms 去掉重复框
JSONArray srcRec2 = filterRec2(srcRec);// 过滤后每个json保存目标的类别、概率、左上右下坐标
// 将网络输出的两个点坐标转换到原始图片的坐标 根据原始宽高和网络输入宽高确定缩放比
// xmin, ymin, xmax, ymax -> (xmin_org, ymin_org, xmax_org, ymax_org)
JSONArray dstRec = transferSrc2Dst(srcRec2,srcw,srch);
// 对原始图片标注框图和类别信息,弹窗显示
pointBox(pic,dstRec);
}
}// 实际上有两个依赖,前者只能cpu推理,后者可以使用cpu或gpu推理
// <dependency>
// <groupId>com.microsoft.onnxruntime</groupId>
// <artifactId>onnxruntime_gpu</artifactId>
// <version>1.11.0</version>
// </dependency>
// <dependency>
// <groupId>com.microsoft.onnxruntime</groupId>
// <artifactId>onnxruntime_gpu</artifactId>
// <version>1.11.0</version>
// </dependency>
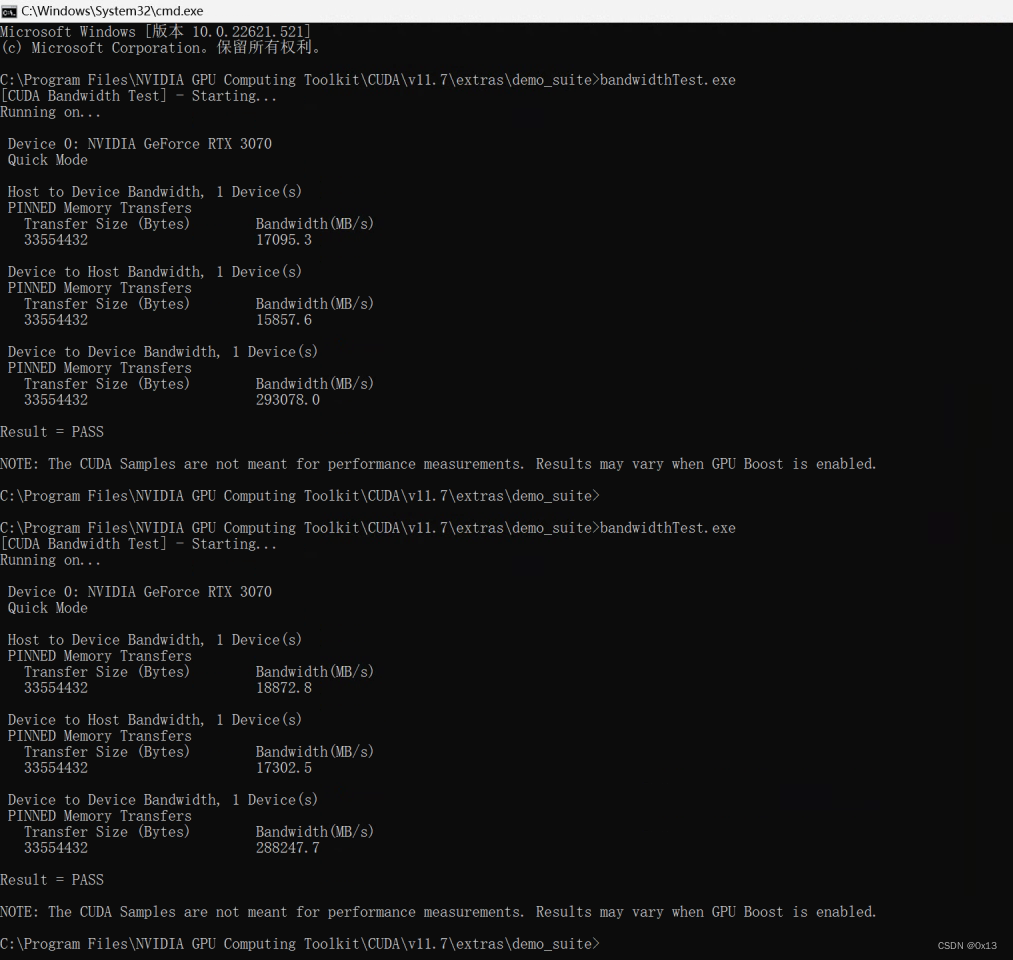
通过下面的方式设置GPU:
int gpuDeviceId = 0; // The GPU device ID to execute on
var sessionOptions = new OrtSession.SessionOptions();
sessionOptions.addCUDA(gpuDeviceId);
var session = environment.createSession("model.onnx", sessionOptions);
其中deviceId通过cuda脚本查询,这里就是0: