预览点这里 ,代码在相应的 github 仓库中
(首次加载比较慢,以后可以看看怎么优化一下打包)
(一)准备工作
vue3 + vite + p5 + eslint
 // .eslintrc.cjs
 module.exports = {
  env: {
    browser: true,
    es2021: true,
  },
  extends: ["eslint:recommended", "plugin:vue/vue3-essential"],
  parserOptions: {
    ecmaVersion: "latest",
    sourceType: "module",
  },
  plugins: ["vue"],
  rules: {},
};
// 数据结构 cells = [{ x, y, avaliable, // 格子是否可用:初始化游戏时,用来判断此格子能不能放图片 imgId }];图片是在 icones 下载的 svg,方便且图片体积小
使用 p5 的 library
click 时需要判断是否点到了某个格子。之前写五子棋时就有同样的需求,那时自己写了个方法实现的。这次想锻炼一下检索能力,就查了查有没有现成的包,果然找到了—— p5.collide2D
但是说明里没讲怎样引用。在项目里直接import会报错:Uncaught ReferenceError: p5 is not defined
只能去看 p5.collide2d.js 的源码了:p5.prototype._collideDebug = false; p5.prototype.collideRectRect = function (x, y, w, h, x2, y2, w2, h2) {...}; p5.prototype.collideRectRectVector = function (p1, sz, p2, sz2) {...};这样的写法是不支持模块化引用的,只能自己改一改了。
把代码下载到本地,然后在文件开头加上import p5 from "p5";
(二) 画图
- 预加载图片
new p5(function (p) { // 在 p5.preload 中加载图片 p.preload = function () { imageNames.forEach((name) => { const url = new URL(`./assets/svg/${name}.svg`, import.meta.url).href; // vite 中使用 `new URL` 获取图片地址 imageMaps[name] = p.loadImage(url); // p5.loadImage 可以直接加载 svg 格式 }); }; p.setup = function () {}; p.draw = function () {}; } - 初始化游戏
  const cells = []
  function newGame() {
    cells.length = 0;
    initCells();
    placeImges();
  }

  function initCells() {
    for (let i = 0; i < 8; i++) {
      for (let j = 0; j < 14; j++) {
        cells.push({ x: i, y: j, available: true , imgId: undefined });
      }
    }
  }

  function placeImges() {
    const cellsToPlace = cells.filter((cell) => cell.available); // avaliable 为 false 的格子,不放图片
    while (cellsToPlace.length > 0) {
      const [cell1] = cellsToPlace.splice(0, 1);
      const randomIndex = p5.prototype.random(0, cellsToPlace.length);
      const [cell2] = cellsToPlace.splice(randomIndex, 1);
      const image = p5.prototype.random(imageNames);
      cell1.imgId = image;
      cell2.imgId = image;
    }
  }
(三)关键算法:判断相连
判断两个格子是否能相连。如果能相连,还要返回相连路径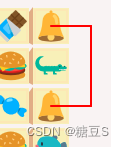
3.1 傻瓜算法
先写了个傻瓜算法,粗暴的遍历查找
- y 从 min 到 max( cell3和 cell4 沿 y 轴向下移),判断 cell1 -> cell3 -> cell4 -> cell2 通不通
- x 从 min 到 max( cell3和 cell4 沿 x 轴向右移),判断 cell1 -> cell3 -> cell4 -> cell2通不通
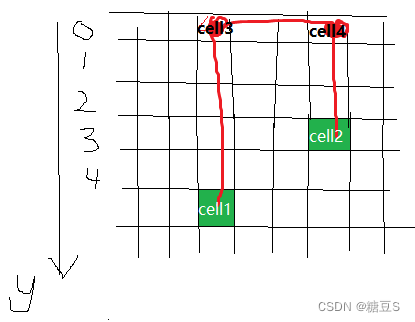
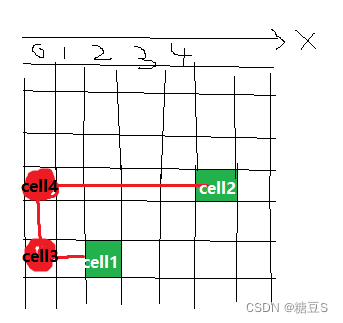
这样就简化为判断三条直线通不通
但有很多不必要的计算,找的也不是最短路径
3.2 优化算法
小伙伴提供了一个有趣的思路,步骤如下:
- check if 不拐弯
- check if 拐一个弯
- check if 转两个弯,从圈上走
- check if 转两个弯,从圈外走,找最短的
具体解释如下:
passableCells
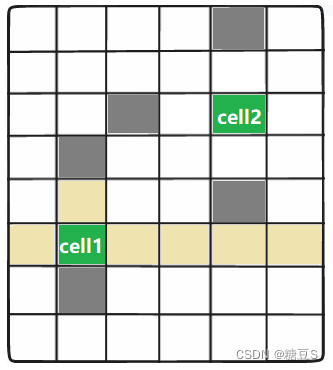
passableCells:cell 沿着上下左右四个方向延伸,直到遇到障碍物为止
如下图:cell1 的 passableCells 是黄色格子,cell2 的 passableCells 是蓝色格子;

更近一步,passableCells 还可以分为圈上的和圈外的。
如下图:圈 指的是 cell1 和 cell2 围成的矩形,有三角标记的格子就是“圈上的”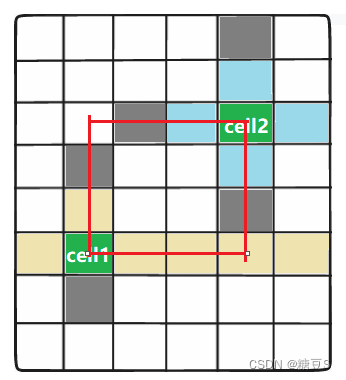
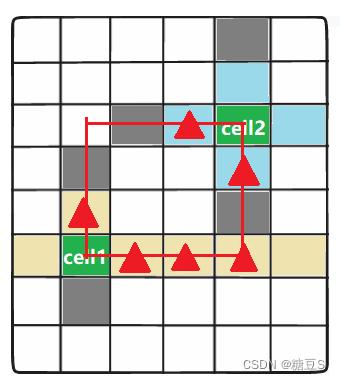
对于圈外的 passableCells,要知道它的 方向 和 到圈的距离:
如下图,三角标记的格子到 圈 的距离都是1
step1: check if 不拐弯
    // check if 不拐弯
    const isDirectConnecting = checkIsDirectConnectable(cell1, cell2);
    if (isDirectConnecting) {
      return [cell1, cell2];	// 联通路径
    }
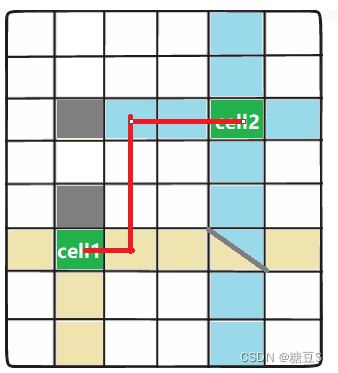
step2:check if 拐一个弯
等价于判断 passableCells_cell1_innerRect(cell1的延伸格子,内圈上的) 和 passableCells_cell2_innerRect 是否有交集
如下图:无交集,说明不可能只拐一个弯就连上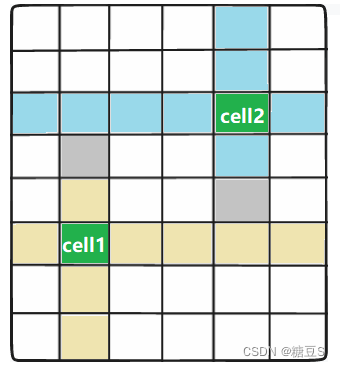
有交集(星星格子),说明能连上。联通路径是 celll1->交集点->cell2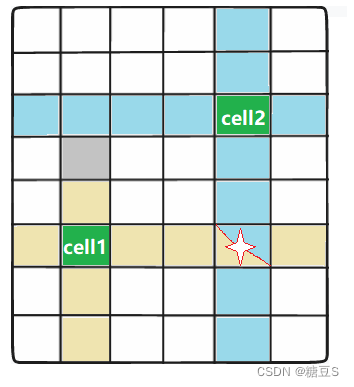
    // check if 拐一个弯
    const [intersectionCell] = getIntersection(
      passableCells_cell1_innerRect ,
      passableCells_cell2_innerRect
    );
    if (intersectionCell) {
      return [cell1, intersectionCell, cell2];	// 联通路径
    }
step3:check if 转两个弯 在圈上走
等价于判断:passableCells_cell1_innerRect 中的格子 和 passableCells_cell2_innerRect 的格子,是否有能直接连接的
如下图:找到能直接连接的了: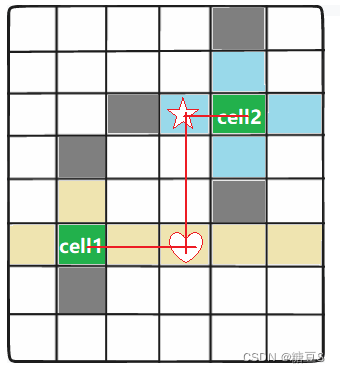
没有能直接连接的: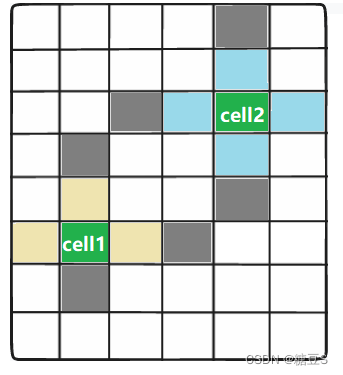
    // check if 转两个弯 从圈上走
    for (let i = 0; i <= passableCells_cell1_innerRect.length - 1; i++) {
      const cell3 = passableCells_cell1_innerRect[i];
      for (let j = 0; j <= passableCells_cell2_innerRect.length - 1; j++) {
        const cell4 = passableCells_cell2_innerRect[j];
        if (checkIsDirectConnectable(cell3, cell4)) {
          return [cell1, cell3, cell4, cell2];	// 联通路径
        }
      }
    }
step4:check if check if 转两个弯 从圈 外走,找最短路径
等价于判断:passableCells_cell1_outerRect中的格子 和 passableCells_cell2_outerRect 的格子,是否有能直接连接的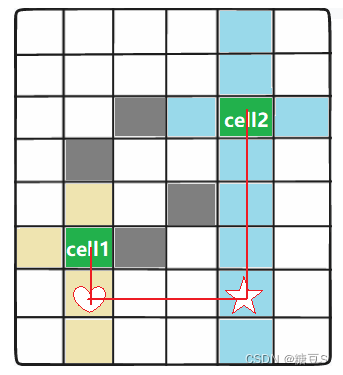
    // check if check if 转两个弯 从圈外走,找最短路径
    // 找最短路径
    let distance = 1;
    let leftCount = passableCells_cell1_outerRect.length;
    while (leftCount > 0) {
      const cell5s = passableCells_cell1_outerRect.filter(
        (o) => o.toInnerRectDistance === distance
      );
      for (let i = 0; i <= cell5s.length - 1; i++) {
        const cell5 = cell5s[i];
        const cell6s = passableCells_cell2_outerRect.filter((o) => o.dir === cell5.dir); // 能连上的肯定是“方向”相同的
        for (let j = 0; j <= cell6s.length - 1; j++) {
          const cell6 = cell6s[j];
          if (checkIsDirectConnectable(cell5, cell6)) {
            return [cell1, cell5, cell6, cell2];
          }
        }
        leftCount--;
      }
      distance++;
    }
再看一遍路径长度
step1 不拐弯 肯定是最近的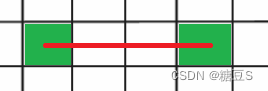
step2 拐一个弯 和 step3 转两个弯,在圈上走 ,路径长度是一样的,都是 x坐标差 + y坐标差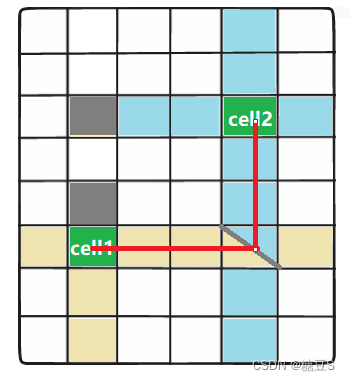
step4 转两个弯 从圈外走,路径长度是 x坐标差 + y坐标差 + 2 * toInnerRectDistance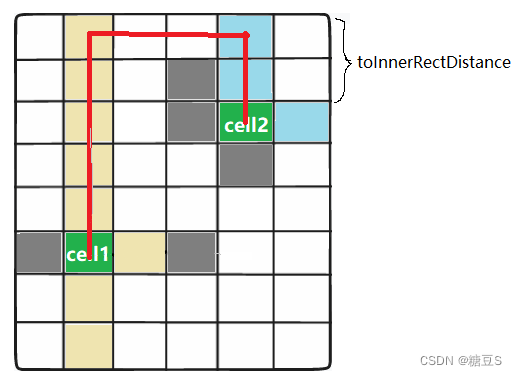
(四)完善功能
图片自动引入
  const imageNames = [];

  const svgs = import.meta.glob("../assets/svg/*.svg");
  for (const path in svgs) {
    const matchRes = path.match(/\/svg\/(\w+)\.svg/);
    const imageName = matchRes[1];
    imageNames.push(imageName);
  }
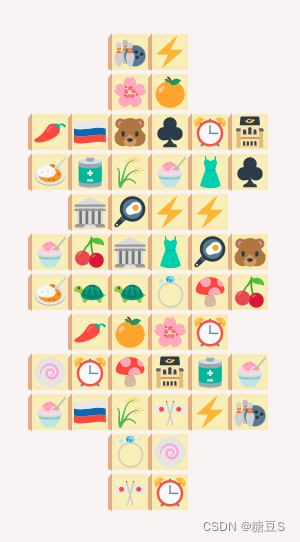
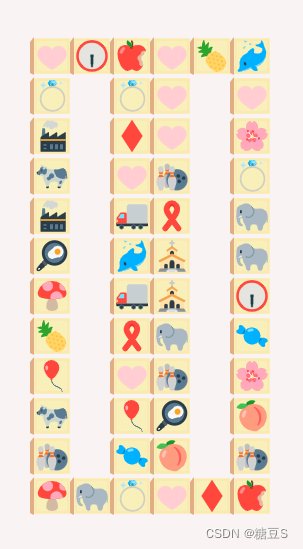
提供多种初始牌型
// 修改 initCells 方法
function initCells() {
   const strategy = randomPick([
      function(i,j){ ...},
      function(i,j){ ...},
    ]);
    for (let i = 0; i < 8; i++) {
      for (let j = 0; j < 14; j++) {
        cells.push({
          x: i,
          y: j,
          // avaliable: true,
          available: strategy(i, j),
          imgId: undefined,
        });
      }
    }
  }

消除时显示路径
点击 cell1 和 cell2 后,若能相连,则消除:
添加显示相连的路径:

上图中,路径出现时,两端的图片已经消失了,感觉怪怪的。
所以要让图片多显示一会儿:(要保证图片还显示,但不能“堵路”。不然会影响游玩手感)
  p.touchEnded = function () {
    ...
    if (connectingLine) {
      // 消除的时候,添加 tempDisplayConnectingLines 和 tempDisplayEliminatedCells
      addTempDisplayItem({ type: "connectingLine", value: connectingLine, time: 800 });
      addTempDisplayItem({
        type: "eliminatedCells",
        value: [cloneDeep(activeCell), cloneDeep(targetCell)],
        time: 800,
      });
      activeCell.active = false;
      // imgId 必须立刻清空,不能“堵路”
      activeCell.imgId = undefined;
      targetCell.imgId = undefined;
    }
  };
  const tempDisplay = ref([]);
  const tempDisplayConnectingLines = computed();
  const tempDisplayEliminatedCells = computed();

  function addTempDisplayItem(obj) {
    const id = uniqueId();
    tempDisplay.value.push({ id, type: obj.type, value: obj.value});
    // 添加进来的item,一段时间后会被清理掉
    setTimeout(() => {
      removeTempDisplayItem(id);
    }, obj.time);
  }
  function removeTempDisplayItem(id) {}
其他
新游戏、判断是否需要洗牌、洗牌、提示等,这些功能都没什么好说的
为了支持移动端,点击事件用 p5.touchEnded 替代 p5.click
部署
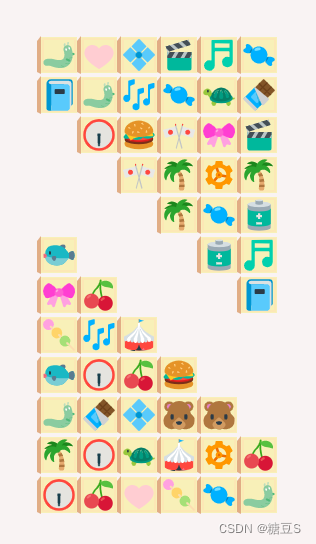
写完基本功能后截了个动图,爸妈看后说想玩一玩,所以我就发布在 github pages 上了。
(途中发现一个事情,vite build后的页面不能直接打开。因为打包后的代码还是模块化的,不能在 file:// 中打开)
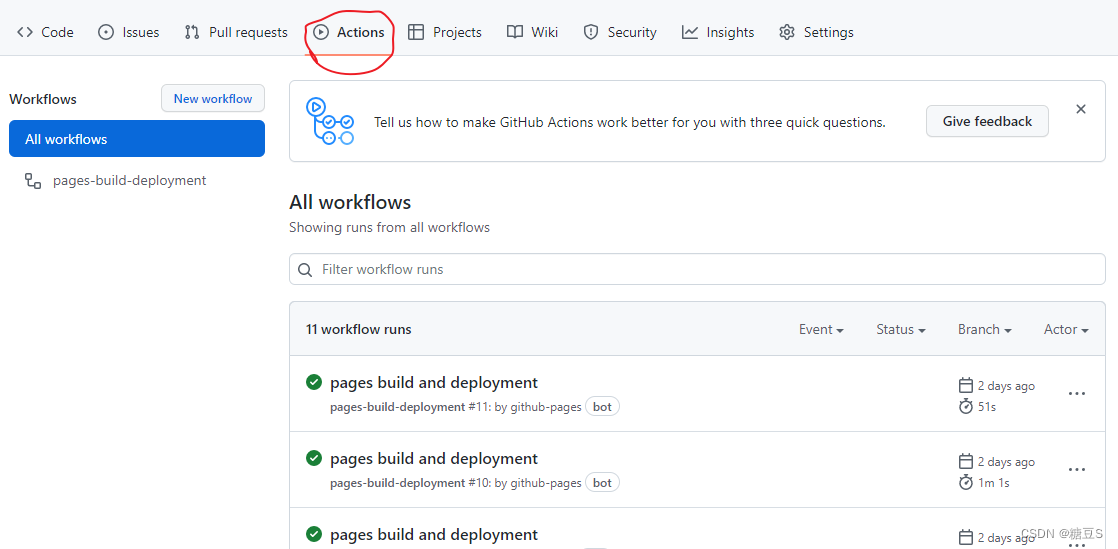
github pages 可以设置 docs 为发布的目标文件夹
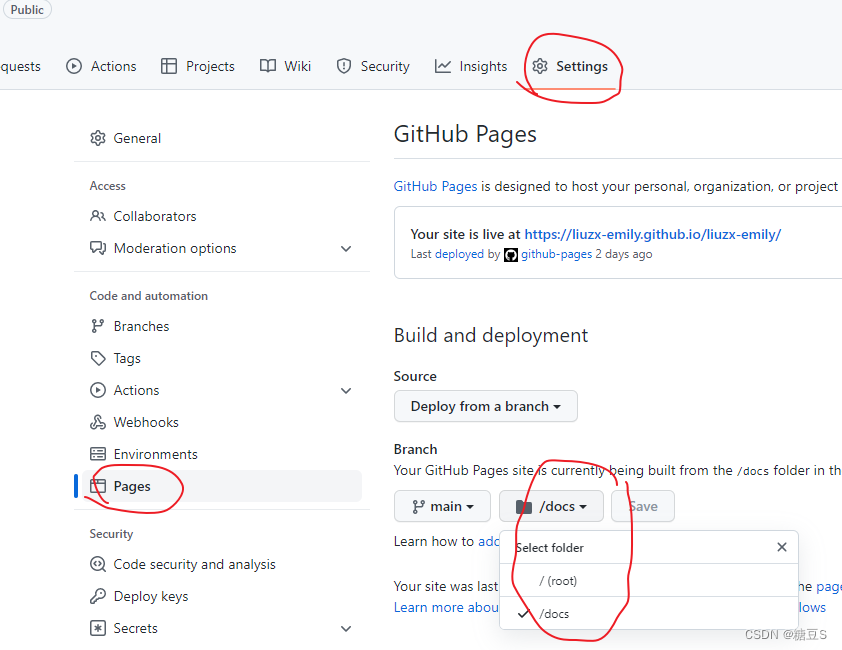
修改打包设置
export default defineConfig({
  // ...
  build: {
      outDir: "docs",
});
每次修改完代码之后,重新打包,然后再 commit push(新的打包 docs 文件夹一定要 push 上去)
github 就会自动 build 和 deploy 了,需要一定时间,进度可以看 repo 的 actions 页签: