概述
先看一下模型的最后效果

目前计算机视觉的发展如火如荼,让老照片动起来让大家惊艳于计算机视觉的发展。该如何实现该功能呢?本文将一步一步的帮您实现。在阅读本文之前建议有一些基本知识。
1、泰勒公式与雅各比行列式
2、图像上下采样
3、反向光流
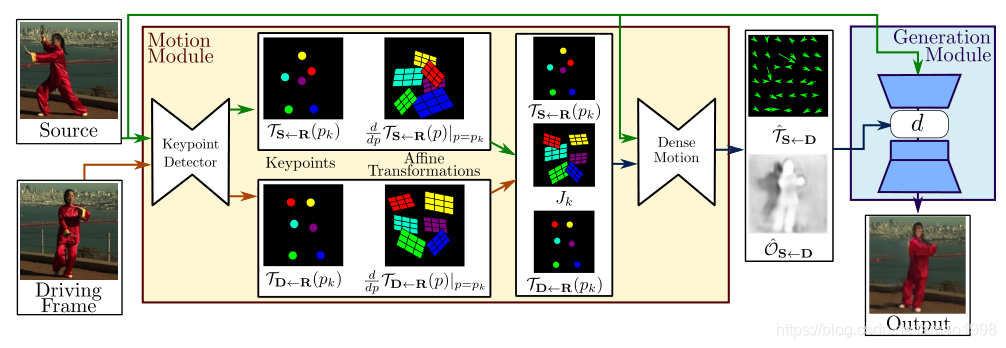
本文将分为几部分来完成。本章主要讲解关键点抽取模型,该模型主要为了定位关键点,将物体整体动画分解为背景(不变的)+关键点变化
模型结构
本文是关于first order motion model的pytorch具体实现
引入相关pytorch类库
from torch import nn
import torch
import torch.nn.functional as F
from imageio import imread
import numpy as np
from torchvision import models
1、模型配置
dataset_params:
  root_dir: data/vox-png
  frame_shape: [256, 256, 3]
  id_sampling: True
  pairs_list: data/vox256.csv
  augmentation_params:
    flip_param:
      horizontal_flip: True
      time_flip: True
    jitter_param:
      brightness: 0.1
      contrast: 0.1
      saturation: 0.1
      hue: 0.1


model_params:
  common_params:
    num_kp: 10
    num_channels: 3
    estimate_jacobian: True
  kp_detector_params:
     temperature: 0.1
     block_expansion: 32
     max_features: 1024
     scale_factor: 0.25
     num_blocks: 5
  generator_params:
    block_expansion: 64
    max_features: 512
    num_down_blocks: 2
    num_bottleneck_blocks: 6
    estimate_occlusion_map: True
    dense_motion_params:
      block_expansion: 64
      max_features: 1024
      num_blocks: 5
      scale_factor: 0.25
  discriminator_params:
    scales: [1]
    block_expansion: 32
    max_features: 512
    num_blocks: 4
    sn: True

train_params:
  num_epochs: 100
  num_repeats: 75
  epoch_milestones: [60, 90]
  lr_generator: 2.0e-4
  lr_discriminator: 2.0e-4
  lr_kp_detector: 2.0e-4
  batch_size: 40
  scales: [1, 0.5, 0.25, 0.125]
  checkpoint_freq: 50
  transform_params:
    sigma_affine: 0.05
    sigma_tps: 0.005
    points_tps: 5
  loss_weights:
    generator_gan: 0
    discriminator_gan: 1
    feature_matching: [10, 10, 10, 10]
    perceptual: [10, 10, 10, 10, 10]
    equivariance_value: 10
    equivariance_jacobian: 10

reconstruction_params:
  num_videos: 1000
  format: '.mp4'

animate_params:
  num_pairs: 50
  format: '.mp4'
  normalization_params:
    adapt_movement_scale: False
    use_relative_movement: True
    use_relative_jacobian: True

visualizer_params:
  kp_size: 5
  draw_border: True
  colormap: 'gist_rainbow'
可以将上面的代码存储成yaml文件然后用如下代码进行读取
import yaml
with open("conf/vox-256.yaml") as f:
    config = yaml.load(f,yaml.FullLoader)
2、关键点抽取模型-keypoint detector
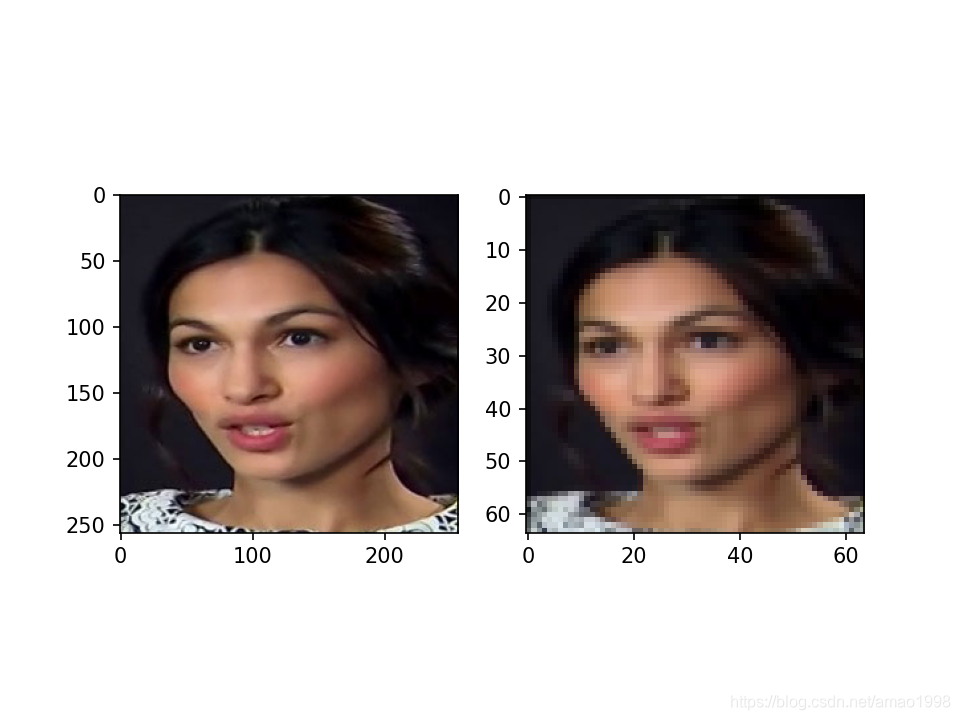
2.1 图片预处理-图片缩放
AntiAlias Interpolation 抗锯齿插值算法
在原文中默认的图像大小是 ** 256*256 ** 但考虑到运算速度在真正进行模型调试时,会采用64*64的图片进行训练,此时会使用该模型为图片进行缩放
2.1.1 AntiAliasInterpolation2d源码
class AntiAliasInterpolation2d(nn.Module):
    """
    Band-limited downsampling, for better preservation of the input signal.
    """
    def __init__(self, channels, scale):
        super(AntiAliasInterpolation2d, self).__init__()
        #
        sigma = (1 / scale - 1) / 2
        kernel_size = 2 * round(sigma * 4) + 1
        self.ka = kernel_size // 2
        self.kb = self.ka - 1 if kernel_size % 2 == 0 else self.ka

        kernel_size = [kernel_size, kernel_size]
        sigma = [sigma, sigma]
        kernel = 1
        meshgrids = torch.meshgrid(
            [
                torch.arange(size, dtype=torch.float32)
                for size in kernel_size
                ]
        )
        for size, std, mgrid in zip(kernel_size, sigma, meshgrids):
            mean = (size - 1) / 2
            kernel *= torch.exp(-(mgrid - mean) ** 2 / (2 * std ** 2))

        # Make sure sum of values in gaussian kernel equals 1.
        kernel = kernel / torch.sum(kernel)
        # Reshape to depthwise convolutional weight
        kernel = kernel.view(1, 1, *kernel.size())
        kernel = kernel.repeat(channels, *[1] * (kernel.dim() - 1))

        self.register_buffer('weight', kernel)
        self.groups = channels
        self.scale = scale
        inv_scale = 1 / scale
        self.int_inv_scale = int(inv_scale)

    def forward(self, input):
        if self.scale == 1.0:
            return input

        out = F.pad(input, (self.ka, self.kb, self.ka, self.kb))
        out = F.conv2d(out, weight=self.weight, groups=self.groups)
        out = out[:, :, ::self.int_inv_scale, ::self.int_inv_scale]

        return out
2.1.2 AntiAliasInterpolation2d测试代码
import matplotlib.pyplot as plt
%matplotlib notebook
predictor=AntiAliasInterpolation2d(3,0.25)
imgdata=imagedata=imread('test.jpg')/255
imagedata=torch.unsqueeze(torch.tensor(imagedata,dtype=torch.float32),0)
imagedata=imagedata.permute([0,3,1,2])
x=outdata=predictor(imagedata)
figure,ax=plt.subplots(1,2)
ax[0].imshow(imgdata)
ax[1].imshow(outdata.permute([0,2,3,1])[0])
输出效果如下
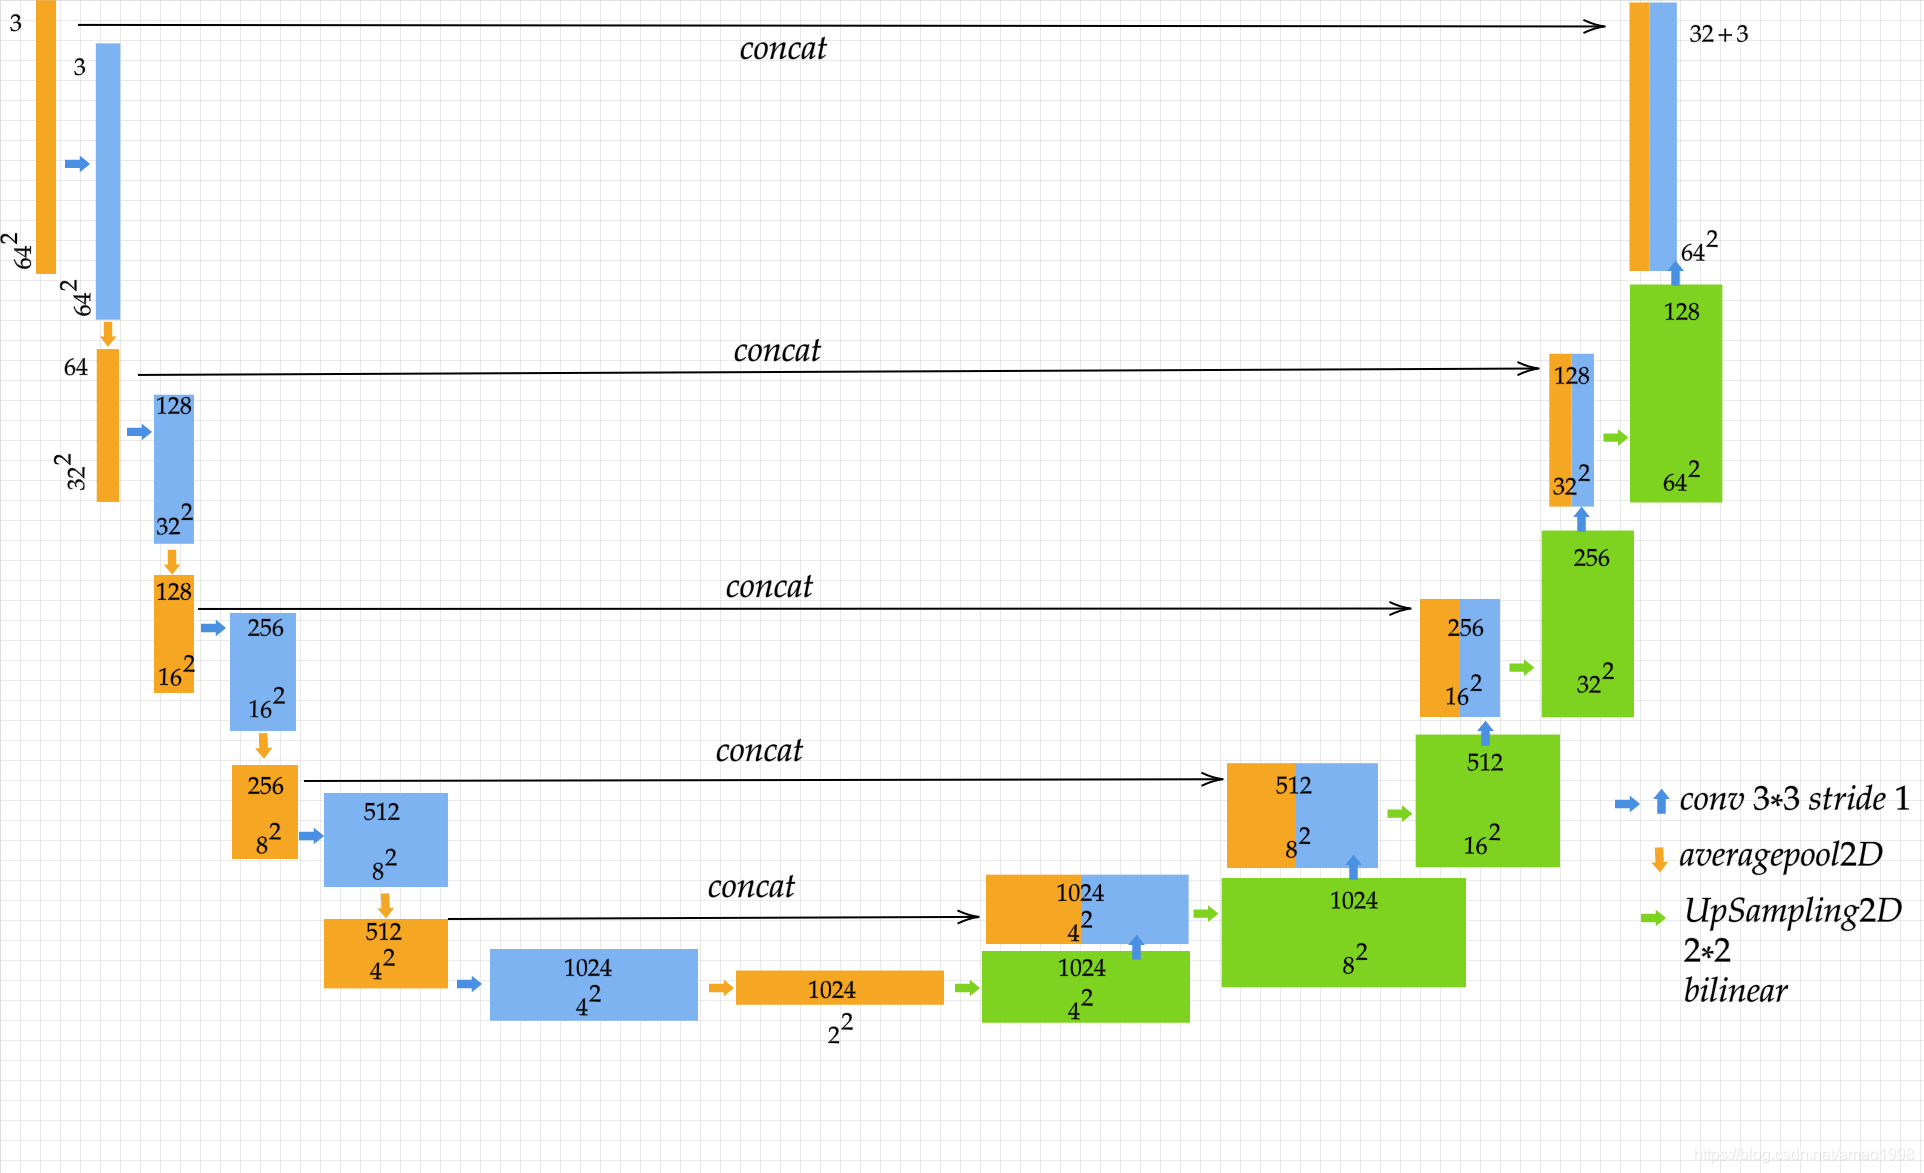
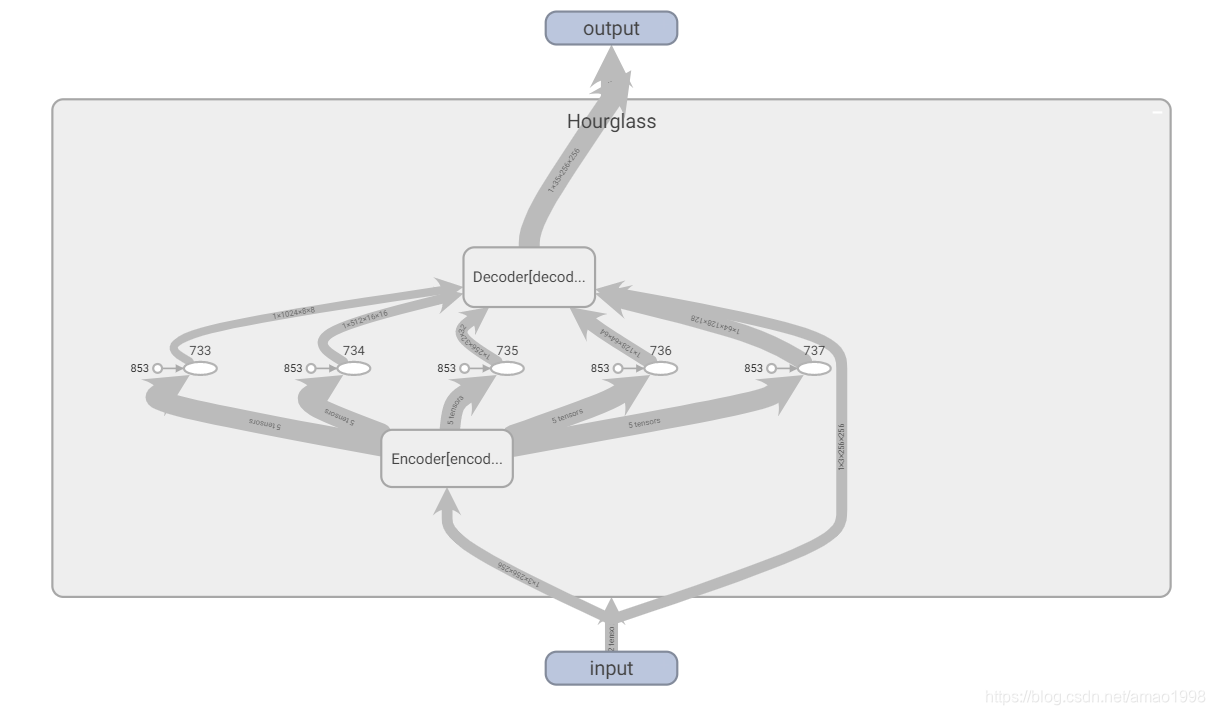
2.2 关键点特征图提取 Hourglass(沙漏)模型
- 该模型主要用来对原图与驱动图中的关键点进行抽取,模型结构如下图所示
- 注意该模型虽然称之为Hourglass模型但与相关论文中的沙漏模型是不同的他的结构更像是Unet模型的变体
- 该模型用于检测模型的原始关键点信息
2.2.1 模型相关代码
class UpBlock2d(nn.Module):
    """
    Upsampling block for use in decoder.
    """

    def __init__(self, in_features, out_features, kernel_size=3, padding=1, groups=1):
        super(UpBlock2d, self).__init__()
        self.conv = nn.Conv2d(in_channels=in_features, out_channels=out_features, kernel_size=kernel_size,
                              padding=padding, groups=groups)
#         self.norm = BatchNorm2d(out_features, affine=True)
        self.norm=torch.nn.BatchNorm2d(out_features, affine=True)

    def forward(self, x):
        out = F.interpolate(x, scale_factor=2)
        out = self.conv(out)
        out = self.norm(out)
        out = F.relu(out)
        return out

class DownBlock2d(nn.Module):
    """
    Downsampling block for use in encoder.
    """
    def __init__(self, in_features, out_features, kernel_size=3, padding=1, groups=1):
        super(DownBlock2d, self).__init__()
        self.conv = nn.Conv2d(in_channels=in_features, out_channels=out_features, kernel_size=kernel_size,
                              padding=padding, groups=groups)
#         self.norm = BatchNorm2d(out_features, affine=True)
        self.norm=torch.nn.BatchNorm2d(out_features, affine=True)
        self.pool = nn.AvgPool2d(kernel_size=(2, 2))

    def forward(self, x):
        out = self.conv(x)
        out = self.norm(out)
        out = F.relu(out)
        out = self.pool(out)
        return out
class Encoder(nn.Module):
    """
    Hourglass Encoder
    """

    def __init__(self, block_expansion, in_features, num_blocks=3, max_features=256):
        super(Encoder, self).__init__()

        down_blocks = []
        for i in range(num_blocks):
            down_blocks.append(DownBlock2d(in_features if i == 0 else min(max_features, block_expansion * (2 ** i)),
                                           min(max_features, block_expansion * (2 ** (i + 1))),
                                           kernel_size=3, padding=1))
        self.down_blocks = nn.ModuleList(down_blocks)

    def forward(self, x):
        outs = [x]
        for down_block in self.down_blocks:
            outs.append(down_block(outs[-1]))
        return outs


class Decoder(nn.Module):
    """
    Hourglass Decoder
    """

    def __init__(self, block_expansion, in_features, num_blocks=3, max_features=256):
        super(Decoder, self).__init__()

        up_blocks = []

        for i in range(num_blocks)[::-1]:
            in_filters = (1 if i == num_blocks - 1 else 2) * min(max_features, block_expansion * (2 ** (i + 1)))
            out_filters = min(max_features, block_expansion * (2 ** i))
            up_blocks.append(UpBlock2d(in_filters, out_filters, kernel_size=3, padding=1))

        self.up_blocks = nn.ModuleList(up_blocks)
        self.out_filters = block_expansion + in_features

    def forward(self, x):
        out = x.pop()
        for up_block in self.up_blocks:
            out = up_block(out)
            skip = x.pop()
            out = torch.cat([out, skip], dim=1)
        return out

class Hourglass(nn.Module):
    """
    Hourglass architecture.
    """

    def __init__(self, block_expansion, in_features, num_blocks=3, max_features=256):
        super(Hourglass, self).__init__()
        self.encoder = Encoder(block_expansion, in_features, num_blocks, max_features)
        self.decoder = Decoder(block_expansion, in_features, num_blocks, max_features)
        self.out_filters = self.decoder.out_filters

    def forward(self, x):
        return self.decoder(self.encoder(x))
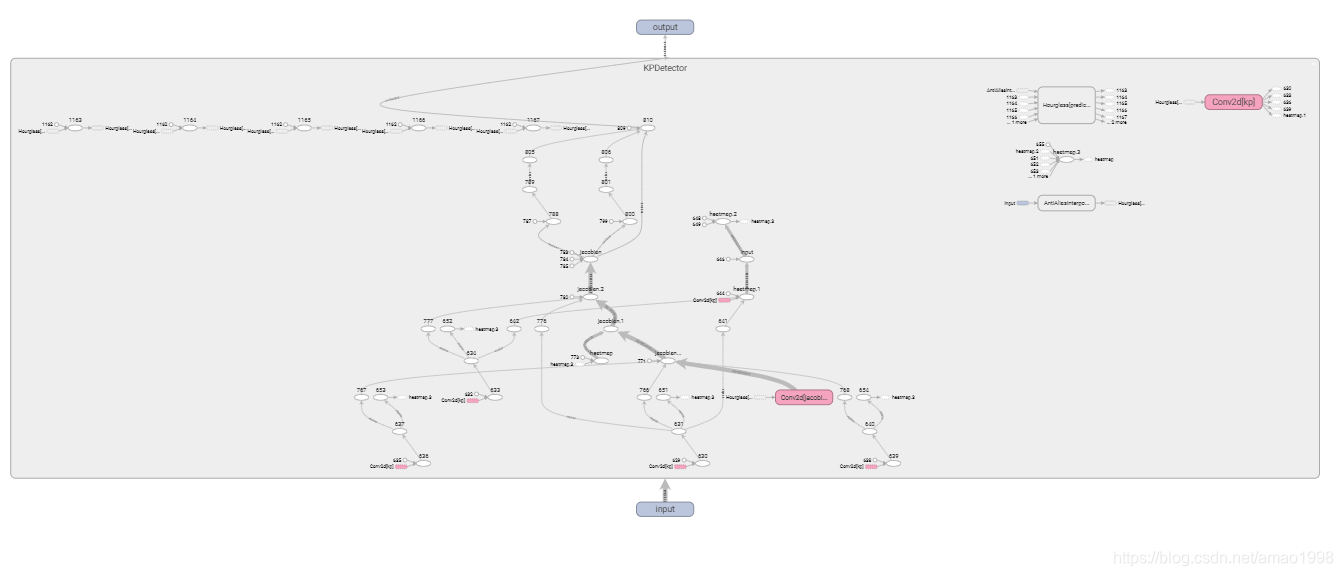
2.2.2 使用tensorboard可视化模型
在交互式模型下可以将hourglass模型再展开,看到具体的模型结构以确定模型与设计是否相同
注意
原论文中使用的batchnormal2d不是pytorch框架自带的。因为再分布式计算的情况下,每一个设备的batchnormal操作并不是针对所有数据,而是运行在
本设备上的数据所以采用了第三方的代码 Synchronized-BatchNorm-PyTorch,其代码链接如下 https://github.com/vacancy/Synchronized-BatchNorm-PyTorch
2.3 抽取10个关键点数据
- hourglass 是获取图像关键点特征图的关键模型,通过该模型可以有效抽取所有关键点的特征图,此时我们假定我们需要10个最主要的关键点
- 可以通过一个卷积层抽取10个关键点,同时对其进行softmax操作对其权重进行排序
2.3.1 关键代码与测试代码
kp = nn.Conv2d(in_channels=predictor.out_filters, out_channels=10, kernel_size=(7, 7),padding=0)
feature_map = predictor(x)
prediction = kp(feature_map)
final_shape = prediction.shape
heatmap = prediction.view(final_shape[0], final_shape[1], -1)
heatmap = F.softmax(heatmap / 0.1, dim=2)
heatmap = heatmap.view(*final_shape)
2.3.2 创建本地归一化坐标系(R)获取高斯置信图
- 该函数根据指定的高与宽创建一个网格(mesh grid)
- 该网格在-1 与 1 之间均与分布
- 首先使用linspace生成网格坐标点
- 将坐标点转化到-1到+1的均匀分布
- 填充网格点生成坐标
创建归一化坐标系
def make_coordinate_grid(spatial_size, type):
    """
    Create a meshgrid [-1,1] x [-1,1] of given spatial_size.
    """
    h, w = spatial_size
    x = torch.arange(w).type(type)
    y = torch.arange(h).type(type)

    x = (2 * (x / (w - 1)) - 1)
    y = (2 * (y / (h - 1)) - 1)

    yy = y.view(-1, 1).repeat(1, w)
    xx = x.view(1, -1).repeat(h, 1)

    meshed = torch.cat([xx.unsqueeze_(2), yy.unsqueeze_(2)], 2)

    return meshed
def gaussian2kp(heatmap):
        """
        Extract the mean and from a heatmap
        """
        shape = heatmap.shape
        heatmap = heatmap.unsqueeze(-1)
        grid = make_coordinate_grid(shape[2:], heatmap.type()).unsqueeze_(0).unsqueeze_(0)
        value = (heatmap * grid).sum(dim=(2, 3))
        kp = {'value': value}

        return kp
out = gaussian2kp(heatmap)
输出效果如下
{'value': tensor([[[-0.4011, -0.4888],
         [-0.5129,  0.3301],
         [ 0.0890, -0.1418],
         [-0.0375,  0.1512],
         [-0.0831, -0.0603],
         [-0.4330,  0.4204],
         [ 0.0383,  0.0883],
         [-0.2365,  0.4034],
         [-0.1921,  0.3863],
         [-0.4409, -0.3465]]], grad_fn=<SumBackward1>)}
- 相关原理说明
- 该函数是用来进行关键点定位,通过10个conv对hourglass输出(featuremap)进行变化,生成了10个关键点的未知信息,每个关键点的为58*58
- 对58*58进行进行argmax操作即可获得该关键点的坐标但由于argmax不可导所以引入soft-argmax概念并通过在宽高方向上的softmax操作来进行
请参考如下代码,帮助理解
- 伪造一个特征点
- 在宽高方向上进行softmax操作
- 可视化该图形
# 伪造特征点
kp_test_data=torch.ones([2,2])
kp_test_data=nn.functional.pad(kp_test_data,[46,10,20,36])
figure=plt.figure(figsize=(4,4))
plt.imshow(kp_test_data,cmap='gray')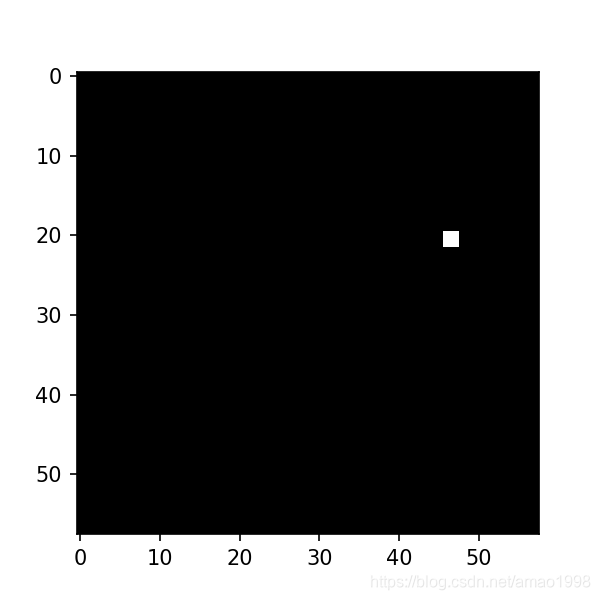
# 观察置信图分布
x=y=np.arange(0,58)
X,Y=np.meshgrid(x,y)
figure=plt.figure(figsize=(5,4))
ax3d=figure.add_subplot(projection='3d')
ax3d.plot_surface(X, Y, kp_test_data.numpy(), rstride=1, cstride=1, cmap=plt.get_cmap('rainbow'))
ax3d.set_xlabel('x')
ax3d.set_ylabel('y')
ax3d.set_zlabel('z')
plt.show()
- 进行softmax之后的输出
- 注意如果想在一个平面上进行softmax则整个维度必须大于3否在便只能在行或者列上进行softmax
- 所以将图像数据转化到pytorch标准的4维格式[batch,chanel,heigth,width]
- 注意将原始数据放大10倍对结果观察十分重要
#修正维度
rowdata=kp_test_data.view(-1).unsqueeze(0).unsqueeze(0)
softmax_rawdata=F.softmax(rowdata / 0.1, dim=2).view(1,1,58,58)
x=y=np.arange(0,58)
X,Y=np.meshgrid(x,y)
figure=plt.figure(figsize=(5,4))
ax3d=figure.add_subplot(projection='3d')
ax3d.plot_surface(X, Y, softmax_rawdata.view([58,58]).numpy(), rstride=1, cstride=1, cmap=plt.get_cmap('rainbow'))
ax3d.set_xlabel('x')
ax3d.set_ylabel('y')
ax3d.set_zlabel('z')
plt.show()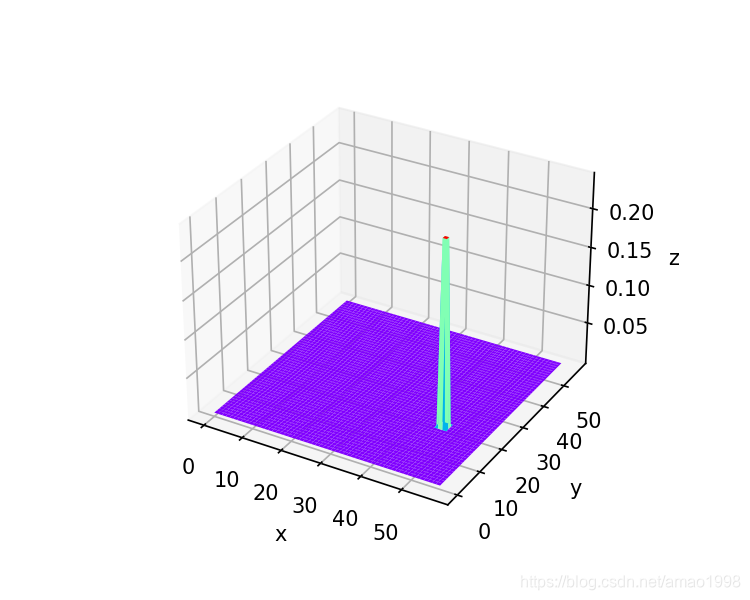
- 观察应用网格之后的效果
- 可以看到关键点坐标系从-1 到 1 两个值大致说明了关键点的坐标,具体看下面代码
grid = make_coordinate_grid([58,58], torch.float32)
heatmap1=softmax_rawdata.view([58,58,1])
landmark=(heatmap1 * grid).view([2,58,58])
value = landmark.sum(dim=(1, 2))
print(value)
此时输出
tensor([0.3286, 0.0094])可以看到x坐标明显靠右,y坐标靠近中间,他们的相对位置与原图基本一致
2.3 获得变换矩阵雅各比矩阵(行列式)
- 对R映射到X的变换在??pk点进行泰勒公式的一阶展开,结果如下
则
为雅各比行列式,详细描述为 函数在 ??pk 点的导数
在二维空间中雅各比行列式则由4个参数构成
- 所以为获取雅各比矩阵我们对原始的关键点特征图应用4*40个卷积层,而卷积层的初始化采用恒等变换的方式
- 这种初始化方式是将权重置为0 将偏置置为单位阵。这样原始的雅各比矩阵就是单位阵,使用单位阵变换原始特征图则不发生任何变化
- 相关源码如下
init:
self.jacobian = nn.Conv2d(in_channels=self.predictor.out_filters,out_channels=4 * 10, kernel_size=(7, 7), padding=0)
self.jacobian.weight.data.zero_()
self.jacobian.bias.data.copy_(torch.tensor([1, 0, 0, 1] * self.num_jacobian_maps, dtype=torch.float))forward:
if self.jacobian is not None:
jacobian_map = self.jacobian(feature_map)
jacobian_map = jacobian_map.reshape(final_shape[0], self.num_jacobian_maps, 4, final_shape[2],
final_shape[3])
heatmap = heatmap.unsqueeze(2)
# 根据关键点heatmap的权重来设置雅各比行列式的重要性
jacobian = heatmap * jacobian_map
jacobian = jacobian.view(final_shape[0], final_shape[1], 4, -1)
jacobian = jacobian.sum(dim=-1)
jacobian = jacobian.view(jacobian.shape[0], jacobian.shape[1], 2, 2)
out['jacobian'] = jacobian
2.4 模型完整代码KPDetector
class KPDetector(nn.Module):
    """
    Detecting a keypoints. Return keypoint position and jacobian near each keypoint.
    """

    def __init__(self, block_expansion, num_kp, num_channels, max_features,
                 num_blocks, temperature, estimate_jacobian=False, scale_factor=1,
                 single_jacobian_map=False, pad=0):
        super(KPDetector, self).__init__()

        self.predictor = Hourglass(block_expansion, in_features=num_channels,
                                   max_features=max_features, num_blocks=num_blocks)

        self.kp = nn.Conv2d(in_channels=self.predictor.out_filters, out_channels=num_kp, kernel_size=(7, 7),
                            padding=pad)

        if estimate_jacobian:
            self.num_jacobian_maps = 1 if single_jacobian_map else num_kp
            self.jacobian = nn.Conv2d(in_channels=self.predictor.out_filters,
                                      out_channels=4 * self.num_jacobian_maps, kernel_size=(7, 7), padding=pad)
            self.jacobian.weight.data.zero_()
            self.jacobian.bias.data.copy_(torch.tensor([1, 0, 0, 1] * self.num_jacobian_maps, dtype=torch.float))
        else:
            self.jacobian = None

        self.temperature = temperature
        self.scale_factor = scale_factor
        if self.scale_factor != 1:
            self.down = AntiAliasInterpolation2d(num_channels, self.scale_factor)

    def gaussian2kp(self, heatmap):
        """
        Extract the mean and from a heatmap
        """
        shape = heatmap.shape
        heatmap = heatmap.unsqueeze(-1)
        grid = make_coordinate_grid(shape[2:], heatmap.type()).unsqueeze_(0).unsqueeze_(0)
        value = (heatmap * grid).sum(dim=(2, 3))
        kp = {'value': value}

        return kp

    def forward(self, x):
        if self.scale_factor != 1:
            x = self.down(x)

        feature_map = self.predictor(x)
        prediction = self.kp(feature_map)

        final_shape = prediction.shape
        heatmap = prediction.view(final_shape[0], final_shape[1], -1)
        heatmap = F.softmax(heatmap / self.temperature, dim=2)
        heatmap = heatmap.view(*final_shape)

        out = self.gaussian2kp(heatmap)

        if self.jacobian is not None:
            jacobian_map = self.jacobian(feature_map)
            jacobian_map = jacobian_map.reshape(final_shape[0], self.num_jacobian_maps, 4, final_shape[2],
                                                final_shape[3])
            heatmap = heatmap.unsqueeze(2)

            jacobian = heatmap * jacobian_map
            jacobian = jacobian.view(final_shape[0], final_shape[1], 4, -1)
            jacobian = jacobian.sum(dim=-1)
            jacobian = jacobian.view(jacobian.shape[0], jacobian.shape[1], 2, 2)
            out['jacobian'] = jacobian
        return out
#         return out['jacobian']
模型测试代码如下
imgdata=imagedata=imread('test.jpg')/255
imagedata=torch.unsqueeze(torch.tensor(imagedata,dtype=torch.float32),0)
x_data=imagedata.permute([0,3,1,2])
print(x_data.shape)
kp_detector = KPDetector(**config['model_params']['kp_detector_params'],
                             **config['model_params']['common_params'])
使用tensorboard观察模型结构