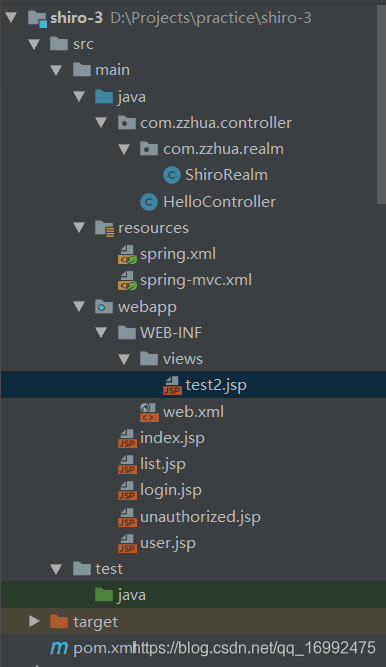
与spring集成
1.导入依赖
<?xml version="1.0" encoding="UTF-8"?>
<project xmlns="http://maven.apache.org/POM/4.0.0"
         xmlns:xsi="http://www.w3.org/2001/XMLSchema-instance"
         xsi:schemaLocation="http://maven.apache.org/POM/4.0.0 http://maven.apache.org/xsd/maven-4.0.0.xsd">
    <modelVersion>4.0.0</modelVersion>

    <groupId>com.zzhua</groupId>
    <artifactId>shiro-3</artifactId>
    <version>1.0-SNAPSHOT</version>

    <properties>
        <jsp.version>2.1</jsp.version>
        <servlet.version>3.1.0</servlet.version>
    </properties>

    <packaging>war</packaging>

    <dependencies>
        <dependency>
            <groupId>javax.servlet.jsp</groupId>
            <artifactId>jsp-api</artifactId>
            <version>${jsp.version}</version>
            <scope>provided</scope>
        </dependency>

        <!-- javax.servlet-api -->
        <dependency>
            <groupId>javax.servlet</groupId>
            <artifactId>javax.servlet-api</artifactId>
            <version>${servlet.version}</version>
            <scope>provided</scope>
        </dependency>
        <dependency>
            <groupId>org.springframework</groupId>
            <artifactId>spring-context</artifactId>
            <version>5.0.2.RELEASE</version>
        </dependency>
        <dependency>
            <groupId>org.springframework</groupId>
            <artifactId>spring-web</artifactId>
            <version>5.0.2.RELEASE</version>
        </dependency>
        <dependency>
            <groupId>org.springframework</groupId>
            <artifactId>spring-webmvc</artifactId>
            <version>5.0.2.RELEASE</version>
        </dependency>

        <dependency>
            <groupId>org.apache.shiro</groupId>
            <artifactId>shiro-spring</artifactId>
            <version>1.3.2</version>
        </dependency>

        <dependency>
            <groupId>org.apache.shiro</groupId>
            <artifactId>shiro-ehcache</artifactId>
            <version>1.3.2</version>
        </dependency>

    </dependencies>

    <build>

        <plugins>
            <!-- 配置tomcat的运行插件 -->
            <plugin>
                <groupId>org.apache.tomcat.maven</groupId>
                <artifactId>tomcat7-maven-plugin</artifactId>
                <version>2.2</version>
                <configuration>
                    <!-- 配置端口 -->
                     <port>8080</port>
                    <!-- 配置urlencoding -->
                     <uriEncoding>UTF-8</uriEncoding>
                    <!-- 配置项目的访问路径 -->
                     <path>/</path>
                </configuration>
            </plugin>

            <!-- 配置jdk的编译版本 -->
            <plugin>
                <groupId>org.apache.maven.plugins</groupId>
                <artifactId>maven-compiler-plugin</artifactId>
                <version>3.7.0</version>
                <configuration>
                    <!-- 指定source和target的版本 -->
                    <source>1.8</source>
                    <target>1.8</target>
                </configuration>
            </plugin>
        </plugins>
    </build>


</project>
2.配置文件
spring-mvc.xml
<?xml version="1.0" encoding="UTF-8"?>
<beans xmlns="http://www.springframework.org/schema/beans"
       xmlns:xsi="http://www.w3.org/2001/XMLSchema-instance" xmlns:mvc="http://www.springframework.org/schema/mvc"
       xmlns:context="http://www.springframework.org/schema/context"
       xsi:schemaLocation="http://www.springframework.org/schema/beans http://www.springframework.org/schema/beans/spring-beans.xsd http://www.springframework.org/schema/mvc http://www.springframework.org/schema/mvc/spring-mvc.xsd http://www.springframework.org/schema/context http://www.springframework.org/schema/context/spring-context.xsd">

    <context:component-scan base-package="com.zzhua.controller"/>
    <mvc:default-servlet-handler/>

    <mvc:annotation-driven/>

    <bean class="org.springframework.web.servlet.view.InternalResourceViewResolver">
        <property name="prefix" value="/WEB-INF/views/"></property>
        <property name="suffix" value=".jsp"></property>
    </bean>

</beans>
spring.xml
<?xml version="1.0" encoding="UTF-8"?>
<beans xmlns="http://www.springframework.org/schema/beans"
       xmlns:xsi="http://www.w3.org/2001/XMLSchema-instance"
       xsi:schemaLocation="http://www.springframework.org/schema/beans http://www.springframework.org/schema/beans/spring-beans.xsd">

    <!--经过测试,发现property标签配置的顺序与代码执行的顺序一致,
        这里没影响-->

    <bean id="securityManager" class="org.apache.shiro.web.mgt.DefaultWebSecurityManager">
        <property name="cacheManager" ref="cacheManager"></property>
        <property name="realm" ref="shiroRealm"></property>
    </bean>

    <bean id="shiroRealm" class="com.zzhua.controller.com.zzhua.realm.ShiroRealm"></bean>

    <bean id="cacheManager" class="org.apache.shiro.cache.ehcache.EhCacheManager"></bean>

    <bean id="lifecycleBeanPostProcessor" class="org.apache.shiro.spring.LifecycleBeanPostProcessor"></bean>

    <bean class="org.springframework.aop.framework.autoproxy.DefaultAdvisorAutoProxyCreator"
          depends-on="lifecycleBeanPostProcessor"/>

    <bean class="org.apache.shiro.spring.security.interceptor.AuthorizationAttributeSourceAdvisor">
        <property name="securityManager" ref="securityManager"/>
    </bean>

    <!--此处的名字必须和web.xml中配置的拦截器的名称一致-->
    <bean id="shiroFilter" class="org.apache.shiro.spring.web.ShiroFilterFactoryBean">

        <!--安全管理器-->
        <property name="securityManager" ref="securityManager"/>

        <!--这里要用绝对路径-->
        <property name="loginUrl" value="/login.jsp"/>
        <property name="successUrl" value="/user.jsp"/>
        <property name="unauthorizedUrl" value="/unauthorized.jsp"/>

        <!--将自定义filter过滤器加入到拦截器链中,等待使用   filter名字 == 对应filter -->
        <!--<property name="filters" ref="Map<String,Filter>"></property>-->

        <property name="filterChainDefinitions">
            <value>
                <!--
					没有在此处配置的,不拦截;
                    /**是拦截所有;
                    从上到下依次匹配,前面的匹配上了,后面的不生效,第一次匹配优先
                    anon允许不登陆也可以访问

                    路径 = 过滤器  // 这里可以使用上面加入的自定义拦截器
                -->

                /list.jsp=anon
                /** = authc

            </value>
        </property>
    </bean>


</beans>
web.xml
<?xml version="1.0" encoding="UTF-8"?>
<web-app xmlns="http://xmlns.jcp.org/xml/ns/javaee"
         xmlns:xsi="http://www.w3.org/2001/XMLSchema-instance"
         xsi:schemaLocation="http://xmlns.jcp.org/xml/ns/javaee http://xmlns.jcp.org/xml/ns/javaee/web-app_3_1.xsd"
         version="3.1">

	<!--shiroFilter初始化时,会获取到web容器中的spring容器,在spring容器中寻找同filter-name名称一样的bean,
        先从缓存中找,然后从mergedDefinition中也找不到,就抛异常了
		寻找过程:filter能够拿到ServletContext,而spring容器保存在ServletContext中,
        所以filter去尝试拿本filter-name对应的bean或者targetBeanName设置的名字,
		而这里的filter配置的是一个代理filter,而且这个代理filter能够拿到spring容器中的bean
		DelegatingFilterProxy拦截到请求后,根据在ioc容器中找到的对应名字的ShiroFilter 的bean,
        从这个bean中获取定义的拦截器链,把请求交给对应的拦截器处理。
     -->
    <filter>
        <filter-name>shiroFilter</filter-name>
        <filter-class>org.springframework.web.filter.DelegatingFilterProxy</filter-class>
    </filter>
    <filter-mapping>
        <filter-name>shiroFilter</filter-name>
        <url-pattern>/*</url-pattern>
    </filter-mapping>

    <listener>
       <listener-class>org.springframework.web.context.ContextLoaderListener</listener-class>
    </listener>
    <context-param>
        <param-name>contextConfigLocation</param-name>
        <param-value>classpath:spring.xml</param-value>
    </context-param>

    <servlet>
        <servlet-name>springmvc</servlet-name>
        <servlet-class>org.springframework.web.servlet.DispatcherServlet</servlet-class>
        <init-param>
            <param-name>contextConfigLocation</param-name>
            <param-value>classpath:spring-mvc.xml</param-value>
        </init-param>
        <load-on-startup>1</load-on-startup>
    </servlet>
    <servlet-mapping>
        <servlet-name>springmvc</servlet-name>
        <url-pattern>/</url-pattern>
    </servlet-mapping>


</web-app>
3.shiroRealm
public class ShiroRealm implements Realm {

    @Override
    public String getName() {
        return "my-shiro";
    }

    @Override
    public boolean supports(AuthenticationToken token) {
        return false;
    }

    @Override
    public AuthenticationInfo getAuthenticationInfo(AuthenticationToken token) throws AuthenticationException {
        return null; // 返回认证信息,交给shiro去验证密码
    }
}

@Controller
@RequestMapping("/hello")
public class HelloController {

    @RequestMapping("test1")
    @ResponseBody
    public String test1(){
        return "ok";
    }

    @RequestMapping("test2")
    public String test2(){
        return "test2";
    }

}
[外链图片转存失败,源站可能有防盗链机制,建议将图片保存下来直接上传(img-xSa4vgA3-1594621183298)(assets/image-20200617164457783.png)]
注意要使用LinkedHashMap
[外链图片转存失败,源站可能有防盗链机制,建议将图片保存下来直接上传(img-XzqOOZsc-1594621183299)(assets/image-20200617164548391.png)]
4.quickstart
package com.atguigu.shiro.helloworld;

import org.apache.shiro.SecurityUtils;
import org.apache.shiro.authc.*;
import org.apache.shiro.config.IniSecurityManagerFactory;
import org.apache.shiro.mgt.SecurityManager;
import org.apache.shiro.session.Session;
import org.apache.shiro.subject.Subject;
import org.apache.shiro.util.Factory;
import org.slf4j.Logger;
import org.slf4j.LoggerFactory;


/**
 * Simple Quickstart application showing how to use Shiro's API.
 *
 * @since 0.9 RC2
 */
public class Quickstart {

    private static final transient Logger log = LoggerFactory.getLogger(Quickstart.class);


    public static void main(String[] args) {

        // The easiest way to create a Shiro SecurityManager with configured
        // realms, users, roles and permissions is to use the simple INI config.
        // We'll do that by using a factory that can ingest a .ini file and
        // return a SecurityManager instance:

        // Use the shiro.ini file at the root of the classpath
        // (file: and url: prefixes load from files and urls respectively):
        Factory<SecurityManager> factory = new IniSecurityManagerFactory("classpath:shiro.ini");
        SecurityManager securityManager = factory.getInstance();

        // for this simple example quickstart, make the SecurityManager
        // accessible as a JVM singleton.  Most applications wouldn't do this
        // and instead rely on their container configuration or web.xml for
        // webapps.  That is outside the scope of this simple quickstart, so
        // we'll just do the bare minimum so you can continue to get a feel
        // for things.
        SecurityUtils.setSecurityManager(securityManager);

        // Now that a simple Shiro environment is set up, let's see what you can do:

        // get the currently executing user:
        // 获取当前的 Subject. 调用 SecurityUtils.getSubject();
        Subject currentUser = SecurityUtils.getSubject();

        // Do some stuff with a Session (no need for a web or EJB container!!!)
        // 测试使用 Session
        // 获取 Session: Subject#getSession()
        Session session = currentUser.getSession();
        session.setAttribute("someKey", "aValue");
        String value = (String) session.getAttribute("someKey");
        if (value.equals("aValue")) {
            log.info("---> Retrieved the correct value! [" + value + "]");
        }

        // let's login the current user so we can check against roles and permissions:
        // 测试当前的用户是否已经被认证. 即是否已经登录.
        // 调动 Subject 的 isAuthenticated()
        if (!currentUser.isAuthenticated()) {
        	// 把用户名和密码封装为 UsernamePasswordToken 对象
            UsernamePasswordToken token = new UsernamePasswordToken("lonestarr", "vespa");
            // rememberme
            token.setRememberMe(true);
            try {
            	// 执行登录.
                currentUser.login(token);
            }
            // 若没有指定的账户, 则 shiro 将会抛出 UnknownAccountException 异常.
            catch (UnknownAccountException uae) {
                log.info("----> There is no user with username of " + token.getPrincipal());
                return;
            }
            // 若账户存在, 但密码不匹配, 则 shiro 会抛出 IncorrectCredentialsException 异常。
            catch (IncorrectCredentialsException ice) {
                log.info("----> Password for account " + token.getPrincipal() + " was incorrect!");
                return;
            }
            // 用户被锁定的异常 LockedAccountException
            catch (LockedAccountException lae) {
                log.info("The account for username " + token.getPrincipal() + " is locked.  " +
                        "Please contact your administrator to unlock it.");
            }
            // ... catch more exceptions here (maybe custom ones specific to your application?
            // 所有认证时异常的父类.
            catch (AuthenticationException ae) {
                //unexpected condition?  error?
            }
        }

        //say who they are:
        //print their identifying principal (in this case, a username):
        log.info("----> User [" + currentUser.getPrincipal() + "] logged in successfully.");

        //test a role:
        // 测试是否有某一个角色. 调用 Subject 的 hasRole 方法.
        if (currentUser.hasRole("schwartz")) {
            log.info("----> May the Schwartz be with you!");
        } else {
            log.info("----> Hello, mere mortal.");
            return;
        }

        //test a typed permission (not instance-level)
        // 测试用户是否具备某一个行为. 调用 Subject 的 isPermitted() 方法。
        if (currentUser.isPermitted("lightsaber:weild")) {
            log.info("----> You may use a lightsaber ring.  Use it wisely.");
        } else {
            log.info("Sorry, lightsaber rings are for schwartz masters only.");
        }

        //a (very powerful) Instance Level permission:
        // 测试用户是否具备某一个行为.
        if (currentUser.isPermitted("user:delete:zhangsan")) {
            log.info("----> You are permitted to 'drive' the winnebago with license plate (id) 'eagle5'.  " +
                    "Here are the keys - have fun!");
        } else {
            log.info("Sorry, you aren't allowed to drive the 'eagle5' winnebago!");
        }

        //all done - log out!
        // 执行登出. 调用 Subject 的 Logout() 方法.
        System.out.println("---->" + currentUser.isAuthenticated());

        currentUser.logout();

        System.out.println("---->" + currentUser.isAuthenticated());

        System.exit(0);
    }
}
shiro.ini
#
# Licensed to the Apache Software Foundation (ASF) under one
# or more contributor license agreements.  See the NOTICE file
# distributed with this work for additional information
# regarding copyright ownership.  The ASF licenses this file
# to you under the Apache License, Version 2.0 (the
# "License"); you may not use this file except in compliance
# with the License.  You may obtain a copy of the License at
#
#     http://www.apache.org/licenses/LICENSE-2.0
#
# Unless required by applicable law or agreed to in writing,
# software distributed under the License is distributed on an
# "AS IS" BASIS, WITHOUT WARRANTIES OR CONDITIONS OF ANY
# KIND, either express or implied.  See the License for the
# specific language governing permissions and limitations
# under the License.
#
# =============================================================================
# Quickstart INI Realm configuration
#
# For those that might not understand the references in this file, the
# definitions are all based on the classic Mel Brooks' film "Spaceballs". ;)
# =============================================================================

# -----------------------------------------------------------------------------
# Users and their assigned roles
#
# Each line conforms to the format defined in the
# org.apache.shiro.realm.text.TextConfigurationRealm#setUserDefinitions JavaDoc
# -----------------------------------------------------------------------------
[users]
# user 'root' with password 'secret' and the 'admin' role
root = secret, admin
# user 'guest' with the password 'guest' and the 'guest' role
guest = guest, guest
# user 'presidentskroob' with password '12345' ("That's the same combination on
# my luggage!!!" ;)), and role 'president'
presidentskroob = 12345, president
# user 'darkhelmet' with password 'ludicrousspeed' and roles 'darklord' and 'schwartz'
darkhelmet = ludicrousspeed, darklord, schwartz
# user 'lonestarr' with password 'vespa' and roles 'goodguy' and 'schwartz'
lonestarr = vespa, goodguy, schwartz

# -----------------------------------------------------------------------------
# Roles with assigned permissions
#
# Each line conforms to the format defined in the
# org.apache.shiro.realm.text.TextConfigurationRealm#setRoleDefinitions JavaDoc
# -----------------------------------------------------------------------------
[roles]
# 'admin' role has all permissions, indicated by the wildcard '*'
admin = *
# The 'schwartz' role can do anything (*) with any lightsaber:
schwartz = lightsaber:*
# The 'goodguy' role is allowed to 'delete' (action) the user (type) with
# license plate 'zhangsan' (instance specific id)
goodguy = user:delete:zhangsan
note.txt
1. 授权需要继承 AuthorizingRealm 类, 并实现其 doGetAuthorizationInfo 方法
2. AuthorizingRealm 类继承自 AuthenticatingRealm, 但没有实现 AuthenticatingRealm 中的
doGetAuthenticationInfo, 所以认证和授权只需要继承 AuthorizingRealm 就可以了. 同时实现他的两个抽象方法.

1. 为什么使用 MD5 盐值加密:
2. 如何做到:
1). 在 doGetAuthenticationInfo 方法返回值创建 SimpleAuthenticationInfo 对象的时候, 需要使用
SimpleAuthenticationInfo(principal, credentials, credentialsSalt, realmName) 构造器
2). 使用 ByteSource.Util.bytes() 来计算盐值.
3). 盐值需要唯一: 一般使用随机字符串或 user id
4). 使用 new SimpleHash(hashAlgorithmName, credentials, salt, hashIterations); 来计算盐值加密后的密码的值.

1. 如何把一个字符串加密为 MD5
2. 替换当前 Realm 的 credentialsMatcher 属性. 直接使用 HashedCredentialsMatcher 对象, 并设置加密算法即可.

密码的比对:
通过 AuthenticatingRealm 的 credentialsMatcher 属性来进行的密码的比对!

1. 获取当前的 Subject. 调用 SecurityUtils.getSubject();
2. 测试当前的用户是否已经被认证. 即是否已经登录. 调用 Subject 的 isAuthenticated()
3. 若没有被认证, 则把用户名和密码封装为 UsernamePasswordToken 对象
1). 创建一个表单页面
2). 把请求提交到 SpringMVC 的 Handler
3). 获取用户名和密码.
4. 执行登录: 调用 Subject 的 login(AuthenticationToken) 方法.
5. 自定义 Realm 的方法, 从数据库中获取对应的记录, 返回给 Shiro.
1). 实际上需要继承 org.apache.shiro.realm.AuthenticatingRealm 类
2). 实现 doGetAuthenticationInfo(AuthenticationToken) 方法.
6. 由 shiro 完成对密码的比对.
5.Login&Realm
@Controller
public class LoginController {

    @RequestMapping("/login")                   // 导入hiberate-validator即可使用参数校验
    public String login(@Validated User user, BindingResult bindingResult){

        System.out.println("请求到达controller...");

        if (bindingResult.hasErrors()) {
            System.out.println("提取信息有误");
            return "forward:/login.jsp";
        }

        // 封装为UsernamepasswordToken对象,因为它实现了 AuthenticationToken接口
        UsernamePasswordToken token =
            new UsernamePasswordToken(user.getUsername(), user.getPassword());

        try {

            // 调用 subject对象的login(AuthenticationToken)方法,
            // 该方法会将参数token经由shiro传递给我们自定义的realm的doGetAuthenticationInfo(token)方法
            // 在这个方法里,由我们自定义的realm根据这个token返回一个认证的info信息,提供给shiro
            // shiro会拿到这个info信息,然后自动匹配密码是否正确。
            // 如果密码正确,
            //      subject就能拿到info信息的第一个参数principle(身份),
            //      并且该subject是已登录状态(返回一个cookie给浏览器),
            //      下次访问其它链接时,判断有cookie,就不会重定向到loginUrl了,直接访问;
            //                                    否则就会重定向到loginUrl
            // 如果密码匹配不对
            //       访问任何被shiro控制的路径都会重定向到loginUrl

            SecurityUtils.getSubject().login(token);

        } catch (AuthenticationException e) {
            System.out.println("捕获到异常....");
            // 这里值得注意的是,当用户第一次访问成功后,拿到了cookie,
            // 可是用户又提交了一次,但是是错误的密码,由于上面调用了subject.login(token)
            // 再次交给realm去验证,就会被这里捕获异常,被重定向到list.jsp
            // 重定向时,是有cookie的,shiro会放行的。所以这里可以考虑,加上subject.logout()
            if (e instanceof UnknownAccountException) {
                System.out.println("登录失败: " + e.getMessage());
            }else if (e instanceof IncorrectCredentialsException){
                System.out.println("登录失败: " + e.getMessage());
            }else {
                System.out.println("登录失败: " + e.getMessage());
            }
        }

        System.out.println("重定向到list.jsp");
        return "redirect:/list.jsp";

    }

}


package com.zzhua.realm;

import com.zzhua.entity.User;
import org.apache.shiro.authc.*;
import org.apache.shiro.authz.AuthorizationInfo;
import org.apache.shiro.realm.AuthorizingRealm;
import org.apache.shiro.subject.PrincipalCollection;

public class ShiroRealm extends AuthorizingRealm {


    @Override
    protected AuthorizationInfo doGetAuthorizationInfo(PrincipalCollection principals) {
        return null;
    }

    @Override                                          // token就是subject.login(token)传过来的
    protected AuthenticationInfo doGetAuthenticationInfo(AuthenticationToken token) throws AuthenticationException {

        System.out.println("进入到认证...");

        // 所以可以强转
        UsernamePasswordToken upToken = (UsernamePasswordToken) token;

        if ("unknown".equals(upToken.getUsername())) {
            throw new UnknownAccountException("未知账户异常");
        }

        System.out.println("返回info,交给shiro去帮我们验证");
        SimpleAuthenticationInfo info = new SimpleAuthenticationInfo(
                new User(upToken.getUsername() + "123", "haha"), // principal 身份,传递给授权的方法
                "123456",        // credentials 要验证的密码
                super.getName()  // realm的名字
        );
        return info;
    }
}
6.认证源码追踪
Subject.login(token)
public class DelegatingSubject implements Subject

public void login(AuthenticationToken token) throws AuthenticationException {
        clearRunAsIdentitiesInternal();

        // 调用安全管理器securityManager的login方法,返回subject
        Subject subject = securityManager.login(this, token);

        PrincipalCollection principals;

        String host = null;

        if (subject instanceof DelegatingSubject) {
            DelegatingSubject delegating = (DelegatingSubject) subject;
            //we have to do this in case there are assumed identities - we don't want to lose the 'real' principals:
            principals = delegating.principals;
            host = delegating.host;
        } else {
            principals = subject.getPrincipals();
        }

        if (principals == null || principals.isEmpty()) {
            String msg = "Principals returned from securityManager.login( token ) returned a null or " +
                    "empty value.  This value must be non null and populated with one or more elements.";
            throw new IllegalStateException(msg);
        }
        this.principals = principals;
        this.authenticated = true;
        if (token instanceof HostAuthenticationToken) {
            host = ((HostAuthenticationToken) token).getHost();
        }
        if (host != null) {
            this.host = host;
        }
        Session session = subject.getSession(false);
        if (session != null) {
            this.session = decorate(session);
        } else {
            this.session = null;
        }
    }
public class DefaultSecurityManager extends SessionsSecurityManager {
/**
     * First authenticates the {@code AuthenticationToken} argument, and if successful, constructs a
     * {@code Subject} instance representing the authenticated account's identity.
     * <p/>
     * Once constructed, the {@code Subject} instance is then {@link #bind bound} to the application for
     * subsequent access before being returned to the caller.
     *
     * @param token the authenticationToken to process for the login attempt.
     * @return a Subject representing the authenticated user.
     * @throws AuthenticationException if there is a problem authenticating the specified {@code token}.
     */
    public Subject login(Subject subject, AuthenticationToken token) throws AuthenticationException {
        AuthenticationInfo info;
        try {

            // 调用父类,验证token,返回info
            info = authenticate(token);

        } catch (AuthenticationException ae) {
            try {
                onFailedLogin(token, ae, subject);
            } catch (Exception e) {
                if (log.isInfoEnabled()) {
                    log.info("onFailedLogin method threw an " +
                            "exception.  Logging and propagating original AuthenticationException.", e);
                }
            }
            throw ae; //propagate
        }

        Subject loggedIn = createSubject(token, info, subject);

        onSuccessfulLogin(token, info, loggedIn);

        return loggedIn;
    }
}


public abstract class AuthenticatingSecurityManager extends RealmSecurityManager {
	/**
     * Delegates to the wrapped {@link org.apache.shiro.authc.Authenticator Authenticator} for authentication.
     */
    public AuthenticationInfo authenticate(AuthenticationToken token) throws AuthenticationException {
        return this.authenticator.authenticate(token); // 调用 核心组件authenticator的验证方法
    }
}


public abstract class AbstractAuthenticator implements Authenticator, LogoutAware {

    public final AuthenticationInfo authenticate(AuthenticationToken token){

        if (token == null) {
            throw new IllegalArgumentException("authentication token cannot be null.");
        }

        AuthenticationInfo info;
        try {

            info = doAuthenticate(token); // 回调子类ModularRealmAuthenticator重写的doAuthenticate方法

            if (info == null) {  // 为null就抛异常

                throw new AuthenticationException(msg);
            }
        } catch (Throwable t) {
            AuthenticationException ae = null;
            if (t instanceof AuthenticationException) {
                ae = (AuthenticationException) t;
            }

           // 通知验证失败,传递给authenticator中的所有listener对象,回调其中的onfailure(token,ex)方法
            notifyFailure(token, ae);
            throw ae; // 继续抛出
        }

        log.debug("Authentication successful for token [{}].  Returned account [{}]", token, info);

        // 通知验证成功传递给authenticator中的所有listener对象,回调其中的onSuccess(token,ex)方法
        notifySuccess(token, info);

        return info;
    }
}

    public class ModularRealmAuthenticator extends AbstractAuthenticator {
    /**
     * List of realms that will be iterated through when a user authenticates.
     */
    private Collection<Realm> realms; //realm的集合

     /**
     * The authentication strategy to use during authentication attempts, defaults to a
     * {@link org.apache.shiro.authc.pam.AtLeastOneSuccessfulStrategy} instance.
     */
    private AuthenticationStrategy authenticationStrategy; // 认证策略

    protected AuthenticationInfo doAuthenticate(AuthenticationToken authenticationToken) {
            Collection<Realm> realms = getRealms();
            if (realms.size() == 1) {
                return doSingleRealmAuthentication(realms.iterator().next(), authenticationToken);
            } else {
                return doMultiRealmAuthentication(realms, authenticationToken);
            }
    }

    // 单realm验证
    protected AuthenticationInfo doSingleRealmAuthentication(Realm realm, AuthenticationToken token) {
        if (!realm.supports(token)) {
            String msg = "Realm [" + realm + "] does not support authentication token [" +
                    token + "].  Please ensure that the appropriate Realm implementation is "
                +"configured correctly or that the realm accepts AuthenticationTokens of this type.";
            throw new UnsupportedTokenException(msg);
        }

        AuthenticationInfo info = realm.getAuthenticationInfo(token); // 从realm中获取info

        if (info == null) {
            String msg = "Realm [" + realm + "] was unable to find account data for the " +
                    "submitted AuthenticationToken [" + token + "].";
            throw new UnknownAccountException(msg); // 为空,马上抛异常
        }

        return info;
    }
}


public abstract class AuthenticatingRealm extends CachingRealm implements Initializable {

    /**
     * The default suffix appended to the realm name used for caching authentication data.
     *
     * @since 1.2
     */
    private static final String DEFAULT_AUTHORIZATION_CACHE_SUFFIX = ".authenticationCache";

    private Cache<Object, AuthenticationInfo> authenticationCache;

    /*-------------------------------------------
    |         C O N S T R U C T O R S           |
    ============================================*/
    public AuthenticatingRealm() {
        this(null, new SimpleCredentialsMatcher());
    }

    public AuthenticatingRealm(CacheManager cacheManager) {
        this(cacheManager, new SimpleCredentialsMatcher());
    }

    public AuthenticatingRealm(CredentialsMatcher matcher) {
        this(null, matcher);
    }

    // 都会调用此构造方法
    public AuthenticatingRealm(CacheManager cacheManager, CredentialsMatcher matcher) {
        authenticationTokenClass = UsernamePasswordToken.class;

        // retain backwards compatibility for Shiro 1.1 and earlier.
        // Setting to true by default will  probably cause
        // unexpected results for existing applications:
        this.authenticationCachingEnabled = false;  // 注意这里:认证缓存默认是关闭的

        int instanceNumber = INSTANCE_COUNT.getAndIncrement();
        //认证缓存的名字
        this.authenticationCacheName = getClass().getName() + DEFAULT_AUTHORIZATION_CACHE_SUFFIX;
        if (instanceNumber > 0) {
            this.authenticationCacheName = this.authenticationCacheName + "." + instanceNumber;
        }

        if (cacheManager != null) {
            setCacheManager(cacheManager); // 缓存不为空,则会调用此方法
        }
        if (matcher != null) {
            setCredentialsMatcher(matcher);
        }
    }

    public final AuthenticationInfo getAuthenticationInfo(AuthenticationToken token) {

        // 先从缓存中获取
        AuthenticationInfo info = getCachedAuthenticationInfo(token);

        if (info == null) {

            //otherwise not cached, perform the lookup: 没有缓存,就查询
            info = doGetAuthenticationInfo(token);  // 在这里回调,我们自定义realm的认证方法

            if (token != null && info != null) {
                cacheAuthenticationInfoIfPossible(token, info); // 做缓存
            }
        }

        if (info != null) {
            assertCredentialsMatch(token, info); // shiro作密码匹配
        }

        return info;
    }


    private void cacheAuthenticationInfoIfPossible(AuthenticationToken token,
                                                   AuthenticationInfo info) {
        if (!isAuthenticationCachingEnabled(token, info)) {
            //return quietly, caching is disabled for this token/info pair:
            return;
        }

        Cache<Object, AuthenticationInfo> cache = getAvailableAuthenticationCache(); // 获取认证缓存
        if (cache != null) {
            Object key = getAuthenticationCacheKey(token); // 获取token的principal,这里就是username
            cache.put(key, info);
        }
    }
    // 获取认证缓存
    private Cache<Object, AuthenticationInfo> getAvailableAuthenticationCache() {
        Cache<Object, AuthenticationInfo> cache = getAuthenticationCache();  // 获取本类成员变量
        boolean authcCachingEnabled = isAuthenticationCachingEnabled(); // 缓存是否开启
        if (cache == null && authcCachingEnabled) { // 缓存为空,并且开启
            cache = getAuthenticationCacheLazy();
        }
        return cache;
    }
    // 缓存是否开启,开启认证缓存需要设置2项
    public boolean isAuthenticationCachingEnabled() {
        return
            this.authenticationCachingEnabled  // 开启本类认证缓存
            && isCachingEnabled();             //
    }
    private Cache<Object, AuthenticationInfo> getAuthenticationCacheLazy() {

        if (this.authenticationCache == null) {

            CacheManager cacheManager = getCacheManager(); // 获取缓存管理器

            if (cacheManager != null) {
                String cacheName = getAuthenticationCacheName(); // 根据名字获取缓存
                this.authenticationCache = cacheManager.getCache(cacheName);
            }
        }

        return this.authenticationCache;
    }


}

// realm实现了Initializable接口,如果配置了lifecycleBeanPostProcessor,会触发init方法
public abstract class AuthenticatingRealm extends CachingRealm implements Initializable {

    protected void assertCredentialsMatch(AuthenticationToken token, AuthenticationInfo info) {
        CredentialsMatcher cm = getCredentialsMatcher();  // realm中配置的凭证匹配器
        if (cm != null) {
            if (!cm.doCredentialsMatch(token, info)) {  // 调用匹配的方法
                throw new IncorrectCredentialsException(msg);
            }
        }
    }
}

// 比如时简单的凭证匹配器
public class SimpleCredentialsMatcher extends CodecSupport implements CredentialsMatcher {

    public boolean doCredentialsMatch(AuthenticationToken token, AuthenticationInfo info) {
        Object tokenCredentials = getCredentials(token);  // 获取token中的password  char[]
        Object accountCredentials = getCredentials(info); // 获取info中封装的第二参数 Object
        return equals(tokenCredentials, accountCredentials);
    }

    /**
        protected boolean isByteSource(Object o) {
            return o instanceof byte[] || o instanceof char[] || o instanceof String ||
                    o instanceof ByteSource || o instanceof File || o instanceof InputStream;
        }
    */
    protected boolean equals(Object tokenCredentials, Object accountCredentials) {

        if (isByteSource(tokenCredentials) && isByteSource(accountCredentials)) {
            byte[] tokenBytes = toBytes(tokenCredentials);
            byte[] accountBytes = toBytes(accountCredentials);
            return MessageDigest.isEqual(tokenBytes, accountBytes);
        } else {
            return accountCredentials.equals(tokenCredentials);
        }
    }
}

// 如果需要盐值加密,那么可以找CredentialsMatcher的子类即可
配置一个shiro登录退出的监听器
<!--配置一个shiro登陆退出的监听器-->
<bean class="com.zzhua.listener.LoginListener" depends-on="securityManager">
    <constructor-arg name="securityManager" ref="securityManager"/>
</bean>

public class LoginListener implements AuthenticationListener {

	// 使用构造器注入,因为默认的情况下,securityManager在创建的时候,源码是直接new的ModularRealmAuthenticator
    public LoginListener(AuthenticatingSecurityManager securityManager){
        ModularRealmAuthenticator authenticator = (ModularRealmAuthenticator) securityManager.getAuthenticator();
        ArrayList<AuthenticationListener> listeners = new ArrayList<>();
        listeners.add(this);
        authenticator.setAuthenticationListeners(listeners);
    }

    @Override
    public void onSuccess(AuthenticationToken token, AuthenticationInfo info) {
        System.out.println("恭喜: 登录成功了哦" + (User)token.getPrincipal());
    }

    @Override
    public void onFailure(AuthenticationToken token, AuthenticationException ae) {
        System.out.println("不要瞎搞,我已经偷偷记住你了" );
    }

    @Override
    public void onLogout(PrincipalCollection principals) {
        System.out.println("伊,有人注销了: ");
    }


}
7.配置多realm认证
通过源码追踪,可以知道securityManager是将验证交给了authenticator来完成的(authenticator默认是在securityManager 构造方法里面直接new的ModularRealmAuthenticator),但是我们可以自己注入一个authenticator给SecurityManager,就可以覆盖掉默认的了。
疑问一:验证是如何交给realm的
那么还有一个问题,realm是设置给securityManager的,而securityManager是将验证交给authenticator完成的,而验证逻辑是由realm来完成的,所以realm设置给securityManager后必须设置给authenticator。
public abstract class RealmSecurityManager extends CachingSecurityManager {
    /**
     * Sets the realms managed by this <tt>SecurityManager</tt> instance.
     *
     * @param realms the realms managed by this <tt>SecurityManager</tt> instance.
     * @throws IllegalArgumentException if the realms collection is null or empty.
     */
    public void setRealms(Collection<Realm> realms) {
        if (realms == null) {
            throw new IllegalArgumentException("Realms collection argument cannot be null.");
        }
        if (realms.isEmpty()) {
            throw new IllegalArgumentException("Realms collection argument cannot be empty.");
        }
        this.realms = realms;
        afterRealmsSet(); // 设置realm之后
    }

}

public abstract class AuthenticatingSecurityManager extends RealmSecurityManager {
    /**
     * Passes on the {@link #getRealms() realms} to the internal delegate
     * <code>Authenticator</code> instance so
     * that it may use them during authentication attempts.
     */
    protected void afterRealmsSet() {
        super.afterRealmsSet();
        if (this.authenticator instanceof ModularRealmAuthenticator) {
            // 将它设置给authenticator,所以只要把realm交给securityManager,它就会把realm交给authenticator
            ((ModularRealmAuthenticator) this.authenticator).setRealms(getRealms());
        }
    }
}
默认的认证策略是AtLeastOneSuccessfulStrategy,可以配置给authenticator
8.shiro内置的filter
public enum DefaultFilter {

    anon(AnonymousFilter.class),
    authc(FormAuthenticationFilter.class),
    authcBasic(BasicHttpAuthenticationFilter.class),
    logout(LogoutFilter.class),
    noSessionCreation(NoSessionCreationFilter.class),
    perms(PermissionsAuthorizationFilter.class),
    port(PortFilter.class),
    rest(HttpMethodPermissionFilter.class),
    roles(RolesAuthorizationFilter.class),
    ssl(SslFilter.class),
    user(UserFilter.class);

    // ...
}
9.授权源码追踪
subject.hasRole(“admin”)
和认证一样,同样是来到了DelegatingSubject
public class DelegatingSubject implements Subject {
    public boolean hasRole(String roleIdentifier) {
        return
            // 判断是否有身份,此处表明必须经过认证,才会判断权限
            this.hasPrincipals() &&

            // 根据principal,即身份判断权限
            this.securityManager.hasRole(this.getPrincipals(), roleIdentifier);
    }
}

public abstract class AuthorizingSecurityManager extends AuthenticatingSecurityManager {

    // 默认是以直接new的方式,创建的授权核心组件,后面可以手动注入,修改此属性
	private Authorizer authorizer = new ModularRealmAuthorizer();

    public boolean hasRole(PrincipalCollection principals, String roleIdentifier) {
            return this.authorizer.hasRole(principals, roleIdentifier); // 调用此方法获取授权
    }

    // 这个方法,在securityManager设置realm的时候,被回调。并将realm设置给授权核心组件
    protected void afterRealmsSet() {
        super.afterRealmsSet();
        if (this.authorizer instanceof ModularRealmAuthorizer) {
            ((ModularRealmAuthorizer)this.authorizer).setRealms(this.getRealms());
        }
    }
}

// 因为默认的就是new ModularRealmAuthorizer();,来到ModularRealmAuthorizer
public class ModularRealmAuthorizer implements Authorizer,
                                               PermissionResolverAware, 		                                                                      RolePermissionResolverAware {

/**
     * Returns <code>true</code> if any of the configured realms'
     * {@link #hasRole(org.apache.shiro.subject.PrincipalCollection, String)} call
       returns <code>true</code>,
     * <code>false</code> otherwise.
     */
    public boolean hasRole(PrincipalCollection principals, String roleIdentifier) {
        assertRealmsConfigured();

        // 这里获取到的realm就是,之前setRealm回调时,设置进去的
        for (Realm realm : getRealms()) {
            if (!(realm instanceof Authorizer)) continue;
            // 当有realm中返回有授权时,即刻返回true
            if (((Authorizer) realm).hasRole(principals, roleIdentifier)) { // 调用授权
                return true;
            }
        }
        return false;
    }
}

public abstract class AuthorizingRealm extends AuthenticatingRealm implements
                                               Authorizer, Initializable,
                                               PermissionResolverAware, RolePermissionResolverAware {


    private Cache<Object, AuthorizationInfo> authorizationCache;

    /**
     * The default suffix appended to the realm name for caching AuthorizationInfo instances.
     */
    private static final String DEFAULT_AUTHORIZATION_CACHE_SUFFIX = ".authorizationCache";

     /*===================构造方法开始=========================*/
    public AuthorizingRealm() {
        this(null, null);
    }

    public AuthorizingRealm(CacheManager cacheManager) {
        this(cacheManager, null);
    }

    public AuthorizingRealm(CredentialsMatcher matcher) {
        this(null, matcher);
    }

    public AuthorizingRealm(CacheManager cacheManager, CredentialsMatcher matcher) {
        super();
        if (cacheManager != null) setCacheManager(cacheManager);
        if (matcher != null) setCredentialsMatcher(matcher);

        this.authorizationCachingEnabled = true; // 授权缓存默认是开启的
        this.permissionResolver = new WildcardPermissionResolver();

        int instanceNumber = INSTANCE_COUNT.getAndIncrement();
        // 缓存名称设置
        this.authorizationCacheName = getClass().getName() + DEFAULT_AUTHORIZATION_CACHE_SUFFIX;
        if (instanceNumber > 0) {
            this.authorizationCacheName = this.authorizationCacheName + "." + instanceNumber;
        }
    }
  /*===================构造方法结束=========================*/

    public boolean hasRole(PrincipalCollection principal, String roleIdentifier) {
        AuthorizationInfo info = getAuthorizationInfo(principal); // 根据身份获取授权
        return hasRole(roleIdentifier, info);                     // 比对授权信息
    }

    protected AuthorizationInfo getAuthorizationInfo(PrincipalCollection principals) {

        if (principals == null) {
            return null;
        }

        AuthorizationInfo info = null;

        // 获取到授权的缓存,调用
        Cache<Object, AuthorizationInfo> cache = getAvailableAuthorizationCache();

        if (cache != null) {
            Object key = getAuthorizationCacheKey(principals);
            info = cache.get(key);
        }

        // 缓存中没有,去realm中找
        if (info == null) {

            // Call template method if the info was not found in a cache
            info = doGetAuthorizationInfo(principals);

            // 查找到结果,加入到缓存中
            // If the info is not null and the cache has been created,
            // then cache the authorization info.
            if (info != null && cache != null) {
                Object key = getAuthorizationCacheKey(principals);
                cache.put(key, info);
            }
        }

        return info;
    }


    private Cache<Object, AuthorizationInfo> getAvailableAuthorizationCache() {
        Cache<Object, AuthorizationInfo> cache = getAuthorizationCache(); // 返回成员变量缓存
        if (cache == null && isAuthorizationCachingEnabled()) { // 授权缓存是否开启
            cache = getAuthorizationCacheLazy();
        }
        return cache;
    }
    public boolean isAuthorizationCachingEnabled() { // 授权缓存开启需要设置2项
        return
            isCachingEnabled()    // 第一项时CachingRealm
            && authorizationCachingEnabled; // 第二项是自己的
    }
    private Cache<Object, AuthorizationInfo> getAuthorizationCacheLazy() {

        if (this.authorizationCache == null) {

            // 获取到realm中的缓存管理器
            CacheManager cacheManager = getCacheManager();

            if (cacheManager != null) {

                //获取授权缓存的名字
                String cacheName = getAuthorizationCacheName();
                // 从缓存管理器中根据名字找到授权缓存
                this.authorizationCache = cacheManager.getCache(cacheName);

            }
        }
        return this.authorizationCache;
    }


}
这里要说明的是:securityManager在web环境下配置的是DefaultWebSecurityManager,他继承了AuthenticatingSecurityManager,和AuthorizingSecurityManager,因此在设置realm的时候,会把realm设置给ModularRealmAuthorizer核心组件
10.多realm授权拦截
只要将realm配置给securityManager,如果realm实现了AuthorizingRealm就会添加到ModularRealmAuthorizer授权核心组件中
然后没有别的,就是一个for循环,挨个realm遍历获取权限信息进行比对,这两个过程可以在源码追踪中看到
在shiroFilterFactoryBean中配置需要角色、权限控制相关的资源;
如果登录了,在访问受权限控制的资源时会检查权限,回调realm中的授权方法,返回授权信息,然后交给shiro比对,如果权限不够,则会重定向到securityManager中的unauthorizedUrl
<property name="filterChainDefinitions">
    <value>

        /admin.jsp = roles[admin]
        /guest.jsp = roles[guest]
        /user.jsp = roles[user]

        /login = anon
        /login.jsp=anon
        /** = authc

    </value>
</property>
public class ShiroRealm extends AuthorizingRealm {

    public static void main(String[] args) {
        String simpleHash = new SimpleHash("MD5", "123456", "guest", 2).toString();
        System.out.println(simpleHash);
    }

    @Override
    protected AuthorizationInfo doGetAuthorizationInfo(PrincipalCollection principals) {

        // 这里获取的principal就是认证方法传过来的principal
        User user = (User) principals.getPrimaryPrincipal();

        SimpleAuthorizationInfo info = new SimpleAuthorizationInfo();

        if("admin".equals(user.getUsername())){
            info.addRole("admin");
        }
        if ("user".equals(user.getUsername())) {
            info.addRole("user");
        }
        if ("guest".equals(user.getUsername())) {
            info.addRole("guest");
        }

        return info;
    }

     @Override
    protected AuthenticationInfo doGetAuthenticationInfo(AuthenticationToken token) {
        // ...
        // 用户认证成功后,会将这里的principal传给上面的doGetAuthorizationInfo(principals)方法中
        return new SimpleAuthenticationInfo(principal,creadentials,realmName);
    }
}

// 下面分析这个SimpleAuthenticationInfo
public class SimpleAuthenticationInfo
    public SimpleAuthenticationInfo(
        Object principal,
        Object hashedCredentials,
        ByteSource credentialsSalt,
        String realmName) {
    		// 关键是这个信息,其它用于给shiro作密码匹配,还有一个是realm的名字
            this.principals = new SimplePrincipalCollection(principal, realmName);
            this.credentials = hashedCredentials;
            this.credentialsSalt = credentialsSalt;
        }
}

public class SimplePrincipalCollection implements MutablePrincipalCollection {

    private Map<String, Set> realmPrincipals;

    public SimplePrincipalCollection(Object principal, String realmName) {
        if (principal instanceof Collection) {
            addAll((Collection) principal, realmName);
        } else {
            // 添加单个principal
            add(principal, realmName);
        }
    }
    public void add(Object principal, String realmName) {
        if (realmName == null) {
            throw new IllegalArgumentException("realmName argument cannot be null.");
        }
        if (principal == null) {
            throw new IllegalArgumentException("principal argument cannot be null.");
        }
        this.cachedToString = null;
        // 根据realm名称获取 该realm名称所对应的set集合,该set集合是principal;
        // 获取到该set集合后,把这个principal放进去
        getPrincipalsLazy(realmName).add(principal);
    }
    protected Collection getPrincipalsLazy(String realmName) {
        if (realmPrincipals == null) {
            realmPrincipals = new LinkedHashMap<String, Set>(); // 所以realmPrincipals是LinkedHashMap
        }
        Set principals = realmPrincipals.get(realmName);
        if (principals == null) {
            principals = new LinkedHashSet();
            realmPrincipals.put(realmName, principals);
        }
        return principals;
    }
}
11.缓存的开启与关闭
<property name="cachingEnabled" value="false"/><!--这个不开也可以用-->
<property name="authenticationCachingEnabled" value="false"/>
<!--授权缓存,单独开启也能生效,是个单独的开关--><!--后面看下这个缓存是怎么生效的,上面那个不是总开关?-->
<property name="authorizationCachingEnabled" value="true"/>

认证缓存默认是没有的,因为被调用的构造方法是无参的,所以刚开始初始化就没有缓存,
并且this.authenticationCachingEnabled = false;也默认被关闭了

授权缓存,被调用的也是无参构造,但是this.authorizationCachingEnabled = true;默认打开

public abstract class CachingRealm implements Realm, Nameable, CacheManagerAware, LogoutAware {

    private String name;
    private boolean cachingEnabled;
    private CacheManager cacheManager;

    public CachingRealm() {
        this.cachingEnabled = true;  // 唯一构造方法,设置的是true
        this.name = getClass().getName() + "_" + INSTANCE_COUNT.getAndIncrement();
    }

}
疑问二:缓存是怎样设置给realm的
cachingManager明明是设置给securityManager的,那么真正用的却是realm?
此处需要查看继承图
public abstract class CachingSecurityManager
    implements SecurityManager, Destroyable, CacheManagerAware, EventBusAware {

    public void setCacheManager(CacheManager cacheManager) {
        this.cacheManager = cacheManager;
        afterCacheManagerSet(); // 回调子类SessionSecurityManager的afterCacheManagerSet()方法
    }
}

public abstract class SessionsSecurityManager extends AuthorizingSecurityManager {

    @Override
    protected void afterCacheManagerSet() {
        super.afterCacheManagerSet(); // 又去调用父类的afterCacheManagerSet()方法
        applyCacheManagerToSessionManager();
    }

}

public abstract class RealmSecurityManager extends CachingSecurityManager {

    protected void afterCacheManagerSet() {
        super.afterCacheManagerSet();
        applyCacheManagerToRealms(); // 将缓存管理器应用到realm中
    }

    protected void applyCacheManagerToRealms() {
        CacheManager cacheManager = getCacheManager();
        Collection<Realm> realms = getRealms();  // 从缓存管理器中获取到所有的realm
        if (cacheManager != null && realms != null && !realms.isEmpty()) {
            for (Realm realm : realms) {
                if (realm instanceof CacheManagerAware) {  // 前提是realm实现了CacheManagerAware接口
                    ((CacheManagerAware) realm).setCacheManager(cacheManager);
                }
            }
        }
    }
}
当然,也可以自己手动设置给realm,
authorizingRealm继承了AuthenticatingRealm,AuthenticatingRealm继承了CachingRealm
12.shiro标签
<shiro:hasAnyRoles name="admin,user,guest">ok</shiro:hasAnyRoles>
<shiro:principal/>
13shiro权限注解
使用权限注解拦截controller方法
如:@RequiresRoles(“admin”)
拦截使用的是aop代理,所以需要对bean创建时,生成代理对象,
将spring.xml中的
<bean class="org.springframework.aop.framework.autoproxy.DefaultAdvisorAutoProxyCreator"
      depends-on="lifecycleBeanPostProcessor"/>
移到spring-mvc.xml中即可。这个bean相当于在bean工厂中注入了SmartInstantiationAwareBeanPostProcessor,他是一个后置处理器,在getBean()时,会起作用返回代理。
depends-on需要的bean在父容器中,所以可以拿到。但是如果将lifecycleBeanPostProcessor也移动过来的话,有些初始化方法会丢失。所以可以去掉depends-on.
lifecycle后置处理器会回调实现了Initializable接口的bean重写的init方法
测试成功,没有权限访问时,会抛出异常
14使用工厂方法注入拦截器链
<!-- 配置一个 bean, 该 bean 实际上是一个 Map. 通过实例工厂方法的方式,然后将该map注入给ShiroFilterFactoryBean -->
<bean id="filterChainDefinitionMap"
   factory-bean="filterChainDefinitionMapBuilder" factory-method="buildFilterChainDefinitionMap"></bean>

<bean id="filterChainDefinitionMapBuilder"
   class="com.atguigu.shiro.factory.FilterChainDefinitionMapBuilder"></bean>
public class FilterChainDefinitionMapBuilder {

    <!--此处可换成,查询数据库获取数据-->
   public LinkedHashMap<String, String> buildFilterChainDefinitionMap(){
      LinkedHashMap<String, String> map = new LinkedHashMap<>();

      map.put("/login.jsp", "anon");
      map.put("/shiro/login", "anon");
      map.put("/shiro/logout", "logout");
      map.put("/user.jsp", "authc,roles[user]");
      map.put("/admin.jsp", "authc,roles[admin]");
      map.put("/list.jsp", "user");

      map.put("/**", "authc");

      return map;
   }

}
15.会话管理
web中session存入的数据,可以通过shiro的session拿到
@Controller
@RequestMapping("/hello")
public class HelloController {

    @RequiresRoles("admin")
    @RequestMapping("test1")
    @ResponseBody
    public String test1(HttpSession session){
        session.setAttribute("name","blender");
        Object name = SecurityUtils.getSubject().getSession().getAttribute("name");
        System.out.println(name);
        return "ok";
    }
}
配置session监听器
<bean id="securityManager" class="org.apache.shiro.web.mgt.DefaultWebSecurityManager">
    <property name="realms">
        <list>
            <ref bean="shiroRealm"/>
            <ref bean="visitorRealm"/>
        </list>
    </property>
    <property name="cacheManager" ref="cacheManager"></property>
    <!--将session管理器配置到security管理器中-->
    <property name="sessionManager" ref="sessionManager"/>
</bean>

<!--会话监听器-->
<!--将session监听器配置到session管理器中-->
<bean id="sessionManager" class="org.apache.shiro.web.session.mgt.DefaultWebSessionManager">
    <property name="sessionListeners">
        <list>
            <!--web环境,如果用户不主动退出,是不知道会话是否过期,因此就不会调用会话监听器的过期方法;
                可以使用会话验证调度器来验证会话-->
            这里测试下
            <ref bean="shiroSessionListener"/>
        </list>
    </property>
</bean>
session的crud
注入jdbc操作数据库,注入生成sessionId的那个属性。配置给spring管理。然后将此sessionDao注入给session管理器即可
public class MySessionDao extends EnterpriseCacheSessionDAO {

	@Autowired
	private JdbcTemplate jdbcTemplate = null;

	@Override
	protected Serializable doCreate(Session session) {
		Serializable sessionId = generateSessionId(session);
		assignSessionId(session, sessionId);
		String sql = "insert into sessions(id, session) values(?,?)";
		jdbcTemplate.update(sql, sessionId,
				SerializableUtils.serialize(session));
		return session.getId();
	}

	@Override
	protected Session doReadSession(Serializable sessionId) {
		String sql = "select session from sessions where id=?";
		List<String> sessionStrList = jdbcTemplate.queryForList(sql,
				String.class, sessionId);
		if (sessionStrList.size() == 0)
			return null;
		return SerializableUtils.deserialize(sessionStrList.get(0));
	}

	@Override
	protected void doUpdate(Session session) {
		if (session instanceof ValidatingSession
				&& !((ValidatingSession) session).isValid()) {
			return;
		}
		String sql = "update sessions set session=? where id=?";
		jdbcTemplate.update(sql, SerializableUtils.serialize(session),
				session.getId());
	}

	@Override
	protected void doDelete(Session session) {
		String sql = "delete from sessions where id=?";
		jdbcTemplate.update(sql, session.getId());
	}
}

package com.atguigu.shiro.realms;

import org.apache.shiro.codec.Base64;
import org.apache.shiro.session.Session;

import java.io.ByteArrayInputStream;
import java.io.ByteArrayOutputStream;
import java.io.ObjectInputStream;
import java.io.ObjectOutputStream;

public class SerializableUtils {

	public static String serialize(Session session) {
		try {
			ByteArrayOutputStream bos = new ByteArrayOutputStream();
			ObjectOutputStream oos = new ObjectOutputStream(bos);
			oos.writeObject(session);
			return Base64.encodeToString(bos.toByteArray());
		} catch (Exception e) {
			throw new RuntimeException("serialize session error", e);
		}
	}

	public static Session deserialize(String sessionStr) {
		try {
			ByteArrayInputStream bis = new ByteArrayInputStream(
					Base64.decode(sessionStr));
			ObjectInputStream ois = new ObjectInputStream(bis);
			return (Session) ois.readObject();
		} catch (Exception e) {
			throw new RuntimeException("deserialize session error", e);
		}
	}

}
16.缓存
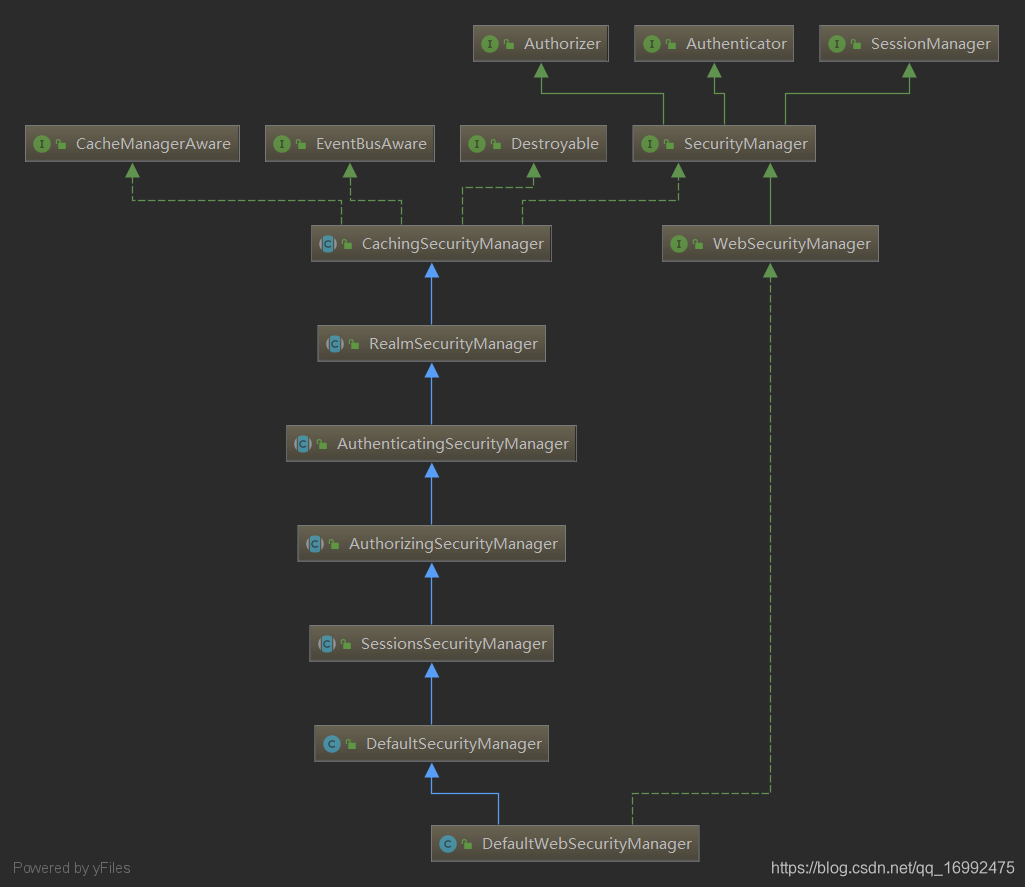
shiro中的组件DefaultSecrityManager会自动检测相应的对象是否实现了CacheManagerAware并自动注入相应的cacheManager
[外链图片转存失败,源站可能有防盗链机制,建议将图片保存下来直接上传(img-yd5fJgVu-1594621183304)(assets/image-20200618165455732.png)]
[外链图片转存失败,源站可能有防盗链机制,建议将图片保存下来直接上传(img-Eg53hrcg-1594621183304)(assets/DefaultWebSecurityManager-1592495426956.png)]
从上图看出我们配置的securityManager继承了很多SecurityManager,他们都分别分管不同的功能实现。比如hu安村的功能设置都集中在CachingSecurityManager接口
public abstract class CachingSecurityManager implements SecurityManager, Destroyable, CacheManagerAware, EventBusAware {

    /**
     * The CacheManager to use to perform caching operations to enhance performance.  Can be null.
     */
    private CacheManager cacheManager;

    /**
     * Default no-arg constructor that will automatically attempt to initialize a default cacheManager
     */
    public CachingSecurityManager() {
    }

    public CacheManager getCacheManager() {
        return cacheManager;
    }


    public void setCacheManager(CacheManager cacheManager) {
        this.cacheManager = cacheManager;
        afterCacheManagerSet();
    }

    protected void afterCacheManagerSet() {
        applyEventBusToCacheManager();
    }


}
自定义缓存组件分析:
通过引入ehcache的包和shiro-ehcache包,把缓存管理器注入给shiro,实现缓存的功能。
shiro相当于是声明了一个CacheManager的接口,和Cache的接口。如下。
shiro声明这样的接口的一个作用就是在告诉第三方实现,如果要让我(shiro)能够使用缓存的话,那么你要提供我这两个接口的实现类,让我来使用,怎么实现我不管,你给我这样的实现,我才能用。
而shiro-ehcache包里面也就写了两个类,只不过他这个包还依赖了ehcache-core,他要用到ehcache去实现嘛;它还依赖了shiro-core,他要实现的接口就在这里面嘛。而他自己就只提供了这两个接口的实现。从而把缓存管理器注入给了shiro,让shiro能够使用。
package org.apache.shiro.cache;  // 包是shiro框架下的
public interface CacheManager {

     // 通过名字获取Cache这样的一个缓存组件,这个组件也是shiro定义的
    public <K, V> Cache<K, V> getCache(String name) throws CacheException;
}

package org.apache.shiro.cache; // 包同样是shiro框架下的
public interface Cache<K, V> {  // 定义的是Cache这样的缓存组件应该要实现的功能,实现之后,才能被shiro使用

    public V get(K key) throws CacheException; // 根据名字从缓存中拿到对应的值

    public V put(K key, V value) throws CacheException; // 放入缓存

    public V remove(K key) throws CacheException; // 从缓存中移除

    public void clear() throws CacheException; // 清空缓存

    public int size(); // 缓存大小

    public Set<K> keys(); // 缓存键的set集合

    public Collection<V> values(); // 缓存值的集合
}
所以如果要改成其它的缓存,那么我们自定义缓存的实现,即可。
17.记住我
token设置rememeberMe,设置securityManager的RememberMeManager的属性,修改时长(默认是1年)
没有生效?
https://www.cnblogs.com/Unicron/p/12605818.html
此次为user忘记实现可序列化接口了
源码可以追溯到
public class DefaultSecurityManager extends SessionsSecurityManager {
    public Subject login(Subject subject, AuthenticationToken token) throws AuthenticationException {
        AuthenticationInfo info;
        try {
            info = authenticate(token);
        } catch (AuthenticationException ae) {
            try {
                onFailedLogin(token, ae, subject);
            } catch (Exception e) {

            }
            throw ae; //propagate
        }

        Subject loggedIn = createSubject(token, info, subject);

        onSuccessfulLogin(token, info, loggedIn);

        return loggedIn;
    }

    protected void onSuccessfulLogin(
                                AuthenticationToken token, AuthenticationInfo info, Subject subject) {
        rememberMeSuccessfulLogin(token, info, subject);
    }

    protected void rememberMeSuccessfulLogin(AuthenticationToken token, AuthenticationInfo info, Subject subject) {
        RememberMeManager rmm = getRememberMeManager();  // 获取remememberMeManager
        if (rmm != null) {
              rmm.onSuccessfulLogin(subject, token, info);  // 此处调用 记住我的方法 ,依此进入源码即可
        }
    }

}
18.shiro的大致原理
首先shiro的实现都是基于web三大组件中的filter过滤器来实现的,代理过滤器DelegatingFilterProxy设置为拦截所有请求,拦截每一个请求时,根据请求的url从ShiroFilterFactoryBean中定义的拦截器链找到对应的filter来处理【过滤器可以拿到spring容器(因为spring容器保存在了ServletContext中),从而拿到ShiroFilterFactoryBean,于是请求就交给filter来管了,同时shiroFilterFactoryBean中还注入了securityManager,那么filter处理的过程中,就可以使用securityManager。这样组件之间就可以协作完成认证和授权了(如果你没登陆就想访问受控制的url,那么我的filter就让你重定向到登录url;如果你要登录,我filter须设置不拦截登录的请求,那么登录逻辑就是我filter把你的登录请求交给SecurityManager,从而调到对应的realm,返回登录结果信息,你登录成功完成后,把你的信息身份principal记录下来,下次你来我filter就知道是你,就不用你登录了)】。比如某url是authc对应的FormAuthenticationFilter,那么它会获取请求中的cookie,然后查看当前用户是否登录过,如果登录过,那么就直接放行【登录成功后,尝试删除cookie,再次访问,发现又需要重新登录,足可以说明shiro是通过cookie来识别已登录用户的】;如果未登录,那么就重定向到loginUrl,让用户去登录,登录的过程逻辑如上所述。这是认证逻辑,并且只会认证一次,认证通过后,就无须再次认证了【因为有了cookie,通过cookie,可以拿到服务器端的session,在session里面拿到用户的登录身份】
用户登录后,当访问的url是受权限控制的时候,那么就会调用授权逻辑,查看当前已登录的用户是否有对应的操作权限,如果有,则放行;注意,每一次访问url都会调用,可以考虑开启授权缓存,减轻数据库的访问压力。
从这里也可以看出些设计模式的味道在里面,也是使用的组合而非继承来把各种功能组合到一个类中,更容易的完成功能,这就是桥接模式的体现,使得两边都可以向下扩展。
19.自定义过滤器,定制返回结果
securityManager是shiro的核心组件,
它掌控了所有的拦截器链,并在filterchain中指明了,访问不同url时所对应的filter去处理,比如url的授权是authc那么用户就需要登录认证过后才能访问,然后就会检查用户是否登录过。shiro拦截所有的请求后,根据拦截器链来干活,干活的同时还需要有认证和授权这两个帮手。shiro提供了一系列的拦截器,我们可以继承这些拦截器重用shiro的内置逻辑,重写某部分方法改变相应的逻辑,并把我们自定义继承过来的拦截器交给shiro,并配置该自定义拦截器对哪些url生效。
自定义过滤器步骤
1.继承shiro内置的过滤器UserFilter,重写跳转到登录界面方法,改为如果是ajax请求,那么返回json数据回去,如果不是则重定向到登录界面。
public class MyFilter extends UserFilter {

    @Override
    protected void redirectToLogin(ServletRequest request, ServletResponse response)
                                                                        throws IOException {
        HttpServletRequest httpServletRequest = (HttpServletRequest) request;

        // ajax 弹窗显示未登录
        String header = httpServletRequest.getHeader("X-Requested-With");
        if (header != null && "XMLHttpRequest".equals(header)) {
            boolean authenticated = SecurityUtils.getSubject().isAuthenticated();
            if (!authenticated) {
                response.setContentType("application/json;charset=utf8");
                response.getWriter().write("修改shiro默认的跳转登录URL,改为返回信息给前端");
            }
        } else {
            // web 重定向到登录页面
            super.redirectToLogin(request, response);
        }

    }
}
2.将自定义过滤器,交给spring管理
@Configuration
public class FilterConfiguration {
    @Bean
    public Map<String, Filter> filtersMap(){
        HashMap<String, Filter> filtersMap = new HashMap<>();
        filtersMap.put("myFilter", new MyFilter()); // 过滤器的名字 <-> 过滤器
        return filtersMap;
    }
}
3.将自定义过滤器注入给ShiroFilterFactoryBean
<bean id="shiroFilter" class="org.apache.shiro.spring.web.ShiroFilterFactoryBean">
    <property name="securityManager" ref="securityManager"/>
    <property name="loginUrl" value="/login.jsp"/>
    <property name="successUrl" value="/user.jsp"/>
    <property name="unauthorizedUrl" value="/unauthorized.jsp"/>

    <!--将自定义过滤器的map给到shiro,则在拦截器定义中就可以使用它了-->
    <property name="filters" ref="filtersMap"></property>

    <property name="filterChainDefinitions">
        <value>

            /test1.jsp = authc
            /test2.jsp = user
            /admin.jsp = roles[admin]
            /guest.jsp = roles[guest]
            /user.jsp = roles[user]
            /login = anon
            /login.jsp=anon

            /** = myFilter    <!--使用自定义过滤器,定义它要拦截的url-->

        </value>
    </property>
</bean>

<context:component-scan base-package="com.zzhua.filter"/>
4.演示
修改了返回结果
