Spring Cloud 2.2.2 源码之十五Ribbon执行原理一
基本流程图

请求流程
首先SpringMVC请求会分发到test处理方法: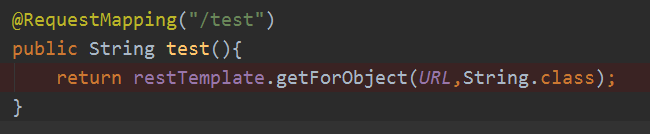
然后一直执行,直到这里被LoadBalancerInterceptor拦截:
拦截处理
其实就是把拦截的地址取出来,然后常见一个新的请求,让负载均衡客户端去执行。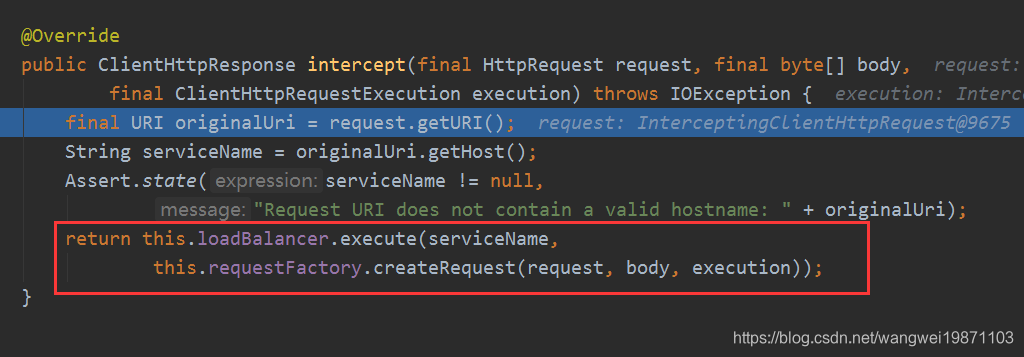
LoadBalancerRequestFactory的createRequest
是一个lambda表达式,最终肯定是会被调用,最后还是用ClientHttpRequestExecution去执行,但是请求是包装过的ServiceRequestWrapper实例:
RibbonLoadBalancerClient的execute
接着看负载均衡客户端怎么执行,这里前面是serviceName服务名,里面变成了serviceId了,好奇怪。
最后到这里,先获取负载均衡器,然后选择一个要请求的服务器,封装成RibbonServer,最后调用执行:
getLoadBalancer根据服务名获取ILoadBalancer类型的负载均衡器
内部是根据SpringClientFactory来获取的。
SpringClientFactory的getInstance
感觉是要去容器拿ILoadBalancer类型的实例。

最后要得到一个AnnotationConfigApplicationContext,然后去里面拿。
NamedContextFactory的createContext
其实第一次是拿不到的,contexts里没有缓存,所以要创建一个AnnotationConfigApplicationContext。
这个熟悉吧,就是注解的上下文创建,然后注册一些配置类RibbonClientConfiguration和EurekaRibbonClientConfiguration,然后刷新返回。所以这里比较迷惑的地方就是你找不到这两个类在自动配置的时候注册,居然是在这里,藏的好深啊。
	protected AnnotationConfigApplicationContext createContext(String name) {
		AnnotationConfigApplicationContext context = new AnnotationConfigApplicationContext();
		if (this.configurations.containsKey(name)) {
			for (Class<?> configuration : this.configurations.get(name)
					.getConfiguration()) {
				context.register(configuration);
			}
		}
		//会注册EurekaRibbonClientConfiguration
		for (Map.Entry<String, C> entry : this.configurations.entrySet()) {
			if (entry.getKey().startsWith("default.")) {
				for (Class<?> configuration : entry.getValue().getConfiguration()) {
					context.register(configuration);
				}
			}
		}
		context.register(PropertyPlaceholderAutoConfiguration.class,
				this.defaultConfigType);//注册RibbonClientConfiguration
		context.getEnvironment().getPropertySources().addFirst(new MapPropertySource(
				this.propertySourceName,
				Collections.<String, Object>singletonMap(this.propertyName, name)));
		if (this.parent != null) {
			// Uses Environment from parent as well as beans
			context.setParent(this.parent);
			// jdk11 issue
			// https://github.com/spring-cloud/spring-cloud-netflix/issues/3101
			context.setClassLoader(this.parent.getClassLoader());
		}
		context.setDisplayName(generateDisplayName(name));
		context.refresh();
		return context;
	}
注意RibbonClientConfiguration
这里要注意this.defaultConfigType其实是SpringClientFactory构造函数放入的RibbonClientConfiguration,这个比较隐蔽,居然不是自动配置的时候注册进来的。
当然这两个配置类注册进来后,注解上下文刷新就会有很多其他的bean实例初始化啦,下篇讲。
好了,今天就到这里了,希望对学习理解有帮助,大神看见勿喷,仅为自己的学习理解,能力有限,请多包涵。