介绍 (Introduction)
A Rasberry Pi (RPi) is a low cost mini computer and has the size of a credit card. It is a great solution for hobby and home projects (and some commercial, too) because it has various input/output pins, video, camera, sound interfaces and many good OSes to install.
Rasberry Pi(RPi)是一种低成本的微型计算机,具有信用卡大小。 对于业余和家庭项目(以及一些商业项目),它是一个很好的解决方案,因为它具有各种输入/输出引脚,视频,摄像头,声音接口以及许多不错的OS。
One the main characteristics of a RPi is its GPIO pins. GPIO stands for General-Purpose Input/Output.These pins are the interface with the external world.
RPi的主要特征之一是其GPIO引脚。 GPIO代表通用输入/输出。 这些引脚是与外部世界的接口。
In a simple way, you can think them as switches that you can read the status (inputs) and lamps that you can turn on or off (outputs).
通过简单的方式,您可以将它们视为可以读取状态(输入)的开关和可以打开或关闭(输出)的指示灯。
布局 (Layout)
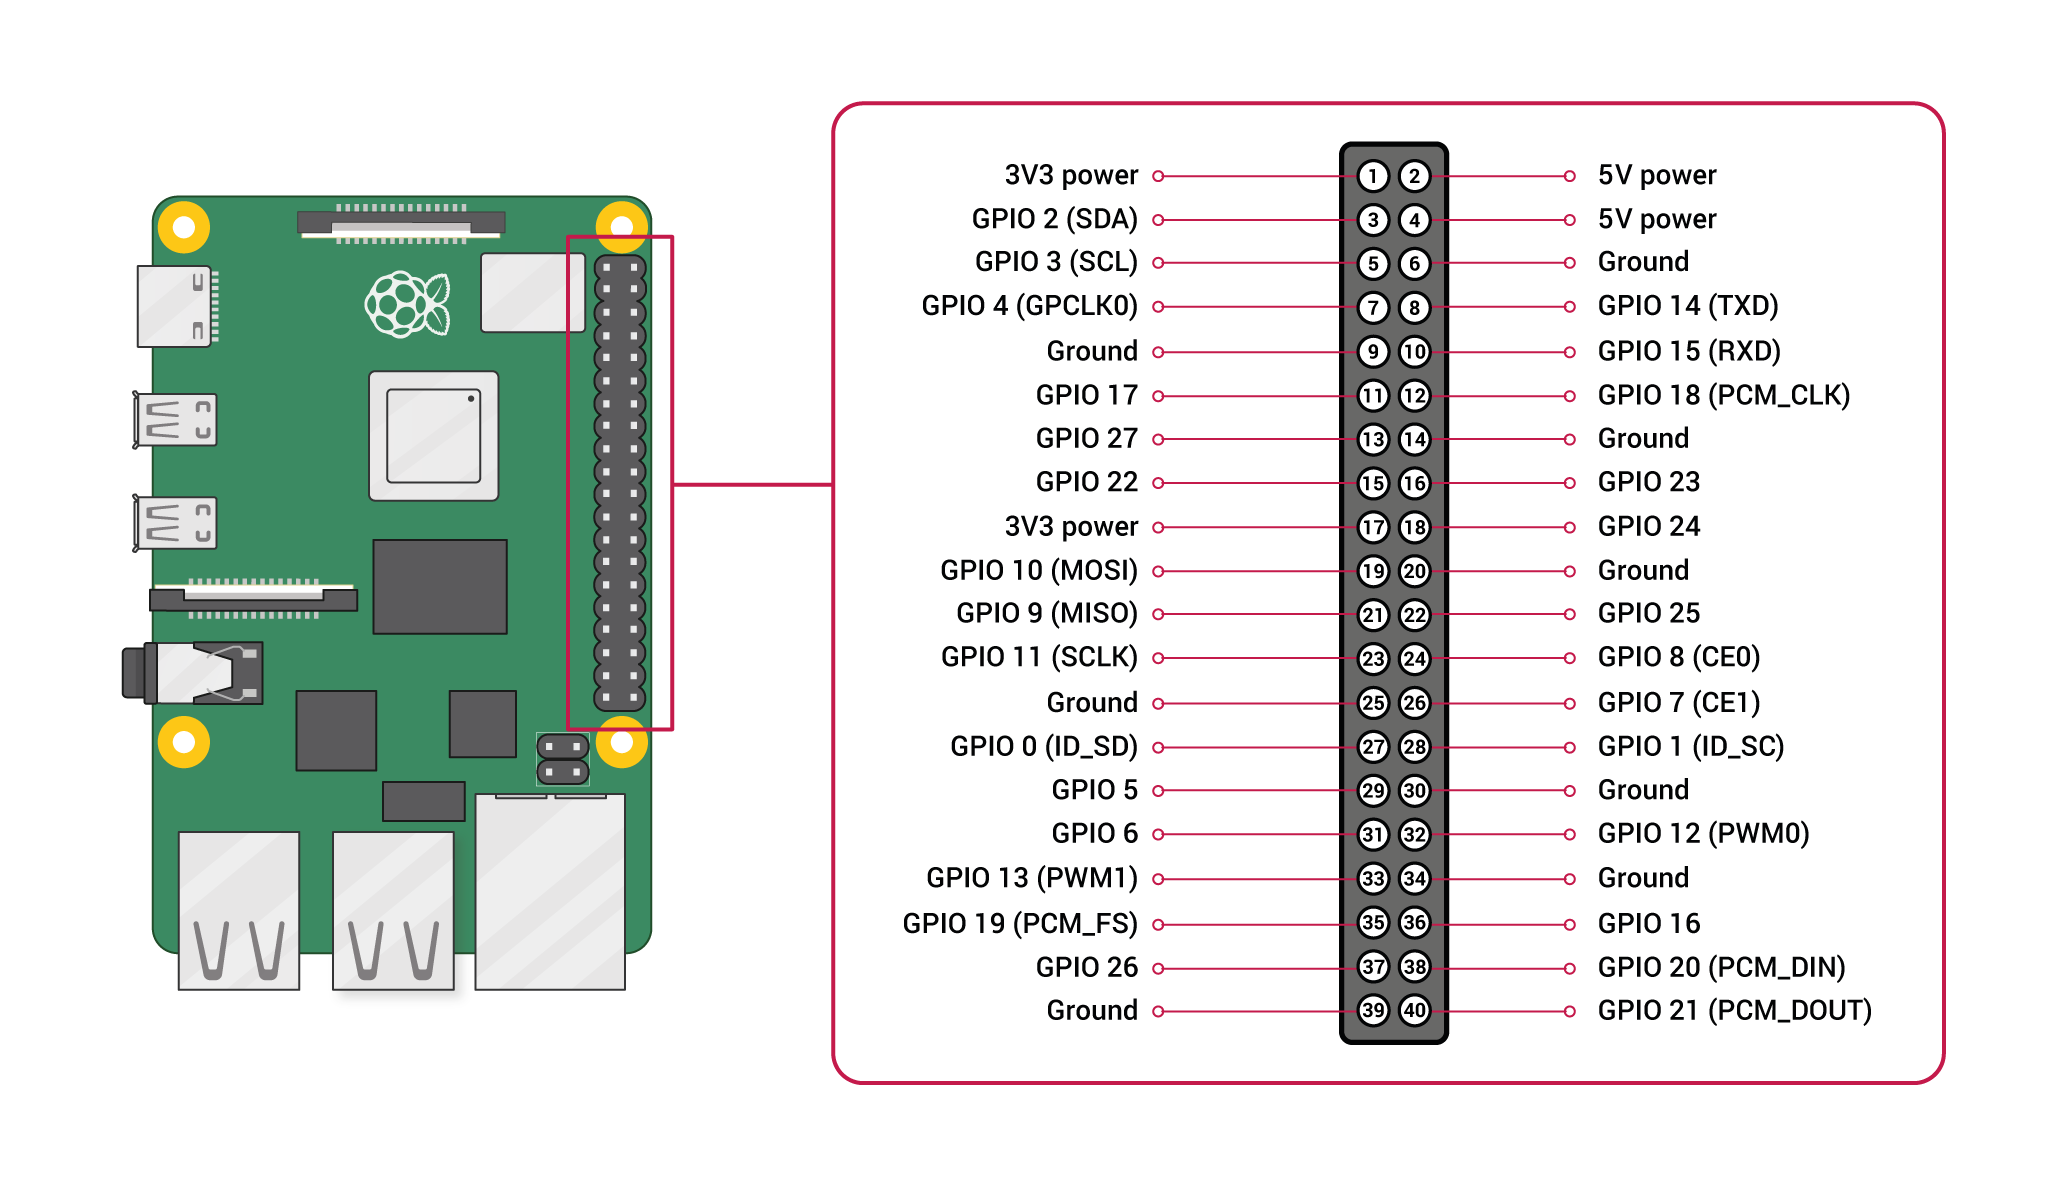
The Raspberry Pi contains 40 GPIO pins, distributed as the image below.
Raspberry Pi包含40个GPIO引脚,如下图所示。
As you can see, some inputs can also have other functions than just input or output.
如您所见,某些输入还可以具有除输入或输出以外的其他功能。
GPIO: general input or output pin. The output level is 3.3V with 50mA max, so avoid using with a large load which can damage the pin and even the board. A LED, ok. A motor, don’t even think about it.
GPIO :通用输入或输出引脚。 输出电平为3.3V,最大电流为50mA,因此请避免在大负载下使用,否则会损坏引脚,甚至损坏电路板。 LED,好的。 电机,甚至不用考虑它。
I2C(Inter-Integrated Circuit): it allows to connect with hardwares that support the I2C protocol.
I2C (内部集成电路) :它允许与支持I2C协议的硬件连接。
SPI(Serial Peripheral Interface Bus): it allows to connect with hardwares that support the SPI protocol.
SPI (串行外围设备接口总线) :它允许与支持SPI协议的硬件连接。
UART: it allows to communicate with serial devices.
UART :它允许与串行设备通信。
PWM: it allows to control a device power with PWM.
PWM :它允许使用PWM控制设备电源。
There also some pins to power other devices:
还有一些引脚可以为其他设备供电:
3.3V: limited to 50mA.
3.3V :限制为50mA。
5.0V: comes directly from the USB, so it depends of its source.
5.0V :直接来自USB,因此取决于其来源。
GND: ground pins.
GND :接地引脚。
电路图 (Circuit)
All of the examples will use the circuit bellow.
所有示例都将使用电路波纹管。

安装GPIO零 (Installing GPIO Zero)
To use the GPIOs in Python, we have the beautiful GPIO Zero library.
要在Python中使用GPIO,我们有漂亮的GPIO零库。
It is simple to install and to use it. It abstracts a lot of configuration you would have to do with other libraries. It even includes some advanced devices like ADC, sonardistance sensors, servomotor, and other boards.
它很容易安装和使用。 它抽象了许多您需要与其他库一起进行的配置。 它甚至包括一些高级设备,例如ADC,声纳距离传感器 , 伺服电机和其他板卡 。
To install it on your Pi, simply run the command:
要将其安装在您的Pi上,只需运行以下命令:
pip3 install gpiozeroTo use, just import the library in the beginning of the file:
要使用,只需将库导入文件的开头即可:
import gpiozeroPIN编号和设备 (PIN Numbering and Devices)
All the pins uses the BCM pin numbering for the GPIO, not the physical one. That is, when you look the pin diagram, its the number that comes after the GPIO.
所有引脚均使用BCM引脚编号作为GPIO,而不是物理引脚。 也就是说,当您查看引脚图时,其编号在GPIO之后。
For our example, the LED is attached to the “GPIO18”, so we have to specify the pin number as “18”.
对于我们的示例,LED连接到“ GPIO18”,因此我们必须将引脚号指定为“ 18”。
You can also use other formats of numbering, such as the same used in WiringPior RPi.GPIO libraries.
您还可以使用其他编号方式,例如在WiringPi或RPi.GPIO库中使用的编号方式。
led = LED(18)
led = LED("GPIO18")
led = LED("BCM18")
led = LED("BOARD12")
led = LED("J8:12")
These formats are merely translations.
这些格式仅是翻译。
For the library, anything that is connected to a pin is a Device. There are a lot of implemented devices already, such as LEDand Button. You can also extend it and implement your own device.
对于库,连接到引脚的任何设备都是Device 。 已经有很多实现的设备,例如LED和Button 。 您还可以扩展它并实现自己的设备。
These classes implements all the necessary logic for that specific device so you don’t have to worry about.
这些类为该特定设备实现了所有必要的逻辑,因此您不必担心。
纽扣 (Button)
Back to our circuit.
回到我们的电路。
To use the button, we simply create an object of the class Button.
要使用按钮,我们只需创建Button类的对象。
To check if a button is pressed, just use is_pressed property.
要检查按钮是否被按下,只需使用is_pressed属性。
import gpiozero


button1 = gpiozero.Button(24)
button2 = gpiozero.Button(25, pull_up=False)


while True:
  if button1.is_pressed:
    print("Button 1 is pressed")
  if button2.is_pressed:
    print("Button 2 is pressed")
You can instead wait until a button has some state.
您可以等到按钮具有某种状态。
import gpiozero


button1 = gpiozero.Button(24)
button2 = gpiozero.Button(25, pull_up=False)


while True:
  button1.wait_for_press()
  print("Button 1 is pressed")
  button2.wait_for_release()
  print("Button 2 is released")
Or even execute a callback function when an event happened.
甚至在事件发生时执行回调函数。
import gpiozero
import time


def but_1_pressed():
  print("Button 1 is pressed")

def but_2_released():
  print("Button 2 is pressed")


button1 = gpiozero.Button(24)
button2 = gpiozero.Button(25, pull_up=False)


button1.when_pressed = but_1_pressed
button2.when_released = but_2_released


while True:
  time.sleep(0.1)
发光二极管 (LED)
To use the LED, just declare the a LED object. And use the functions on and off.
要使用LED,只需声明一个LED对象。 并使用功能的on和off 。
import gpiozero
import time


red = gpiozero.LED(18)
blue = gpiozero.LED(23)


while True:
  time.sleep(1)
  red.on()
  blue.off()
  time.sleep(1)
  red.off()
  blue.on()
Or you can toggle the state of the LED instead.
或者,您也可以toggle LED的状态。
import gpiozero
import time


red = gpiozero.LED(18)
blue = gpiozero.LED(23)


while True:
  time.sleep(1)
  red.toggle()
  blue.toggle()
You can even do this in the background.
您甚至可以在后台执行此操作。
import gpiozero
import time


red = gpiozero.LED(18)
blue = gpiozero.LED(23)


red.blink()
blue.blink()


while True:
  time.sleep(1)
恢复 (Resume)
In this article, I showed you how to install and start with the gpiozero library. You can check their documentation to see other advanced topics and how to create your own device.
在本文中,我向您展示了如何安装并开始使用gpiozero库。 您可以查看他们的文档以查看其他高级主题以及如何创建自己的设备。
If you liked this article, here are some other you might enjoy:
如果您喜欢这篇文章,则可能会喜欢以下其他文章:
And follow me on Twitterto know when I release a new article.
并在Twitter上关注我,以了解何时发布新文章。
翻译自: https://medium.com/vacatronics/getting-started-with-raspberry-pi-gpio-and-python-657c96add78