文章目录
seata介绍文档
启动seata服务
1.下载或者解压缩
seata-server-1.3.0
2.修改三个配置文件
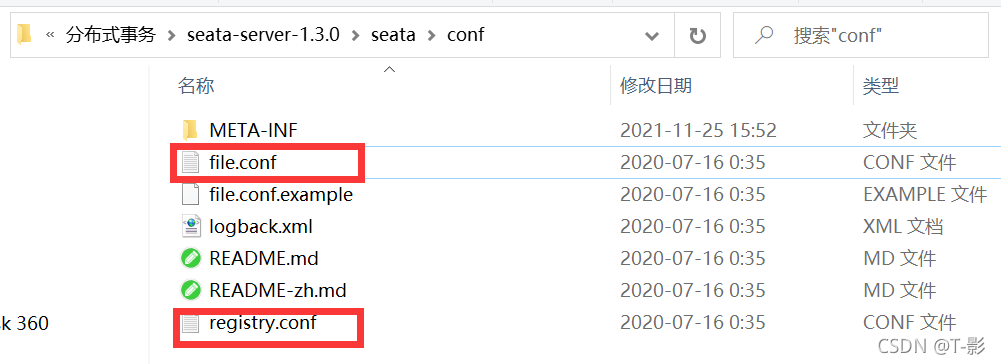
registry.conf
向eureka注册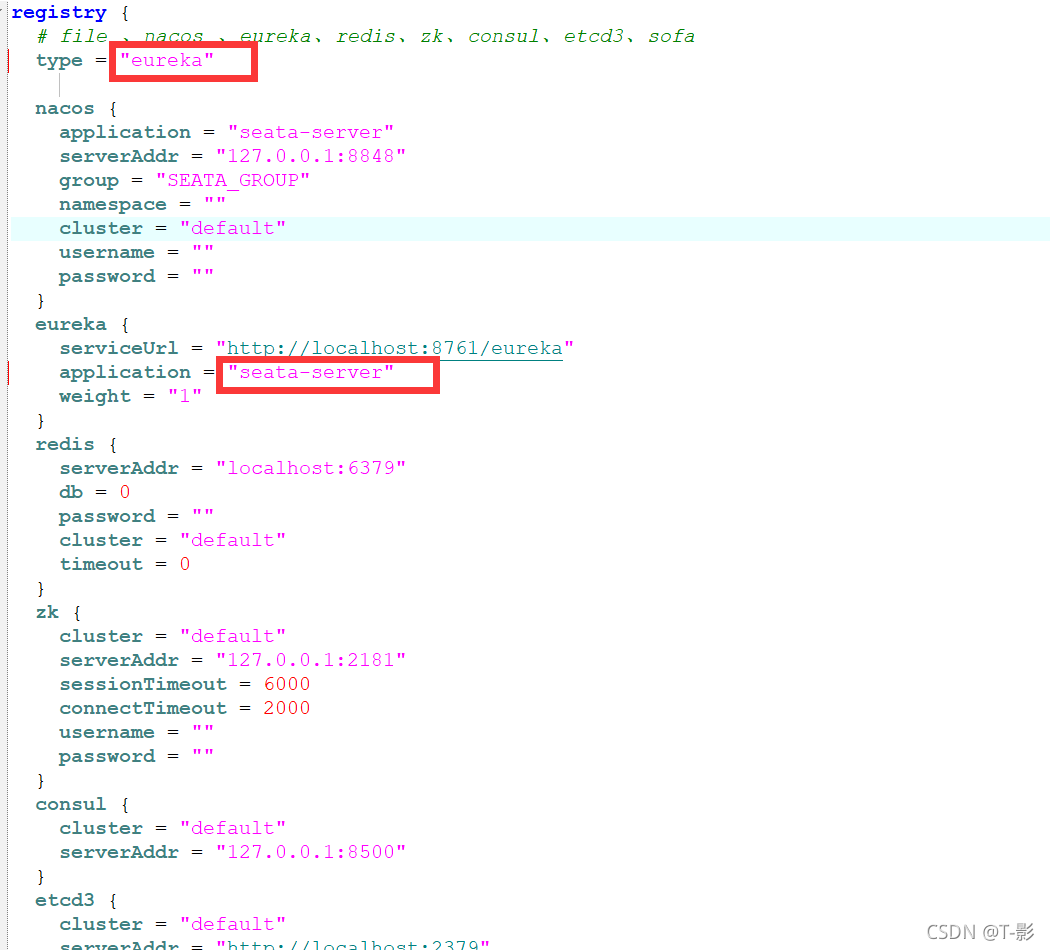
file.conf
seata server运行过程中产生的日志数据,存储到什么位置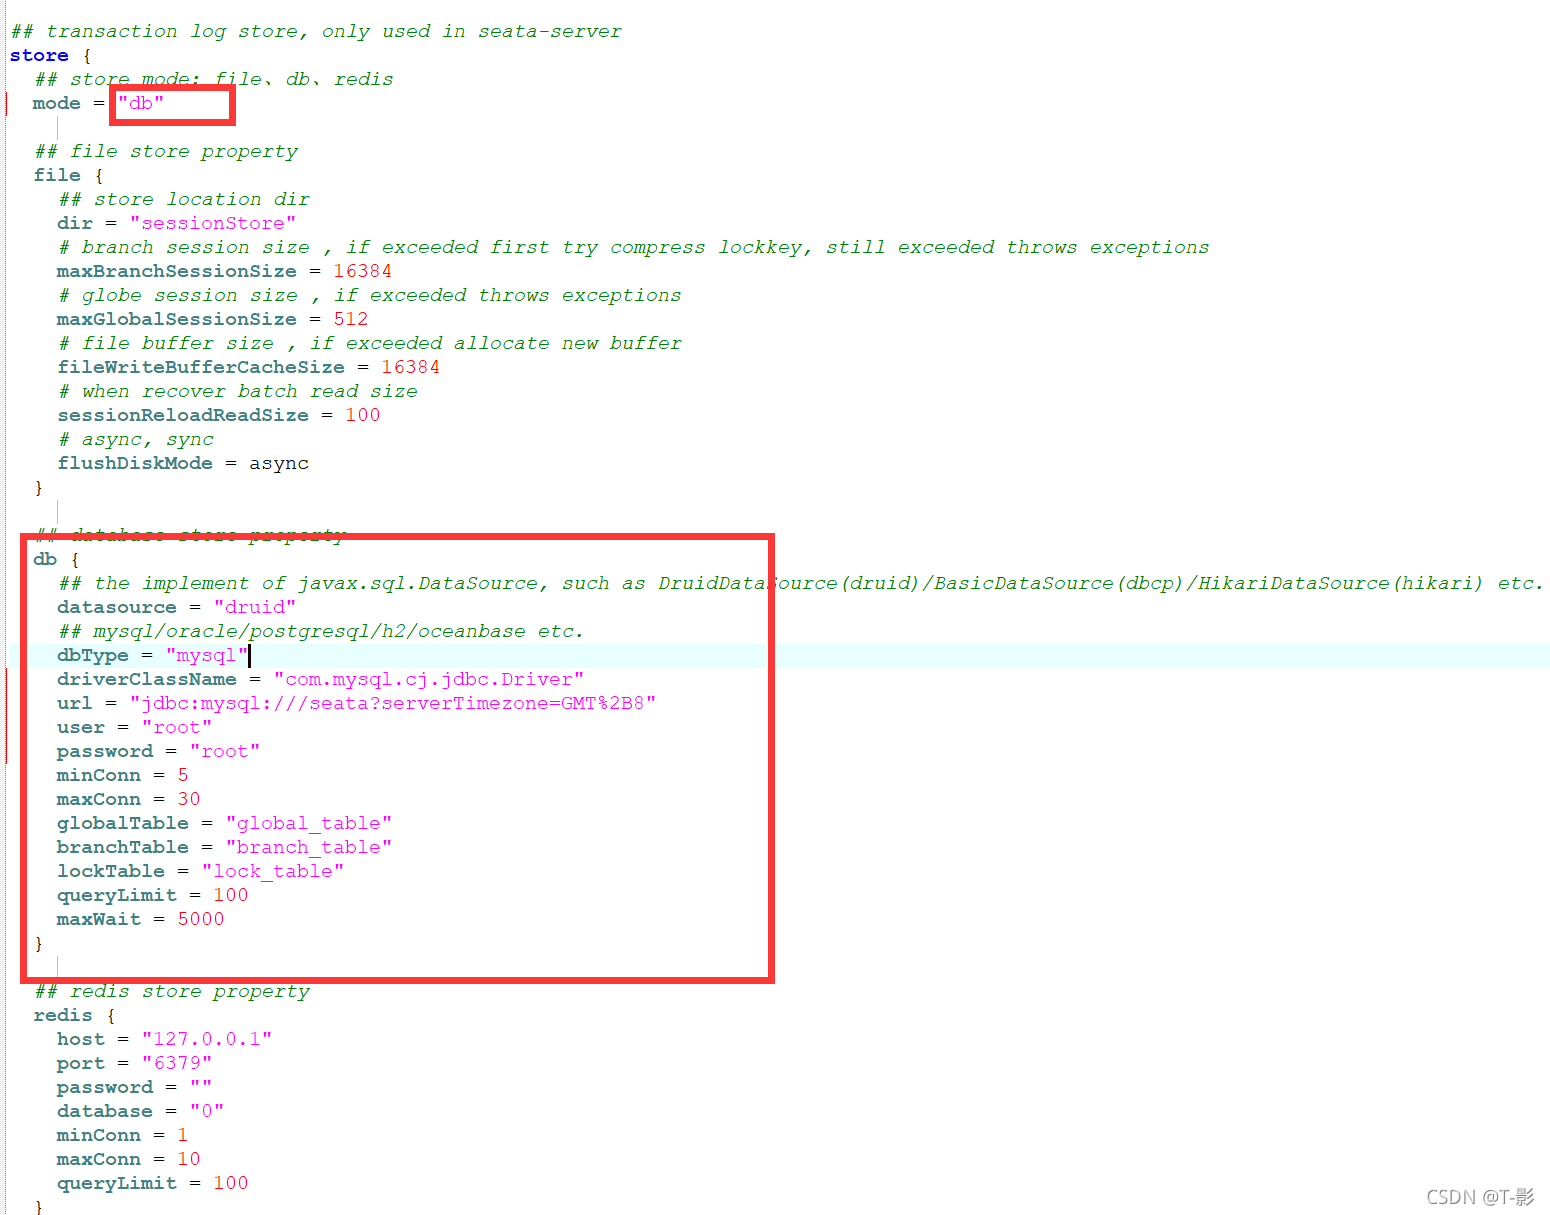
seata-server.bat
修改占用内存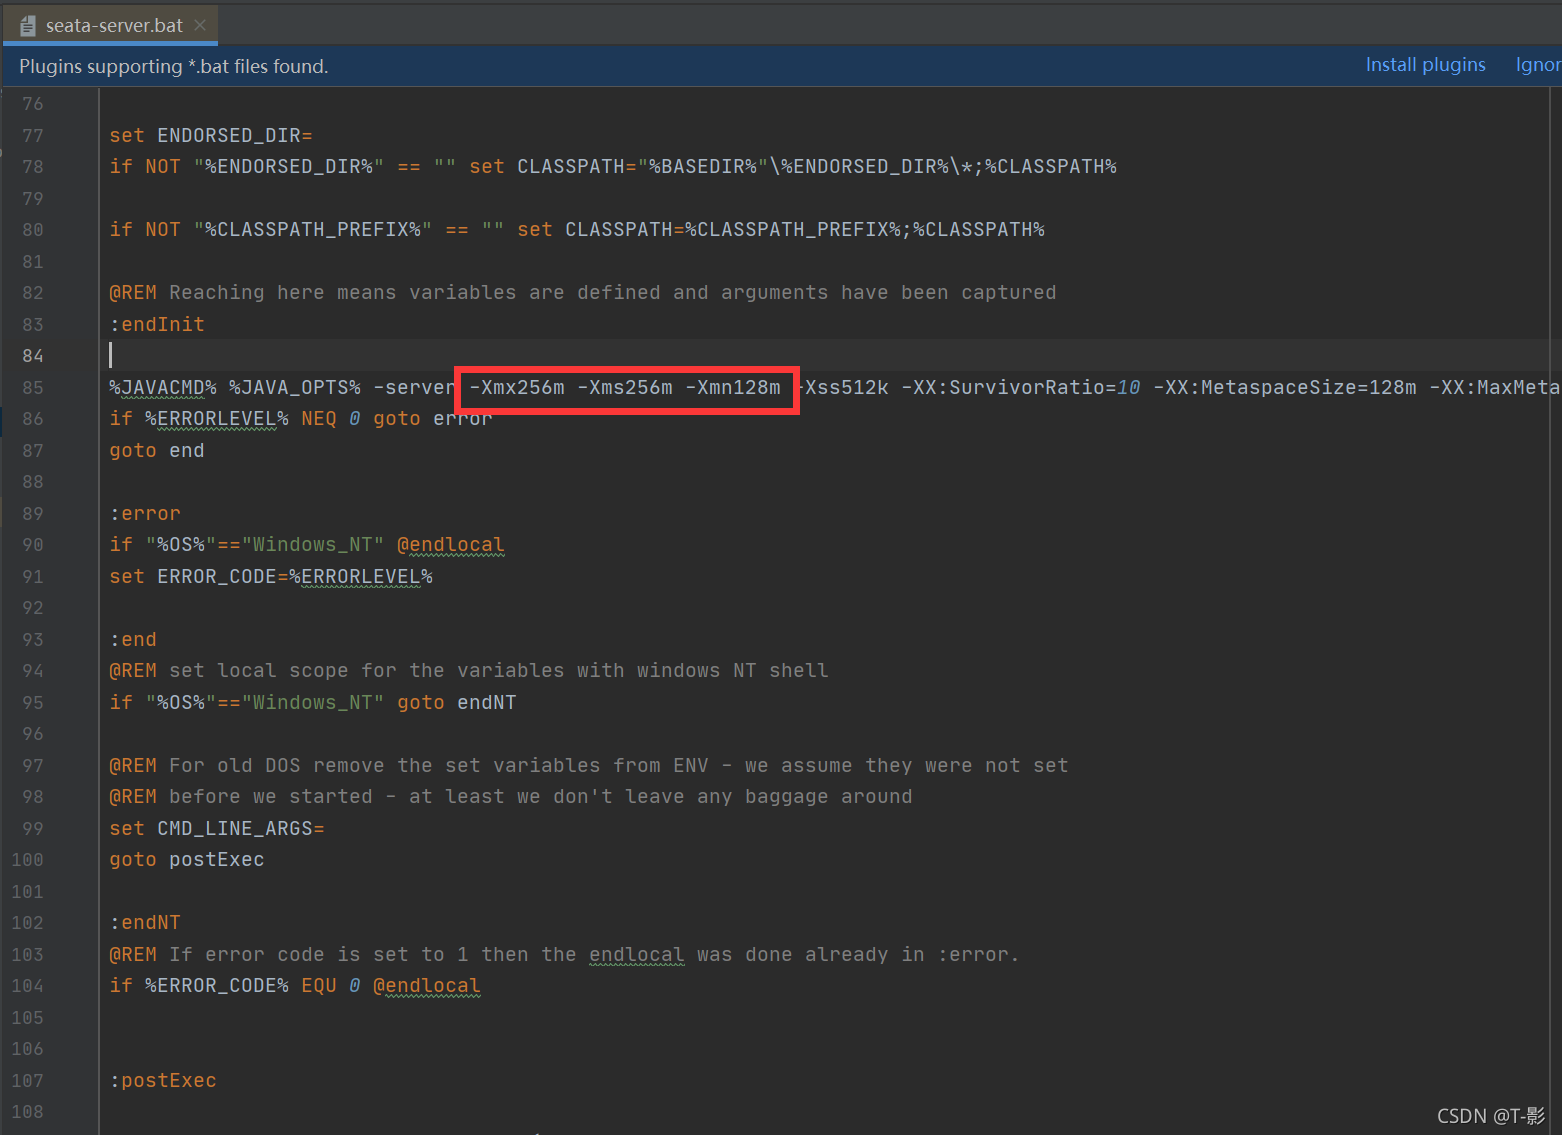
3.运行seata-server.bat启动服务
JAVA_HOME环境变量
JDK必须用1.8
bin目录中执行:seata-server.bat
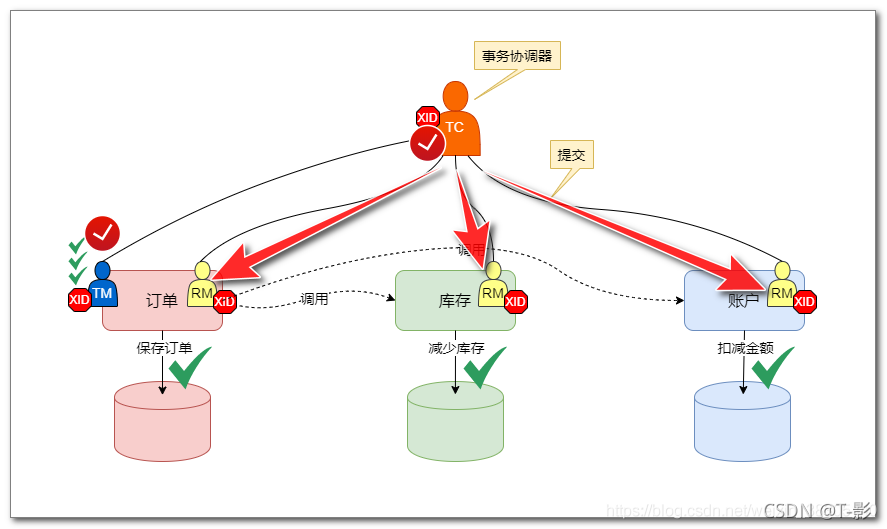
添加Seata At事务
1.父项目添加seata依赖
		<dependency>
          <groupId>com.alibaba.cloud</groupId>
          <artifactId>spring-cloud-alibaba-seata</artifactId>
          <version>${spring-cloud-alibaba-seata.version}</version>
          <exclusions>
            <exclusion>
              <artifactId>seata-all</artifactId>
              <groupId>io.seata</groupId>
            </exclusion>
          </exclusions>
        </dependency>
        <dependency>
          <groupId>io.seata</groupId>
          <artifactId>seata-all</artifactId>
          <version>${seata.version}</version>
        </dependency>
2.修改三个配置文件:
- application.yml
设置事务组的组名
spring:
	cloud:
    	alibaba:
      		seata:
        		tx-service-group: order_tx_group
- registry.conf
指定注册中心的地址
registry {
  # file 、nacos 、eureka、redis、zk、consul、etcd3、sofa
  type = "eureka"

  nacos {
    serverAddr = "localhost"
    namespace = ""
    cluster = "default"
  }
  eureka {
    serviceUrl = "http://localhost:8761/eureka"
    # application = "default"
    # weight = "1"
  }
  redis {
    serverAddr = "localhost:6379"
    db = "0"
    password = ""
    cluster = "default"
    timeout = "0"
  }
  zk {
    cluster = "default"
    serverAddr = "127.0.0.1:2181"
    session.timeout = 6000
    connect.timeout = 2000
    username = ""
    password = ""
  }
  consul {
    cluster = "default"
    serverAddr = "127.0.0.1:8500"
  }
  etcd3 {
    cluster = "default"
    serverAddr = "http://localhost:2379"
  }
  sofa {
    serverAddr = "127.0.0.1:9603"
    application = "default"
    region = "DEFAULT_ZONE"
    datacenter = "DefaultDataCenter"
    cluster = "default"
    group = "SEATA_GROUP"
    addressWaitTime = "3000"
  }
  file {
    name = "file.conf"
  }
}

config {
  # file、nacos 、apollo、zk、consul、etcd3、springCloudConfig
  type = "file"

  nacos {
    serverAddr = "localhost"
    namespace = ""
    group = "SEATA_GROUP"
  }
  consul {
    serverAddr = "127.0.0.1:8500"
  }
  apollo {
    app.id = "seata-server"
    apollo.meta = "http://192.168.1.204:8801"
    namespace = "application"
  }
  zk {
    serverAddr = "127.0.0.1:2181"
    session.timeout = 6000
    connect.timeout = 2000
    username = ""
    password = ""
  }
  etcd3 {
    serverAddr = "http://localhost:2379"
  }
  file {
    name = "file.conf"
  }
}
- file.conf
事务组对应使用的协调器
修改
vgroupMapping.order_tx_group = "seata-server"
transport {
  # tcp udt unix-domain-socket
  type = "TCP"
  #NIO NATIVE
  server = "NIO"
  #enable heartbeat
  heartbeat = true
  # the client batch send request enable
  enableClientBatchSendRequest = true
  #thread factory for netty
  threadFactory {
    bossThreadPrefix = "NettyBoss"
    workerThreadPrefix = "NettyServerNIOWorker"
    serverExecutorThread-prefix = "NettyServerBizHandler"
    shareBossWorker = false
    clientSelectorThreadPrefix = "NettyClientSelector"
    clientSelectorThreadSize = 1
    clientWorkerThreadPrefix = "NettyClientWorkerThread"
    # netty boss thread size,will not be used for UDT
    bossThreadSize = 1
    #auto default pin or 8
    workerThreadSize = "default"
  }
  shutdown {
    # when destroy server, wait seconds
    wait = 3
  }
  serialization = "seata"
  compressor = "none"
}
service {
  #transaction service group mapping
  # order_tx_group 与 yml 中的 “tx-service-group: order_tx_group” 配置一致
  # “seata-server” 与 TC 服务器的注册名一致
  # 从eureka获取seata-server的地址,再向seata-server注册自己,设置group
  vgroupMapping.order_tx_group = "seata-server"
  #only support when registry.type=file, please don't set multiple addresses
  order_tx_group.grouplist = "127.0.0.1:8091"
  #degrade, current not support
  vgroupMapping.order_tx_group = "seata-server"
  enableDegrade = false
  #disable seata
  disableGlobalTransaction = false
}

client {
  rm {
    asyncCommitBufferLimit = 10000
    lock {
      retryInterval = 10
      retryTimes = 30
      retryPolicyBranchRollbackOnConflict = true
    }
    reportRetryCount = 5
    tableMetaCheckEnable = false
    reportSuccessEnable = false
  }
  tm {
    commitRetryCount = 5
    rollbackRetryCount = 5
  }
  undo {
    dataValidation = true
    logSerialization = "jackson"
    logTable = "undo_log"
  }
  log {
    exceptionRate = 100
  }
}
3.新建自动配置类,创建数据源代理
package cn.tedu;

import com.zaxxer.hikari.HikariDataSource;
import io.seata.rm.datasource.DataSourceProxy;
import org.springframework.boot.context.properties.ConfigurationProperties;
import org.springframework.context.annotation.Bean;
import org.springframework.context.annotation.Configuration;
import org.springframework.context.annotation.Primary;

import javax.sql.DataSource;

//自动配置类
@Configuration
public class DSAutoConf {
    //创建原始数据源
    @ConfigurationProperties(prefix = "spring.datasource")//将yml配置注入进来
    @Bean
    public DataSource getDataSource(){
        return new HikariDataSource();
    }
    //创建数据源代理
    @Primary //首选对象
    @Bean
    public DataSource getDataSourceProxy(DataSource ds){
        return new DataSourceProxy(ds);
    }
}
4.排除spring自己的配置源
启动类上加注解
@SpringBootApplication(exclude = DataSourceAutoConfiguration.class)//排除spring自己的默认配置源
5.在业务方法上添加事务注解
- @Transactional 控制本地事务
- @GlobleTransactional 启动全局事务,只在第一个模块添加
实现类上加注解
   @Transactional//控制本地事务
    @GlobalTransactional//启动全局事务,只加在第一个模块
    @Override
    public void create(Order order) {
        // TODO: 从全局唯一id发号器获得id
        String s = easyIdClient.getId("order_business");
        Long orderId = Long.valueOf(s);
        order.setId(orderId);

        orderMapper.create(order);

        // TODO: 调用storage,修改库存
        storageClient.decrease(order.getProductId(),order.getCount());

        // TODO: 调用account,修改账户余额
        accountClient.decrease(order.getUserId(),order.getMoney());

    }
版权声明:本文为weixin_60590058原创文章,遵循CC 4.0 BY-SA版权协议,转载请附上原文出处链接和本声明。