微服务和VUE入门教程(12):前端提示搜索框的实现
微服务和VUE入门教程(0): 着手搭建项目
微服务和VUE入门教程(1): 搭建前端登录界面
微服务和VUE入门教程(2): 注册中心
微服务和VUE入门教程(3): user微服务的搭建
微服务和VUE入门教程(4):网关zuul的搭建
微服务和VUE入门教程(5): 前后端交互
微服务和VUE入门教程(6):连接数据库-mybatis
微服务和VUE入门教程(7):配置中心-config
微服务和VUE入门教程(8):前端主页的编写
微服务和VUE入门教程(9): token验证-token后端生成以及前端获取
微服务和VUE入门教程(10): token验证-前端登录拦截以及token过期提醒
微服务和VUE入门教程(11): mybatis 动态查询
微服务和VUE入门教程(12):前端提示搜索框的实现
微服务和VUE入门教程(13): token验证-zuul拦截与验证
微服务和VUE入门教程(14): 热部署
微服务和VUE入门教程(15): 课堂小知识
微服务和VUE入门教程(16): zuul 熔断
微服务和VUE入门教程(17): VUE 响应拦截器
微服务和VUE入门教程(18): 前端接口模块化
微服务和VUE入门教程(19): VUE组件化–子组件向父组件通信
微服务和VUE入门教程(20): VUE组件化–父组件向子组件通信
微服务和VUE入门教程(21): springboot中定时器-Schedule
微服务和VUE入门教程(22): 页面长时间未操作自动退出登录
微服务和VUE入门教程(23): 微服务之间的调用
微服务和VUE入门教程(24): 微服务之断路器
微服务和VUE入门教程(25): 微服务之Hystrix-dashboard
微服务和VUE入门教程(26): 微服务之turbine
微服务和VUE入门教程(27):VUE前端工程打包
1. 前言
为了让搜索框更加人性化,带提示信息的更加适合我们的需求。
2. 后端代码的编写
在编写前端代码之前,我们需要获取提示的信息,需要从后端获取。根据我们的需求,我们需要获取提示信息:学生姓名和学号。
2.1 mapper的xml
sql语句如下
<!--学生部分信息获取-->
<select id="stuPartInfoSel" resultMap="BaseStuMap">
    select stu_name, stu_no from student
</select>
2.2 dao层
List<Student> stuPartInfoSel();
2.3 service 接口
List<Student> getStuPartInfo();
2.4 service 实现类
@Override
public List<Student> getStuPartInfo(){
    return stuDAO.stuPartInfoSel();
}
2.5 controller
   @RequestMapping(value = "/stu_name/&/stu_no/get", method = RequestMethod.GET)
    public JSONObject getStuNameAndNo(){
        List<Student> stuNameList = stuService.getStuPartInfo();
        JSONObject result = new JSONObject();
        result.put("stuNameList",stuNameList);

        return result;
    }
3. 前端代码的编写
     <el-autocomplete
            popper-class="my-autocomplete"
            v-model="state"
            :fetch-suggestions="querySearch"
            placeholder="请输入内容"
            @select="handleSelect">
            <i
              class="el-icon-edit el-input__icon"
              slot="suffix"
             >
            </i>
            <template slot-scope="{ item }">
              <div class="name">{{ item.stuName }}</div>
              <span class="addr">{{ item.stuNo }}</span>
            </template>
          </el-autocomplete>

<style>
  .stuName {
    text-overflow: ellipsis;
    overflow: hidden;
  }
  .stuNo {
    font-size: 12px;
    color: #b4b4b4;
  }
</style>

<script>
  export default {
    data() {
      return {
      //提示信息
        stuNameList: [],
        state: ''
      };
    },
    methods: {
    //搜索框查询
      querySearch(queryString, cb) {
      // 如果提示信息为空,则查询提示信息
        if (this.stuNameList.length === 0) {
          this.getAllStuNameAndNo();
        }
        var stuInfos = this.stuNameList;
        var results = queryString ? stuInfos.filter(this.createFilter(queryString)) : stuInfos;
        // 调用 callback 返回建议列表的数据
        cb(results);
      },
      //过滤
      createFilter(queryString) {
        return (stuInfos) => {
        // 根据学生姓名和id都可以进行过滤
          return (stuInfos.stuName.toLowerCase().indexOf(queryString.toLowerCase()) === 0 ||
            stuInfos.stuNo.toLowerCase().indexOf(queryString.toLowerCase()) === 0);
        };
      },
      // 点击提示信息,查询
      handleSelect(item) {
        this.state = item.stuName;
        this.searchMess.stuName = item.stuName;
        this.searchMess.stuNo = item.stuNo;
        this.searchMess.classId = '';
        this.searchMess.stuAge1 = '';
        this.searchMess.stuAge2 = '';

        this.pagination.pageNum = 1;
        this.pagination.pageSize = 10;

        this.getStudentList();
      },
    }
  }
</script>

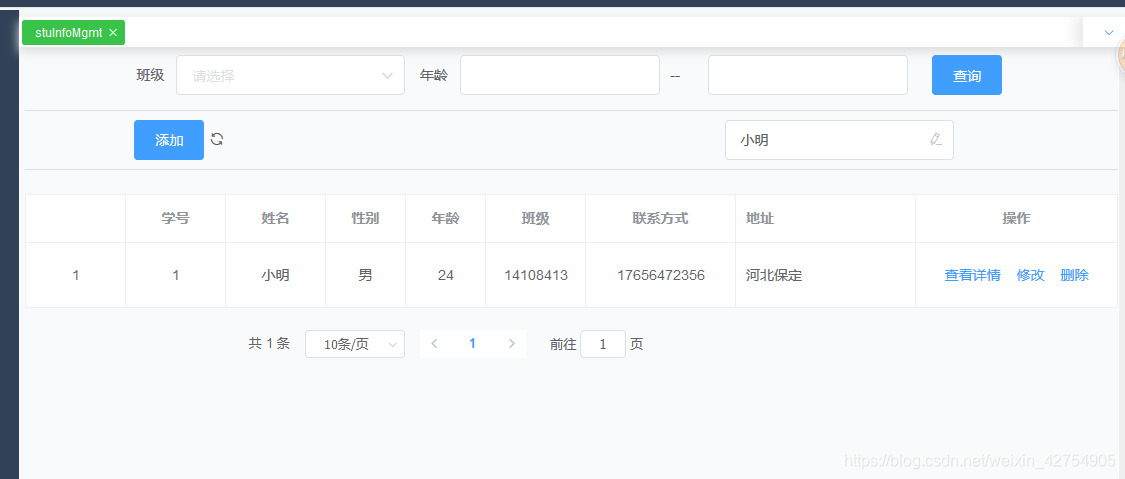
4. 刷新功能
我们发现,精确查询之后,如果想要看到全部信息,只能刷新页面。我们肯定不想这么麻烦,于是我们做一个伪刷新的功能,只是刷新数据,并不刷新界面。
如上图所示,我们在添加的按钮旁添加了一个刷新的按钮。
<span class="el-icon-refresh" style="cursor:pointer;" @click="refreshPage">刷新</span>
刷新方法
初始化页面一样。
//刷新页面
refreshPage() {
  this.searchMess.stuName = '';
  this.searchMess.stuNo = '';
  this.searchMess.classId = '';
  this.searchMess.stuAge1 = '';
  this.searchMess.stuAge2 = '';

  this.pagination.pageNum = 1;
  this.pagination.pageSize = 10;
  this.state = '';
  this.getStudentList();

}