1、Java NIO基本介绍
●Java NIO (New IO)也有人称之为java non-blocking IO是从Java 1.4版本开始引入的一-个新的IO API,可以替代标准的Java IO API。NIO与原来的IO有同样的作用和目的,但是使用的方式完全不同,NIO支持面向缓冲区的、基于通道的IO操作。NIO将以更加高效的方式进行文件的读写操作。NIO可以理解为非阻塞IO,传统的IO的read和write只能阻塞执行,线程在读写IO期间不能干其他事情,比如调用socket.read()时, 如果服务器一直没有数据传输过来,线程就一直阻塞,而NIO中可以配置socket为非阻塞模式。
●NIO相关类都被放在java.nio包及子包下,并且对原java.io包中的很多类进行改写。
●NIO有三大核心部分: Channel( 通道),Buffer( 缓冲区), Selector(选择器)
●Java NIO的非阻塞模式,使一个线程从某通道发送请求或者读取数据,但是它仅能得到目前可用的数据,如果目前没有数据可用时,就什么都不会获取,而不是保持线程阻塞,所以直至数据变的可以读取之前,该线程可以继续做其他的事情。非阻塞写也是如此,一个线程请求写入一些数据到某通道,但不需要等待它完全写入,这个线程同时可以去做别的事情。
●通俗理解: NIO是可以做到用一个线程来处理多个操作的。假设有1000个请求过来根据实际情况,可以分配20或者80个线程来处理。不像之前的阻塞IO那样,非得分配1000个。
1.1、NIO和BIO的比较
●BIO以流的方式处理数据,而NIO以块的方式处理数据,块I/O的效率比流I/O高很多
●BIO是阻塞的,NIO则是非阻塞的
●BIO基于字节流和字符流进行操作,而NIO基于Channel(通道)和Buffer(缓冲区)进行操作,数据总是从通道读取到缓冲区中,或者从缓冲区写入到通道中。Selector(选择器)用于监听多个通道的事件(比如:连接请求,数据到达等),因此使用单个线程就可以监听多个客户端通道
| NIO | BIO |
|---|---|
| 面向缓冲区(Buffer) | 面向流(Stream) |
| 非阻塞(Non Blocking IO) | 阻塞IO(Blocking IO) |
| 选择器(Selectors) |
1.2、NIO三大核心原理示意图
NOI有三大核心部分:Channel(通道),Buffer(缓冲区),Selector(选择器)
1.2.1、Buffer缓冲区
缓冲区本质上是一块可以写入数据,然后可以从中读取数据的内存。这块内存被包装成NIO Buffer对象,并提供了一组方法,用来方便的访问该块内存。相比较直接对数组的操作,Buffer API更加容易操作和管理。
1.2.2、Channel(通道)
Java NIO的通道类似流,但又有些不同:既可以从通道中读取数据,又可以写数据到通道。但流的(input或output)读写通常是单向的。通道可以非阻塞读取和写入通道, 通道可以支持读取或写入缓冲区,也支持异步地读写。
1.2.3、Selector选择器
Selector是一个Java NIO组件,可以能够检查一个或多个NIO通道,并确定哪些通道已经准备好进行读取或写入。这样,一个单独的线程可以管理多个channel,从而管理多个网络连接,提高效率
●每个channel都会对应一个Buffer
●一个线程对应Selector,一个Selector对应多 个channel(连接)
●程序切换到哪个channel是由事件决定的
●Selector会根据不同的事件,在各个通道上切换
●Buffer就是一个内存块 ,底层是一个数组
●数据的读取写入是通过Buffer完成的, BIO中要么是输入流,或者是输出流,不能双向,但是NIO的Buffer是可以读也可以写。
●Java NIO系统的核心在于:通道(Channel)和缓冲区 (Buffer)。通道表示打开到IO设备(例如:文件、套接字)的连接。若需要使用NIO系统,需要获取用于连接IO设备的通道以及用于容纳数据的缓冲区。然后操作缓冲区,对数据进行处理。简而言之,Channel 负责传输,Buffer 负责存取数据
2、NIO核心一:缓冲区(Buffer)
缓冲区(Buffer)
一个用于特定基本数据类型的容器。由java.nio包定义的,所有缓冲区都是Buffer抽象类的子类。Java NIO中的Buffer主要用于与NIO通道进行交互,数据都是从通道读入缓冲区,从缓冲区写入通道的。
Buffer类及其子类
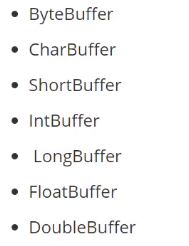
Buffer就像一个数组,可以保存多个相同类型的数据。根据数据类型不同,有以下Buffer常用子类:
上述Buffer类他们都采用相似的方法进行管理数据,只是各自管理的数据类型不同而已。都是通过如下方法获取一个Buffer对象:
static XxxBuffer allocate(int capacity):创建一个容量为capacity的XxxBuffer对象
缓冲区的基本属性
Buffer中的重要概念:


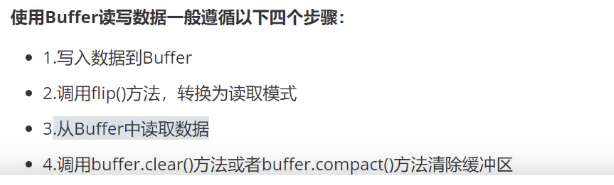
API测试:
package com.jialidun.nio;

import org.junit.Test;

import java.nio.ByteBuffer;

/**
 * 目标:对缓冲区Buffer的常用API进行案例实现
 */
public class BufferTest {

    @Test
    public void test02(){
        //1、分配一个缓冲区,容量设置成10
        ByteBuffer buffer = ByteBuffer.allocate(10);
        System.out.println(buffer.position());//0
        System.out.println(buffer.limit());//10
        System.out.println(buffer.capacity());//10
        System.out.println("--------------------------");
        String name = "abcdef";
        buffer.put(name.getBytes());
        System.out.println(buffer.position());//6
        System.out.println(buffer.limit());//10
        System.out.println(buffer.capacity());//10

        System.out.println("--------------------------");

        //2、chear清除缓冲区中的数据
        //clear只是将位置恢复到0,而buffer里还有数据,往里添加数据的时候会覆盖之前的数据
        buffer.clear();
        System.out.println(buffer.position());//0
        System.out.println(buffer.limit());//10
        System.out.println(buffer.capacity());//10
        System.out.println((char)buffer.get());//a

        //3、定义一个缓冲区
        ByteBuffer buf = ByteBuffer.allocate(10);
        String n = "rygar666";
        buf.put(n.getBytes());
        buf.flip();

        //读取数据
        byte[] b = new byte[2];
        buf.get(b);
        String rs = new String(b);
        System.out.println(rs);

        System.out.println(buf.position());//2
        System.out.println(buf.limit());//8
        System.out.println(buf.capacity());//10

        System.out.println("-------------------");

        buf.mark();//标记此刻这个位置!2

        byte[] b2 = new byte[3];
        buf.get(b2);
        System.out.println(new String(b2));
        System.out.println(buf.position());//5
        System.out.println(buf.limit());//8
        System.out.println(buf.capacity());//10
        System.out.println("---------------------------");

        buf.reset();//回到标记位置
        if(buf.hasRemaining()){
            System.out.println(buf.remaining());//剩下的个数
        }

    }

    @Test
    public void test01(){
        //1、分配一个缓冲区,容量设置成10
        ByteBuffer buffer = ByteBuffer.allocate(10);
        System.out.println(buffer.position());//0
        System.out.println(buffer.limit());//10
        System.out.println(buffer.capacity());//10
        System.out.println("--------------------------");

        //2、put往缓冲区中添加数据
        String name = "abcdef";
        buffer.put(name.getBytes());
        System.out.println(buffer.position());//6
        System.out.println(buffer.limit());//10
        System.out.println(buffer.capacity());//10

        System.out.println("--------------------------");


        //3、Buffer flip()为将缓冲区的界限设置为当前位置,并将当前位置设值为0:可读模式
        buffer.flip();
        System.out.println(buffer.position());//0
        System.out.println(buffer.limit());//6
        System.out.println(buffer.capacity());//10

        System.out.println("----------------------------");

        //4、get数据的读取
       char ch = (char)buffer.get();
        System.out.println(ch);//a
        System.out.println(buffer.position());//1
        System.out.println(buffer.limit());//6
        System.out.println(buffer.capacity());//10
    }

}
直接与非直接缓冲区
什么是直接内存与非直接内存
byte byffer可以是两种类型, -种是基于直接内存(也就是非堆内存) ;另一种是非直接内存(也就是堆内存)。对于直接内存来说,JVM将会在IO操作上具有更高的性能,因为它直接作用于本地系统的IO操作。而非直接内存,也就是堆内存中的数据,如果要作IO操作,会先从本进程内存复制到直接内存,再利用本地IO处理。
从数据流的角度,非直接内存是下面这样的作用链:
本地IO-->直接内存-->非直接内存-->直接内存-->本地IO
而直接内存是:
本地IO-->直接内存-->本地IO
很明显,在做IO处理时,比如网络发送大量数据时,直接内存会具有更高的效率。直接内存使用allocateDirect创建,但是它比申请普通的堆内存需要耗费更高的性能。不过,这部分的数据是在JVM之外的,因此它不会占用应用的内存。所以呢,当你有很大的数据要缓存,并且它的生命周期又很长,那么就比较适合使用直接内存。只是一般来说,如果不是能带来很明显的性能提升,还是推荐直接使用堆内存。字节缓冲区是直接缓冲区还是非直接缓冲区可通过调用其isDirect()方法来确定。
使用场景
1.有很大的数据需要存储,它的声明周期又很长
2.适合频繁的IO操作,比如网络并发场景
测试代码:
@Test
    public void test03(){
        //1、创建一个直接内存的缓冲区
        ByteBuffer buffer = ByteBuffer.allocateDirect(1024);
        System.out.println(buffer.isDirect());//true


    }
3、NIO核心二:通道(Channel)
通道Channel概述
通道(Channel) :由java.nio.channels包定义的。Channel表示IO源与目标打开的连接。Channel 类似于传统的"流”。只不过Channel本身不能直接访问数据,Channel 只能与Buffer进行交互。
1、NIO的通道类似于流,但有些区别如下:
●通道可以同时进行读写,而流只能读或者只能写
●通道可以实现异步读写数据
●通道可以从缓冲读数据,也可以写数据到缓冲
2、BIO中的stream是单向的,例如FileInputStream对象只能进行读取数据的操作,而NIO中的通道(Channel)是双向的,可以读操作,也可以写操作。
3、Channel在NIO中是一个接口
public interface Channel extends Closeable{}
常用的Channel实现类
●FileChannel:用于读取、写入、映射和操作文件的通道。
●DatagramChannel:通过UDP读写网络中的数据通道。
●SocketChannel:通过TCP读写网络中的数据。
●ServerSocketChannel:可以监听新进来的TCP连接,对每一个新进来的连接都会创建一个SocketChannel。(ServerSocketChannel类似ServerSocket,SocketChannel类似Socket)
FileChannel类
获取通道的一种方式是对支持通道的对象调用getChannel()方法。支持通道的类如下:
●FileInputStream
●FileOutputStream
●RandomAccessFile
●DatagramSocket
●Socket
●ServerSocket
获取通道的其他方式是使用Files类的静态方法newByteChannel()获取字节通道。或者通过通道的静态方法open()打开并返回指定通道。
FileChannel的常用方法
案例1:本地文件写数据

package com.jialidun;

import org.junit.Test;

import java.io.*;
import java.nio.ByteBuffer;
import java.nio.channels.FileChannel;

public class ChannelTest {
    @Test
    public void write(){

        try {
            //1、需要得到一个字节输出流,通向目标文件
            FileOutputStream fos = new FileOutputStream("data01.txt");

            //2、得到字节输出流对应的通道Channel
            FileChannel channel = fos.getChannel();

            //3、分配缓冲区
            ByteBuffer buffer = ByteBuffer.allocate(1024);
            buffer.put("Java是世界上最好的语言!".getBytes());

            //4、把缓冲区切换成写出模式
            buffer.flip();
            channel.write(buffer);
            channel.close();
            System.out.println("写数据到文件中!");

        } catch (FileNotFoundException e) {
            e.printStackTrace();
        } catch (IOException e) {
            e.printStackTrace();
        }
    }
}
案例2:本地文件读数据
package com.jialidun;

import org.junit.Test;

import java.io.*;
import java.nio.ByteBuffer;
import java.nio.channels.FileChannel;

public class ChannelTest {
@Test
    public void read(){

        try {
            //1、定义一个文件字节输入流与源文件接通
            FileInputStream fis = new FileInputStream("data01.txt");

            //2、需要得到文件字节输入流的文件通道
            FileChannel channel = fis.getChannel();

            //3、定义一个缓冲区
            ByteBuffer buffer = ByteBuffer.allocate(1024);

            //4、读取数据到缓冲区
            channel.read(buffer);
            buffer.flip();

            //5、读取出缓冲区中的数据并输出即可
            //buffer.remaining()剩余的个数
            String rs = new String(buffer.array(),0,buffer.remaining());
            System.out.println(rs);

        } catch (FileNotFoundException e) {
            e.printStackTrace();
        } catch (IOException e) {
            e.printStackTrace();
        }
    }
}
案例3:使用Buffer完成文件复制
package com.jialidun;

import org.junit.Test;

import java.io.*;
import java.nio.ByteBuffer;
import java.nio.channels.FileChannel;

public class ChannelTest {

    @Test
    public void copy() {
        //源文件
        File srcFile = new File("E:\\image\\RYGAR.jpg");
        File destFile = new File("E:\\Files\\RYGAR.jpg");

        FileChannel fisChannel = null;
        FileChannel fosChannel = null;

        try {
            //得到一个字节输出流、字节输入流
            FileInputStream fis = new FileInputStream(srcFile);

            //得到一个字节输出流
            FileOutputStream fos = new FileOutputStream(destFile);

            //得到的是文件通道
            fisChannel = fis.getChannel();
            fosChannel = fos.getChannel();

            //分配缓冲区
            ByteBuffer buffer = ByteBuffer.allocate(1024);
            while (true){
                //必须先清空缓存然后再写入数据到缓冲区
                buffer.clear();
                //开始读取一次数据
                int flag = fisChannel.read(buffer);
                if (flag==-1){
                    break;
                }
                //已经读取了数据,把缓冲区的模式切换成可读模式
                buffer.flip();
                //把数据写出到输出通道
                fosChannel.write(buffer);
            }


        } catch (FileNotFoundException e) {
            e.printStackTrace();
        } catch (IOException e) {
            e.printStackTrace();
        }finally {
            try {
                fisChannel.close();
            } catch (IOException e) {
                e.printStackTrace();
            }

            try {
                fosChannel.close();
            } catch (IOException e) {
                e.printStackTrace();
            }
            System.out.println("复制完成!");
        }
    }
}
案例4:分散(Scatter)和聚集(Gather)
分散读取(Scatter):是指把Channel通道的数据读入到多个缓冲区中去
聚集写入(Gathering):是指将多个Buffer中的数据"聚集"到Channel。
package com.jialidun;

import org.junit.Test;

import java.io.*;
import java.nio.ByteBuffer;
import java.nio.channels.FileChannel;

public class ChannelTest {

    @Test
    public void test() throws IOException {
        //1、字节输入管道
        FileInputStream fis = new FileInputStream("data01.txt");

        FileChannel fisChannel = fis.getChannel();

        //2、字节输出管道
        FileOutputStream fos = new FileOutputStream("data02.txt");

        FileChannel fosChannel = fos.getChannel();

        //3、定义多个缓冲区做数据分散
        ByteBuffer buffer1 = ByteBuffer.allocate(4);
        ByteBuffer buffer2 = ByteBuffer.allocate(1024);

        ByteBuffer[] buffers = {buffer1,buffer2};
        //4、从通道中读取数据分散到各个缓冲区
        fisChannel.read(buffers);

        //5、我们可以从每个缓冲区中查询是否有数据读取到了
        for (ByteBuffer buffer:buffers){
            buffer.flip();//切换到读取模式
            System.out.println(new String(buffer.array(),0,buffer.remaining()));
        }

        //6、聚集写入到通道
        fosChannel.write(buffers);
        fisChannel.close();
        fosChannel.close();
        System.out.println("文件复制~");

    }
}
案例5:transferFrom()
从目标通道中去复制原通道数据
package com.jialidun;

import org.junit.Test;

import java.io.*;
import java.nio.ByteBuffer;
import java.nio.channels.FileChannel;

public class ChannelTest {
    @Test
    public void test02() throws IOException {
        //1、字节输入管道
        FileInputStream fis = new FileInputStream("data01.txt");
        FileChannel fisChannel = fis.getChannel();

        //2、字节输出管道
        FileOutputStream fos = new FileOutputStream("data04.txt");
        FileChannel fosChannel = fos.getChannel();

        //3、复制数据
        fosChannel.transferFrom(fisChannel,fisChannel.position(),fisChannel.size());

        fisChannel.close();
        fosChannel.close();
        System.out.println("完成复制!");
    }
}
案例6:transferTo()
把原通道数据复制到目标通道
package com.jialidun;

import org.junit.Test;

import java.io.*;
import java.nio.ByteBuffer;
import java.nio.channels.FileChannel;

public class ChannelTest {
    @Test
    public void test02() throws IOException {
        //1、字节输入管道
        FileInputStream fis = new FileInputStream("data01.txt");
        FileChannel fisChannel = fis.getChannel();

        //2、字节输出管道
        FileOutputStream fos = new FileOutputStream("data04.txt");
        FileChannel fosChannel = fos.getChannel();

        //3、复制数据      fisChannel.transferTo(fisChannel.position(),fisChannel.size(),fosChannel);
        fisChannel.close();
        fosChannel.close();
        System.out.println("完成复制!");
    }
}
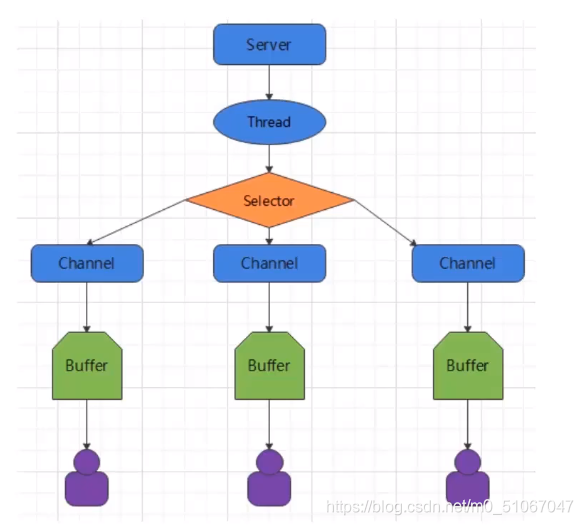
4、NIO核心三:选择器(Selector)
选择器(Selector)概述
选择器(Selector) 是SelectableChannle对象的多路复用器,Selector 可以同时监控多个SelectableChannel的IO状况,也就是说,利用Selector可使一个单独的线程管理多个 Channel。Selector 是非阻塞IO的核心
●Java的NIO,用非阻塞的IO方式。可以用一个线程,处理多个的客户端连接,就会使用到Selector(选择器)
●Selector能够检测多个注册的通道上是否有事件发生(注意:多个Channel以事件的方式可以注册到同一个Selector),如果有事件发生,便获取事件然后针对每个事件进行相应的处理。这样就可以只用一个单线程去管理多个通道,也就是管理多个连接和请求。
●只有在连接/通道真正有读写事件发生时,才会进行读写,就大大地减少了系统开销,并且不必为每个连接都创建一个线程, 不用去维护多个线程
●避免了多线程之间的上下文切换导致的开销
选择器(Selector)的应用
创建Selector:通过调用Selector.open()方法创建一个Selector
Selector selector = selector.open();
向选择器注册通道:SelectableChannel.regist(Selector sel,int ops)
当调用register(Selector sel, int ops)将通道注册选择器时,选择器对通道的监听事件,需要通过第二个参数ops指定。可以监听的事件类型(用可使用SelectionKey的四个常量表示) :
●读:SelectionKey.OP_READ(1)
●写:SelectionKey.OP_WROTE(4)
●连接:SelectionKey.OP_CONNECT(8)
●接收:SelectionKey.OP_ACCEPT(16)
●若注册时不止监听一个事件,则可以使用"位或"操作符连接。
int interface = SelectionKey.OP_READ|SelectionKey.OP_WRITE
4.1、NIO非阻塞时网络通信原理分析
Selector示意图和特点说明
Selector可以实现: 一个I/O 线程可以并发处理N个客户端连接和读写操作,这从根本上解决了传统同步阻塞I/O一连接一 线程模型, 架构的性能、弹性伸缩能力和可靠性都得到了极大的提升。
服务端流程
当客户端连接服务端时,服务端会通过ServerSocketChannel得到SocketChannel:
1、获取通道
ServerSocketChannel ssChannel = ServerSocketChannel.open();
2、切换非阻塞模式
ssChannel.configureBlocking(false);
3、绑定连接
ssChannel.bind(new InetSocketAddress(9999);
4、获取选择器
Selector selector = Selector.open();
5、将通道注册到选择器上,并且指定"监听接收事件"
ssChannel.register(Selector,selectionKey.OP_ACCEPT);
6、轮询式的获取选择器上已经"准备就绪"的事件
//轮询式的获取选择器上已经“准备就绪”的事件
while (selector. select( > 0) {
	System. out. print1n("轮一轮");
//7.获取当前选择器中所有注册的“选择键(己就绪的监听事件)”
	Iterator<Selectionkey> it = selector. selectedkeys (). iterator();
	while (it. hasNext()) {
	//8.获取准备“就绪"的是事件
	Selectionkey sk = it. next();
//9.判断具体是什么事件准备就绪
if (sk. isAcceptable() {
	//10.若“接收就绪”, 获取客户端连接
	SocketChanne1 sChanne1 = ssChanne1 . accept();
	//11.切换非阻塞 模式
	sChanne1. configureB locking(false);
	//12.将该通道注册到选择器上
	sChanne1. register(selector, Selectionkey. OP_ READ);
	} else if (sk. isReadable() {
		//13.获取当前选择器上“读就绪”状态的通道
		socketChanne1 sChanne1 = (SocketChanne1)sk.channe();
		//14.读取数据
		ByteBuffer buf = ByteBuffer. al1ocate (1024);
		int len = 0;
		while ((len = sChanne1. read(buf)) > 0) {
			buf. flip();
			system.out.print1n(new string (buf. array(, 0,1en));
			buf. clear();
		}
	}
		//15.取消选择键 SelectinonKey
		it.remove();
  }
}
客户端流程
1、获取通道SocketChannel sChannel = SocketChannel.open(new InetSocketAddress("127.0.0.1",9999));
2、切换非阻塞模式sChanne1. configureB locking(false);
3、分配指定大小的缓冲区ByteBuffer buf = ByteBuffer. allocate (1024);
4、发送数据给服务端
scanner scan = new Scanner (System. in);
while (scan. hasNext(){
	String str = scan. nextline();
	buf. put((new simpleDateFormat("yyyy/MM/dd HH:mm: ss"). format (System. currentTimeMillis())+ "\n"+ str).getBytes());
	buf. flip();
	sChanne1. write (buf);
	buf.clear();
  }
  //关闭通道
  sChannel.close();
服务端实现:
package com.jialidun.one;

import java.io.IOException;
import java.net.InetSocketAddress;
import java.nio.ByteBuffer;
import java.nio.channels.SelectionKey;
import java.nio.channels.Selector;
import java.nio.channels.ServerSocketChannel;
import java.nio.channels.SocketChannel;
import java.util.Iterator;

/**
 * 目标:NIO非阻塞通信下的入门案例:服务端开发
 */
public class Server {
    public static void main(String[] args) throws IOException {
        System.out.println("---服务端启动---");

        //1、获取通道、负责链接客户端的连接请求
        ServerSocketChannel ssChannel = ServerSocketChannel.open();
        //2、切换为非阻塞模式
        ssChannel.configureBlocking(false);
        //3、绑定连接的端口
        ssChannel.bind(new InetSocketAddress(9999));

        //4、获取选择器Selector
        Selector selector = Selector.open();

        //5、将通道都注册到选择器上去,并且开始指定监听接收事件
        ssChannel.register(selector, SelectionKey.OP_ACCEPT);

        //6、使用Selector选择器轮询已经就绪好的事件
        while (selector.select() > 0){
            //7、获取选择器中的所有注册的通道中已经就绪好的事件
            Iterator<SelectionKey> it = selector.selectedKeys().iterator();
            //8、开始遍历这些准备好的事件
            while (it.hasNext()){
                //提取当前这个事件
                SelectionKey sk = it.next();
                //9、判断这个事件具体是什么
                if(sk.isAcceptable()){
                    //10、直接获取当前接入的客户端通道
                    SocketChannel socketChannel = ssChannel.accept();
                    //11、切换成非阻塞模式
                    socketChannel.configureBlocking(false);
                    //12、将本客户端通道注册到选择器
                    socketChannel.register(selector,SelectionKey.OP_READ);
                }else if(sk.isReadable()){
                    //13、获取当前选择器上的读就绪事件
                    SocketChannel socketChannel = (SocketChannel) sk.channel();
                    //14、开始读取数据
                    ByteBuffer buffer = ByteBuffer.allocate(1024);
                    int len;
                    while ((len=socketChannel.read(buffer)) > 0){
                        buffer.flip();
                        System.out.println(new String(buffer.array(),0,len));
                        buffer.clear();//清楚之前的数据
                    }
                }
                it.remove();//处理完毕之后需要移除当前时间
            }
        }
    }
}
客户端实现:
package com.jialidun.one;


import java.io.IOException;
import java.net.InetSocketAddress;
import java.nio.ByteBuffer;
import java.nio.channels.SocketChannel;
import java.util.Scanner;

/**
 * 目标:客户端案例实现-基于NIO非阻塞通信
 */
public class Client {
    public static void main(String[] args) throws IOException {
        //1、获取通道
        SocketChannel sChannel = SocketChannel.open(new InetSocketAddress("127.0.0.1",9999));
        //2、切换成非阻塞模式
        sChannel.configureBlocking(false);
        //3、分配指定缓冲区大小
        ByteBuffer buffer = ByteBuffer.allocate(1024);
        //4、发送数据给服务端
        Scanner sc = new Scanner(System.in);
        while (true){
            System.out.print("请说:");
            String msg =sc.nextLine();
            buffer.put(("天蓬:"+msg).getBytes());
            buffer.flip();
            sChannel.write(buffer);
            buffer.clear();
        }
    }
}