目录
git基本组成框架:Workspace、Stage、Repository、Remote
- Workspace:开发者工作区,当前写代码的目录
- Stage:暂存区/缓存区
- Repository:本地仓库,本地所有的提交都会保存在这里,git会保存好每一个历史版本
- Remote:远程仓库,服务器仓库
一、Git常用命令
1.设置用户签名
CC@LAPTOP-R4VGGC1O MINGW64 ~
# git config --global user.name 用户名
文件保存在:C:\Users\CC\.gitconfig
2.初始化本地库
git init 初始化当前目录为仓库,初始化后会自动将当前仓库设置为master
3.查看本地库状态
git status
# git status
On branch master

No commits yet

nothing to commit (create/copy files and use "git add" to track)

CC@LAPTOP-R4VGGC1O MINGW64 /e/Git/git-demo (master)
$
新建文件并输入内容
CC@LAPTOP-R4VGGC1O MINGW64 /e/Git/git-demo (master)
# vim hello.txt

# ll
total 1
-rw-r--r-- 1 CC 197121 11 Nov 14 22:13 hello.txt

CC@LAPTOP-R4VGGC1O MINGW64 /e/Git/git-demo (master)
# cat hello.txt
hello git!
再次查看本地库状态
解释:untracked 原先没有的,新建的
CC@LAPTOP-R4VGGC1O MINGW64 /e/Git/git-demo (master)
# git status
On branch master

No commits yet

Untracked files:
  (use "git add <file>..." to include in what will be committed)
        hello.txt

nothing added to commit but untracked files present (use "git add" to track)
4.添加暂存区
git add 文件名
这里要说明一点,当我们使用git add将文件提交到暂存区以后,我们在修改这个文件时,它跟暂存区内容是没有任何关系的!我们使用git commit提交时,它只会提交暂存区中的内容,当我们首次提交内容到暂存区后,我又修改了一下文件内容,如果想提交第二次修改,我们只需要再git add一次,然后再次使用git commit提交就可以了!
CC@LAPTOP-R4VGGC1O MINGW64 /e/Git/git-demo (master)
# git add hello.txt
warning: LF will be replaced by CRLF in hello.txt.
The file will have its original line endings in your working directory
再次查看本地库状态,git已经追踪到了我们添加的文件,此时文件只是存在暂存区里面
CC@LAPTOP-R4VGGC1O MINGW64 /e/Git/git-demo (master)
# git status
On branch master

No commits yet

Changes to be committed:
  (use "git rm --cached <file>..." to unstage)
        new file:   hello.txt
git rm --cached 文件名
从暂存区里面删除文件可采用上述命令,但是不会对工作区产生影响,文件仍然存在工作区里面!
CC@LAPTOP-R4VGGC1O MINGW64 /e/Git/git-demo (master)
# git rm --cached hello.txt
rm 'hello.txt'
5.提交本地库
将暂存区的文件提交到本地库
git commit -m "日志信息" 文件名
CC@LAPTOP-R4VGGC1O MINGW64 /e/Git/git-demo (master)
# git commit -m "first commit" hello.txt
warning: LF will be replaced by CRLF in hello.txt.
The file will have its original line endings in your working directory
[master (root-commit) 689e0ac] first commit
 1 file changed, 1 insertion(+)
 create mode 100644 hello.txt
再次查看本地库状态
CC@LAPTOP-R4VGGC1O MINGW64 /e/Git/git-demo (master)
# git status
On branch master
nothing to commit, working tree clean
简单查看版本信息 689e0ac是版本号的简略写法
CC@LAPTOP-R4VGGC1O MINGW64 /e/Git/git-demo (master) # git reflog 689e0ac (HEAD -> master) HEAD@{0}: commit (initial): first commit更详细的信息:git log
CC@LAPTOP-R4VGGC1O MINGW64 /e/Git/git-demo (master)
# git log
commit 689e0acc5cb9a374eb448a5ee4b73adf8a8b5924 (HEAD -> master)
Author: chen <1424861923@qq.com>
Date:   Sun Nov 14 22:29:20 2021 +0800

    first commit
6.修改文件内容,模拟版本更替
CC@LAPTOP-R4VGGC1O MINGW64 /e/Git/git-demo (master)
# cat hello.txt
hello git!

CC@LAPTOP-R4VGGC1O MINGW64 /e/Git/git-demo (master)
# vim hello.txt

CC@LAPTOP-R4VGGC1O MINGW64 /e/Git/git-demo (master)
# cat hello.txt
hello hello hello hello hello!

CC@LAPTOP-R4VGGC1O MINGW64 /e/Git/git-demo (master)
# git status
On branch master
Changes not staged for commit:
  (use "git add <file>..." to update what will be committed)
  (use "git restore <file>..." to discard changes in working directory)
        modified:   hello.txt
修改后的文件添加到暂存区
CC@LAPTOP-R4VGGC1O MINGW64 /e/Git/git-demo (master)
# git add hello.txt
warning: LF will be replaced by CRLF in hello.txt.
The file will have its original line endings in your working directory

CC@LAPTOP-R4VGGC1O MINGW64 /e/Git/git-demo (master)
# git status
On branch master
Changes to be committed:
  (use "git restore --staged <file>..." to unstage)
        modified:   hello.txt
提交到本地库
CC@LAPTOP-R4VGGC1O MINGW64 /e/Git/git-demo (master)
# git commit -m "second commit" hello.txt
warning: LF will be replaced by CRLF in hello.txt.
The file will have its original line endings in your working directory
[master 6843ece] second commit
 1 file changed, 1 insertion(+), 1 deletion(-)
再次查看本地库状态!
CC@LAPTOP-R4VGGC1O MINGW64 /e/Git/git-demo (master)
# git status
On branch master
nothing to commit, working tree clean
查看版本信息,指针指向第二个版本
CC@LAPTOP-R4VGGC1O MINGW64 /e/Git/git-demo (master)
# git reflog
6843ece (HEAD -> master) HEAD@{0}: commit: second commit
689e0ac HEAD@{1}: commit (initial): first commit
7.版本穿梭
CC@LAPTOP-R4VGGC1O MINGW64 /e/Git/git-demo (master)
# git reflog
6843ece (HEAD -> master) HEAD@{0}: commit: second commit
689e0ac HEAD@{1}: commit (initial): first commit

CC@LAPTOP-R4VGGC1O MINGW64 /e/Git/git-demo (master)
# git reset --hard 689e0ac
HEAD is now at 689e0ac first commit

CC@LAPTOP-R4VGGC1O MINGW64 /e/Git/git-demo (master)
# git reflog
689e0ac (HEAD -> master) HEAD@{0}: reset: moving to 689e0ac
6843ece HEAD@{1}: commit: second commit
689e0ac (HEAD -> master) HEAD@{2}: commit (initial): first commit

CC@LAPTOP-R4VGGC1O MINGW64 /e/Git/git-demo (master)
# cat hello.txt
hello git!
可以看到指针切换,指向了第一个版本

二、Git分支操作
1.什么是分支?
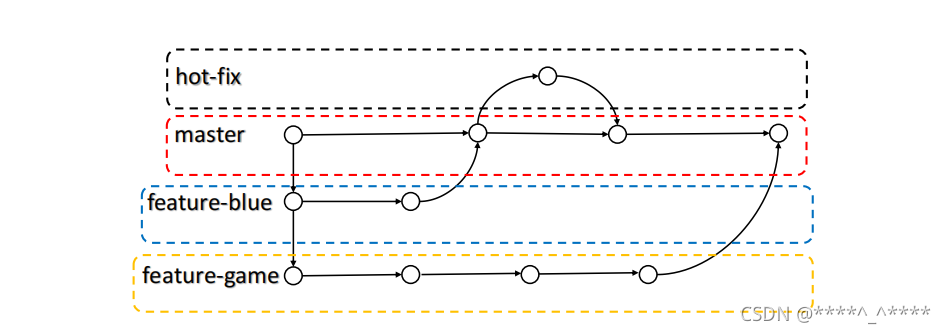
在版本控制过程中,同时推进多个任务,我们可以为每个任务创建单独的分支,使用分支意味着程序员可以把自己的工作从开发主线上分离开来,开发自己分支的时候,不会影响主线分支的运行,对于初学者而言,分支可以简单理解为副本,一个分支就是一个单独的副本,分支底层其实也是指针的引用,使用分支可以同时并行推进多个功能模块的开发,提高开发效率,各个分支在开发过程中,如果某一个分支开发失败,不会对其他分支有任何影响,只需要将失败的分支删除,然后重新开始即可!2.关于分支的操作
查看分支 git branch 单纯查看有哪些分支
CC@LAPTOP-R4VGGC1O MINGW64 /e/Git/git-demo (master)
# git branch
  aa
  hot-fix
* master
查看分支 git branch -v 包括提交信息
CC@LAPTOP-R4VGGC1O MINGW64 /e/Git/git-demo (master)
# git branch -v
* master 689e0ac first commit
创建分支,并切换到该分支上 git checkout -b 分支名 相当于以下两条命令
CC@LAPTOP-R4VGGC1O MINGW64 /e/Git/git-demo (master)
# git checkout -b bb
Switched to a new branch 'bb'
创建分支 git branch 分支名
现在我们使用该命令创建一个分支:hot-fix
CC@LAPTOP-R4VGGC1O MINGW64 /e/Git/git-demo (master)
# git branch hot-fix

CC@LAPTOP-R4VGGC1O MINGW64 /e/Git/git-demo (master)
# git branch -v
  hot-fix 689e0ac first commit
* master  689e0ac first commit
切换分支 git checkout 分支名
切换到hot-fix分支上,然后修改文件hello.txt
CC@LAPTOP-R4VGGC1O MINGW64 /e/Git/git-demo (master)
# git checkout hot-fix
Switched to branch 'hot-fix'

CC@LAPTOP-R4VGGC1O MINGW64 /e/Git/git-demo (hot-fix)
# git branch -v
* hot-fix 689e0ac first commit
  master  689e0ac first commit

CC@LAPTOP-R4VGGC1O MINGW64 /e/Git/git-demo (hot-fix)
# vim hello.txt

CC@LAPTOP-R4VGGC1O MINGW64 /e/Git/git-demo (hot-fix)
# git status
On branch hot-fix
Changes not staged for commit:
  (use "git add <file>..." to update what will be committed)
  (use "git restore <file>..." to discard changes in working directory)
        modified:   hello.txt

no changes added to commit (use "git add" and/or "git commit -a")
提交hot-fix分支修改后的文件到暂存区,然后是本地库
CC@LAPTOP-R4VGGC1O MINGW64 /e/Git/git-demo (hot-fix)
# git add hello.txt

CC@LAPTOP-R4VGGC1O MINGW64 /e/Git/git-demo (hot-fix)
# git status
On branch hot-fix
Changes to be committed:
  (use "git restore --staged <file>..." to unstage)
        modified:   hello.txt

CC@LAPTOP-R4VGGC1O MINGW64 /e/Git/git-demo (hot-fix)
# git commit -m "hot-fix first commit" hello.txt
[hot-fix 954a043] hot-fix first commit
 1 file changed, 1 insertion(+)

CC@LAPTOP-R4VGGC1O MINGW64 /e/Git/git-demo (hot-fix)
# cat hello.txt
hello git!
hot-fix complete!
当切换到master分支上查看文件内容时,发现文件内容还是之前的内容,也就是说hot-fix和master之间还没有建立任何联系!
CC@LAPTOP-R4VGGC1O MINGW64 /e/Git/git-demo (hot-fix)
# git checkout master
Switched to branch 'master'

CC@LAPTOP-R4VGGC1O MINGW64 /e/Git/git-demo (master)
# cat hello.txt
hello git!
合并分支 git merge 分支名
基于当前分支,合并另外一个分支,前提是需要保证分支之间不发生冲突!
冲突产生的原因:两个分支在同一个文件的同一个位置有两套完全不同的修改,git无法决定我们使用哪一个,必须人为决定使用哪一个!
下面我们站在master分支,将hot-fix分支合并过来!然后再次查看文件内容,可以看到在hot-fix分支上所做的修改已经同步过来了!
CC@LAPTOP-R4VGGC1O MINGW64 /e/Git/git-demo (master)
# git merge hot-fix
Updating 689e0ac..954a043
Fast-forward
 hello.txt | 1 +
 1 file changed, 1 insertion(+)

CC@LAPTOP-R4VGGC1O MINGW64 /e/Git/git-demo (master)
# cat hello.txt
hello git!
hot-fix complete!
两个分支合并过之后,下面看一个分支冲突的演示案例:同时修改master分支和hot-fix分支中的hello.txt文件,并且都提交到暂存区和本地库,当再次站在master分支上合并hot-fix分支时,出现了冲突问题!
CC@LAPTOP-R4VGGC1O MINGW64 /e/Git/git-demo (master)
# vim hello.txt

CC@LAPTOP-R4VGGC1O MINGW64 /e/Git/git-demo (master)
# cat hello.txt
master test!

CC@LAPTOP-R4VGGC1O MINGW64 /e/Git/git-demo (master)
# git add hello.txt

CC@LAPTOP-R4VGGC1O MINGW64 /e/Git/git-demo (master)
# git commit -m "test" hello.txt
[master e8d15b7] test
 1 file changed, 1 insertion(+), 2 deletions(-)

CC@LAPTOP-R4VGGC1O MINGW64 /e/Git/git-demo (master)
# git checkout hot-fix
Switched to branch 'hot-fix'

CC@LAPTOP-R4VGGC1O MINGW64 /e/Git/git-demo (hot-fix)
# vim hello.txt

CC@LAPTOP-R4VGGC1O MINGW64 /e/Git/git-demo (hot-fix)
# cat hello.txt
hot-fix test
hot-fix complete!

CC@LAPTOP-R4VGGC1O MINGW64 /e/Git/git-demo (hot-fix)
# git add hello.txt

CC@LAPTOP-R4VGGC1O MINGW64 /e/Git/git-demo (hot-fix)
# git commit -m "test" hello.txt
[hot-fix b33ba3d] test
 1 file changed, 1 insertion(+), 1 deletion(-)

CC@LAPTOP-R4VGGC1O MINGW64 /e/Git/git-demo (hot-fix)
# git checkout master
Switched to branch 'master'

CC@LAPTOP-R4VGGC1O MINGW64 /e/Git/git-demo (master)
# git merge hot-fix
Auto-merging hello.txt
CONFLICT (content): Merge conflict in hello.txt
Automatic merge failed; fix conflicts and then commit the result.

CC@LAPTOP-R4VGGC1O MINGW64 /e/Git/git-demo (master|MERGING)
$
我们也可以使用git status来查看冲突信息
CC@LAPTOP-R4VGGC1O MINGW64 /e/Git/git-demo (master|MERGING)
# git status
On branch master
You have unmerged paths.
  (fix conflicts and run "git commit")
  (use "git merge --abort" to abort the merge)

Unmerged paths:
  (use "git add <file>..." to mark resolution)
        both modified:   hello.txt

no changes added to commit (use "git add" and/or "git commit -a")
如何解决冲突问题:修改文件,打开文件之后git会将有冲突的地方(通过符号)展示出来,只需要将其修改,然后删除特殊符号、保存、提交到暂存区,最后提交到本地库(注意此时使用commit命令不能带文件名)
CC@LAPTOP-R4VGGC1O MINGW64 /e/Git/git-demo (master|MERGING)
# vim hello.txt

CC@LAPTOP-R4VGGC1O MINGW64 /e/Git/git-demo (master|MERGING)
# git add hello.txt

CC@LAPTOP-R4VGGC1O MINGW64 /e/Git/git-demo (master|MERGING)
# git commit -m "merge test"
[master 89fa447] merge test

CC@LAPTOP-R4VGGC1O MINGW64 /e/Git/git-demo (master)
$
删除分支 git branch -d 分支名
如果你想删除的分支没有合并,删除分支就意味着会丢失数据,此时git无法使用-d删除,可使用-D强制删除 git branch -D 分支名
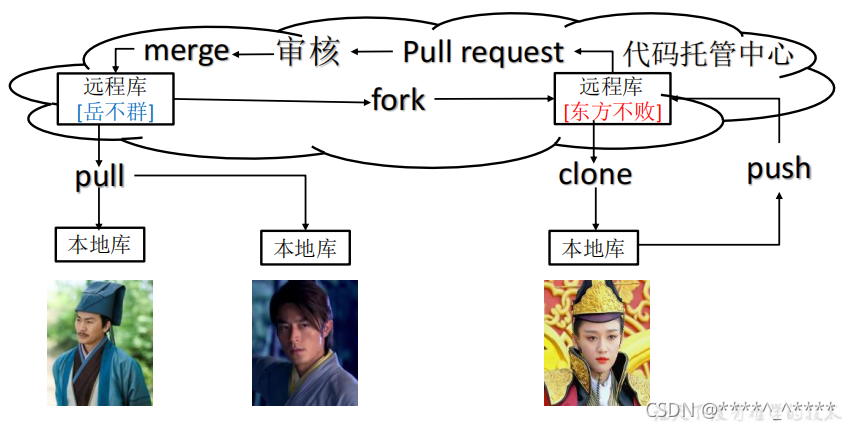
三、Git团队协作机制
1.团队内协作
2.跨团队协作
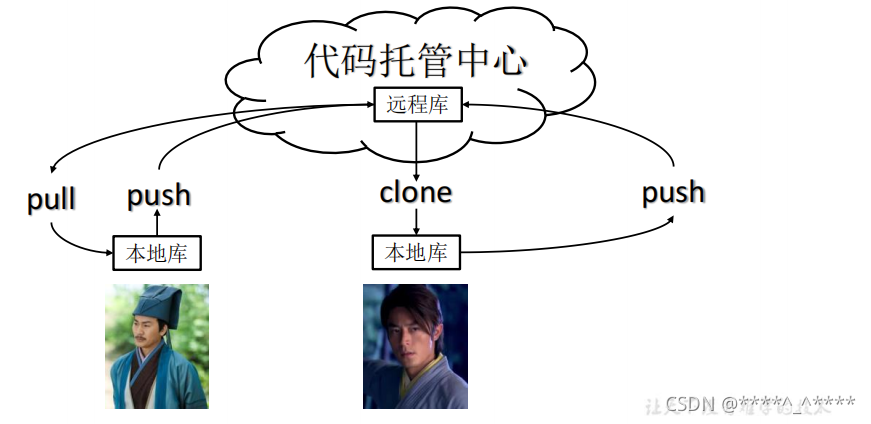
四、GitHub操作
git remote -v 查看当前所有远程地址别名
git remote add 别名 远程地址(https方式/ssh方式) 添加远程仓库并起别名
git push 别名 分支 推送本地分支上的内容到远程仓库
git clone 远程地址 将远程仓库的内容克隆到本地(从无到有)
- 不能使用别名
- 默认情况下,从远程克隆到本地库只能看到master分支,如果要将远程的分支同步到本地可以使用:
git pull 远程库地址别名 远程分支名 将远程仓库对应分支最新内容拉取下来后与本地当前分支直接合并
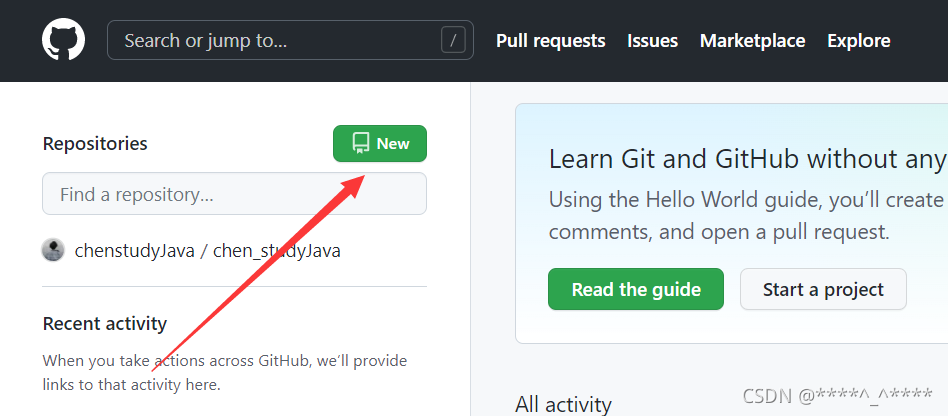
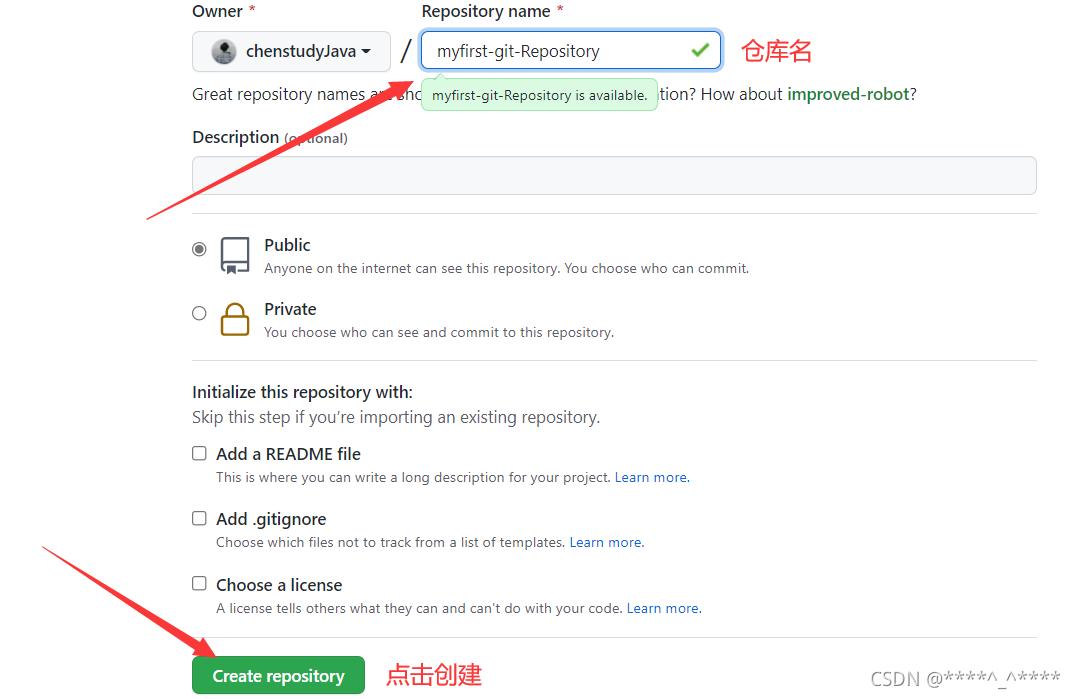
4.1Github新建远程仓库
登录GitHub,打开创建仓库界面
输入远程仓库名,设置共享方式为public,点击创建
可以看到仓库已经创建好了,并且有https/ssh两个地址
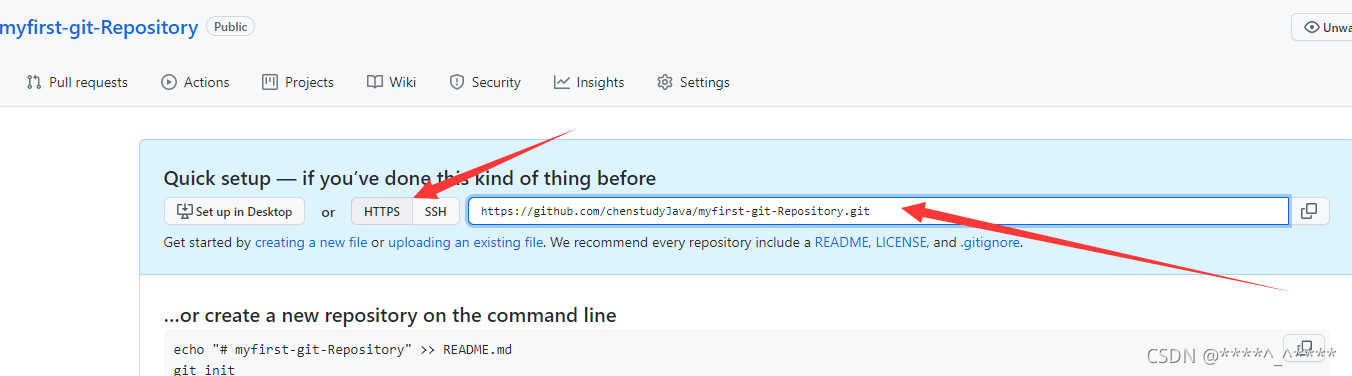
4.2本机与远程仓库关联
在本机打开Git Bash命令窗口,添加远程仓库,并起一个在本机使用的别名,如下面的代码所示,我起的别名是 git-demo
CC@LAPTOP-R4VGGC1O MINGW64 /e/Git/git-demo (master)
# git remote add git-demo https://github.com/chenstudyJava/myfirst-git-Repository.git

CC@LAPTOP-R4VGGC1O MINGW64 /e/Git/git-demo (master)
# git remote -v
git-demo        https://github.com/chenstudyJava/myfirst-git-Repository.git (fetch)
git-demo        https://github.com/chenstudyJava/myfirst-git-Repository.git (push)
推送本地分支上的内容到远程仓库
此时会弹出一个窗口让你登录,这里我先选择打开浏览器认证登录
CC@LAPTOP-R4VGGC1O MINGW64 /e/Git/git-demo (master)
# git push git-demo master
Enumerating objects: 18, done.
Counting objects: 100% (18/18), done.
Delta compression using up to 8 threads
Compressing objects: 100% (6/6), done.
Writing objects: 100% (18/18), 1.34 KiB | 229.00 KiB/s, done.
Total 18 (delta 0), reused 0 (delta 0), pack-reused 0
To https://github.com/chenstudyJava/myfirst-git-Repository.git
 * [new branch]      master -> master
然后刷新远程仓库,可以看到
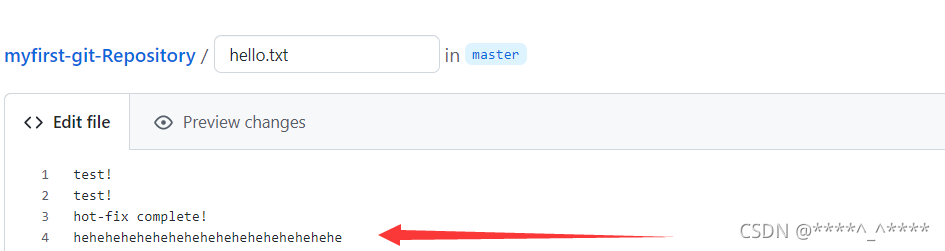
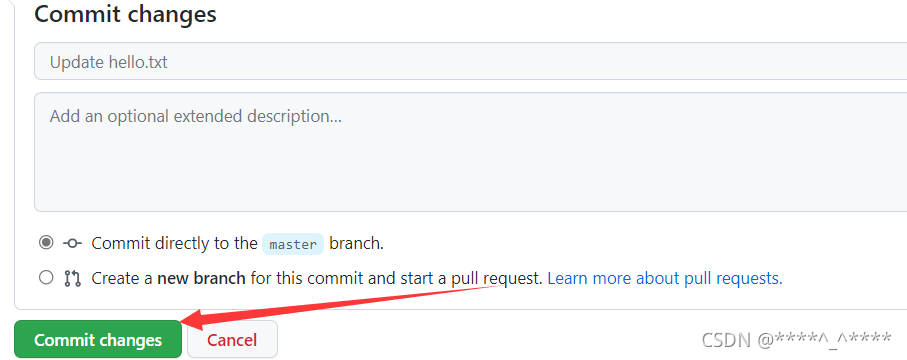
现在我在远程库修改hello.txt文件,增加了第四行的语句
提交
使用git pull命令将远程仓库的最新内容同步到本地 git pull 远程库地址别名 远程分支名
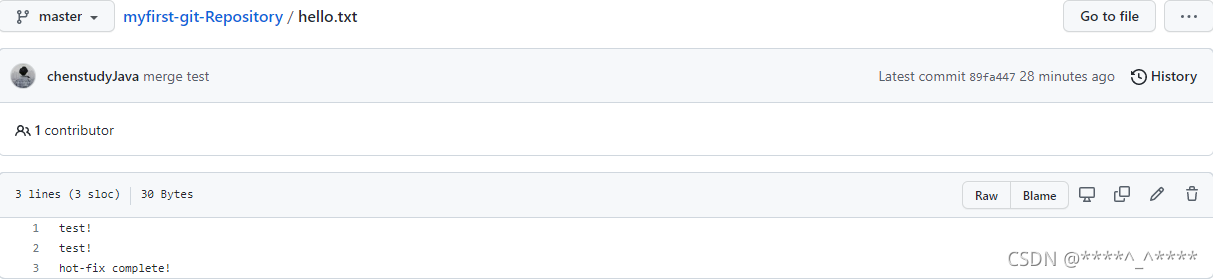
CC@LAPTOP-R4VGGC1O MINGW64 /e/Git/git-demo (master)
# git pull git-demo master
remote: Enumerating objects: 5, done.
remote: Counting objects: 100% (5/5), done.
remote: Compressing objects: 100% (2/2), done.
remote: Total 3 (delta 0), reused 0 (delta 0), pack-reused 0
Unpacking objects: 100% (3/3), 655 bytes | 109.00 KiB/s, done.
From https://github.com/chenstudyJava/myfirst-git-Repository
 * branch            master     -> FETCH_HEAD
   89fa447..f4b88ac  master     -> git-demo/master
Updating 89fa447..f4b88ac
Fast-forward
 hello.txt | 1 +
 1 file changed, 1 insertion(+)

CC@LAPTOP-R4VGGC1O MINGW64 /e/Git/git-demo (master)
# git status
On branch master
nothing to commit, working tree clean

CC@LAPTOP-R4VGGC1O MINGW64 /e/Git/git-demo (master)
# cat hello.txt
test!
test!
hot-fix complete!
hehehehehehehehehehehehehehehehehe
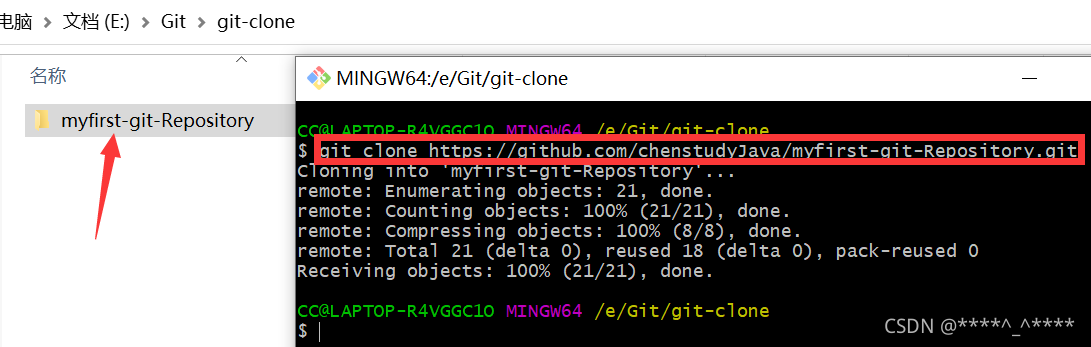
4.3克隆仓库
新建文件夹git-clone,进入目录打开窗口,输入克隆命令(图中红框部分)
克隆会自动帮我们做如下3个操作:
- 拉取代码
- 初始化本地仓库
- 创建别名
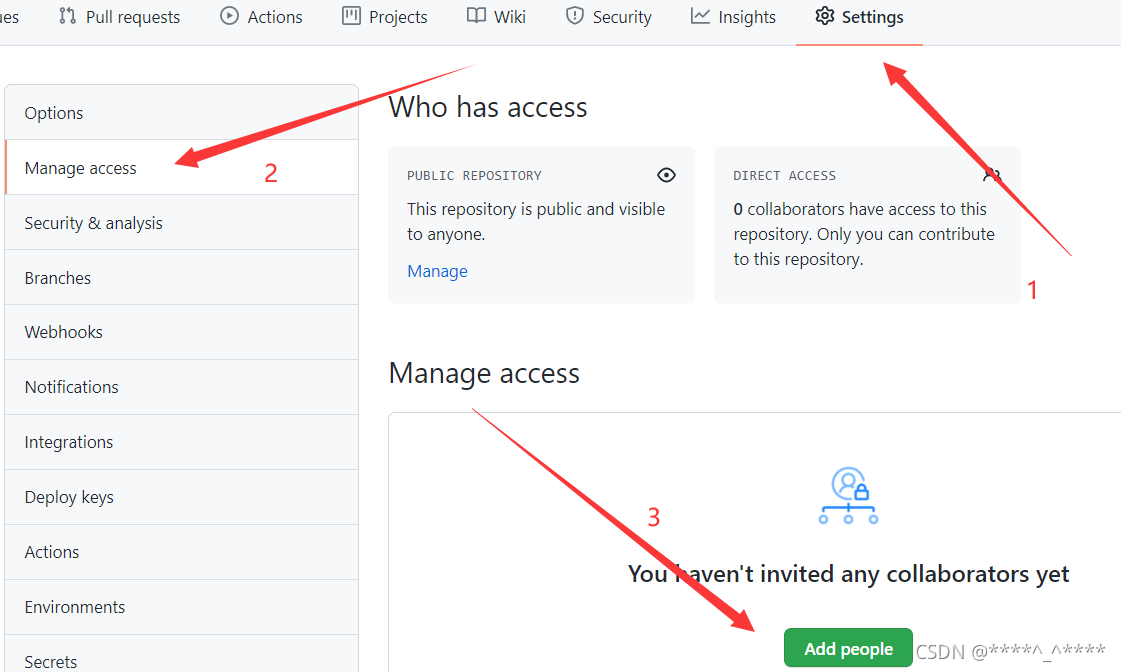
CC@LAPTOP-R4VGGC1O MINGW64 /e/Git/git-clone
# ll
total 0
drwxr-xr-x 1 CC 197121 0 Nov 15 18:02 myfirst-git-Repository/

CC@LAPTOP-R4VGGC1O MINGW64 /e/Git/git-clone
# cd myfirst-git-Repository/

CC@LAPTOP-R4VGGC1O MINGW64 /e/Git/git-clone/myfirst-git-Repository (master)
# git remote -v
origin  https://github.com/chenstudyJava/myfirst-git-Repository.git (fetch)
origin  https://github.com/chenstudyJava/myfirst-git-Repository.git (push)
添加团队成员,添加之后该成员可以push推送代码
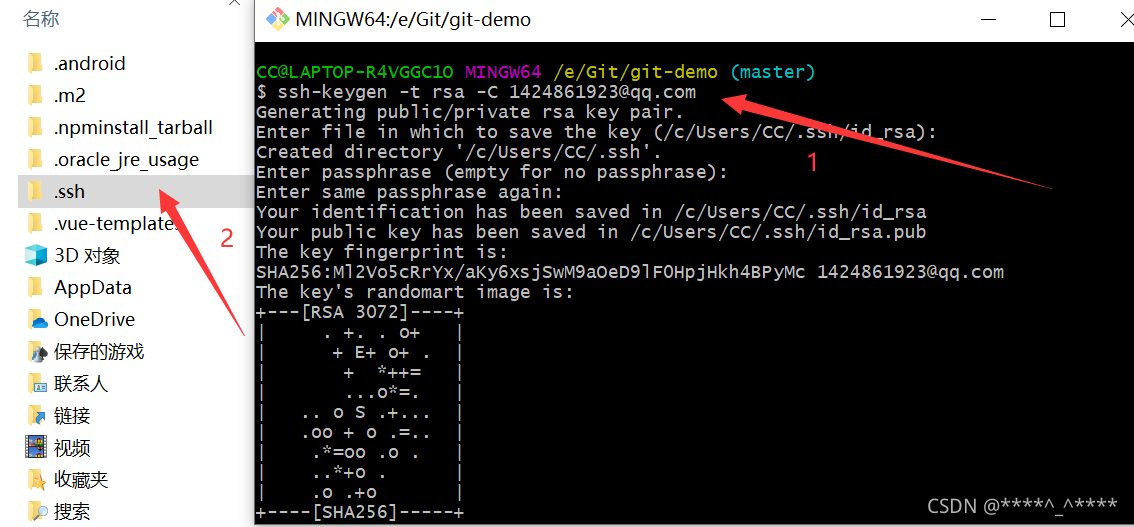
4.4ssh免密登录
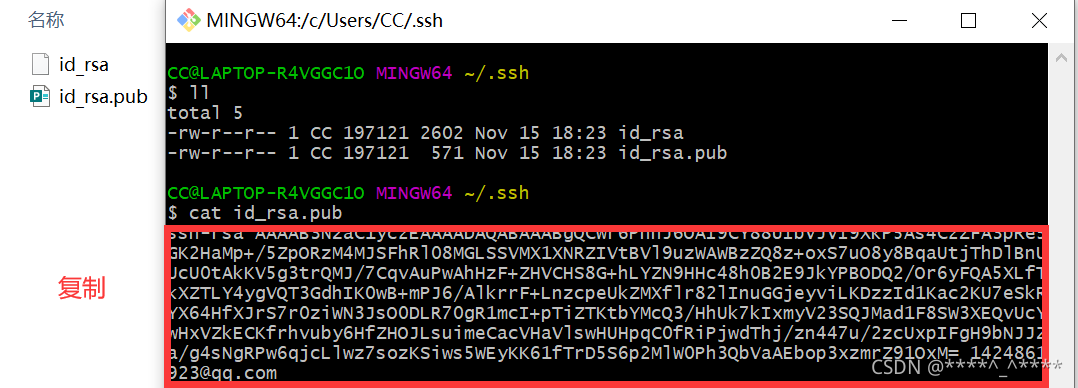
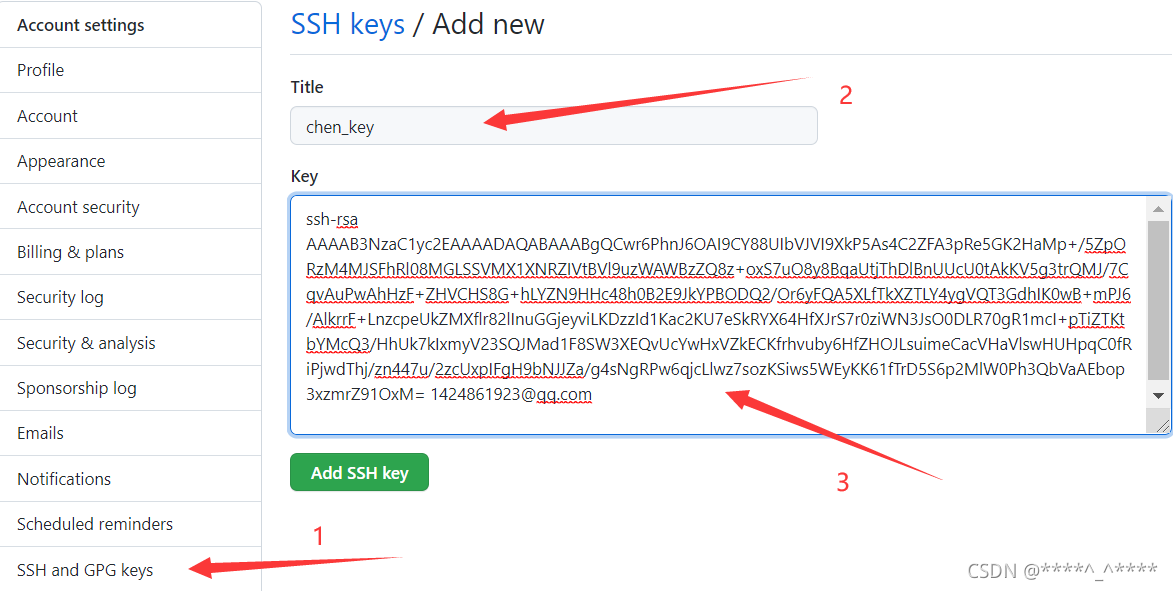
复制公钥
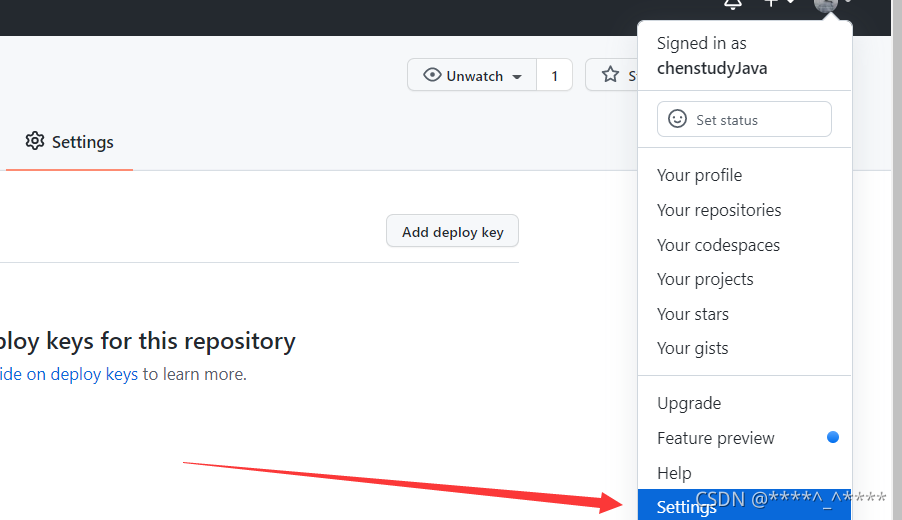
打开settings
添加
测试
CC@LAPTOP-R4VGGC1O MINGW64 /e/Git/git-demo (master)
# git pull git@github.com:chenstudyJava/myfirst-git-Repository.git master
The authenticity of host 'github.com (20.205.243.166)' can't be established.
RSA key fingerprint is SHA256:nThbg6kXUpJWGl7E1IGOCspRomTxdCARLviKw6E5SY8.
This key is not known by any other names
Are you sure you want to continue connecting (yes/no/[fingerprint])? yes
Warning: Permanently added 'github.com' (RSA) to the list of known hosts.
From github.com:chenstudyJava/myfirst-git-Repository
 * branch            master     -> FETCH_HEAD
Already up to date.

CC@LAPTOP-R4VGGC1O MINGW64 /e/Git/git-demo (master)
# cat hello.txt
test!
test!
hot-fix complete!
hehehehehehehehehehehehehehehehehe
测试push命令
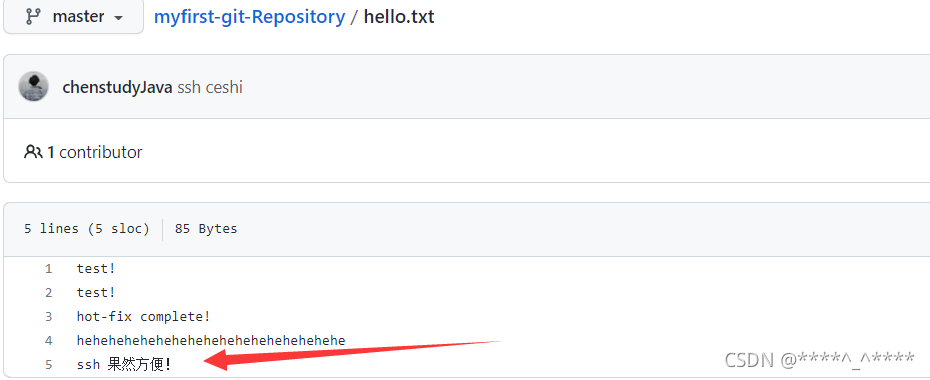
CC@LAPTOP-R4VGGC1O MINGW64 /e/Git/git-demo (master)
# cat hello.txt
test!
test!
hot-fix complete!
hehehehehehehehehehehehehehehehehe

CC@LAPTOP-R4VGGC1O MINGW64 /e/Git/git-demo (master)
# vim hello.txt

CC@LAPTOP-R4VGGC1O MINGW64 /e/Git/git-demo (master)
# cat hello.txt
test!
test!
hot-fix complete!
hehehehehehehehehehehehehehehehehe
ssh 果然方便!

CC@LAPTOP-R4VGGC1O MINGW64 /e/Git/git-demo (master)
# git add hello.txt

CC@LAPTOP-R4VGGC1O MINGW64 /e/Git/git-demo (master)
# git commit -m "ssh ceshi" hello.txt
[master 1bd2320] ssh ceshi
 1 file changed, 1 insertion(+)

CC@LAPTOP-R4VGGC1O MINGW64 /e/Git/git-demo (master)
# git push git@github.com:chenstudyJava/myfirst-git-Repository.git master
Enumerating objects: 5, done.
Counting objects: 100% (5/5), done.
Delta compression using up to 8 threads
Compressing objects: 100% (2/2), done.
Writing objects: 100% (3/3), 285 bytes | 142.00 KiB/s, done.
Total 3 (delta 0), reused 0 (delta 0), pack-reused 0
To github.com:chenstudyJava/myfirst-git-Repository.git
   f4b88ac..1bd2320  master -> master
远程仓库查看
五、IDEA集成Git
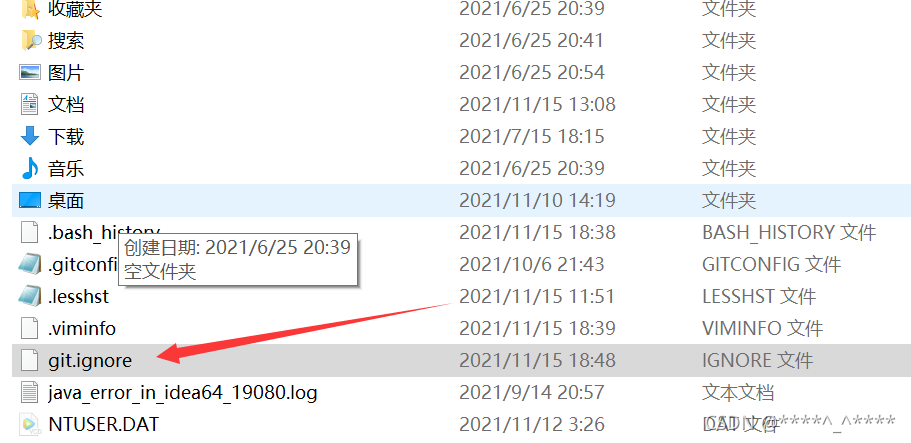
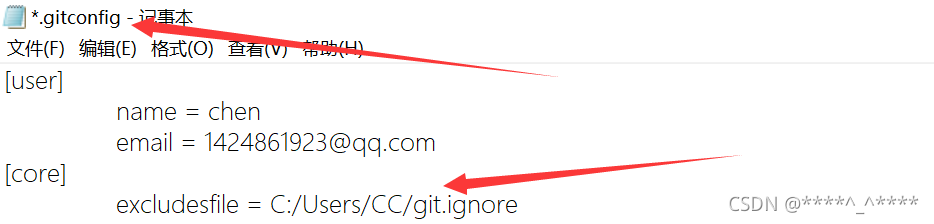
在C:\Users\CC目录下新建文件
复制忽略内容到git.ignore
# Compiled class file
*.class

# Log file
*.log

# BlueJ files
*.ctxt

# Mobile Tools for Java (J2ME)
.mtj.tmp/

# Package Files #
*.jar
*.war
*.nar
*.ear
*.zip
*.tar.gz
*.rar

# virtual machine crash logs, see http://www.java.com/en/download/help/error_hotspot.xml
hs_err_pid*

.classpath
.project
.settings
target
.idea
*.iml
引用忽略文件
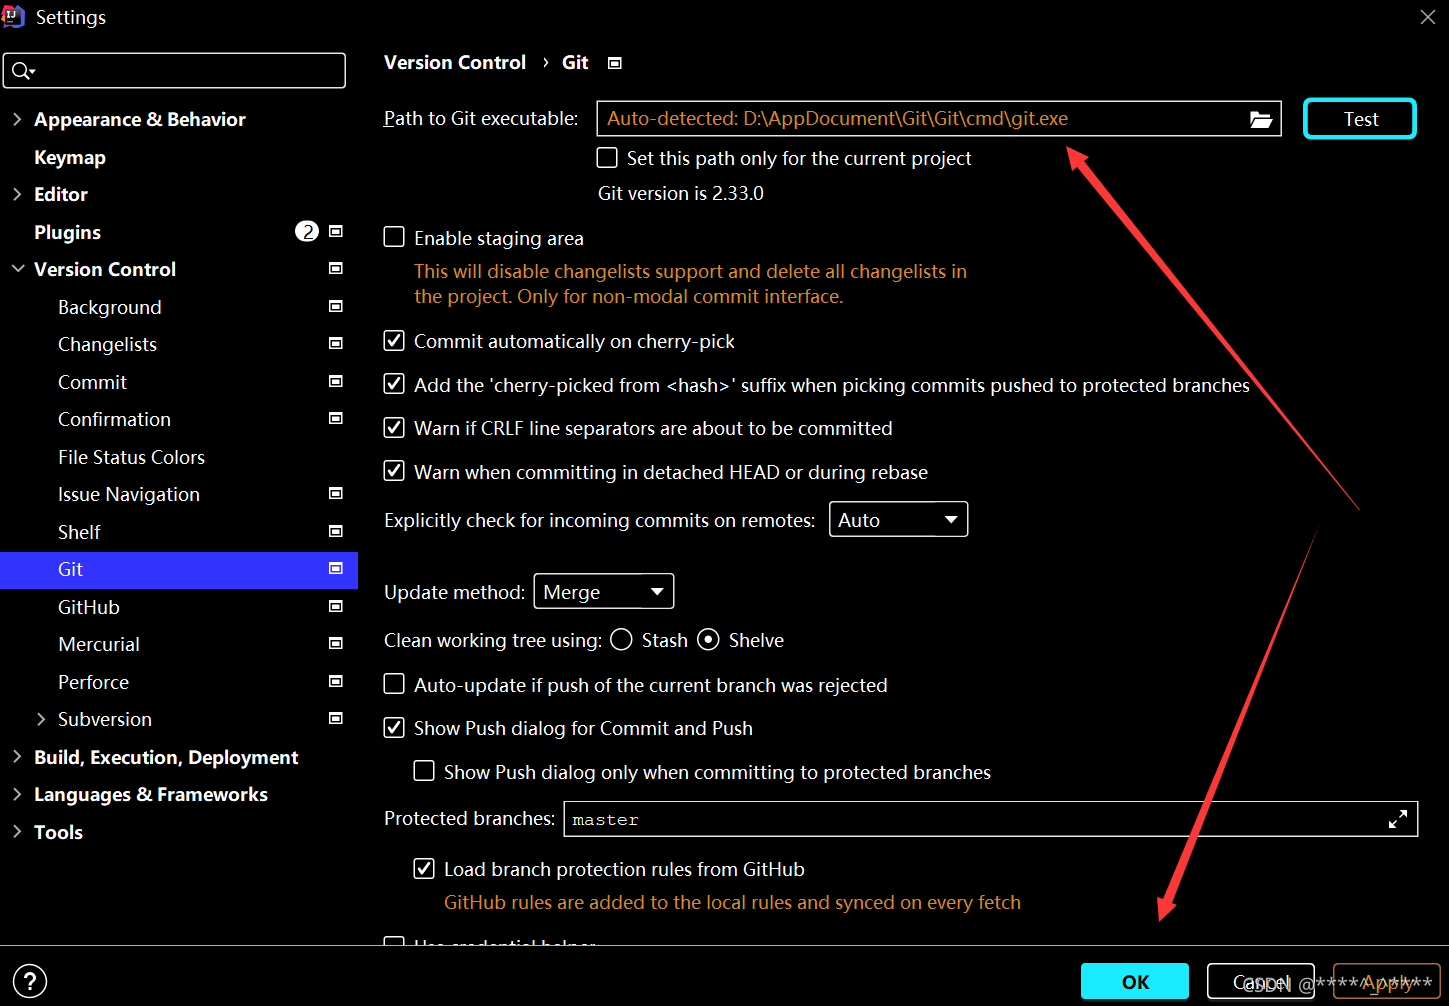
IDEA引入
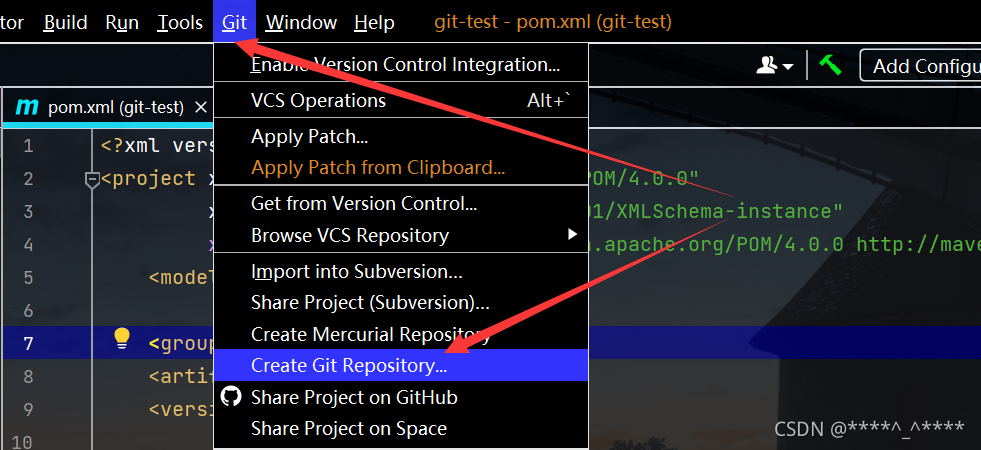
将项目交给git管理
切换到本地
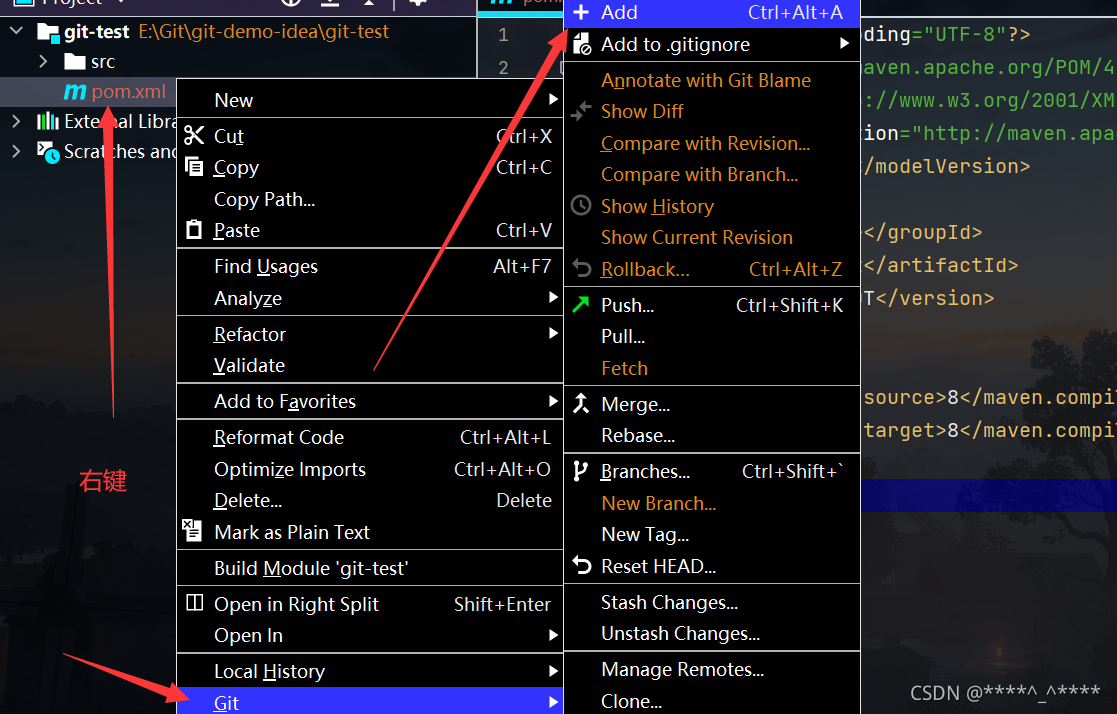
文件添加到暂存区
查看版本
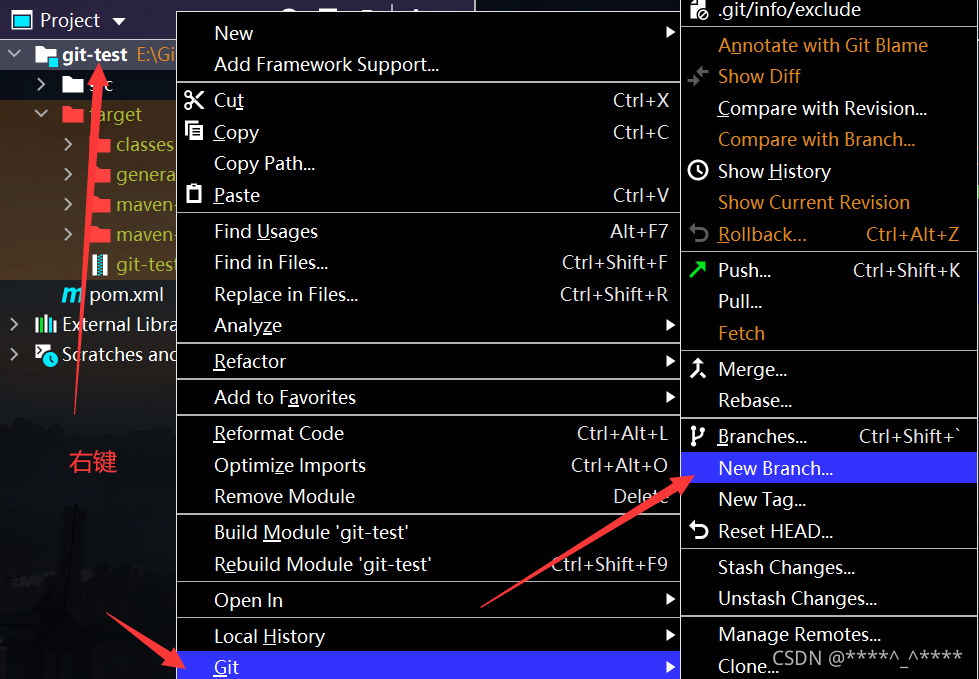
创建新的分支
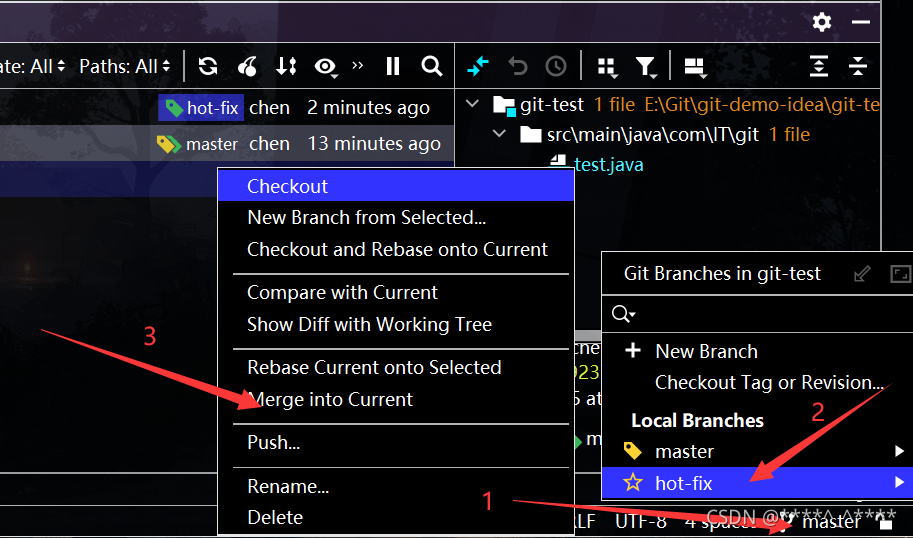
合并分支
合并结果


六、IDEA集成GitHub
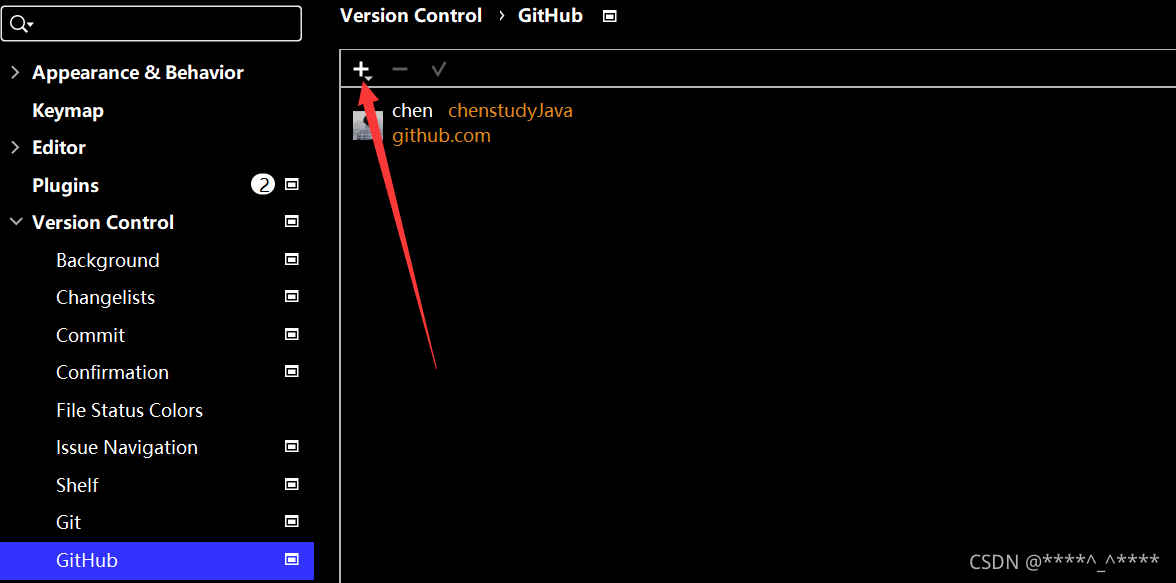
IDEA登录
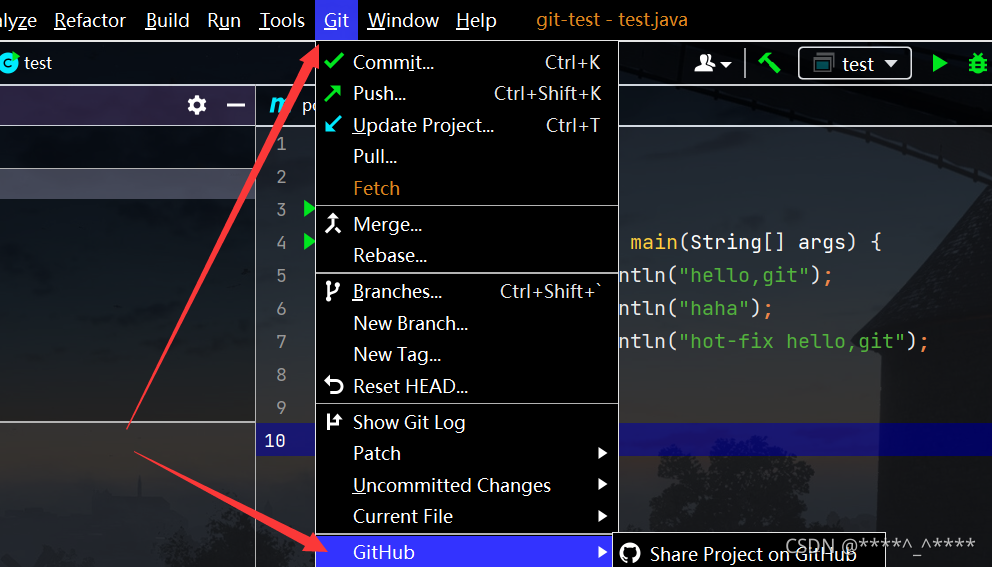
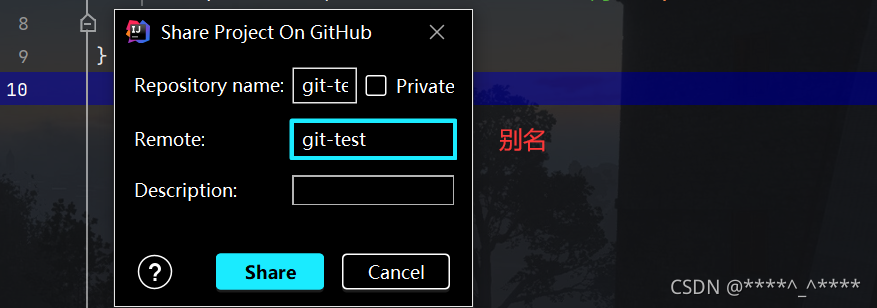
分享项目到GitHub
添加信息
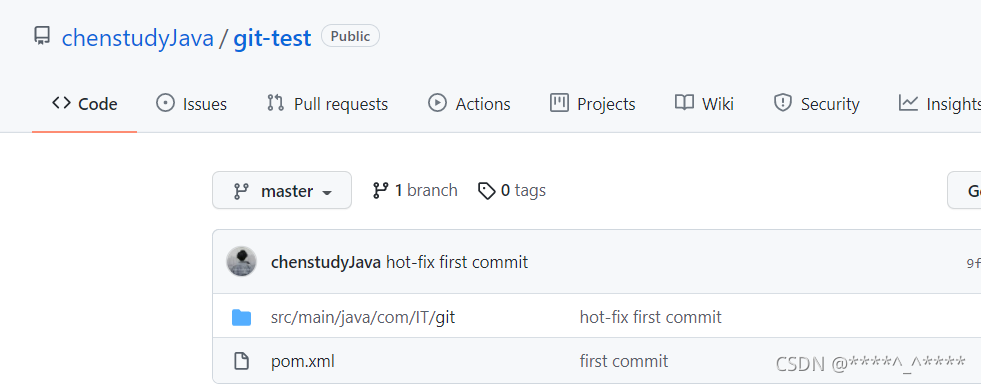
登录远程库查看结果
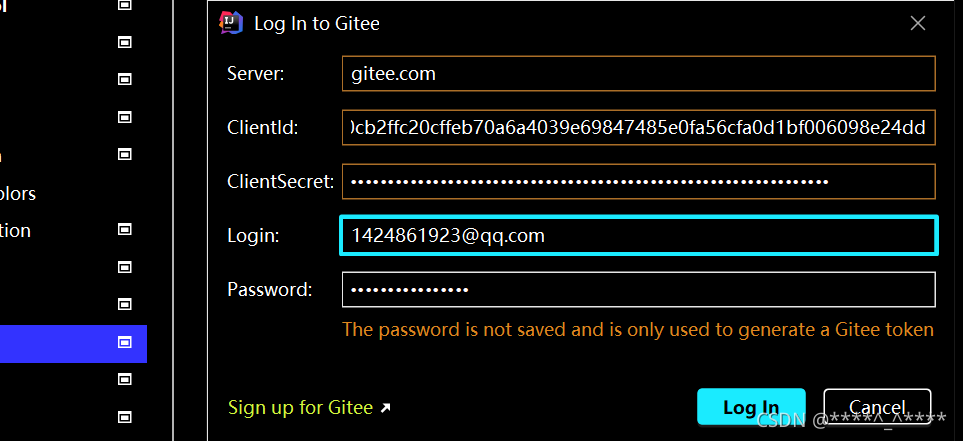
七、国内代码托管中心—码云
IDEA登录
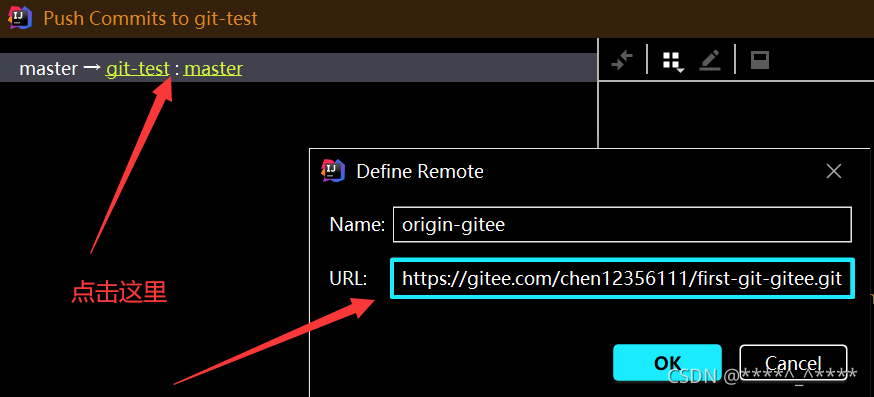
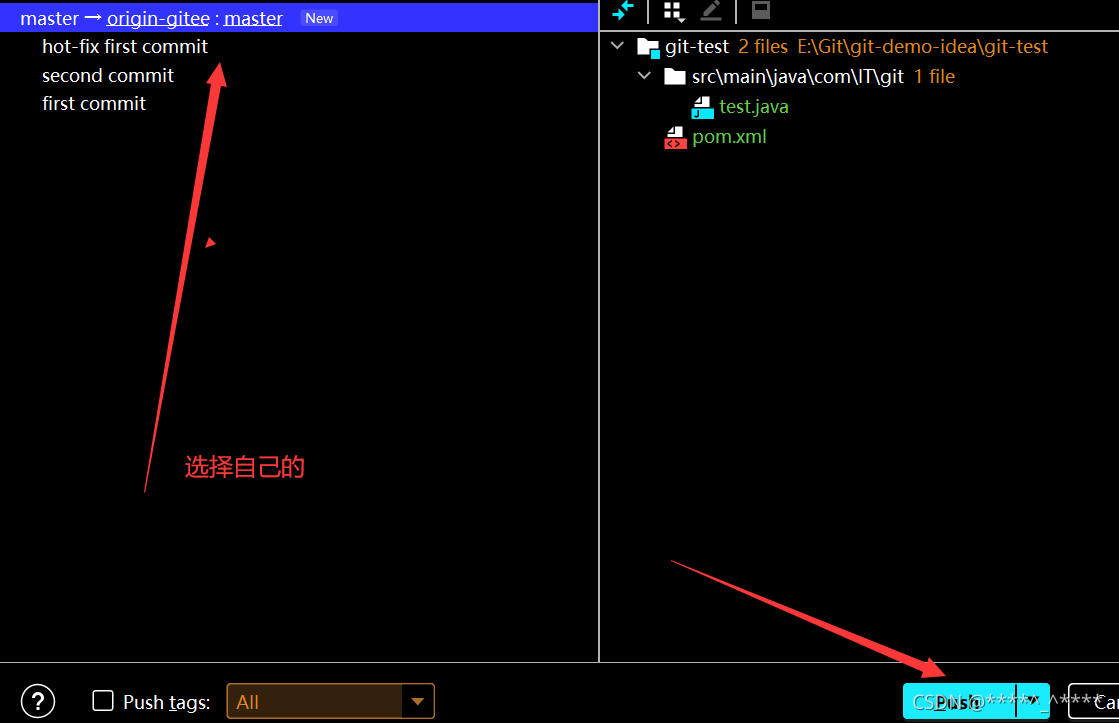
测试push
提交