小程序订阅消息推送
只需要三步:1、去官网订阅模板;2、前端调用订阅请求;3、后端推送订阅消息。
官方教程:https://developers.weixin.qq.com/miniprogram/dev/framework/open-ability/subscribe-message.html
1、去官网订阅模板
进入你的小程序网页中找到左侧工具栏的【功能-订阅消息】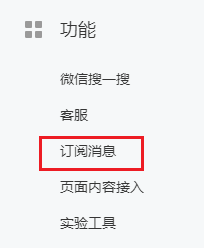
在订阅消息中先点击【选用】挑选你需要的模板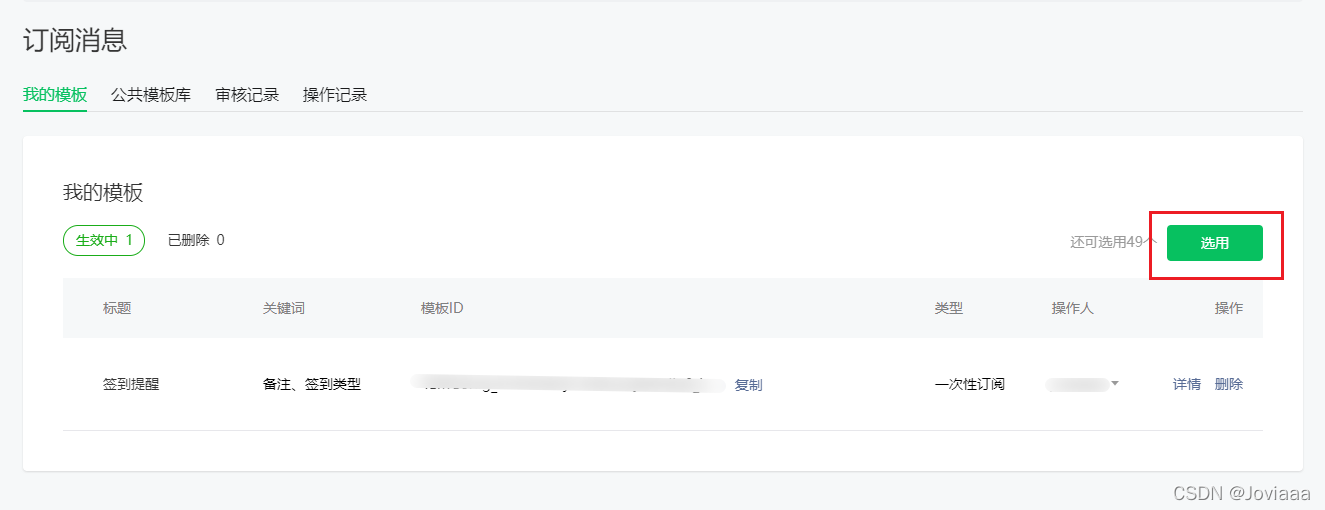
随便挑选一个模板,选择你需要的【关键词】,如果没有合适的可以点击申请(审核时间很慢…),最后填写【场景说明】就可以提交使用啦!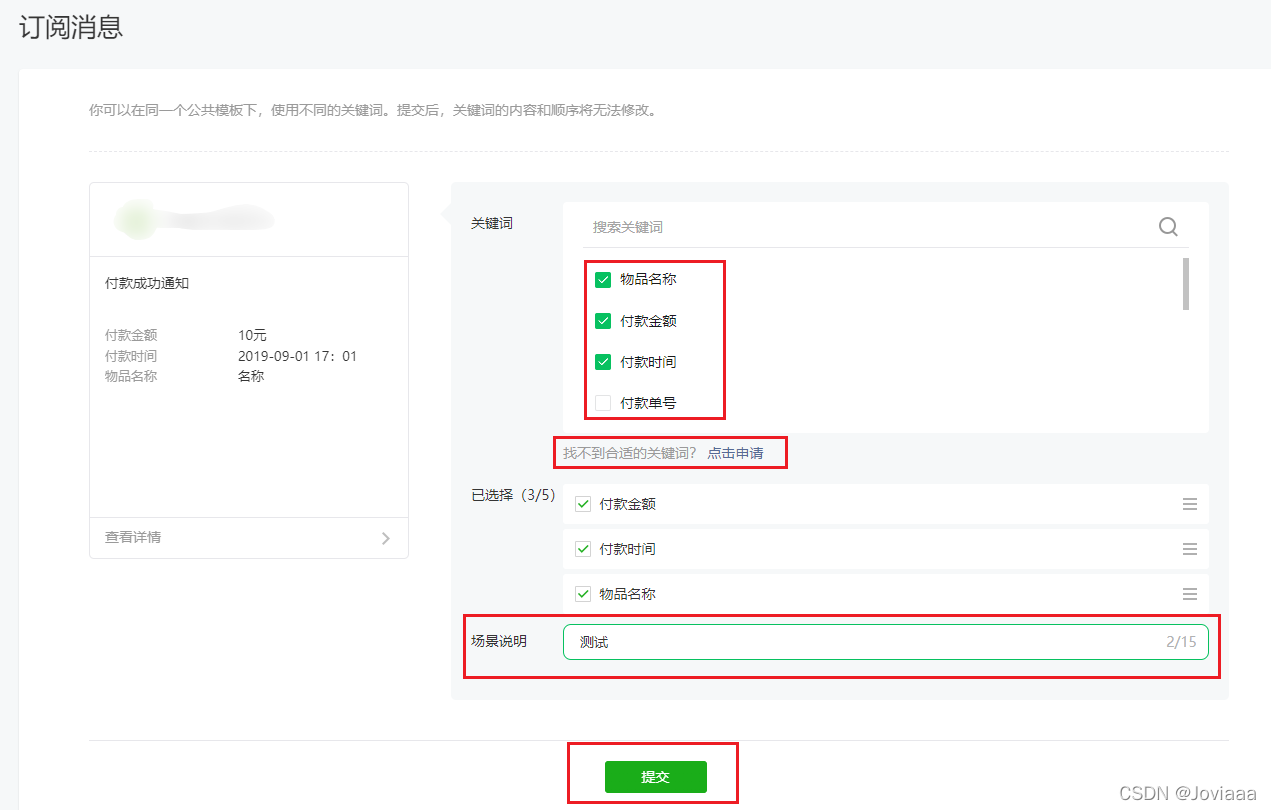
记住,其中模板的ID以及详细信息都非常重要,下面两步会用到。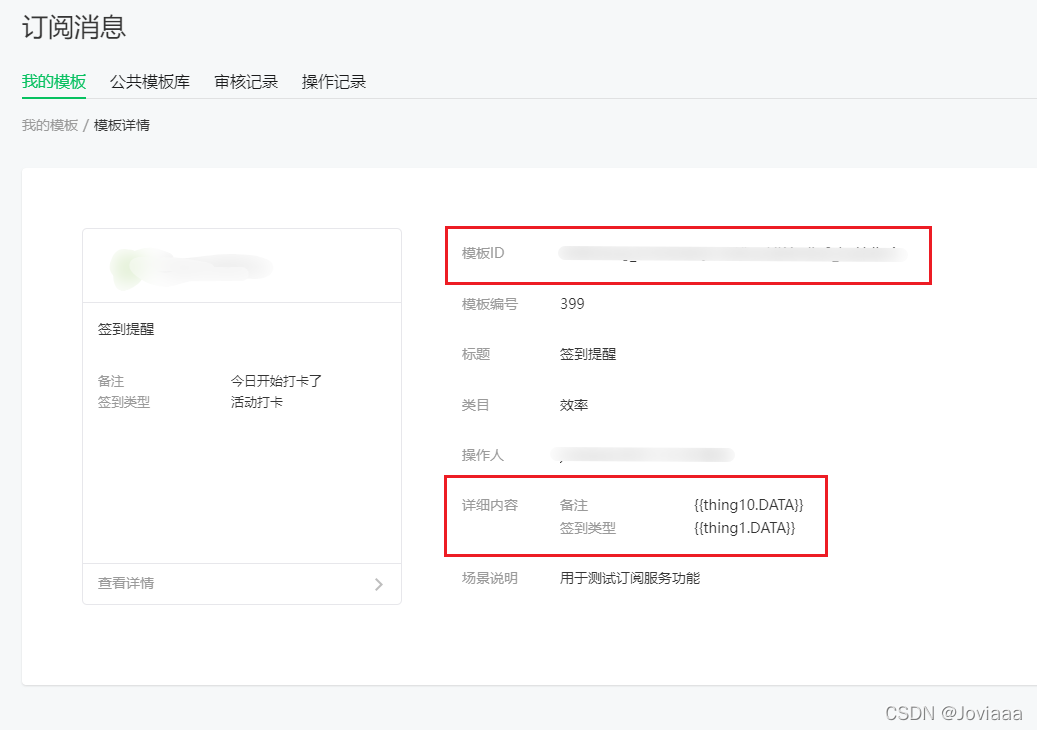
2、前端调用订阅请求
前端需要做的事情就是调用请求弹框为后端获取订阅推送的权限,其中,用户点击一次后端只能推送一次,多点多得,不受时间限制。
小程序给出的官方教程特别简单
https://developers.weixin.qq.com/miniprogram/dev/api/open-api/subscribe-message/wx.requestSubscribeMessage.html
wx.requestSubscribeMessage({
  tmplIds: [''], //这里填写你的模板ID
  success (res) {
  	//成功后的操作
  	console.log("订阅成功", res)
  }
  fail(res) {
    //失败后的操作
    console.log("订阅失败", res)
  }
})
但是我们要知道,当用户选择【取消】,并勾选了“总保持以上选择,不在询问”时,就再也没办法主动调起请求窗口了,这个用户拒绝成本是非常大的,因此我们需要做一些预防用户拒绝的操作。
 	  const tmplId = '' //这里填写你的模板ID
      wx.requestSubscribeMessage({
        tmplIds: [tmplId],
        success(res) {
          if (res[tmplId] === 'accept') {
            wx.showToast({
              title: '订阅成功!',
              icon: 'success'
            })
          } else if (res[tmplId] == 'reject') {
            //引导用户,手动引导用户点击按钮,去设置页开启,## Modals是自定义组件
            wx.showModal({
              title: '订阅消息',
              content: '您当前拒绝接受消息通知,是否去开启',
              confirmText: '开启授权',
              confirmColor: '#345391',
              cancelText: '仍然拒绝',
              cancelColor: '#999999',
              success(res) {
                if (res.confirm) {
                  // console.log('用户点击确定')
                  wx.openSetting({
                    success(res) {
                      console.log(res.authSetting)
                    },
                    fail(err) {
                      //失败
                      console.log(err)
                    }
                  })
                } else if (res.cancel) {
                  console.log('用户点击取消')
                }
              }
            })
          }
        },
        fail(res) {
          console.log("订阅失败", res)
        }
3、后端推送订阅消息
后端需要调用官方接口subscribeMessage.send
https://developers.weixin.qq.com/miniprogram/dev/api-backend/open-api/subscribe-message/subscribeMessage.send.html总的来说就是【获取token】,完善【json模板】,调用【微信接口】。
1.获取token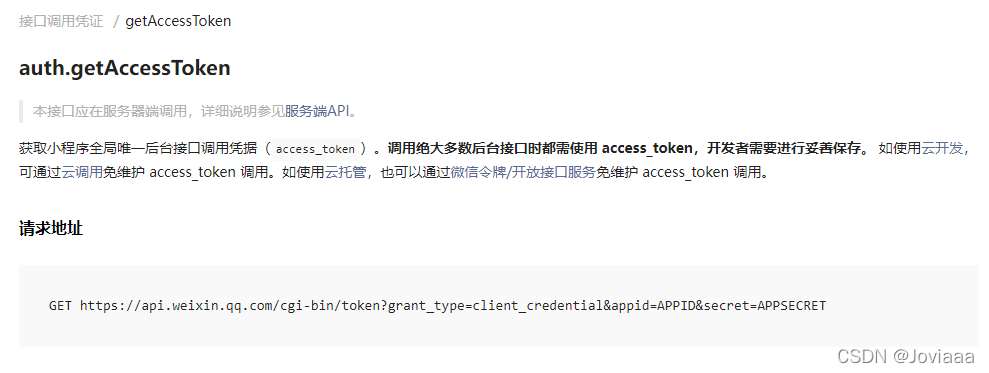
只需要发送appid和secret去调用这个接口就能获取到官方的token
 	var url = "https://api.weixin.qq.com/cgi-bin/token?grant_type=client_credential&appid=APPID&secret=APPSECRET"; //填写你的APPID和APPSECRET
    var resp = await new HttpClient().GetStringAsync(url);//将 GET 请求发送到指定 URI 并在异步操作中以字符串的形式返回响应正文。
    if (string.IsNullOrEmpty(resp))
        throw new Exception("request error");

    var json = Newtonsoft.Json.JsonConvert.DeserializeObject<dynamic>(resp);
    var result = new GetToken();
    result.access_token = json.access_token;
    result.expires_in = json.expires_in == null ? 0 : json.expires_in;
    result.errcode = json.errcode == null ? 0 : json.errcode;
    result.errmsg = json.errmsg;
    return result;
2.完善json模板
你订阅的模板内容一定要和json内容相对应,否则就会失败。
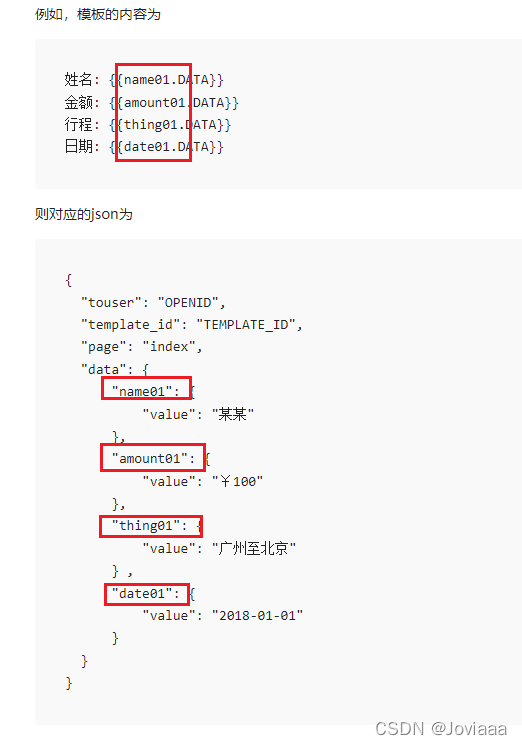
其中,json字段的含义官方都有给出解释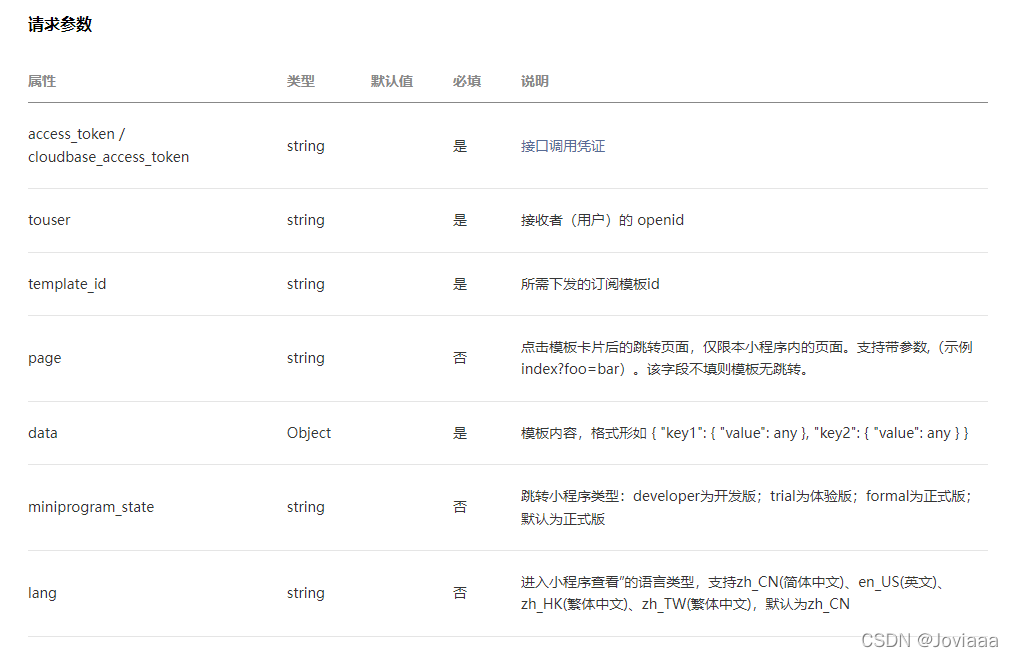
	string token = WXGetToken().Result.access_token.ToString(); //上面获取的token
    string _url = "https://api.weixin.qq.com/cgi-bin/message/subscribe/send?access_token=" + token; //小程序官方api

    string openid = ""; //接收人的openid
    string KL_SUBSCRIBE_BAOXIU = ""; //订阅模板ID:template_id
    string username = "今天开始打卡了";
    string remarks = "活动打卡";
    string page = "pages/login/login"; //点击转跳的页面
    string miniprogram_state = "developer"; //跳转小程序类型:developer为开发版;trial为体验版;formal为正式版;默认为正式版
    string jsonParam = "{\"touser\": \"" + openid + "\"," +
        "\"template_id\": \"" + KL_SUBSCRIBE_BAOXIU + "\"," +
        "\"page\": \"" + page + "\"," +
        "\"data\": {\"thing10\": { \"value\": \"" + username + "\"}," +
        "\"thing1\": {\"value\": \"" + remarks + "\"}}," +
        "\"miniprogram_state\": \"" + miniprogram_state + "\"} ";
3.调用接口
// 调用小程序API
    HttpWebRequest request = (HttpWebRequest)WebRequest.Create(_url);
    request.Method = "POST";
    request.Timeout = 5000;
    request.ContentType = "application/json;charset=UTF-8";
    byte[] byteData = Encoding.UTF8.GetBytes(jsonParam);
    int length = byteData.Length;
    request.ContentLength = length;
    using (Stream writer = request.GetRequestStream())
    {
        writer.Write(byteData, 0, length);
        writer.Close();
    }
    string jsonStrings = string.Empty;
    using (HttpWebResponse responses = (HttpWebResponse)request.GetResponse())
    {
        using (Stream streams = responses.GetResponseStream())
        {
            using (StreamReader readers = new StreamReader(streams, System.Text.Encoding.UTF8))
            {
                jsonStrings = readers.ReadToEnd();
                responses.Close();
                streams.Close();
                readers.Close();
            }
        }
    }
    //这里是返回的数据
    JObject jo = (JObject)JsonConvert.DeserializeObject(jsonStrings);
    string errcode = jo["errcode"].ToString();
    string errmsg = jo["errmsg"].ToString();
    _logger.InfoFormat("【订阅结果】:" + errcode + "," + errmsg);
调用即可完成