Step 1,下载源码(curl - Download),下载之后解压(文件夹路径别有中文也不要有空格),我的路径是: D:\dev\net\libcurlDev\res\curl-7.83.1
Step 2,编译。
方法 1,可以使用 cmake直接编译或者用cmake gui生成vs工程再编译。
方法 2,使用 VS 对应平台的 Native Tools Cmd 命令行编译。这里说一下此方法。
A. VS Native Tools Cmd如下图:

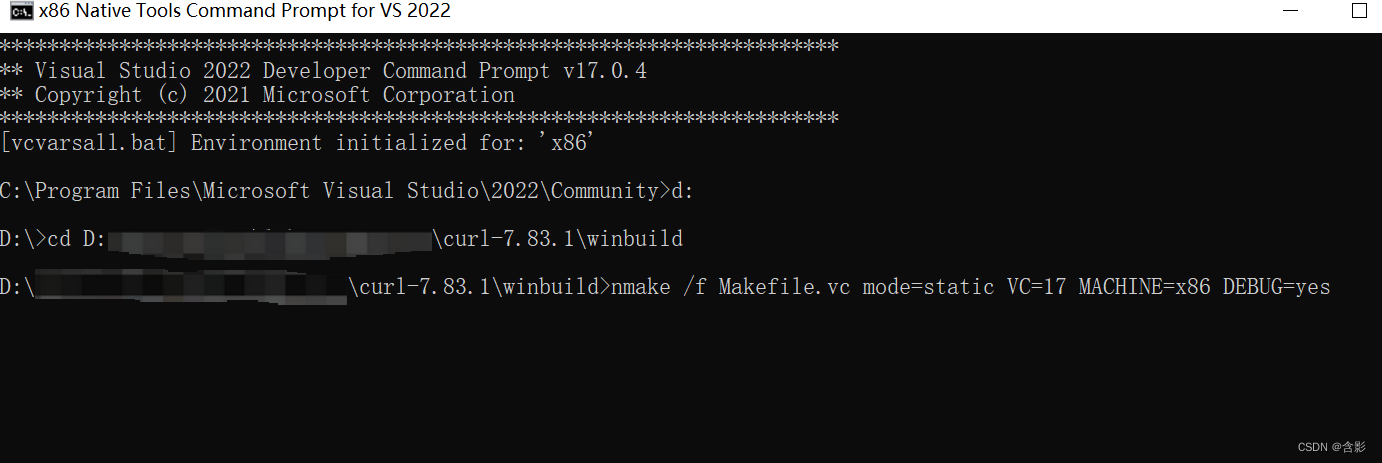
B.(可选先执行curl-7.83.1\buildconf.bat)。以x86 Native Tools Command 命令行窗口为例。在这个命令行窗口里先进入到 curl-7.83.1\winbuild\ 目录下,然后执行编译。
编译Debug lib命令:nmake /f Makefile.vc mode=static VC=17 MACHINE=x86 DEBUG=yes
编译Release lib命令:nmake /f Makefile.vc mode=static VC=17 MACHINE=x86 DEBUG=no
mode=static,编译静态库。mode=dll,编译动态库
如下图:
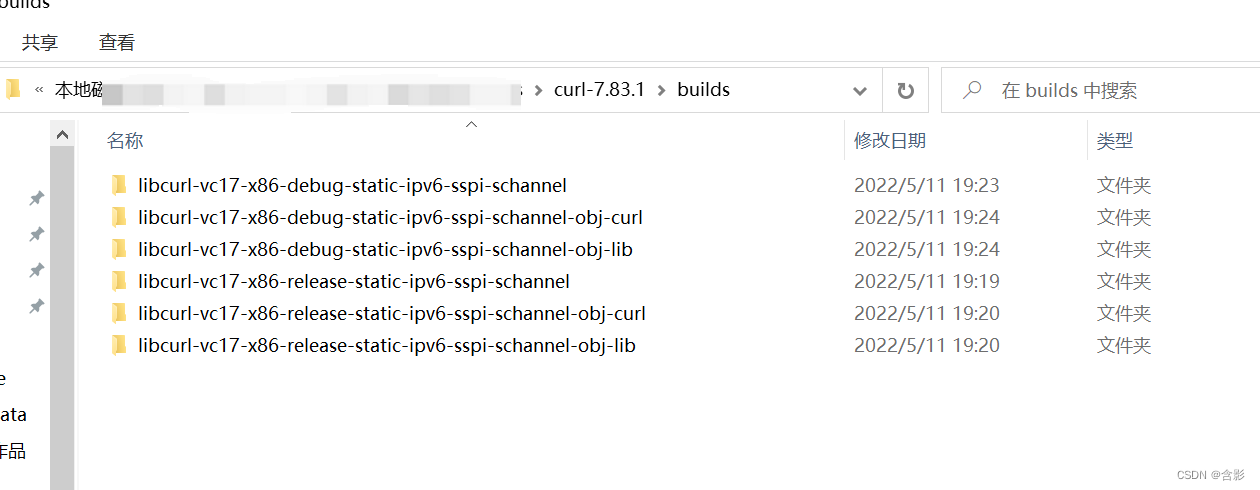
编译好之后如下图:
如果要编译x64版本,需要在 x64 Native Tools Command 命令行窗口中执行命令。并且MACHINE=x64
以静态库的使用为例,使用的时候需要在连接器输入的附加依赖项中加入如下这些lib:
libcurl_a_debug.lib
Ws2_32.lib
Wldap32.lib
winmm.lib
Crypt32.lib
Normaliz.lib
Step 4,测试代码如下:
#define CURL_STATICLIB
#define HTTP_ONLY
/*
 * 加上这两个宏是保证正确编译静态库的代码,防止出现 “LNK2019	无法解析的外部符号 __imp__curl_easy_strerror,函数 _main 中引用了该符号” 这类错误
 * 也可以在 项目属性 -> C/C++ -> 预处理器 -> 预处理器定义 这里添加进来
 */
#include <iostream>
#include <curl/curl.h>
int main()
{
    std::cout << "Hello curl static lib!\n";
	CURL* curl = nullptr;
	CURLcode res;
	curl = curl_easy_init();
	if (curl != nullptr) {
		curl_easy_setopt(curl, CURLOPT_URL, "https://github.com/");
		/* example.com is redirected, so we tell libcurl to follow redirection */
		curl_easy_setopt(curl, CURLOPT_FOLLOWLOCATION, 1L);
		/* Perform the request, res will get the return code */
		res = curl_easy_perform(curl);
		/* Check for errors */
		if (res != CURLE_OK) {
			fprintf(stderr, "curl_easy_perform() failed: %s\n", curl_easy_strerror(res));
		}
		/* always cleanup */
		curl_easy_cleanup(curl);
	}

    return EXIT_SUCCESS;
}