使用unity完成简单的打地鼠游戏2D制作
一、制作流程
1.创建场景scene(虽然是2D游戏,但制作过程使用2D或3D影响不大,我是用3D来制作的)
2.选中主照相机,把Projectiozn改为Orthographic,Position为(0,0,-10),其他保持默认
3.创建文件夹,起名Sprites,将两张图片素材拖入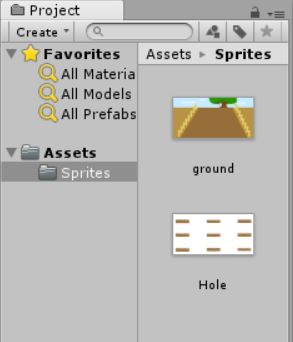
4.分别选中两个图片,将Texture Type更改为Sprite(2D and UI),其他保持默认

5.将图片ground拖进场景,将场景可显示大小更改为图片大小:1280*752,调整主照相机的size为3.76,使图片填充整个界面

6.将图片Hole拖入场景,更改Order in Layer为1,场景内新建空物体Map,将ground和Hole拖成其子物体

7.完成界面
8.添加3D的cube,新建文件夹Material,新建材质,更改贴图为Gophers,拖到cube上,改名Cube1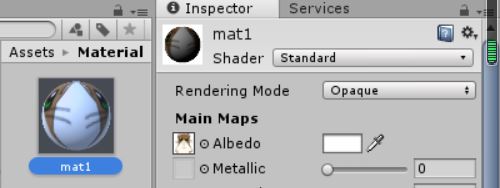
9.新建文件夹Scripts,新建脚本S1,用于点击销毁
using System.Collections;
using System.Collections.Generic;
using UnityEngine;

public class S1 : MonoBehaviour {

	// Use this for initialization
	void Start () {

	}
    void OnMouseDown()
    {
        Debug.Log("Do You Like Me?");
        Destroy(gameObject);
    }

}
10.新建脚本S2,用于实现物体转换和销毁,把其拖给Cube1
using System.Collections;
using System.Collections.Generic;
using UnityEngine;

public class S2 : MonoBehaviour {

    public GameObject m_Prefab2;
	// Use this for initialization
	void Start () {

	}

    void OnMouseDown()
    {
        Instantiate(m_Prefab2, transform.position, Quaternion.identity);
        Destroy(gameObject);
    }
}
11.新建文件夹Prefabs,再在场景里添加Cube2,创建材质mat2,贴图改为Gophers_beaten,新建脚本S3,用于实现自动销毁,加在Cube1上
12.将Cube1和Cube2拖拽到Prefabs里面,形成预制体,在Cube1里面的S2脚本下的Prefab2更改为Cube2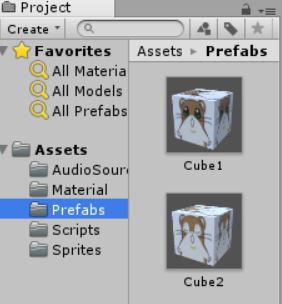
using System.Collections;
using System.Collections.Generic;
using UnityEngine;

public class S3 : MonoBehaviour {

	// Use this for initialization
	void Start () {
        Destroy(gameObject,0.8f);
	}

	// Update is called once per frame
	void Update () {

	}
}
13.新建脚本CreateTarget,用于实现地鼠在九个洞里的随机定时出现
using System.Collections;
using System.Collections.Generic;
using UnityEngine;

public class CreateTarget : MonoBehaviour {
    public GameObject m_Target;
	// Use this for initialization
	void Start () {
        //Create();
        InvokeRepeating("Create", 0, 1);
	}

    void Create()
    {
        Vector3 pos = Vector3.zero;

        int id = 0;
        id = Random.Range(1, 10);

        if (id == 1)
        { pos = new Vector3(2.03f, 1.41f, 0);transform.Rotate(0, 90, 0); }
        if (id == 2)
            pos = new Vector3(0.04f, 1.41f, 0);
        if (id == 3)
            pos = new Vector3(-1.98f, 1.41f, 0);

        if (id == 4)
            pos = new Vector3(-1.98f, 0.46f, 0);
        if (id == 5)
            pos = new Vector3(0.04f, 0.46f, 0);
        if (id == 6)
            pos = new Vector3(2.03f, 0.46f, 0);

        if (id == 7)
            pos = new Vector3(-1.98f, -0.58f, 0);
        if (id == 8)
            pos = new Vector3(0.04f, -0.58f, 0);
        if (id == 9)
            pos = new Vector3(2.03f, -0.58f, 0);
        Instantiate(m_Target, pos, Quaternion.identity);
    }
}
14.在场景中新建空物体Random,将脚本CreateTarget拖到其上,将Target更改为Cube1
15.新建文件夹AudioSource,将两个声音素材拖入,appear拖给预制体Cube1,beaten拖给预制体Cube2

16.分别更改mat1和mat2的Rendering Mode需要更改为cutout,调整Alpha Cutoff为0.25,去掉白边
17.按下图调整主照相机的数值,使其拍摄另一面(或者使用Photoshop将素材图片Gophers_beaten和Gophers上下颠倒,并存成png格式放入素材文件夹,这是为了让界面中的地鼠图像是正的)
18.最后build一下就OK啦
二、重难点
1.因为此游戏属于2D游戏,所有要将主照相机的Projection改为Orthographic
2.每一个脚本在正式编写之前要先试行,以防止编写完成后不能使用
3.需要调整界面为图像的分辨率和大小
4.最后的CreateTarget编写的时候,需要用到InvokeRepeating函数,后面的三个参数分别是调用的函数、起始时间、时间间隔
5.需要将不同种类的文件存放在相应的文件夹中,方便查看
6.随机出现的物体需要事先设置成预制体来使用
7.重叠的两张场景图片之间存在层级关系
8.一开始贴图看起来是反的,拍摄背面则是正的(或者也可以用ps将原始图片上下颠倒,但一定要存成png格式,否则白边依然存在)
9.贴图的Rendering Mode需要更改为cutoff,不然就会有白边