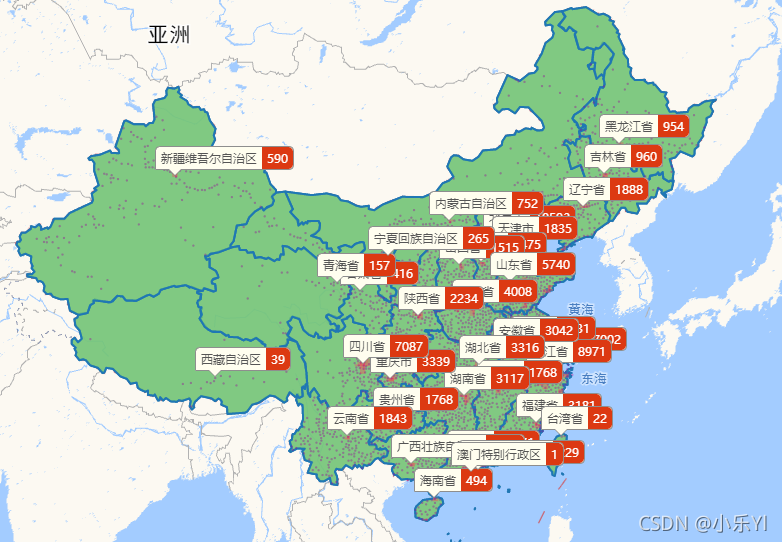
1.安装 vue-amap 插件
npm install vue-amap --save
2. 在 main.js 中引入并设置相关配置
import VueAMap from 'vue-amap';
Vue.use(VueAMap);

VueAMap.initAMapApiLoader({
  key: 'YOUR_KEY',  // 高德key,可以在官网申请
  plugin: ['AMap.Scale', 'AMap.OverView', 'AMap.ToolBar', 'AMap.MapType'], // 插件,按需引入
  v: '1.4.15', // 我也不知道为什么要写这个,不写项目会报错,而且我随便写的,跟我下载的版本对应不了
  uiVersion: '1.0.11' // ui版本号,也是需要写
});
3.案例vue文件
<template>
  <div id="test-map" />
</template>

<script>
import { lazyAMapApiLoaderInstance } from "vue-amap";
export default {
  data() {
    return {
      map: "", // 地图
      pointSimplifier: null,
      district: null,
    };
  },
  methods: {
    // 初始化地图相关实例
    initMap() {
      const that = this;
      lazyAMapApiLoaderInstance.load().then(() => {
        that.map = new AMap.Map("test-map", {
          zooms: [3, 18], // 地图缩放范围
          center: new AMap.LngLat(116.397428, 39.90923),
        });

        // 加载海量点组件
        AMapUI.loadUI(["misc/PointSimplifier"], (PointSimplifier) => {
          if (!PointSimplifier.supportCanvas) {
            alert("当前环境不支持 Canvas!");
            return;
          }
          // 创建组件实例
          that.pointSimplifier = new PointSimplifier({
            map: that.map,
            // data是海量点的坐标,下面是随机产生点坐标的方法
            // 返回要显示的点坐标
            autoSetFitView: false, //禁止自动更新地图视野
            zIndex: 110,
            getPosition: function(item) {
             // item  为 setMapData()方法里mapData里的每一项
              if (!item) {
                return null;
              }
              var parts = item.split(",");

              //返回经纬度 [lng, lat]
              return [parseFloat(parts[0]), parseFloat(parts[1])];
            },
            getHoverTitle: function(dataItem, idx) {
              return idx + ": " + dataItem;
            },
            renderOptions: {
              //点的样式
              pointStyle: {
                width: 6,
                height: 6,
                fillStyle: "rgba(153, 0, 153, 0.38)",
              },
              //鼠标hover时的title信息
              hoverTitleStyle: {
                position: "top",
              },
            },
          });
        });

        //加载相关组件
        AMapUI.load(["ui/geo/DistrictCluster", "lib/utils"], function(
          DistrictCluster,
          utils
        ) {
          // 定义行政区划聚合实例
          that.district = new DistrictCluster({
            map: that.map, //所属的地图实例
            //返回数据项中的经纬度位置
            getPosition: function(item) {
              if (!item) {
                return null;
              }
              var parts = item.split(",");
              //返回经纬度 [lng, lat]
              return [parseFloat(parts[0]), parseFloat(parts[1])];
            },
          });
          that.setMapData()
        });
      });
    },
    setMapData() {
      // 地图点的数据
      const mapData = [
        "113.864691,22.942327",
        "120.412618,36.382612",
        "113.370643,22.938827",
        "113.001181,23.120518",
        "112.985037,23.15046",
        "113.890205,22.798043",
        "110.361899,20.026695",
        "113.682288,34.618975",
        "121.434529,31.215641",
        "109.488707,18.309754",
        "120.682502,28.011099",
        "120.68556,30.912366",
        "126.687123,45.787618",
        "120.48506,30.053066",
        "103.970724,30.397931",
        "117.270073,37.96162",
        "117.212164,31.831641",
        "120.256218,31.882242",
        "121.411101,31.059407",
        "113.336586,33.729581",
        "104.137953,30.784276",
        "114.141516,23.159282",
        "120.499683,30.042305",
        "120.487242,32.180365",
        "108.94686,34.362975",
        "121.299895,31.105064",
        "112.873295,22.920901",
        "114.164329,22.644532",
        "113.373916,23.086728",
        "120.282954,30.196059",
        "113.250159,23.075847",
        "121.145445,31.193621",
        "116.675933,39.986343",
        "120.896422,31.472813",
        "120.75997,31.734934",
        "118.782607,32.00381",
        "118.314741,32.26999",
        "105.268729,23.732875",
        "111.723311,34.771838",
        "120.169746,33.357616",
        "119.537126,26.200017",
        "119.953287,37.165859",
        "113.830123,23.00734",
        "100.70191,25.408898",
        "119.273795,26.060002",
        "121.373427,31.188567",
        "116.466752,39.951042",
      ];

      this.pointSimplifier.setData(mapData);
      this.district.setData(mapData);
    },
  },
  mounted() {
    this.initMap();
  },
};
</script>

<style scoped>
#test-map {
  height: 100%;
}
</style>
然后添加路由访问该页面就可以啦~感谢查看
版权声明:本文为qq_42613224原创文章,遵循CC 4.0 BY-SA版权协议,转载请附上原文出处链接和本声明。