SpringBoot创建与内容
创建SpringBoot的几种方式
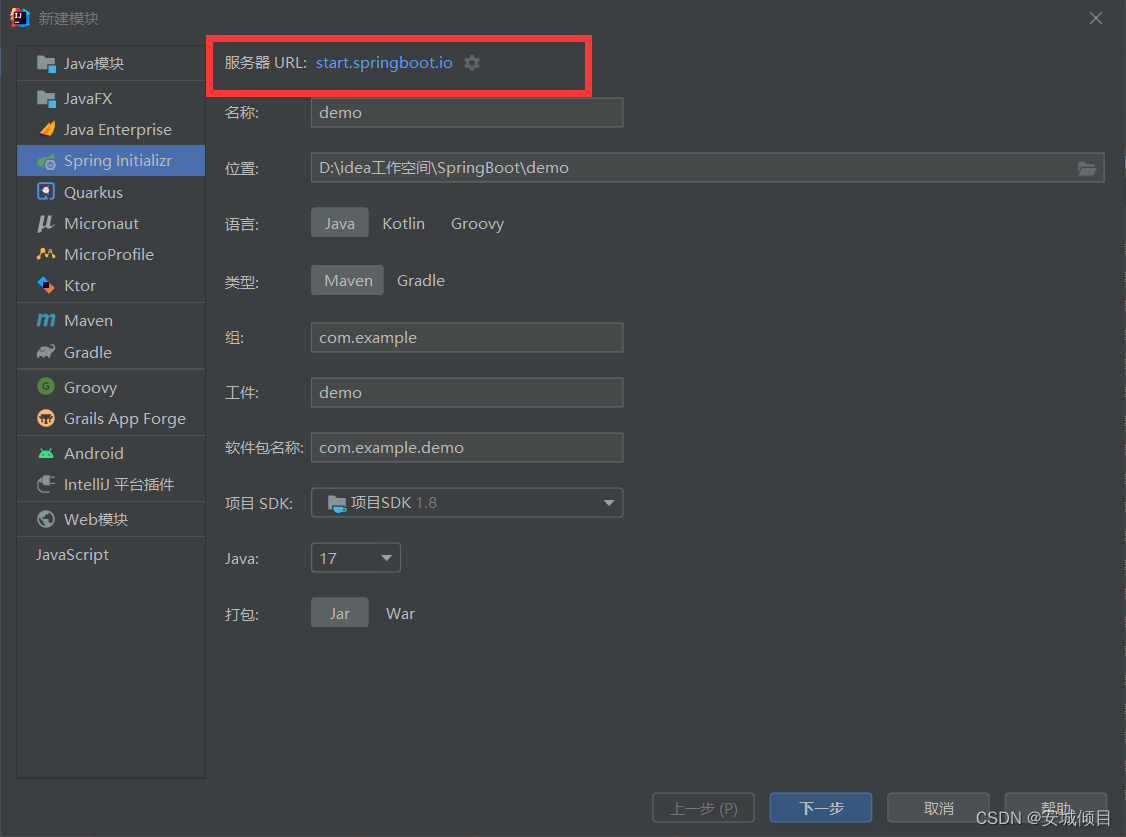
根据SpringBoot自己提供向导式方式创建(需要联网)----使用默认服务器URL
(https://start.spring.io)默认服务器URL为国外地址,创建项目速度较慢
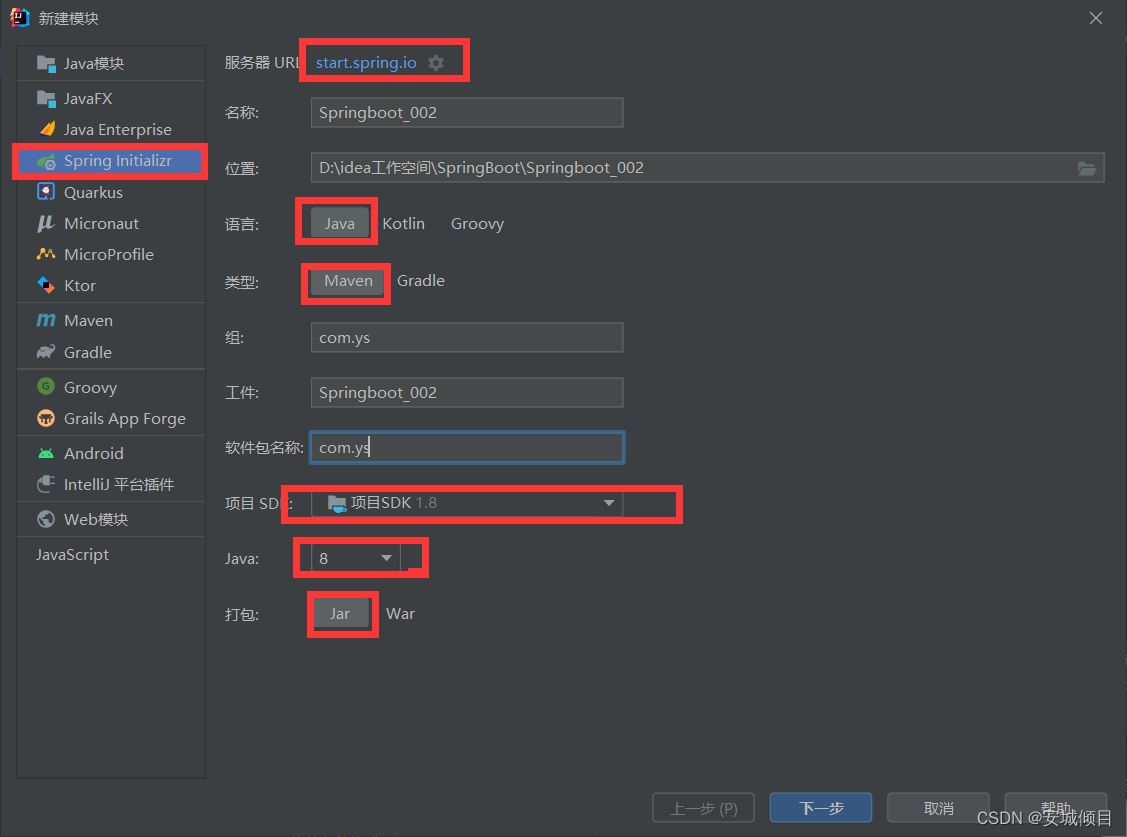
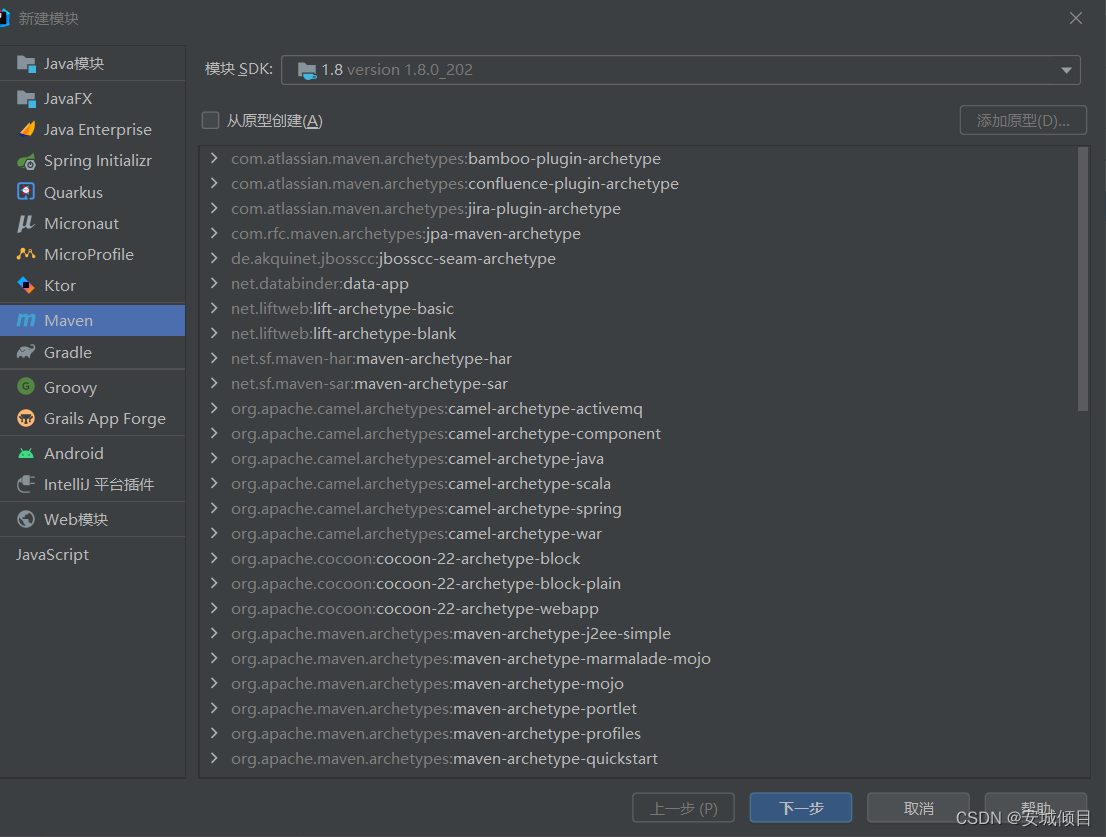
打开项目结构,新建模块,如下选择
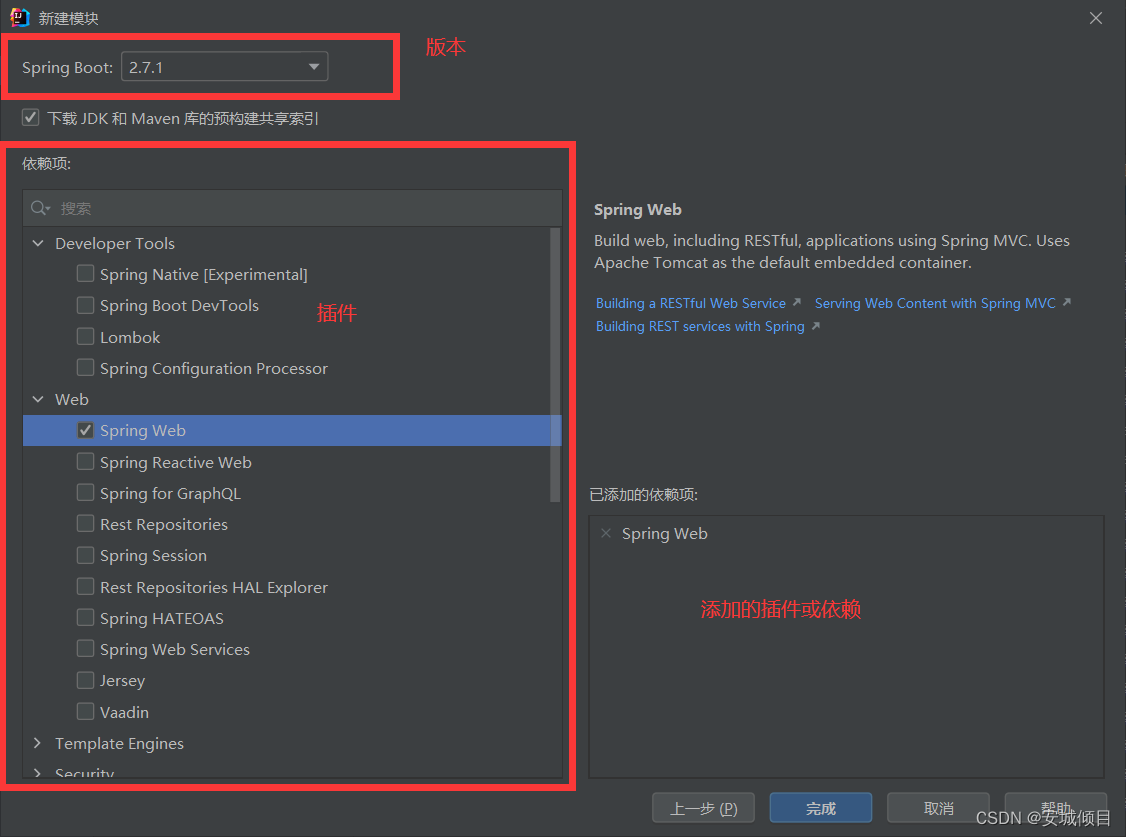
选择所需要的插件和版本
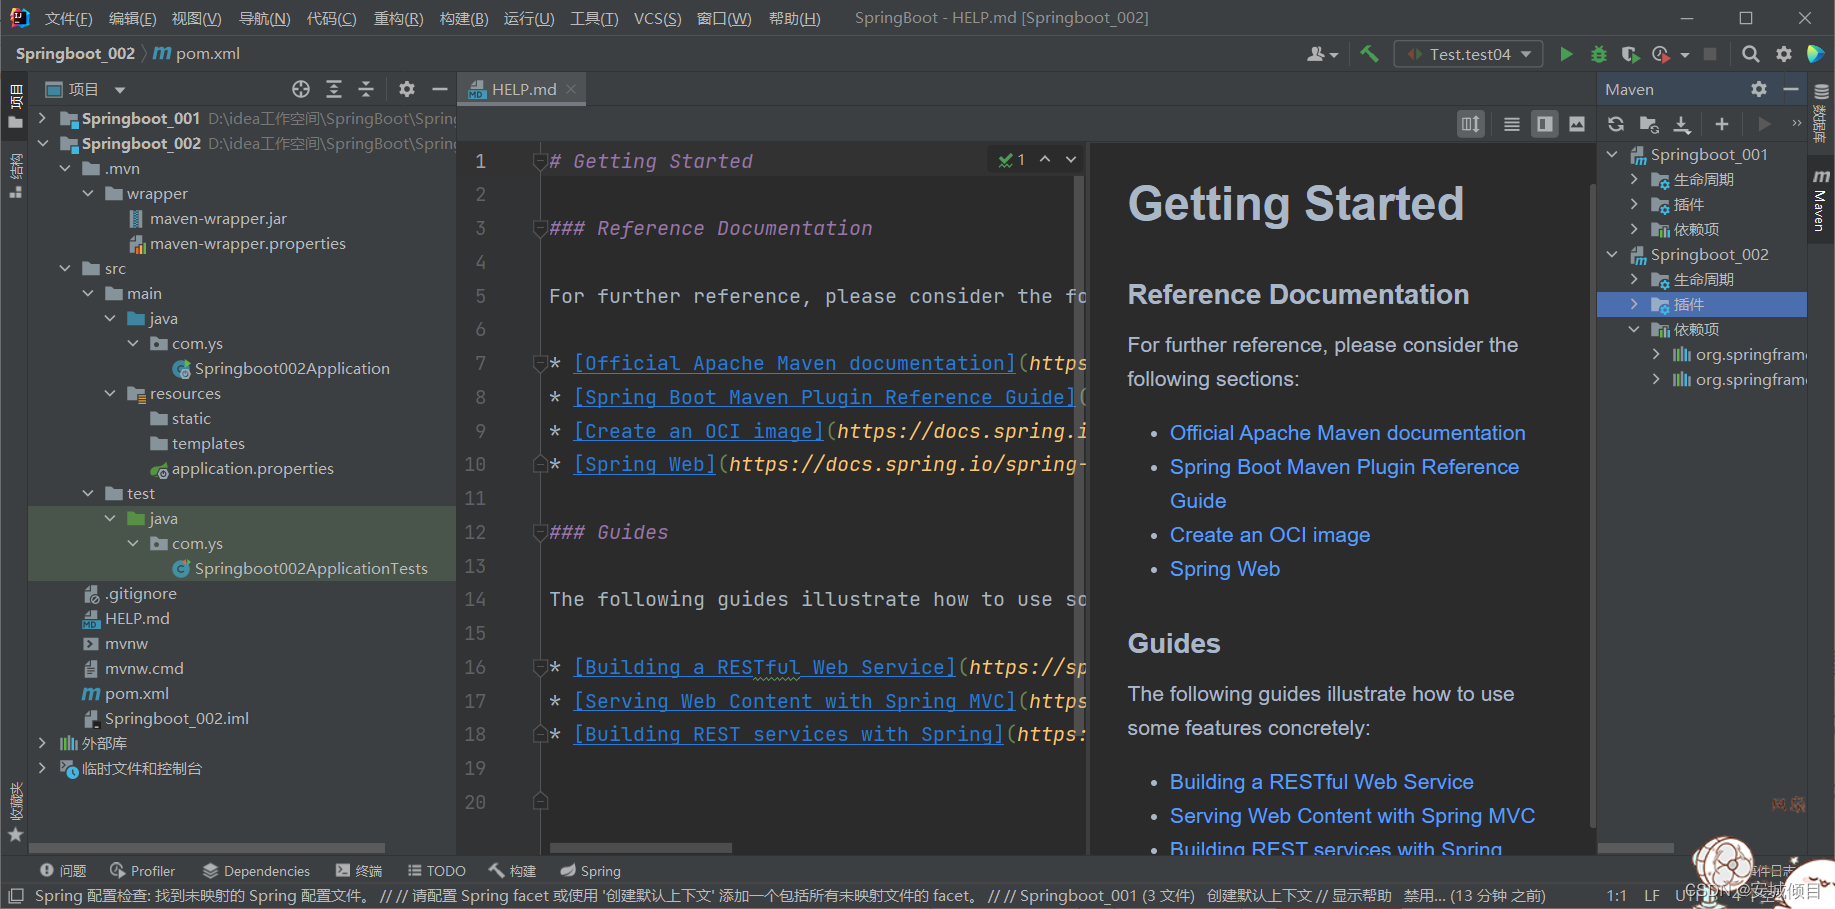
点击完成后,完成创建。然后点击项目结构的应用和确定,创建之后项目结构如下:
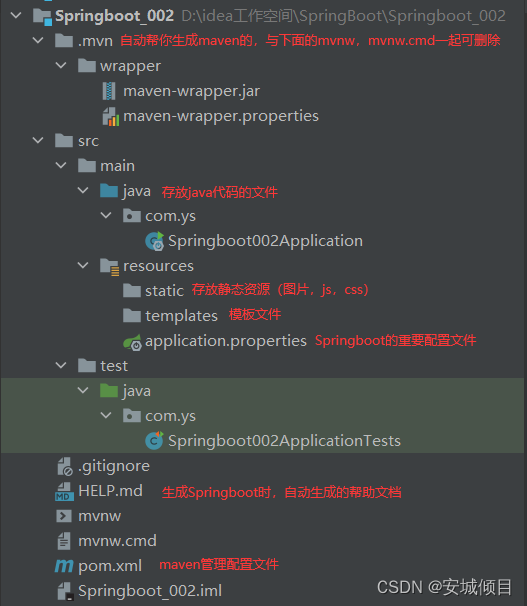
pom.xml文件
<?xml version="1.0" encoding="UTF-8"?>
<project xmlns="http://maven.apache.org/POM/4.0.0" xmlns:xsi="http://www.w3.org/2001/XMLSchema-instance"
         xsi:schemaLocation="http://maven.apache.org/POM/4.0.0 https://maven.apache.org/xsd/maven-4.0.0.xsd">
    <modelVersion>4.0.0</modelVersion>

<!--    springboot的父项目-->
    <parent>
        <groupId>org.springframework.boot</groupId>
        <artifactId>spring-boot-starter-parent</artifactId>
        <version>2.7.1</version>
        <relativePath/> <!-- lookup parent from repository -->
    </parent>
<!--    当前项目的坐标-->
    <groupId>com.ys</groupId>
    <artifactId>Springboot_002</artifactId>
    <version>0.0.1-SNAPSHOT</version>
    <name>Springboot_002</name>
    <description>Springboot_002</description>
<!--    JDK版本-->
    <properties>
        <java.version>1.8</java.version>
    </properties>
<!--    Spring-web的依赖-->
    <dependencies>
        <dependency>
            <groupId>org.springframework.boot</groupId>
            <artifactId>spring-boot-starter-web</artifactId>
        </dependency>
<!--测试依赖-->
        <dependency>
            <groupId>org.springframework.boot</groupId>
            <artifactId>spring-boot-starter-test</artifactId>
            <scope>test</scope>
        </dependency>
    </dependencies>

    <build>
        <plugins>
<!--            编译插件-->
            <plugin>
                <groupId>org.springframework.boot</groupId>
                <artifactId>spring-boot-maven-plugin</artifactId>
            </plugin>
        </plugins>
    </build>

</project>
根据SpringBoot自己提供向导式方式创建(需要联网)----使用国内镜像URL
(https://start.springboot.io)创建速度较快
其他步骤与上面相同
注意:可以在浏览器中直接输入上述的俩个URL
(https://start.spring.io)(https://start.springboot.io)
按照步骤创建可以,获得一个压缩包,解压后导入idea,同样是创建成功了Springboot项目
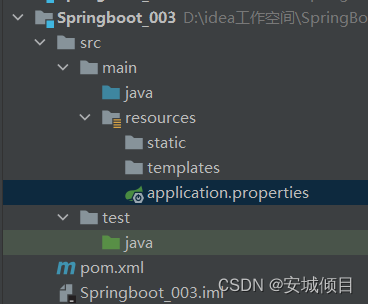
使用普通的maven创建一个Springboot项目
创建好之后对pom.xml进行修改
<?xml version="1.0" encoding="UTF-8"?>
<project xmlns="http://maven.apache.org/POM/4.0.0"
         xmlns:xsi="http://www.w3.org/2001/XMLSchema-instance"
         xsi:schemaLocation="http://maven.apache.org/POM/4.0.0 http://maven.apache.org/xsd/maven-4.0.0.xsd">
    <modelVersion>4.0.0</modelVersion>
<!--    添加Springboot父类,使这个maven项目的开发方式就变为了Springboot-->
     <parent>
         <groupId>org.springframework.boot</groupId>
         <artifactId>spring-boot-starter-parent</artifactId>
         <version>2.7.1</version>
         <relativePath/>
    </parent>

    <groupId>org.example</groupId>
    <artifactId>Springboot_003</artifactId>
    <version>1.0-SNAPSHOT</version>
    <dependencies>
<!--        添加Spring-web依赖-->
        <dependency>
            <groupId>org.springframework.boot</groupId>
            <artifactId>spring-boot-starter-web</artifactId>
        </dependency>
    </dependencies>

    <properties>
        <maven.compiler.source>8</maven.compiler.source>
        <maven.compiler.target>8</maven.compiler.target>
    </properties>

</project>
再对项目结构进行添加即可
例子
一个简单的SpringBoot例子,不需要写配置文件,SpringBoot已经配置好了Spring相关内容
package com.ys.controller;

import org.springframework.stereotype.Controller;
import org.springframework.web.bind.annotation.RequestMapping;
import org.springframework.web.bind.annotation.ResponseBody;

@Controller
public class HelloSpringBoot {
    @RequestMapping("/hello")//请求转发访问
    @ResponseBody//ajax请求必须要的注解
    public String hello(){
        return "欢迎使用SpringBoot框架";
    }
}
启动自动生成的SpringBoot中的类中的主方法,就可以在浏览器进行输入地址访问

SpringBoot的@SpringBootApplication注解
该注解使用于类名之上,使用向导式创建SpringBoot框架时,会自动生成一个java类。
该类被称为SpringBoot主启动类,此类中的主方法被称为SpringBoot主启动方法,而该类就是由@SpringBootApplication修饰的。(同一项目下的不同模块的主启动类,名字不能相同)
package com.ys;

import org.springframework.boot.SpringApplication;
import org.springframework.boot.autoconfigure.SpringBootApplication;

@SpringBootApplication
public class Application {
    public static void main(String[] args) {
        SpringApplication.run(Application.class);
    }
}
@SpringBootApplication的组成
包括了如下的三个注解:
@SpringBootConfiguration
@EnableAutoConfiguration
@ComponentScan
在@SpringBootConfiguration中包含了@Configuration注解,这就意味着使用了@SpringBootConfiguration注解的类,可以作为配置文件使用,例如@Bean注入对象等,即@SpringBootApplication修饰的主启动类可以作为配置文件使用
@EnableAutoConfiguration启用自动配置,把java对象配置好,注入到Spring容器中。例如可以把MyBatis的对象创建好,放到容器中
@ComponentScan
此注解为包扫描,相当于Spring配置文件中的<context:component-scan base-package="" />
默认扫描包是,@ComponentScan所在的类的包和子包。所以@SpringBootApplication的注解修饰的主启动类扫描的都是同级的包或者下一级的包。即其他文件要写在主启动类的同级或者下一级才可以被扫描,SpringBoot才能检测到。
举例创建一个实体类
package com.ys.pojo;

public class Student {
    private String name;
    private Integer age;

    @Override
    public String toString() {
        return "Student{" +
                "name='" + name + '\'' +
                ", age=" + age +
                '}';
    }

    public Student() {
    }

    public String getName() {
        return name;
    }

    public void setName(String name) {
        this.name = name;
    }

    public Integer getAge() {
        return age;
    }

    public void setAge(Integer age) {
        this.age = age;
    }

    public Student(String name, Integer age) {
        this.name = name;
        this.age = age;
    }
}
在主启动类中使用@Bean注入对象
package com.ys;

import com.ys.pojo.Student;
import org.springframework.boot.SpringApplication;
import org.springframework.boot.autoconfigure.SpringBootApplication;
import org.springframework.context.annotation.Bean;

@SpringBootApplication
public class Application {
    public static void main(String[] args) {
        SpringApplication.run(Application.class,args);
    }

    @Bean
    public Student MyStudent(){
        return new Student("zhangs",11);
    }
}
创建主方法进行对象读取
package com.ys;

import com.ys.pojo.Student;
import org.springframework.context.ApplicationContext;
import org.springframework.context.annotation.AnnotationConfigApplicationContext;

public class main {
    public static void main(String[] args) {
        ApplicationContext context = new AnnotationConfigApplicationContext(Application.class);
        Student student=(Student) context.getBean("MyStudent");
        System.out.println(student);
    }
}

SpringBoot的配置文件
配置文件名:application (固定)
扩展名有:properties(k=v);yml(k:v)
文件:application.properties,application.yml
例子:SpringMVC应用
新建一个SpringBoot框架,选择添加Springweb依赖进行创建
创建一个java类作为控制器(处理器)
package com.ys.controller;

import org.springframework.stereotype.Controller;
import org.springframework.web.bind.annotation.RequestMapping;
import org.springframework.web.bind.annotation.ResponseBody;
@Controller
public class BootHello {
    @RequestMapping("/hello")
    @ResponseBody
    public String hello(){
        return "hello SpringBoot";
    }
}
application.properties
#修改端口号
server.port=8080
#添加url的上下文 例:http://localhost:8080/ys/
server.servlet.context-path=/ys
application.yml(冒号后的值前有一个空格)
#修改端口号
server:
  port: 8080
#  http://localhost:8080/ys/   添加url上下文
  servlet:
    context-path: /ys
application.properties/application.yml任意选择一个就可以了,一般情况下使用yml,层次感更强。
存在俩个配置文件时,默认读上面的这个application.properties

多环境配置
在项目的实际开发中,会经历不同的阶段,每个阶段的配置是有所不同的,在SpringBoot中提供了多环境配置,方便进行环境配置的修改
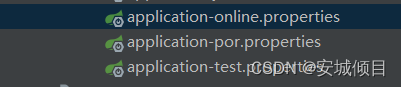
为每一个环境创建一个环境配置文件,命名格式为application-环境标识(自定义).properties(yml)
application-test.properties(yml)---------测试环境配置
application-por.properties(yml)---------开发环境配置
application-online.properties(yml)-------上线环境配置
当你需要使用时,在主配置文件中写入
![]()
#选择你使用的配置文件
spring.profiles.active=online
使用@Value 注入值
可以在配置文件中读取数据
在配置文件中自定义数据
#自定义数据
student.name=张三
student.age=23

data=2020.3.10
创建一个实体类,使用value传值
package com.ys.pojo;

import org.springframework.beans.factory.annotation.Value;
import org.springframework.stereotype.Component;

@Component
public class Student {
    @Value("${student.name}")
    private String name;
    @Value("${student.age}")
    private Integer age;

    public Student(String name, Integer age) {
        this.name = name;
        this.age = age;
    }

    public Student() {
    }

    @Override
    public String toString() {
        return "Student{" +
                "name='" + name + '\'' +
                ", age=" + age +
                '}';
    }

    public String getName() {
        return name;
    }

    public void setName(String name) {
        this.name = name;
    }

    public Integer getAge() {
        return age;
    }

    public void setAge(Integer age) {
        this.age = age;
    }
}
编写controller类,继续数据的读取
package com.ys.controller;

import com.ys.pojo.Student;
import org.springframework.beans.factory.annotation.Autowired;
import org.springframework.stereotype.Controller;
import org.springframework.web.bind.annotation.RequestMapping;
import org.springframework.web.bind.annotation.ResponseBody;
@Controller
public class BootHello {
    @Autowired
//自动寻找对应的Student类
    Student student;
    @RequestMapping("/value")
    @ResponseBody
    public String value(){
        return student.toString();
    }
}
访问页面,得到数据

使用@ConfigurationProperties注入值
该注解使用在类名前,配合prefix=“”进行注入值,当配置文件中的值格式如下
#自定义数据
student.name=张三
student.age=23
编写一个实体类,实体类的变量名要和配置文件中的变量一致
配置文件除去前缀的变量名=实体类的变量名
package com.ys.pojo;

import org.springframework.boot.context.properties.ConfigurationProperties;
import org.springframework.stereotype.Component;

@Component
@ConfigurationProperties(prefix = "student")
//@ConfigurationProperties往本类中注入值,prefix指定值的前缀,自动拼接为student.name
//在配置文件中寻找相同的变量名,相同则把值注入给对应的变量
public class Stu {
    private String name;
    private Integer age;

    @Override
    public String toString() {
        return "Student{" +
                "name='" + name + '\'' +
                ", age=" + age +
                '}';
    }


    public Stu(String name, Integer age) {
        this.name = name;
        this.age = age;

    }

    public Stu() {
    }

    public String getName() {
        return name;
    }

    public void setName(String name) {
        this.name = name;
    }

    public Integer getAge() {
        return age;
    }

    public void setAge(Integer age) {
        this.age = age;
    }
}
编写controller,读取数据
package com.ys.controller;

import com.ys.pojo.Stu;
import com.ys.pojo.Student;
import org.springframework.stereotype.Controller;
import org.springframework.web.bind.annotation.RequestMapping;
import org.springframework.web.bind.annotation.ResponseBody;

import javax.annotation.Resource;

@Controller
public class BootHello {
    @Resource
     //自动注入类 与@Autowired相同,但是更好
    Stu stu;
    @RequestMapping("/hello")
    @ResponseBody
    public String hello(){
        return stu.toString();
    }
}
在实体类中最上方会有提示
![]()
在pom.xml中添加如下依赖(可以在配置文件中提示生成@ConfigurationProperties修饰的实体类的变量)
 <dependency>
            <groupId>org.springframework.boot</groupId>
            <artifactId>spring-boot-configuration-processor</artifactId>
            <optional>true</optional>
        </dependency>
SpringBoot中的jsp用法(不推荐,本身不支持,需要修改配置)
必须添加编译jsp依赖,用于编译jsp页面
如果用到jstl、servlet、jsp需要用到对应的依赖
<!-- 添加jsp处理的依赖,负责编译jsp-->
<dependency>
<groupId>org.apache.tomcat.embed</groupId>
<artifactId>tomcat-embed-jasper</artifactId>
</dependency>
<!-- servlet依赖-->
<dependency>
<groupId>javax.servlet</groupId>
<artifactId>javax.servlet-api</artifactId>
</dependency>
<!-- jstl依赖-->
<dependency>
<groupId>javax.servlet</groupId>
<artifactId>jstl</artifactId>
</dependency>
<!-- jsp依赖-->
<dependency>
<groupId>javax.servlet.jsp</groupId>
<artifactId>javax.servlet.jsp-api</artifactId>
<version>2.3.1</version>
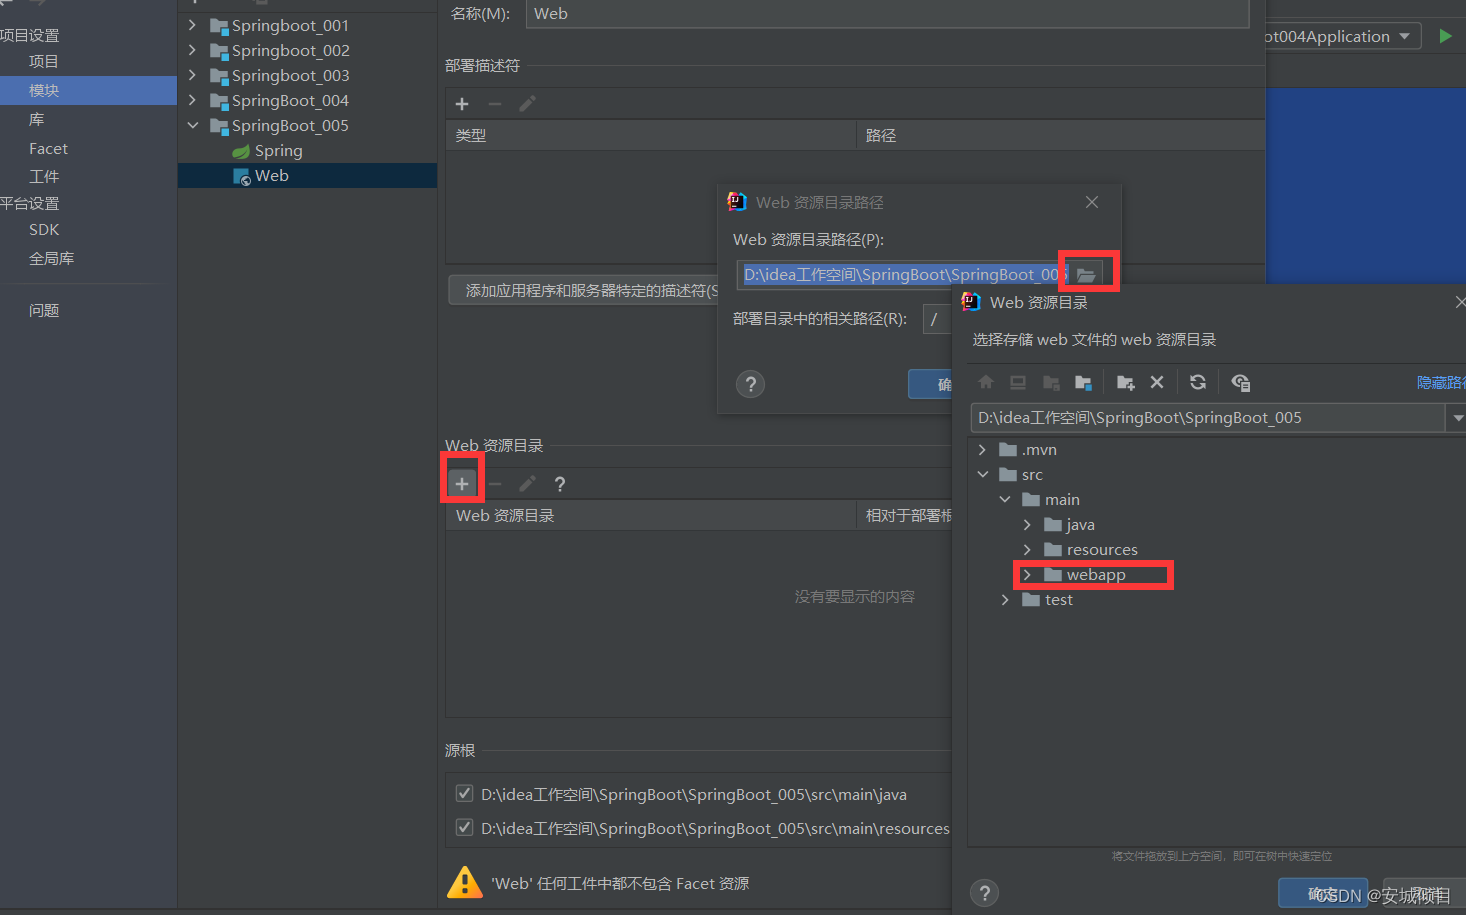
</dependency>在项目中创建一个webapp用于存放,需要修改webapp的类型

在配置文件中,进行视图解析器的配置
server.port=9090

server.servlet.context-path=/ys

#配置视图解析器
#前缀
spring.mvc.view.prefix=/
#后缀
spring.mvc.view.suffix=.jsp
编写controller处理器
package com.ys.controller;

import org.springframework.stereotype.Controller;
import org.springframework.ui.Model;
import org.springframework.web.bind.annotation.RequestMapping;

@Controller
public class JspController {
    @RequestMapping("/jsp")
//    public String jsp(HttpServletRequest request){
//        request.setAttribute("data","2022-07-14");
//        return "index";
//    }与下面作用相同
    public String jsp(Model model){
        model.addAttribute("data","2022-07-14");
        return "index";
    }
}
编写页面index,读取数据data,页面第一次弹出时,没有数据是因为没有通过转发请求访问,导致处理器中的方法没有运行,所以就没有数据,所以需要在url上通过转发请求进行访问。
<%--
  Created by IntelliJ IDEA.
  User: HP
  Date: 2022-07-14
  Time: 15:56
  To change this template use File | Settings | File Templates.
--%>
<%@ page contentType="text/html;charset=UTF-8" language="java" %>
<html>
<head>
    <title>2323</title>
</head>
<body>
<h2>使用index获取controller中的数据:${data}</h2>
</body>
</html>
获取Spring容器的值----一般用于测试容器方法(类)是否能够正常运行
创建一个有返回值的接口
package com.ys.service;

public interface UserService {
    void sayHello(String name);
}
再创建他的实体类
package com.ys.service.impl;

import com.ys.service.UserService;
import org.springframework.stereotype.Service;

@Service
public class UserServiceImpl implements UserService {
    @Override
    public void sayHello(String name) {
        System.out.println("实现接口方法sayHello"+name);
    }
}
在主方法中获取对象并输出
package com.ys;

import com.ys.service.UserService;
import org.springframework.boot.SpringApplication;
import org.springframework.boot.autoconfigure.SpringBootApplication;
import org.springframework.context.ApplicationContext;

@SpringBootApplication
public class SpringBoot005Application {

    public static void main(String[] args) {
//        启动并获取容器
        ApplicationContext context=SpringApplication.run(SpringBoot005Application.class, args);
//        获取容器中的对象
        UserService userService=(UserService)context.getBean("userServiceImpl");
//        注入值
        userService.sayHello("张三");
        System.out.println(userService);
    }

}
CommandLineRunner接口,ApplcationRunner接口
在容器创建后执行,继承CommandLineRunner或ApplcationRunner接口的类中run()方法,可以设置启动数据库,自定义操作等等。
修改上面的主方法如下即可
package com.ys;
import com.ys.service.UserService;
import org.springframework.boot.CommandLineRunner;
import org.springframework.boot.SpringApplication;
import org.springframework.boot.autoconfigure.SpringBootApplication;
import org.springframework.context.ApplicationContext;
import javax.annotation.Resource;
@SpringBootApplication
public class SpringBoot005Application implements CommandLineRunner {
@Resource
UserService userService;
public static void main(String[] args) {
// 启动并获取容器
ApplicationContext context=SpringApplication.run(SpringBoot005Application.class, args);
// 获取容器中的对象
UserService userService=(UserService)context.getBean("userServiceImpl");
// 注入值
userService.sayHello("张三");
System.out.println(userService);
}
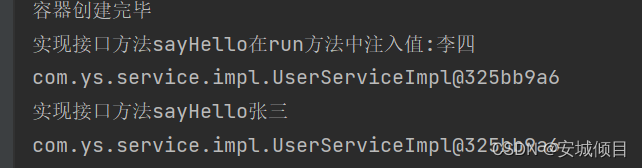
@Override
public void run(String... args) throws Exception {
// 做一些操作,在容器创建后自动执行
System.out.println("容器创建完毕");
userService.sayHello("在run方法中注入值:李四");
System.out.println(userService);
}
}