TinyTeX安装
下载TinyTeX(注意,需要下载TinyTeX-2,否则可能会因为丢失一些包无法编译),然后直接解压,把"TinyTeX-2\TinyTeX\bin\win32"加入到环境变量中。
这样,就完成了TinyTeX的安装。
VSCode上安装LaTeX插件
在插件商店中搜索"LaTeX Workshop"插件并安装。
配置VSCode的LaTeX插件
编译生成pdf文件
在VSCode界面中按F1键入"setjson"之后打开"Preferences: Open Settings(JSON)"
{
    "latex-workshop.latex.tools": [
        {
            // 编译工具和命令
            "name": "pdflatex",
            "command": "pdflatex",
            "args": [
                "-synctex=1",
                "-interaction=nonstopmode",
                "-file-line-error",
                "%DOCFILE%"
            ]
        },
	    "latex-workshop.latex.recipes": [
	        {
	            "name": "pdf->pdf",
	            "tools": [
	                "pdflatex",
	                "pdflatex",
	            ]
	        },
	    ],
}
这里本人写论文一般会用"pdflatex"做为编译器,而且一般需要编译两次才能正常显示应用的文章编号,因此本人做了如上的设置,如果需要用到"xelatex"等别的编译器,只需要做对应修改即可,参考文章中同样给出了具体的操作。
如果文献是用bib文件进行处理的,那么代码修改如下:
{
    "latex-workshop.latex.tools": [
        {
            // 编译工具和命令
            "name": "pdflatex",
            "command": "pdflatex",
            "args": [
                "-synctex=1",
                "-interaction=nonstopmode",
                "-file-line-error",
                "%DOCFILE%"
            ]
        },
        {
            "name": "bibtex",
            "command": "bibtex",
            "args": [
                "%DOCFILE%"
            ]
        }
    ],
    "latex-workshop.latex.recipes": [
        {
            "name": "pdf->bib->pdf->pdf",
            "tools": [
                "pdflatex",
                "bibtex",
                "pdflatex",
                "pdflatex",
            ]
        },
    ],
}
这里要注意最后要用pdflatex编译两次引用论文才能正常显示。
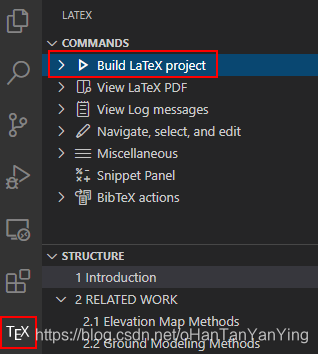
完成上面的设置就可以直接在VSCode的TEX选项中点击进行编译了和查看生成的PDF了,快捷方式为"Ctrl+Alt+B"。
自动删除LaTeX生成时产生的中间文件
// 清空中间文件
    "latex-workshop.latex.autoClean.run": "onBuilt",
    "latex-workshop.latex.clean.fileTypes": [
        "*.aux",
        "*.bbl",
        "*.blg",
        "*.idx",
        "*.ind",
        "*.lof",
        "*.lot",
        "*.out",
        "*.toc",
        "*.acn",
        "*.acr",
        "*.alg",
        "*.glg",
        "*.glo",
        "*.gls",
        "*.ist",
        "*.fls",
        "*.log",
        "*.fdb_latexmk",
    ],
在VSCode中使用Sumatra PDF预览PDF并与tex文件进行交互
使用Sumatra PDF对PDF进行预览
虽然VSCode可以直接提供pdf的预览,然而其使用没有Sumatra PDF那么方便。
先下载并安装Sumatra PDF,然后在之前的设置文件中添加如下的代码:
    // 用SumatraPDF进行预览
    "latex-workshop.view.pdf.viewer": "external",
    "latex-workshop.view.pdf.external.viewer.command": "C:/Software/SumatraPDF/SumatraPDF.exe",  //注意修改路径
    "latex-workshop.view.pdf.external.viewer.args": [
        "-forward-search",
        "%TEX%",
        "%LINE%",
        "-reuse-instance",
        "-inverse-search",
        "code.cmd -r -g \"%f\":%l",
        "%PDF%"
    ],
上面的路径要换成自己的,本人默认安装的vscode,位置可供参考。完成上面的配置就可以直接用VSCode来打开Sumatra PDF进行预览了。
配置正向和反向搜索
下面就是重点了,也是用这整套东西最核心的部分,那就是正向和反向搜索,用LaTeX写过文章的老哥一定十分清楚这两项东西的重要性!
首先是正向搜索,将如下代码添加进配置文件即可:
	// 设置正反向搜索
    "latex-workshop.view.pdf.external.synctex.command": "C:/Software/SumatraPDF/SumatraPDF.exe",  //注意修改路径
    "latex-workshop.view.pdf.external.synctex.args": [
        "-forward-search",
        "%TEX%",
        "%LINE%",
        "-reuse-instance",
        "-inverse-search",
        "code.cmd -r -g \"%f\":%l",
        "%PDF%",
    ],
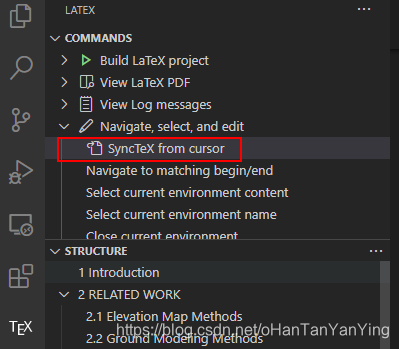
这样点击"SyncTeX from cursor"就可以进行正向搜索了。
接着反向搜索,这在改论文的时候非常重要。
打开SumatraPDF,然后选择"设置"->“选项”->“请输入您双击PDF文件后调用的命令行:”
"C:\Software\Microsoft VS Code/Code.exe" "C:\Software\Microsoft VS Code/resources/app/out/cli.js" --ms-enable-electron-run-as-node -r -g "%f:%l"
这样就可以在SumatraPDF中实现反向搜索了(注意需要在tex文件中添加"\usepackage{pdfsync}"这个包,另外要在VSCode预览中打开SumatraPDF才能反向搜索,如果单独打开SumatraPDF然后双击pdf文件,会直接在VSCode里面打开一个叫做cli.js的文件,不会实现反向搜索的效果)。
在VSCode中使用配置快捷键
上面的操作虽然已经非常方便了,但有键盘的情景下快捷键永远是真理,因此我们可以将操作全部设置成快捷键。
操作是在VSCode界面中按F1键入"keyjson"之后点击"Preferences: Open Keyborad Shortcuts(JSON)",在keybindings.json文件中写入如下代码:
{
    "key": "alt+s",
    "command": "latex-workshop.synctex",
    "when": "editorTextFocus && !isMac"
},
{
    "key": "alt+b",
    "command": "latex-workshop.build",
    "when": "editorTextFocus && !isMac"
},
{
    "key": "alt+t",
    "command": "latex-workshop.kill",
    "when": "editorTextFocus && !isMac"
},
将"Alt+S"绑定到正向搜索,将"Alt+B"绑定到使用默认recipe编译,将"Alt+T"绑定到终止编译。
取消保存前编译
LaTeX Workshop 默认保存的时候自动编译,如果不喜欢这个设置,可以添加以下代码进入设置文件:
"latex-workshop.latex.autoBuild.run": "never",
到此所有配置的东西就全部完成了,配置文件的全部代码如下:
{
    "latex-workshop.latex.tools": [
        {
            // 编译工具和命令
            "name": "pdflatex",
            "command": "pdflatex",
            "args": [
                "-synctex=1",
                "-interaction=nonstopmode",
                "-file-line-error",
                "%DOCFILE%"
            ]

        },
        {
            "name": "bibtex",
            "command": "bibtex",
            "args": [
                "%DOCFILE%"
            ]
        }
    ],
    "latex-workshop.latex.recipes": [
        {
            "name": "pdf->bib->pdf->pdf",
            "tools": [
                "pdflatex",
                "bibtex",
                "pdflatex",
                "pdflatex",
            ]
        },
    ],
    "latex-workshop.latex.autoBuild.run": "never",
    // 用SumatraPDF进行预览
    "latex-workshop.view.pdf.viewer": "external",
    "latex-workshop.view.pdf.external.viewer.command": "C:/Software/SumatraPDF/SumatraPDF.exe",  //注意修改路径
    "latex-workshop.view.pdf.external.viewer.args": [
        "-forward-search",
        "%TEX%",
        "%LINE%",
        "-reuse-instance",
        "-inverse-search",
        "code.cmd -r -g \"%f\":%l",
        "%PDF%"
    ],
    // 设置正反向搜索
    "latex-workshop.view.pdf.external.synctex.command": "C:/Software/SumatraPDF/SumatraPDF.exe",  //注意修改路径
    "latex-workshop.view.pdf.external.synctex.args": [
        "-forward-search",
        "%TEX%",
        "%LINE%",
        "-reuse-instance",
        "-inverse-search",
        "code.cmd -r -g \"%f\":%l",
        "%PDF%",
    ],

    "latex.linter.enabled": false,
    // 清空中间文件
    "latex-workshop.latex.autoClean.run": "onBuilt",
    "latex-workshop.latex.clean.fileTypes": [
        "*.aux",
        "*.bbl",
        "*.blg",
        "*.idx",
        "*.ind",
        "*.lof",
        "*.lot",
        "*.out",
        "*.toc",
        "*.acn",
        "*.acr",
        "*.alg",
        "*.glg",
        "*.glo",
        "*.gls",
        "*.ist",
        "*.fls",
        "*.log",
        "*.fdb_latexmk",
    ],

    "window.zoomLevel": 1,
    "editor.wordWrap": "on",
}
开启自动换行
文件->首选项->设置->搜索"Editor: Word Wrap"->控制折行的方式->on
最后感谢下下面参考的这篇文章,本文基本是按照作者的文章操作完成的,本人所做的工作主要是将个人认为不必要的地方删减了。如发现有雷同绝非巧合!感谢下面文章的作者已经帮助该作者改善错误的众多老哥!
参考文章:
https://zhuanlan.zhihu.com/p/38178015