首先需要了解RCNN和Fast RCNN
R-CNN的主要思路:
- 给定一张输入图片,从图片中提取 2000 个类别独立的候选区域,用Selective Search算法,这是一种遍历搜索的方式。
- 对于每个区域利用 CNN 抽取一个固定长度的特征向量,无视候选框大小不一样,统一变换。
- 再对每个区域利用 SVM 进行目标分类。
R-CNN存在以下几个问题:1、训练分多步。R-CNN的训练先要fine tuning一个预训练的网络,然后针对每个类别都训练一个SVM分类器,最后还要用regressors对bounding-box进行回归,另外region proposal也要单独用selective search的方式获得,步骤比较繁琐。2、时间和内存消耗比较大。在训练SVM和回归的时候需要用网络训练的特征作为输入,特征保存在磁盘上再读入的时间消耗还是比较大的。3、测试的时候也比较慢,每张图片的每个region proposal都要做卷积,重复操作太多。
Fast R-CNN主要思路:
- 卷积不再是对每个region proposal进行,而是直接对整张图像,这样减少了很多重复计算。原来RCNN是对每个region proposal分别做卷积,因为一张图像中有2000左右的region proposal,肯定相互之间的重叠率很高,因此产生重复计算。
- 用ROI pooling进行特征的尺寸变换,因为全连接层的输入要求尺寸大小一样,因此不能直接把region proposal作为输入。
- 将regressor放进网络一起训练,每个类别对应一个regressor,同时用softmax代替原来的SVM分类器。
Fast R-CNN的region proposal仍然是通过selective search方法得到

R-CNN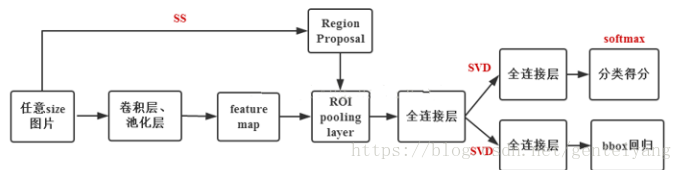
Fast R-CNN
Faster R-CNN
Faster R-CNN相当于Fast R-CNN加RPN。和Fast R-CNN相比,Faster R-CNN的region proposal使用RPN生成,速度提高了很多。
借用代码来分析,参考https://blog.csdn.net/cj1561435010/article/details/106649040/
1、特征提取网络
使用预训练好的VGG16模型。
from torchvision import models
from torch import nn
import torch


def decom_VGG16(path):
    model = load_pretrained_vgg16(path)
    print(model)
    # 拿出vgg16模型的前30层来进行特征提取
    features = list(model.features)[:30]

    # 获取vgg16的分类的那些层
    classifier = list(model.classifier)
    # 除去Dropout的相关层
    del classifier[6]
    del classifier[5]
    del classifier[2]
    classifier = nn.Sequential(*classifier)#重新连起来

    # 前10层的参数不进行更新
    for layer in features[:10]:
        for p in layer.parameters():
            p.requires_grad = False

    features = nn.Sequential(*features)
    return features, classifier


def load_pretrained_vgg16(path):
    vgg16 = models.vgg16()
    vgg16.load_state_dict(torch.load(path)#加载模型
    return vgg16
    # return models.vgg16(pretrained=True)


if __name__ == '__main__':
    path = '../vgg16-397923af.pth'
    vgg16_model = load_pretrained_vgg16(path)
    print(vgg16_model)
2、RPN网络
(1)生成anchors
import numpy as np
def generate_base_anchors(base_size=16, ratios=[0.5, 1, 2], scales=[8, 16, 32], center_x=0, center_y=0):
    """
    function description: 生成k个以(0, 0)为中心的anchors模板

    :param base_size: 特征图的每个像素的感受野大小(相当于featuremap上的一个像素的尺度所对应原图上的尺度)
    :param ratios: 高宽的比率
    :param scales: 面积的scales的开方
    :return:
    """
    base_anchor = np.zeros((len(ratios) * len(scales), 4), dtype=np.float32)
    # 生成anchor的算法本质: 使得总面积不变, 一个像素点衍生出9个anchors,三种面积,三种高宽比->9个。
    for i in range(len(scales)):
        for j in range(len(ratios)):
            index = i * len(ratios) + j
            area = (base_size * scales[i]) ** 2
            width = np.sqrt(area * 1.0 / ratios[j])
            height = width * ratios[j]
            # 只需要保存左上角和右下角的点的坐标即可
            base_anchor[index, 0] = -width / 2. + center_x
            base_anchor[index, 1] = -height / 2. + center_y
            base_anchor[index, 2] = width / 2. + center_x
            base_anchor[index, 3] = height / 2. + center_y
    return base_anchor

def enumerate_shifted_anchor(base_anchor, base_size, width, height):
    """
    function description: 减少不必要的如generate_base_anchors的计算, 较大的特征图的锚框生成模板, 生成锚框的初选模板即滑动窗口

    :param base_anchor: 需要reshape的anchors
    :param base_size: 特征图的每个像素的感受野大小
    :param height: featuremap的高度
    :param width: featuremap的宽度
    :return:
        anchor: 维度为:[width*height*k, 4]的先验框(anchors)
    """
    # 计算featuremap中每个像素点在原图中感受野上的中心点坐标
    shift_x = np.arange(0, width * base_size, base_size)
    shift_y = np.arange(0, height * base_size, base_size)
    shift_x, shift_y = np.meshgrid(shift_x, shift_y)
    print('shift_x: ', shift_x.shape, 'shift_y: ', shift_y.shape)

    # TODO 感觉最正统的方法还是遍历中心点
     index = 0
     for x in shift_x:
         for y in shift_y:
             anchors = generate_base_anchors(center_x=x, center_y=y)
             if index == 0:
                 old_anchors = anchors
             else:
                 anchors = np.concatenate((old_anchors, anchors), axis=0)
                 old_anchors = anchors
             index += 1

    # 最后再合成为所有的先验框, 相当于对featuremap的每个像素点都生成k(9)个先验框(anchors)
    anchors = anchor.reshape((K * A, 4)).astype(np.float32)
    print('result: ', anchors.shape)
    return anchors
生成了很多的anchors。
(2)使用rpn_locs对anchors进行微调
def loc2box(anchors, locs):
    """
    function description: 将所有的anchors根据通过rpn得到的locs值进行校正

    :param anchors: 先验框
    :param locs: rpn得到的locs
    :return:
        roi: 兴趣区域
    """
    anchors_width = anchors[:, 2] - anchors[:, 0]
    anchors_height = anchors[:, 3] - anchors[:, 1]
    anchors_center_x = anchors[:, 0] + 0.5 * anchors_width
    anchors_center_y = anchors[:, 1] + 0.5 * anchors_height

    tx = locs[:, 0]
    ty = locs[:, 1]
    tw = locs[:, 2]
    th = locs[:, 3]

    center_x = tx * anchors_width + anchors_center_x
    center_y = ty * anchors_height + anchors_center_y
    width = np.exp(tw) * anchors_width
    height = np.exp(th) * anchors_height

    # eps是一个很小的非负数, 使用eps将可能出现的零用eps来替换, 避免除数为0而报错
    roi = np.zeros(locs.shape, dtype=locs.dtype)
    roi[:, 0] = center_x - 0.5 * width  # xmin
    roi[:, 2] = center_x + 0.5 * width  # xmax
    roi[:, 1] = center_y - 0.5 * height  # ymin
    roi[:, 3] = center_y + 0.5 * height  # ymax
    return roi
(3) NMS非极大值抑制算法
从所有的ROI选出最大得分的,再与其它ROI计算IOU,超过阈值就合并(即两个矩形合成更大的矩形)
def non_maximum_suppression(roi, thresh):
    """
    function description: 非极大值抑制算法, 每次选出scores最高的roi分别和其他roi计算iou, 剔除iou查过阈值的roi,一直重复这个步骤
    :param roi: 感兴趣的区域
    :param thresh: iou的阈值
    :return:
    """
    # 左上角点的坐标
    xmin = roi[:, 0]
    ymin = roi[:, 1]
    # 右下角点的坐标
    xmax = roi[:, 2]
    ymax = roi[:, 3]

    areas = (xmax - xmin) * (ymax - ymin)
    keep = []
    order = np.arange(roi.shape[0])
    while order.size > 0:
        i = order[0]
        keep.append(i)
        # TODO 和计算iou有些许冗余
        xx1 = np.maximum(xmin[i], xmin[order[1:]])
        yy1 = np.maximum(ymin[i], ymin[order[1:]])
        xx2 = np.minimum(xmax[i], xmax[order[1:]])
        yy2 = np.minimum(ymax[i], ymax[order[1:]])

        width = np.maximum(0.0, xx2 - xx1)
        height = np.maximum(0.0, yy2 - yy1)
        inter = width * height
        # 计算iou
        iou = inter / (areas[i] + areas[order[1:]] - inter)

        idx = np.where(iou <= thresh)[0]  # 去掉和scores的iou大于阈值的roi
        order = order[1 + idx]  # 剔除score最大
    roi_after_nms = roi[keep]
    return roi_after_nms
(4)RPN层
from torch import nn
import torch
import torch.nn.functional as F
from nets.anchors_creator import generate_base_anchors, enumerate_shifted_anchor
from nets.proposal_creator import ProposalCreator
from utils.util import normal_init
from configs.config import in_channels, mid_channels, feature_stride, anchors_scales, anchors_ratios


class RPN(nn.Module):
    def __init__(self):
        super(RPN, self).__init__()

        self.in_channels = in_channels  # 经过预训练好的特征提取网络输出的featuremap的通道数
        self.mid_channels = mid_channels  # rpn网络第一层3x3卷积层输出的维度
        self.feature_stride = feature_stride  # 可以理解为featuremap中感受野的大小(压缩的倍数)
        self.anchor_scales = anchors_scales  # 生成先验框的面积比例的开方
        self.anchor_ratios = anchors_ratios  # 生成先验框的宽高之比

        # 可以把rpn传入; 如果是train阶段, 返回的roi数量是2000; 如果是test则是300
        self.proposal_layer = ProposalCreator(parent_model=self)

        self.base_anchors = generate_base_anchors(scales=self.anchor_scales, ratios=self.anchor_ratios)
        self.feature_stride = feature_stride

        # RPN的卷积层用来接收特征图(预训练好的vgg16网络的输出)
        self.RPN_conv = nn.Conv2d(in_channels=in_channels, out_channels=self.mid_channels, kernel_size=3, stride=1,
                                  padding=1)

        anchors_num = self.base_anchors.shape[0]
        # 2 x k(9) scores, 分类预测
        self.RPN_cls_layer = nn.Conv2d(in_channels=self.mid_channels, out_channels=anchors_num * 2, kernel_size=1,
                                       stride=1,
                                       padding=0)

        # 4 x k(9) coordinates, 回归预测每一个网格点上每一个先验框的变化情况; 此处是1 x 1卷积, 只改变维度
        self.RPN_reg_layer = nn.Conv2d(in_channels=self.mid_channels, out_channels=anchors_num * 4, kernel_size=1,
                                       stride=1,
                                       padding=0)

        # paper中提到的用0均值高斯分布(标准差为0.01)初始化1x1卷积的权重
        normal_init(self.RPN_conv, mean=0, stddev=0.01)
        normal_init(self.RPN_cls_layer, mean=0, stddev=0.01)
        normal_init(self.RPN_reg_layer, mean=0, stddev=0.01)

    def forward(self, base_feature_map, img_size):
        """
        function description: rpn网络的前向计算

        :param base_feature_map: 经过预训练好的特征提取网络后的输出, 维度为: [batch_size, 38, 38, 512]
        :param img_size: 原图的尺寸, 需要用这个对anchors进行才间再转化成rois
        :return:
            rpn_locs:rpn层回归预测每一个先验框的变化情况, 维度为:[n, w*h*k, 4]
            rpn_scores: rpn分类每一个预测框内部是否包含了物体以及相应的置信度, 维度为:[n, w*h*k, 2]
            anchors: featuremap中每个像素点生成k个先验框的集合, 维度为:[w*h*k ,4]
            rois: 通过rpn网络输出的locs来校正先验框anchors的位置并完成NMS之后的rois
        """
        n, _, w, h = base_feature_map.shape

        # 前向传播的时候计算移动的anchors
        anchors = enumerate_shifted_anchor(self.base_anchors, base_size=self.feature_stride, width=w, height=h)

        anchor_num = len(self.anchor_ratios) * len(self.anchor_scales)

        x = F.relu(self.RPN_conv(base_feature_map), inplace=True)  # inplace=True表示原地操作, 节省内存

        # 回归预测, 其中第三个维度的四个数分别代表左上角和右下角的点的坐标
        rpn_locs = self.RPN_reg_layer(x)
        # [n, 4*k, w, h] -> [n, w, h, 4*k] -> [n, w*h*k, 4]
        rpn_locs = rpn_locs.permute(0, 2, 3, 1).contiguous().view(n, -1, 4)

        # 分类预测, 其中第三个维度的第一个数表示类别标签(0为背景), 第二个数表示置信度
        rpn_scores = self.RPN_cls_layer(x)
        # [n, 2*k, w, h] -> [n, w, h, 2*k] -> [n, w*h*k, 2]
        rpn_scores = rpn_scores.permute(0, 2, 3, 1).contiguous()
        # TODO
        # [n, w, h, 2*k] -> [n, w, h, k, 2]
        rpn_scores = rpn_scores.view(n, w, h, anchor_num, 2)
        # [n, w, h, k, 2] -> [n, w*h*k, 2]
        rpn_scores = rpn_scores.view(n, -1, 2)

        # print('rpn_locs: ', rpn_locs.shape)
        # print('rpn_scores: ', rpn_scores.shape)

        # 根据rpn回归的结果对anchors微调以及裁剪之后转为rois, 同时提供rois给Fast-RCNN部分
        rois = self.proposal_layer(rpn_locs[0].detach().cpu().numpy(),
                                   rpn_scores[0].detach().cpu().numpy(),
                                   anchors,
                                   img_size)

        return rpn_locs, rpn_scores, anchors, rois

    @staticmethod
    def reshape(x, width):
        # input_size = x.size()
        # x = x.view(input_size[0], int(d), int(float(input_size[1] * input_size[2]) / float(d)), input_size[3])
        height = float(x.size(1) * x.size(1)) / width
        x = x.view(x.size(0), int(width), int(height), x.size(3))
        return x


if __name__ == '__main__':
    net = RPN()
    x = net(torch.ones((1, 512, 38, 38)), (224, 224))
这里很好理解,看网络的结构即可
(5)ProposalCreator,对rpn的结果进行裁剪和过滤
import numpy as np
from utils.util import loc2box, non_maximum_suppression

class ProposalCreator:
    def __init__(self,
                 parent_model,
                 nms_thresh=0.7,
                 n_train_pre_nms=12000,
                 n_train_post_nms=2000,
                 n_test_pre_nms=6000,
                 n_test_post_nms=300,
                 min_size=16):
        """
        :param parent_model: 区分是training_model还是testing_model
        :param nms_thresh: 非极大值抑制的阈值
        :param n_train_pre_nms: 训练时NMS之前的boxes的数量
        :param n_train_post_nms: 训练时NMS之后的boxes的数量
        :param n_test_pre_nms: 测试时NMS之前的数量
        :param n_test_post_nms: 测试时NMS之后的数量
        :param min_size: 生成一个roi所需的目标的最小高度, 防止Roi pooling层切割后维度降为0
        """
        self.parent_model = parent_model
        self.nms_thresh = nms_thresh
        self.n_train_pre_nms = n_train_pre_nms
        self.n_train_post_nms = n_train_post_nms
        self.n_test_pre_nms = n_test_pre_nms
        self.n_test_post_nms = n_test_post_nms
        self.min_size = min_size

    def __call__(self, locs, scores, anchors, img_size):
        """
        function description: 通过rpn网络输出的locs来校正先验框anchors的位置并完成NMS, 返回固定数量的rois

        :param locs: rpn网络中的1x1卷积的一个输出, 维度为[w*h*k, 4]
        :param scores: rpn网络中的1x1卷积的另一个输出, 维度为:[w*h*k, 2]
        :param anchors: 先验框
        :param img_size: 输入整个Faster-RCNN网络的图片尺寸
        :return:
            roi_after_nms: 通过rpn网络输出的locs来校正先验框anchors的位置并完成NMS之后的rois
        """
        if self.parent_model.training:
            n_pre_nms = self.n_train_pre_nms
            n_post_nms = self.n_train_post_nms
        else:
            n_pre_nms = self.n_test_pre_nms
            n_post_nms = self.n_test_post_nms

        # 根据rpn_locs微调先验框即将anchors转化为rois
        roi = loc2box(anchors, locs)

        # 防止建议框即rois超出图像边缘
        roi[:, [0, 2]] = np.clip(roi[:, [0, 2]], 0, img_size[0])  # 对X轴剪切
        roi[:, [1, 3]] = np.clip(roi[:, [1, 3]], 0, img_size[1])  # 对Y轴剪切

        # 去除高或宽<min_size的rois, 防止Roi pooling层切割后维度降为0
        min_size = self.min_size
        roi_width = roi[:, 2] - roi[:, 0]
        roi_height = roi[:, 3] - roi[:, 1]
        keep = np.where((roi_width >= min_size) & (roi_height >= min_size))[0]  # 得到满足条件的行index
        roi = roi[keep, :]

        scores = scores[:, 1]
        scores = scores[keep]
        # argsort()函数得到的是从小到大的索引, x[start:end:span]中如果span<0则逆序遍历; 如果span>0则顺序遍历
        order = scores.argsort()[::-1]  # 对roi通过rpn的scores进行排序, 得到scores的下降排列的坐标
        # 保留分数排在前面的n_pre_nms个rois
        order = order[: n_pre_nms]
        roi = roi[order, :]

        # 非极大值抑制
        roi_after_nms, _ = non_maximum_suppression(roi, thresh=self.nms_thresh)
        # NMS之后保留分数排在前面的n_post_nms个rois
        roi_after_nms = roi_after_nms[:n_post_nms]

        return roi_after_nms
3、Fast-RCNN部分
from torch import nn
from nets.roi_pooling_2d import RoIPooling2D
from nets.vgg16 import decom_VGG16
from utils.util import normal_init


class FastRCNN(nn.Module):
    def __init__(self,
                 n_class,
                 roi_size,
                 spatial_scale,
                 classifier):
        """
        function description:
            将rpn网络提供的roi"投射"到vgg16的featuremap上, 进行相应的切割并maxpooling(RoI maxpooling),
            再将其展开从2d变为1d,投入两个fc层,然后再分别带入两个分支fc层,作为cls和reg的输出

        :param n_class: 分类的总数
        :param roi_size: RoIPooling2D之后的维度
        :param spatial_scale: roi(rpn推荐的区域-原图上的区域)投射在feature map后需要缩小的比例, 这个个人感觉应该对应感受野大小
        :param classifier: 从vgg16提取的两层fc(Relu激活)
        """
        super(FastRCNN, self).__init__()

        self.classifier = classifier
        self.cls_layer = nn.Linear(4096, n_class)
        self.reg_layer = nn.Linear(4096, n_class * 4)
        normal_init(self.cls_layer, 0, 0.001)
        normal_init(self.reg_layer, 0, 0.01)
        self.n_class = n_class
        self.roi_size = roi_size
        self.spatial_scale = spatial_scale
        self.roi = RoIPooling2D((self.roi_size, self.roi_size), self.spatial_scale)

    def forward(self, x, sample_rois):
        """
        function decsription:

        :param x: 预训练好的特征提取网络的输出即featuremap
        :param sample_rois: 经过NMS后的rois
        :return:
            roi_locs: roi的回归损失
            roi_scores: roi的分类损失
        """
        pool = self.roi(x, sample_rois)
        pool = pool.view(pool.size(0), -1)
        fc7 = self.classifier(pool)

        roi_scores = self.cls_layer(fc7)
        roi_locs = self.reg_layer(fc7)
        return roi_locs, roi_scores
ROIPolling2D
class RoIPooling2D(nn.Module):
    def __init__(self, output_size, spatial_scale, return_indices=False):
        super(RoIPooling2D, self).__init__()

        self.output_size = output_size
        self.spatial_scale = spatial_scale
        self.return_indices = return_indices
        # 将输入张量的维度变为output_size, output_size是元组
        self.adp_max_pool_2D = nn.AdaptiveMaxPool2d(output_size, return_indices)#自适应最大池化

    def forward(self, x, rois):
        """
        function description: 将原图中采样后的roi变换到featuremap中的对应位置

        :param x: 预训练好的特征提取网络的输出即featuremap
        :param rois: 采样后的roi
        :return:
        """
        rois_ = torch.from_numpy(rois).float()
        rois = rois_.mul(self.spatial_scale)
        rois = rois.long()

        num_rois = rois.size(0)
        output = []

        for i in range(num_rois):
            # roi维度为: [4]
            roi = rois[i]
            im = x[..., roi[0]:(roi[2] + 1), roi[1]:(roi[3] + 1)]
            try:
                output.append(self.adp_max_pool_2D(im))  # 元素维度 (1, channel, 7, 7)
            except RuntimeError:
                print("roi:", roi)
                print("raw roi:", rois[i])
                print("im:", im)
                print("outcome:", self.adp_max_pool_2D(im))

        output = torch.cat(output, 0)
        return output
权重初始化
def normal_init(m, mean, stddev, truncated=False):
    """
    function description: 权重初始化函数

    :param m: 输入
    :param mean: 均值
    :param stddev: 标准差
    :param truncated: 是否截断, paper中使用矩阵奇异值分解加速的话就视为截断
    :return:
    """
    if truncated:
        m.weight.data.normal_().fmod_(2).mul_(stddev).add_(mean)
    else:
        m.weight.data.normal_(mean, stddev)
        m.bias.data.zero_()