目录
第一步:创建网关服务
创建一个springboot项目,命名为gateway
第二步:在pom.yml配置文件中添加依赖
<?xml version="1.0" encoding="UTF-8"?>
<project xmlns="http://maven.apache.org/POM/4.0.0" xmlns:xsi="http://www.w3.org/2001/XMLSchema-instance"
         xsi:schemaLocation="http://maven.apache.org/POM/4.0.0 https://maven.apache.org/xsd/maven-4.0.0.xsd">
    <modelVersion>4.0.0</modelVersion>

    <parent>
        <groupId>org.springframework.boot</groupId>
        <artifactId>spring-boot-starter-parent</artifactId>
        <version>2.3.2.RELEASE</version>
        <relativePath/>
    </parent>

    <groupId>com.example</groupId>
    <artifactId>gateway</artifactId>
    <version>0.0.1-SNAPSHOT</version>

    <properties>
        <java.version>1.8</java.version>
        <spring-boot.version>2.3.2.RELEASE</spring-boot.version>
        <spring-cloud.version>Hoxton.SR9</spring-cloud.version>
        <spring-cloud-alibaba.version>2.2.6.RELEASE</spring-cloud-alibaba.version>
    </properties>

    <!-- 只声明依赖,不引入依赖 -->
    <dependencyManagement>
        <dependencies>
            <!-- 声明springBoot版本 -->
            <dependency>
                <groupId>org.springframework.boot</groupId>
                <artifactId>spring-boot-dependencies</artifactId>
                <version>${spring-boot.version}</version>
                <type>pom</type>
                <scope>import</scope>
            </dependency>

            <!-- 声明springCloud版本 -->
            <dependency>
                <groupId>org.springframework.cloud</groupId>
                <artifactId>spring-cloud-dependencies</artifactId>
                <version>${spring-cloud.version}</version>
                <type>pom</type>
                <scope>import</scope>
            </dependency>

            <!-- 声明 springCloud Alibaba 版本 -->
            <dependency>
                <groupId>com.alibaba.cloud</groupId>
                <artifactId>spring-cloud-alibaba-dependencies</artifactId>
                <version>${spring-cloud-alibaba.version}</version>
                <type>pom</type>
                <scope>import</scope>
            </dependency>
        </dependencies>
    </dependencyManagement>

    <dependencies>
        <!-- 引入gateway网关 -->
        <dependency>
            <groupId>org.springframework.cloud</groupId>
            <artifactId>spring-cloud-starter-gateway</artifactId>
            <exclusions>
                <exclusion>
                    <groupId>org.springframework.boot</groupId>
                    <artifactId>spring-boot-starter-web</artifactId>
                </exclusion>
            </exclusions>
        </dependency>

        <!--nacos注册中心-->
        <dependency>
            <groupId>com.alibaba.cloud</groupId>
            <artifactId>spring-cloud-starter-alibaba-nacos-discovery</artifactId>
        </dependency>
    </dependencies>

    <build>
        <plugins>
            <plugin>
                <groupId>org.springframework.boot</groupId>
                <artifactId>spring-boot-maven-plugin</artifactId>
            </plugin>
        </plugins>
    </build>
</project>
第三步:修改application.yml配置文件
master:
  localhost

nacos:
  url: ${master}:8848
  namespace: 21baf036-a74d-4c13-9209-dc69e7c1c1ad

server:
  port: 9091
  servlet:
    context-path: /${spring.application.name}

spring:
  application:
    name: gateway
  cloud:
    nacos:
      discovery:
        register-enabled: true
        server-addr: ${nacos.url}
        namespace: ${nacos.namespace} # 这里需要修改成自己的nacos的命名空间ID
    gateway:
      enabled: true
      globalcors:
        add-to-simple-url-handler-mapping: true
        cors-configurations:
          '[/**]': #拦截的请求
            allowedOrigins: #允许跨域的请求
              - "http://localhost:8080"
              - "http://localhost:8081"
            allowedMethods: #运行跨域的请求方式
              - "GET"
              - "POST"
            allowedHeaders: "*" #允许请求中携带的头信息
            allowedCredentials: true #是否允许携带cookie
            maxAge: 36000 #跨域检测的有效期,单位s
      routes:
        - id: mhxysy
          uri: http://localhost:8080
          predicates:
            - Path=/api/mhxysy/**
          filters:
            - StripPrefix=2

        - id: layui
          uri: http://localhost:8081
          predicates:
            - Path=/api/layui/**
          filters:
            - StripPrefix=2
第四步:使用网关服务
项目的前端封装了ajax请求,在每个请求的路径前加上网配置的对应路由来控制通过每个请求都走网关
let base = "http://localhost:9091/api/mhxysy";

/**
 * 封装的ajax get请求
 * @param url 请求url
 * @param params 请求参数
 * @param success 成功回调函数
 * @param error 失败回调函数
 */
function get(url, params, success, error) {
    $.ajax({
		type: "GET",
		url: base + url,
		data: params,
		cache: false,
		async: true,
        dataType: 'json',
		processData: true,
        success: success,
		error: error
    });
}

/**
 * 封装的ajax post请求
 * @param url 请求url
 * @param params 请求参数
 * @param success 成功回调函数
 * @param error 失败回调函数
 */
function post(url, params, success, error) {
	$.ajax({
		type: "POST",
		url: base + url,
		data: params,
		async: true,
		cache: false,
		dataType: 'json',
		processData: true,
		success: success,
		error: error
	});
}

let error = (res) => {
	console.log(res);

	if (res && res.responseJSON) {
		let response = res.responseJSON;

		if (res.status && res.status === 404) {
			$.messager.alert("提示", "路径" + response.path + "不存在。", "error");
		} else {
			$.messager.alert("提示", response.message, "error");
		}
	}
}

/**
 * 文件上传
 * @param url 上传路径
 * @param data 提交数据
 * @param success 成功回调
 * @param error 失败回调
 */
function ajaxUpload(url, data, success, error) {
	$.ajax({
		url: base + url,
		data: data,
		cache: false,
		async: true,
		type: "POST",
		dataType: 'json',
		processData: false,
		contentType: false,
		success: success,
		error: error
	});
}
启动gateway和mhxysy两个服务,在测试的控制器接口上加上自定义的匿名注解跳过鉴权(因为存在跨域session丢失问题,暂时没有解决)
@RestController
@Api(value = "宠物控制器类", tags = "宠物控制器类")
@RequestMapping(path = "/chongwu", produces = "application/json; charset=utf-8")
public class ChongwuController {
private final ChongwuService service;
@Autowired
public ChongwuController(ChongwuService service) {
this.service = service;
}
/**
* 查询全部宠物
* @return List<Chongwu>
*/
@AnonymityAccess
@ApiOperation("通过ID修改宠物信息")
@RequestMapping(path = "/selectAll", method = RequestMethod.GET)
public List<Chongwu> selectAll() {
return service.selectAll();
}
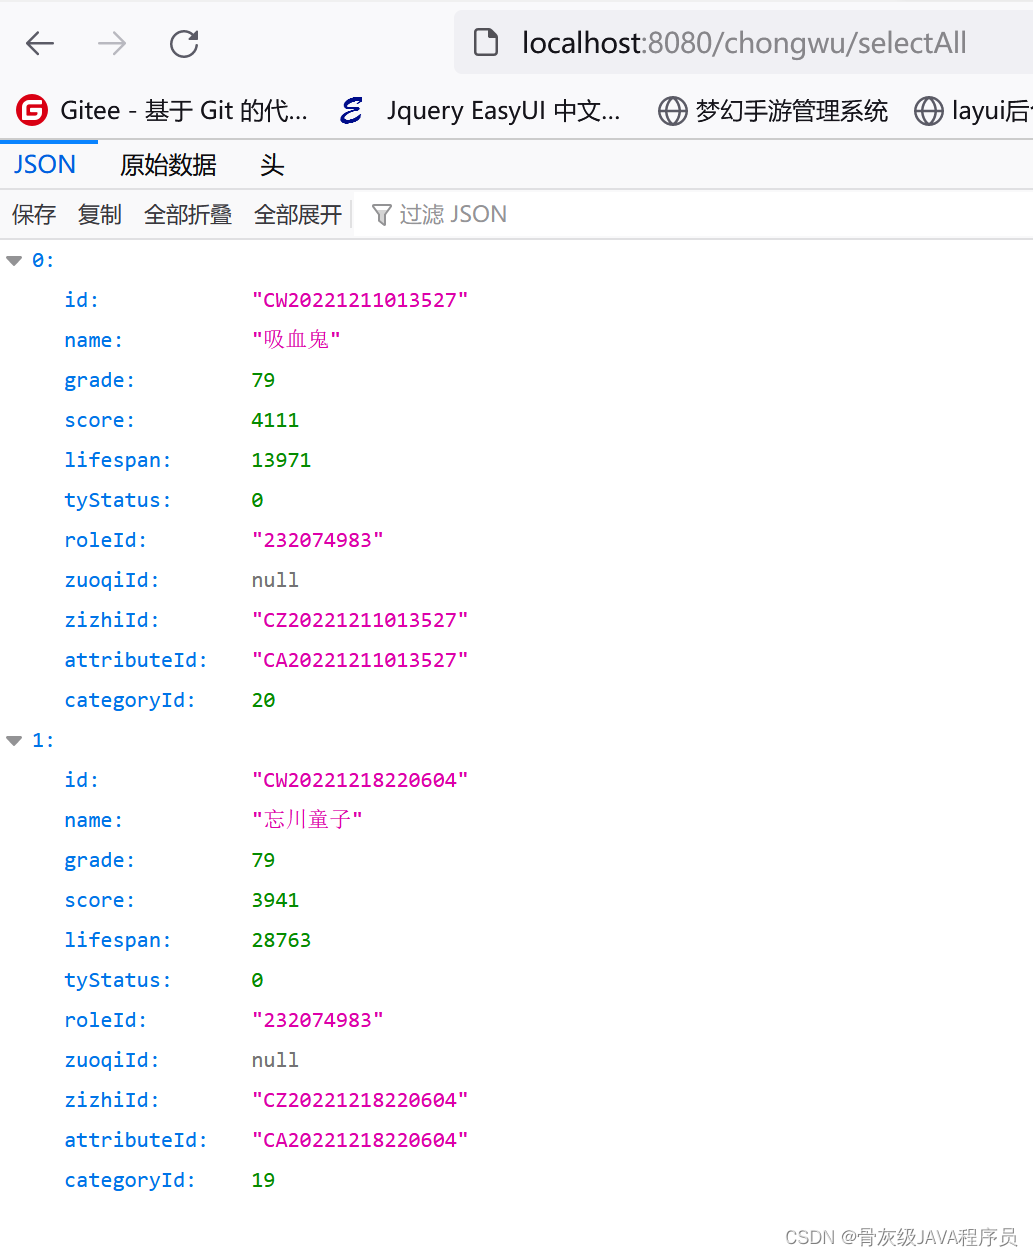
}浏览器访问如下地址,成功返回查询结果
localhost:9091/api/mhxysy/chongwu/selectAll
访问以上地址,请求会被转发到 localhost:8080/chongwu/selectAll ,如图
通过网关转发请求

正常访问
文章就分享到这里了,代码已开源,可按需获取,感谢阅读~
版权声明:本文为heyl163_原创文章,遵循CC 4.0 BY-SA版权协议,转载请附上原文出处链接和本声明。