Apache Griffin安装过程
前言
(本文是我写在word上再转成markdown产生的,转换过程中容易把一些英文字符转成中文字符,虽再三校对,难免还是有疏漏)
为学习搭建griffin数据质量平台,在官方教程的基础上,形成以下文档,作为安装参考。对于刚入门的新手来说,官方教程走不下去的地方比较多,本文已经解决了全部编者在搭建过程中遇到的问题。在阅读时,建议至少阅读完一小节再操作,有些环节,是一定能看到报错信息的,其后才附上解决方案。
限于编者水平(0大数据基础)以及仓促的时间(快过年了),以及技术文档的时效性(以griffin0.6.0为基础编写),遇到的很多问题编者都是知其然不知其所以然,以跑通为目标没有深究原理。本文也不保证一直有用。文章中涉及配置参数的部分,建议同时对照官方文档。
一、环境要求
1.1 虚拟机
按照官方文档,使用Ubuntu
18版本。此处以阿里云2核16G内存虚拟机作为部署服务器。使用全新开通的实例。我写到2.12章节时,发现8G不够,已经卡到无法操作了,最终选用16G内存。
1.2 java
使用JAVA 8 (openjdk)
1.3 maven
使用apt-get安装默认版本,修改mirror源为阿里云。
1.4 MySQL
官方教程在数据库要求的标题中,使用了8.0.11版本MySQL数据库。实际使用了MySQL
5.7版本。这里使用5.7版本。
1.5 node和npm
在编译griffin源码的时候,会安装这些。版本>6.0.0。
1.6 Hadoop
官方文档要求高于2.6.0。选用2.10。
1.7 Hive
官方文档要求为2.x版本。
1.8 Spark
版本2.2.1。选用without Hadoop的版本。
1.9 Livy
最新版
1.10 ElasticSearch
官方要求版本5.0以上。
1.11 Scala
官方文档未提到版本,选用2.x版本。
二、环境准备
2.1 准备文件夹
本文档选择在/home/dq/文件夹下放置相关软件包和数据。dq是自行创建的文件夹。
按照顺序,执行的命令有:
$ mkdir /home/dq/software -p

$ mkdir /home/dq/software/data -p

$ sudo ln -s /home/dq/software /apache

$ sudo ln -s /apache/data /data

$ mkdir /apache/tmp -p

$ mkdir /apache/tmp/hive -p
2.2 安装完整版openjdk 8
官方给的教程安装的openjdk8是没有tools.jar这类工具包的,我们在这台虚拟机上编译griffin,而不是在外边编译好了放到服务器,这时如果用官方教学提供的安装openjdk命令,在后期编译griffin时会报错。因此在这里安装openjdk选用的是完整版。
使用的命令:
# 由于是本教程中第一次使用apt,先apt-get update
sudo apt-get update

sudo apt-get install openjdk-8-jdk
官方给的命令:
sudo apt install openjdk-8-jre-headless
安装好之后,等半分钟,看一下java版本:
java –version
大概会返回这样的信息:
2.3 安装maven
使用该命令:
sudo apt-get install maven
安装好之后,设置maven的mirror为阿里云,备份后编辑maven的配置文件
#备份
cp /etc/maven/settings.xml /etc/maven/settings.xml.bak
# 清空
echo > /etc/maven/settings.xml
#编辑
vim /etc/maven/settings.xml
整个文件直接替换成以下内容(其实网上有很多类似现成的maven配置)
<?xml version="1.0" encoding="UTF-8"?>

<settings xmlns="http://maven.apache.org/SETTINGS/1.0.0"
          xmlns:xsi="http://www.w3.org/2001/XMLSchema-instance"
          xsi:schemaLocation="http://maven.apache.org/SETTINGS/1.0.0 http://maven.apache.org/xsd/settings-1.0.0.xsd">

    <pluginGroups>
    </pluginGroups>

    <proxies>
    </proxies>

    <servers>
    </servers>

    <mirrors>
        <mirror>
            <id>nexus-aliyun</id>
            <mirrorOf>central</mirrorOf>
            <name>Nexus aliyun</name>
            <url>http://maven.aliyun.com/nexus/content/groups/public</url>
        </mirror>
    </mirrors>


    <profiles>
        <profile>
            <id>aliyun</id>
            <!-- repositories and pluginRepositories here-->
            <repositories>
                <repository>
                    <id>nexus-aliyun</id>
                    <name>Nexus aliyun</name>
                    <url>http://maven.aliyun.com/nexus/content/groups/public</url>
                    <releases>
                        <enabled>true</enabled>
                    </releases>
                    <snapshots>
                        <enabled>true</enabled>
                    </snapshots>
                </repository>
            </repositories>
        </profile>
    </profiles>

    <activeProfiles>
        <activeProfile>aliyun</activeProfile>
    </activeProfiles>
</settings>
随后保存该文件。
2.4 安装MySQL
执行命令:
sudo apt install mysql-server-5.7
注意这里安装了5.7版本
修改mysql的root帐号密码,先登录,命令为:
mysql -uroot -p #敲回车让输入密码,不用输入,再敲一次回车就能登录
# 选用mysql数据库
mysql> use mysql;
#更新mysql的root密码为123456
mysql> update user set authentication_string=PASSWORD("123456") where
User='root';
#很多博客说要加上这句
mysql> update user set plugin="mysql_native_password";
#更新权限
mysql> flush privileges;
#退出
mysql> quit;
用新密码重新登录下试试。依然是mysql -uroot
–p敲回车,此时要求输入密码,输入123456再回车,看到能登录成功。
2.5 安装大数据相关软件包之前的准备
国内下载apache网站的hadoop/hive/spark等软件包太慢,准备了一个腾讯的镜像。地址为https://mirrors.cloud.tencent.com/apache/
2.6 设置环境变量
编辑/etc/profile文件,文件末尾之后,粘贴以下内容并保存。
export JAVA_HOME=/usr/lib/jvm/java-8-openjdk-amd64

export HADOOP_HOME=/apache/hadoop
export HADOOP_COMMON_HOME=/apache/hadoop
export HADOOP_COMMON_LIB_NATIVE_DIR=/apache/hadoop/lib/native
export HADOOP_HDFS_HOME=/apache/hadoop
export HADOOP_INSTALL=/apache/hadoop
export HADOOP_MAPRED_HOME=/apache/hadoop
export HADOOP_USER_CLASSPATH_FIRST=true
export HADOOP_CONF_DIR=$HADOOP_HOME/etc/hadoop
export SPARK_HOME=/apache/spark
export LIVY_HOME=/apache/livy
export HIVE_HOME=/apache/hive
export YARN_HOME=/apache/hadoop
export SCALA_HOME=/apache/scala

export PATH=$PATH:$HIVE_HOME/bin:$HADOOP_HOME/bin:$SPARK_HOME/bin:$LIVY_HOME/bin:$SCALA_HOME/bin
以上保存后,控制台执行 source /etc/profile
再执行echo $HADOOP_HOME
如果打印出了/apache/hadoop就是配置环境变量成功了。这里只是挑选了其中一条环境变量,其他的也可以打印。
2.7 下载安装hadoop及配置
进入/apache/目录,通过wget命令,将软件包下载到虚拟机:
wget
https://mirrors.cloud.tencent.com/apache/hadoop/common/hadoop-2.10.1/hadoop-2.10.1.tar.gz
下载到/apache/
解压命令:tar -zxvf hadoop-2.10.1.tar.gz
解压会花费30秒到1分钟。
重命名文件夹命令:mv hadoop-2.10.1 hadoop
看一下java的安装路径。在我这里是/usr/lib/jvm/java-8-openjdk-amd64
进入/apache/hadoop/etc/hadoop,找到hadoop-env.sh,修改该文件。
vi /apache/software/hadoop/etc/hadoop/hadoop-env.sh
找到export
JAVA_HOME=${JAVA_HOME}这样一个地方,把等于号后边的内容修改为本机java绝对路径。既我们刚刚准备的/usr/lib/jvm/java-8-openjdk-amd64
修改完成后保存退出。
配置环节:
这部分官方教程地址是,此处与官方无差异
编辑/apache/hadoop/etc/hadoop/core-site.xml
把以下内容放入core-site.xml
<?xml version="1.0" encoding="UTF-8"?>
<?xml-stylesheet type="text/xsl" href="configuration.xsl"?>
<!--
  Licensed under the Apache License, Version 2.0 (the "License");
  you may not use this file except in compliance with the License.
  You may obtain a copy of the License at

    http://www.apache.org/licenses/LICENSE-2.0

  Unless required by applicable law or agreed to in writing, software
  distributed under the License is distributed on an "AS IS" BASIS,
  WITHOUT WARRANTIES OR CONDITIONS OF ANY KIND, either express or implied.
  See the License for the specific language governing permissions and
  limitations under the License. See accompanying LICENSE file.
-->

<!-- Put site-specific property overrides in this file. -->

<configuration>
    <property>
        <name>fs.defaultFS</name>
        <value>hdfs://127.0.0.1:9000</value>
    </property>
</configuration>
- 开启、关闭hadoop nodes相关命令,摘抄自官方
# format name node
# NOTE: if you already have executed namenode-format before, it'll change cluster ID in
# name node's VERSION file after you run it again. so you need to guarantee same cluster ID
# in data node's VERSION file, otherwise data node will fail to start up.
# VERSION file resides in /apache/data/hadoop-data/nn, snn, dn denoted in previous config.
/apache/hadoop/bin/hdfs namenode -format
# start namenode/secondarynamenode/datanode
# NOTE: you should use 'ps -ef|grep java' to check if namenode/secondary namenode/datanode
# are available after starting dfs service.
# if there is any error, please find clues from /apache/hadoop/logs/
/apache/hadoop/sbin/start-dfs.sh
# stop all nodes
/apache/hadoop/sbin/stop-dfs.sh
启动节点过程中可能会报一些授权问题, 都输入yes。还需要输入登录用户的密码。

启动完毕后,在浏览器打开 <http://你的地址:50070>即可看到效果。注意部分hadoop版本有漏洞,安装后开放50070端口有机会导致服务器中招。

- 开启、关闭hadoop ResourceManager
    # manually clear the ResourceManager state store
    #编者认为该命令是首次使用时运行一次

    /apache/hadoop/bin/yarn resourcemanager -format-state-store

    # startup the ResourceManager 启动

    /apache/hadoop/sbin/yarn-daemon.sh start resourcemanager

    # stop the ResourceManager 关闭

    /apache/hadoop/sbin/yarn-daemon.sh stop resourcemanager
启动后可以到http://你的地址:8088/cluster 看到效果。
- 开启、关闭hadoop NodeManager
    # startup the NodeManager 开启

    /apache/hadoop/sbin/yarn-daemon.sh start nodemanager

    # stop the NodeManager 关闭

    /apache/hadoop/sbin/yarn-daemon.sh stop nodemanager
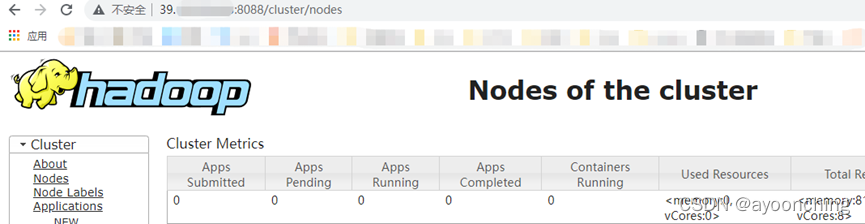
启动完毕后到http://你的地址:8088/cluster/nodes查看效果

- 开启、关闭hadoop HistoryServer是可选项目(官方说法),此处不再描述。
2.8 下载安装Hive及配置
进入/apache/目录,下载2.x版本的软件包到/apache/
wget
https://mirrors.cloud.tencent.com/apache/hive/hive-2.3.9/apache-hive-2.3.9-bin.tar.gz
解压:tar -zxvf apache-hive-2.3.9-bin.tar.gz
重命名: mv apache-hive-2.3.9-bin hive
配置:
- 首先把模板配置文件复制成一份正式配置文件
cp /apache/hive/conf/hive-default.xml.template /apache/hive/conf/hive-site.xml
编辑该hive-site.xml文件。以下根据官方指示修改。
72行附近,找到
<value>${system:java.io.tmpdir}/${system:user.name}</value>
整行删去并改为
<value>/apache/tmp/hive</value>
前述修改下方不远处,找到
<value>${system:java.io.tmpdir}/${hive.session.id}_resources</value>
整行删去改为
<value>/apache/tmp/hive/${hive.session.id}_resources</value>
368行附近,找到
<name>hive.metastore.uris</name>下方的<value/>
整行删去改为
<value>thrift://127.0.0.1:9083</value>
527行附近,找到
<name>javax.jdo.option.ConnectionPassword</name>
下方的<value>mine</value>
整行删去改为
<value>secret</value>
542行附近,找到
<name>javax.jdo.option.ConnectionURL</name>
下方的
<value>jdbc:derby:;databaseName=metastore_db;create=true</value>
整行删去改为
<value>jdbc:mysql://127.0.0.1:3306/hive?createDatabaseIfNotExist=true&useSSL=false</value>
这里官方使用的是postgresql,本文使用MySQL作为元数据管理。注意&号需要用&代替。
1017行附近,找到
<name>javax.jdo.option.ConnectionDriverName</name>
下方的
<value>org.apache.derby.jdbc.EmbeddedDriver</value>
整行删去改为
<value>com.mysql.jdbc.Driver</value>
1042行附近,找到
<name>javax.jdo.option.ConnectionUserName</name>
下方的
<value>APP</value>
整行删去,改为
<value>king</value>
1682行附近,找到
<value>${system:java.io.tmpdir}/${system:user.name}</value>
整行删去,改为
<value>/apache/tmp/hive</value>
3973行附近,找到
<value>${system:java.io.tmpdir}/${system:user.name}/operation_logs</value>
整行删去,改为
<value>/apache/tmp/hive/operation_logs</value>
以上全部修改完成后保存。
在MySQL中创建名为king密码为secret的帐号
先用root帐号登录到Mysql
创建
CREATE USER ‘king’@‘localhost’ IDENTIFIED BY ‘secret’;
授权
GRANT ALL ON . TO ‘king’@‘localhost’;
刷新权限
flush privileges;
可选步骤,查看帐号
use mysql;
select user,host from mysql.user
退出mysql

quit;
如果这时候启动metastore服务会报错,因为hive没有mysql连接器jar包。先不要启动。
到mysql官网下载jar包
https://downloads.mysql.com/archives/c-j/
选择版本号是5.1.49,操作系统选platform independent(平台独立版本)
选中Platform Independent (Architecture Independent), ZIP
Archive,点击后边的下载按钮,等待下载后解压到mysql-connector-java-5.1.49.jar,上传到/apache/hive/lib/下。这个包就留着,以后出现找不到mysql的driver基本就是缺这个。这时启动还会报错,MetaException(message:Version information not found in
metastore. )做一点微小的初始化工作
控制台执行:
schematool -dbType mysql -initSchema启动 hive metastore service
# start hive metastore service

/apache/hive/bin/hive --service metastore &
上一句末尾加了个
&,既后台运行服务。应该不会报错了,此时可以看看9083端口有无活动lsof –i:9083
会看到有一条进程,说明hive metastore service启动完毕。9083端口。
2.9 下载安装Spark及配置
进入/apache/目录,下载spark。官方要求的2.2.1版本在之前提到的腾讯mirror上不存在,改为去spark官网下载。
wget
https://archive.apache.org/dist/spark/spark-2.2.1/spark-2.2.1-bin-without-hadoop.tgz解压和重命名
解压:
tar -zxvf spark-2.2.1-bin-without-hadoop.tgz重命名:
mv spark-2.2.1-bin-without-hadoop spark新建/apache/spark/conf/spark-default.conf 文件,粘贴以下内容
    spark.master yarn-cluster

    spark.serializer org.apache.spark.serializer.KryoSerializer

    spark.yarn.jars hdfs:///home/spark_lib/\*

    spark.yarn.dist.files hdfs:///home/spark_conf/hive-site.xml

    spark.sql.broadcastTimeout 500
- 新建/apache/spark/conf/spark-env.sh 粘贴以下
HADOOP_CONF_DIR= /apache/hadoop/etc/hadoop

SPARK_MASTER_HOST=localhost

SPARK_MASTER_PORT=7077

SPARK_MASTER_WEBUI_PORT=8082

SPARK_LOCAL_IP=localhost

SPARK_PID_DIR=/apache/pids
前述3、4两条在官方文档的地址是:
到maven网站,https://mvnrepository.com/ 搜索slf4j
找到Binding的版本,例如https://mvnrepository.com/artifact/org.slf4j/slf4j-log4j12/1.7.32点击进去找对应的版本,下载jar包。


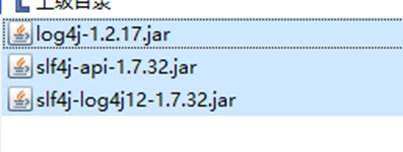
最后把这些jar包上传到/apache/spark/jars/下
上传一些文件到hdfs(这里可能会让读者看到报错)
hdfs dfs -mkdir -p /home/spark_lib

hdfs dfs -mkdir -p /home/spark_conf

hdfs dfs -put $SPARK_HOME/jars/* hdfs:///home/spark_lib/

hdfs dfs -put $HIVE_HOME/conf/hive-site.xml hdfs:///home/spark_conf/
这里走到第3条时可能会报错,如果没报错直接看下一点。报错内容大概是could only be
replicated to 0 nodes instead of minReplication
(=1)。意思是现在有0个结点存活,我们的hadoop没启动成功。我们可以在
此时到/apache/Hadoop/logs/ 找到datanode的日志,发现50070端口被占用,使用
lsof –i:50070
发现,占用的进程是一个病毒,因为hadoop的漏洞导致公网开启50070端口会中招。先直接kill -9击杀之。重启服务。此时Live Nodes数量为1。
重新启动一遍hadoop
/apache/hadoop/sbin/stop-dfs.sh

/apache/hadoop/sbin/start-dfs.sh
启动、关闭spark(将会看到报错)
#复制文件
cp /apache/hive/conf/hive-site.xml /apache/spark/conf/
\# start master and slave nodes 启动主和从节点
/apache/spark/sbin/start-master.sh
/apache/spark/sbin/start-slave.sh spark://localhost:7077
\# stop master and slave nodes 停止主和从节点
/apache/spark/sbin/stop-slaves.sh
/apache/spark/sbin/stop-master.sh
\# stop all 停止全部
/apache/spark/sbin/stop-all.sh
前一步会看到报错,内容为
Exception in thread “main” java.lang.NoClassDefFoundError:
org/apache/hadoop/fs/FSDataInputStream
原因是从spark1.4以后,所有spark的编译都是没有将hadoop的classpath编译进去的,所以必须在spark-env.sh中指定hadoop中的所有jar包。
具体设置如下:
在/apache/spark/conf/spark-evn.sh中添加
# 这里实际上就是执行一条hadoop的命令,将hadoop的classpath引一下
export export SPARK_DIST_CLASSPATH=$(${HADOOP_HOME}/bin/hadoop classpath)

再启动就不报错了
2.10下载安装Livy及配置
Apache griffin需要依靠服务器启动spark jobs,我们使用Livy来提交我们的jobs。
进入/apache/目录,下载Livy软件包
安装解压软件:sudo apt-get install unzip
解压:unzip apache-livy-0.7.1-incubating-bin.zip
重命名: mv apache-livy-0.7.1-incubating-bin livy
创建目录:mkdir -p /apache/livy/logs
创建配置文件:vim $LIVY_HOME/conf/livy.conf
粘贴以下内容,保存:
# update /apache/livy/conf/livy.conf

livy.server.host = 127.0.0.1

livy.spark.master = yarn

livy.spark.deployMode = cluster

livy.repl.enableHiveContext = true

livy.server.port 8998
启动Livy: /apache/livy/bin/livy-server start
2.11 下载Elasticsearch及配置
- 安装
官方要求5.0以上版本,选用5.6.16,介绍页面为:
https://www.elastic.co/cn/downloads/past-releases/elasticsearch-5-6-16
下载zip软件包:
wget
https://artifacts.elastic.co/downloads/elasticsearch/elasticsearch-5.6.16.zip
解压:
unzip elasticsearch-5.6.16.zip
重命名:
mv elasticsearch-5.6.16 elastic
编辑配置文件:
vi /apache/elastic/config/elasticsearch.yml
把以下内容加入并保存:
network.host: 127.0.0.1

http.cors.enabled: true

http.cors.allow-origin: "\*"
- 增加一个ubuntu账号并运行elasticsearch。es不允许使用root运行。
adduser es
回车后我这直接让创建密码了
把文件夹授权给es账号
chown -R es:es /apache/elastic
切换到es账号
su es
运行elasticsearch服务
/apache/elastic/bin/elasticsearch -d
切换回root
su root
可以请求本地的9200端口看看是否启动成功
curl 127.0.0.1:9200
截图如下:
2.12 下载安装Scala及配置
软件包地址为:https://downloads.lightbend.com/scala/2.11.7/scala-2.11.7.tgz
如果失效,可以到scala官网重新找。
进入/apache/文件夹,下载软件包
cd /apache/
wget https://downloads.lightbend.com/scala/2.11.7/scala-2.11.7.tgz
解压:
tar -zxvf scala-2.11.7.tgz
重命名:
mv scala-2.11.7 scala
此时运行scala –version可以打印出版本号。
2.13下载安装griffin及配置
到griffin官网下载源码包。https://griffin.apache.org/docs/latest.html
进入虚拟机/apache/目录,下载
wget https://archive.apache.org/dist/griffin/0.6.0/griffin-0.6.0-source-release.zip
- 解压及重命名
unzip griffin-0.6.0-source-release.zip
mv griffin-0.6.0 griffin
进入/apache/griffin/service/src/main/resources/ application.properties
修改为:
注意此处我参考了GitHub上的配置和官方代码包里的配置,又加上了一点其他配置。我建议以官方代码包里的配置为主。我们编辑的也是代码包里的文件。
#
# Licensed to the Apache Software Foundation (ASF) under one
# or more contributor license agreements.  See the NOTICE file
# distributed with this work for additional information
# regarding copyright ownership.  The ASF licenses this file
# to you under the Apache License, Version 2.0 (the
# "License"); you may not use this file except in compliance
# with the License.  You may obtain a copy of the License at
#
#   http://www.apache.org/licenses/LICENSE-2.0
#
# Unless required by applicable law or agreed to in writing,
# software distributed under the License is distributed on an
# "AS IS" BASIS, WITHOUT WARRANTIES OR CONDITIONS OF ANY
# KIND, either express or implied.  See the License for the
# specific language governing permissions and limitations
# under the License.
#
spring.datasource.url=jdbc:mysql://127.0.0.1/myDB?useSSL=false&useUnicode=true&characterEncoding=utf-8&serverTimezone=Asia/Shanghai&allowPublicKeyRetrieval=true&createDatabaseIfNotExist=true
spring.datasource.username=king
spring.datasource.password=secret
spring.jpa.generate-ddl=true
spring.datasource.driver-class-name=com.mysql.jdbc.Driver
spring.jpa.show-sql=true
# Hive metastore
hive.metastore.uris=thrift://127.0.0.1:9083
hive.metastore.dbname=default
hive.hmshandler.retry.attempts=15
hive.hmshandler.retry.interval=2000ms
#Hive jdbc
hive.jdbc.className=org.apache.hive.jdbc.HiveDriver
hive.jdbc.url=jdbc:hive2://localhost:10000/
hive.need.kerberos=false
hive.keytab.user=xxx@xx.com
hive.keytab.path=/path/to/keytab/file
# Hive cache time
cache.evict.hive.fixedRate.in.milliseconds=900000
# Kafka schema registry
kafka.schema.registry.url=http://localhost:8081
# Update job instance state at regular intervals
jobInstance.fixedDelay.in.milliseconds=60000
# Expired time of job instance which is 7 days that is 604800000 milliseconds.Time unit only supports milliseconds
jobInstance.expired.milliseconds=604800000
# schedule predicate job every 5 minutes and repeat 12 times at most
#interval time unit s:second m:minute h:hour d:day,only support these four units
predicate.job.interval=5m
predicate.job.repeat.count=12
# external properties directory location
external.config.location=
# external BATCH or STREAMING env
external.env.location=
# login strategy ("default" or "ldap")
login.strategy=default
# ldap
ldap.url=ldap://hostname:port
ldap.email=@example.com
ldap.searchBase=DC=org,DC=example
ldap.searchPattern=(sAMAccountName={0})
# hdfs default name
fs.defaultFS=
# elasticsearch
elasticsearch.host=localhost
elasticsearch.port=9200
elasticsearch.scheme=http
# elasticsearch.user = user
# elasticsearch.password = password
# livy
livy.uri=http://localhost:8998/batches
#--livy.need.queue=false
#--livy.task.max.concurrent.count=20
#--livy.task.submit.interval.second=3
#--livy.task.appId.retry.count=3
#这里官方文档没有,我阅读了griffin源码,必须得有。
livy.need.kerberos=false
#--livy.server.auth.kerberos.principal=livy/kerberos.principal
#--livy.server.auth.kerberos.keytab=/path/to/livy/keytab/file
# yarn url
yarn.uri=http://localhost:8088
# griffin event listener
internal.event.listeners=GriffinJobEventHook

logging.file=logs/griffin-service.log
- 修改/apache/griffin/service/src/main/resources/sparkProperties.json
{
  "file": "hdfs:///griffin/griffin-measure.jar",
  "className": "org.apache.griffin.measure.Application",
  "queue": "default",
  "numExecutors": 2,
  "executorCores": 1,
  "driverMemory": "1g",
  "executorMemory": "1g",
  "conf": {
    "spark.yarn.dist.files": "hdfs:///home/spark_conf/hive-site.xml"
  },
  "files": [
  ]
}
- 编辑/apache/griffin/service/src/main/resources/env/env_batch.json
{
  "spark": {
    "log.level": "WARN"
  },
  "sinks": [
    {
      "name": "console",
      "type": "CONSOLE",
      "config": {
        "max.log.lines": 10
      }
    },
    {
      "name": "hdfs",
      "type": "HDFS",
      "config": {
        "path": "hdfs:///griffin/persist",
        "max.persist.lines": 10000,
        "max.lines.per.file": 10000
      }
    },
    {
      "name": "elasticsearch",
      "type": "ELASTICSEARCH",
      "config": {
        "method": "post",
        "api": "http://127.0.0.1:9200/griffin/accuracy",
        "connection.timeout": "1m",
        "retry": 10
      }
    }
  ],
  "griffin.checkpoint": []
}
按需要修改3处依赖。其一,如果不修改打开griffin的网页时,有可能会报java.lang.ClassNotFoundException:
org.apache.geronimo.components.jaspi.AuthConfigFactoryImpl这个是打开griffin网页(8080端口)时出现的,网页中就提示了这个错误。如果没出现就不改了。
解决方法:修改service模块的pom文件,在hive-jdbc 中将jaspic
排除掉,重新编译项目,并把旧的部署备份mysql-connector和配置文件等,再删掉,重新部署一遍新编译的这个。
<exclusion>
<artifactId>geronimo-jaspic_1.0_spec</artifactId>
<groupId>org.apache.geronimo.specs</groupId>
</exclusion>
其二,如果不修改,将会在运行时找不到spark
sql相关的包,既有些包没有被打包到jar里。修改方式是修改measure模块的pom文件,把开头的<spark.scope>provided</spark.scope>中provided改为compile。
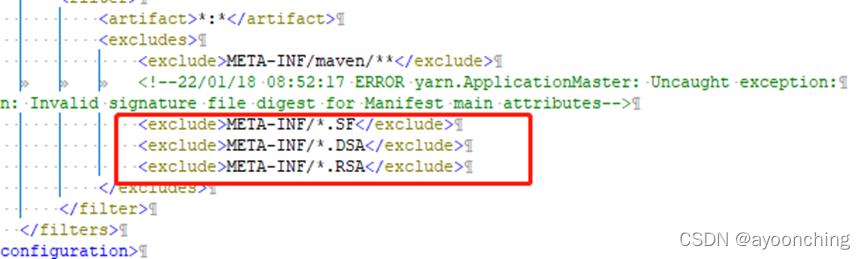
其三,如果不修改,当在griffin的UI界面启动定时任务后,可能会在日志里追踪到Uncaught
exception: java.lang.SecurityException: Invalid signature file digest for
Manifest main
attributes。这个第二处修改,也可以在打包的measure的jar包META-INF中删除以SF、DSA、RSA为后缀的文件。在measure模块的pom中可以到<excludes>标签下加入:
<exclude>META-INF/*.SF</exclude>
<exclude>META-INF/*.DSA</exclude>
<exclude>META-INF/*.RSA</exclude>
编译
进入/apache/griffin/
运行:
mvn clean install上传measure的jar包到hadoop文件夹
创建hadoop下的griffin文件夹:hdfs dfs -mkdir /griffin
进入:/apache/griffin/measure/target
重命名:
mv measure-0.6.0.jar griffin-measure.jar上传:
hdfs dfs -put griffin-measure.jar /griffin/运行启动(尝试)
编译后的griffin软件包在griffin的target目录下,我习惯给它复制出来。
复制到griffin/pkgs文件夹,pkgs是我新建的文件夹。
解压缩: tar -zxvf service-${你的版本号,我的是0.6.0}.tar.gz
进入文件夹:cd service-${你的版本号,我的是0.6.0}
启动任务:
bash ./bin/griffin.sh start这时会发现看不到什么有用的信息,因为它日志是在griffin/pkgs/service-0.6.0的logs文件夹。打开griffin-service.log看到了报错,提示没有mysql驱动器(Cannot
load driver class:
com.mysql.jdbc.Driver)。我们把之前下载到的mysql-connector放在griffin/pkgs/service-0.6.0的lib里。再次,启动任务:
bash ./bin/griffin.sh start又报错,提示Unknown database ‘myDB’。
打开config文件夹,编辑application.properties,这是我们编译前写的配置文件,找到连接myBD的链接,在最后加上&createDatabaseIfNotExist=true并保存。
再次,启动任务:
./bin/griffin.sh start继续报错,提示找不到QRTZ_各种表。
这个坑要从官方教程的开头开始说。在Configuration的Create database ‘quartz’ in
MySQL这里,这里是创建了一个quartz的库,把定时任务相关表初始化了。而后期教程给的例子,QRTZ_各种表都是在myDB这个库里。所以运行服务前,或者其他认为方便的时候,去myDB这个库初始化定时任务表。这些初始化sql脚本也在griffin的config目录里。方法是先登录mysql:
mysql -uroot -p回车输入密码使用myDB数据库:
use myDB;导入初始化QRTZ相关表的脚本:
source /apache/griffin/pkgs/service-0.6.0/config/Init_quartz_mysql_innodb.sql
查看结果:show tables;

会看到很多QRTZ_开头的表,成功了。

退出mysql: quit;

这时,要先停止griffin:bash  ./bin/griffin.sh stop

再次启动:bash ./bin/griffin.sh start

如果依然启动失败,建议查看8080端口被哪个pid占用,接着kill掉该进程。
2.14 启动griffin demo
本节按照官方教程操作,部分有微调。
官方文档在此处分别做了把griffin-measure.jar和hive-site文件夹分布上传到了hdfs的/griffin和/home/spark_conf/文件夹,这些工作在之前的文档中已经做完了。
准备demo表
# login hive client登录到hive 客户端,运行
/apache/hive/bin/hive --database default
建2个表
其一
# create demo tables
hive> CREATE EXTERNAL TABLE `demo_src`(
  `id` bigint,
  `age` int,
  `desc` string)
PARTITIONED BY (
  `dt` string,
  `hour` string)
ROW FORMAT DELIMITED
  FIELDS TERMINATED BY '|'
LOCATION
  'hdfs://127.0.0.1:9000/griffin/data/batch/demo_src';
其二
hive> CREATE EXTERNAL TABLE `demo_tgt`(
  `id` bigint,
  `age` int,
  `desc` string)
PARTITIONED BY (
  `dt` string,
  `hour` string)
ROW FORMAT DELIMITED
  FIELDS TERMINATED BY '|'
LOCATION
  'hdfs://127.0.0.1:9000/griffin/data/batch/demo_tgt';
- 检查创建的表
# check tables created
hive> show tables;
OK
demo_src
demo_tgt
Time taken: 0.04 seconds, Fetched: 2 row(s)
检查表定义
官方教程这里用show create table
demo_src;检查表定义是否正确,不正确要drop掉。编者这里正确,不再drop处理。产生demo数据(这里完全摘抄官方GitHub文档)
使用官方提供的脚本来产生demo数据。进入/apache/data/demo文件夹(没有则创建)。下载各脚本。运行。因为是从github下载,会比较慢
/apache/data/demo$ wget http://griffin.apache.org/data/batch/gen_demo_data.sh
/apache/data/demo$ wget http://griffin.apache.org/data/batch/gen_delta_src.sh
/apache/data/demo$ wget http://griffin.apache.org/data/batch/demo_basic
/apache/data/demo$ wget http://griffin.apache.org/data/batch/delta_tgt
/apache/data/demo$ wget http://griffin.apache.org/data/batch/insert-data.hql.template
/apache/data/demo$ chmod 755 *.sh
/apache/data/demo$ ./gen_demo_data.sh
sh脚本执行之后没有什么提示。
创建gen-hive-data.sh(这里完全摘抄官方GitHub文档)
按照官方脚本创建即可,脚本如下:
#!/bin/bash

#create table
hive -f create-table.hql
echo "create table done"

#current hour
sudo ./gen_demo_data.sh
cur_date=`date +%Y%m%d%H`
dt=${cur_date:0:8}
hour=${cur_date:8:2}
partition_date="dt='$dt',hour='$hour'"
sed s/PARTITION_DATE/$partition_date/ ./insert-data.hql.template > insert-data.hql
hive -f insert-data.hql
src_done_path=/griffin/data/batch/demo_src/dt=${dt}/hour=${hour}/_DONE
tgt_done_path=/griffin/data/batch/demo_tgt/dt=${dt}/hour=${hour}/_DONE
hadoop fs -mkdir -p /griffin/data/batch/demo_src/dt=${dt}/hour=${hour}
hadoop fs -mkdir -p /griffin/data/batch/demo_tgt/dt=${dt}/hour=${hour}
hadoop fs -touchz ${src_done_path}
hadoop fs -touchz ${tgt_done_path}
echo "insert data [$partition_date] done"

#last hour
sudo ./gen_demo_data.sh
cur_date=`date -d '1 hour ago' +%Y%m%d%H`
dt=${cur_date:0:8}
hour=${cur_date:8:2}
partition_date="dt='$dt',hour='$hour'"
sed s/PARTITION_DATE/$partition_date/ ./insert-data.hql.template > insert-data.hql
hive -f insert-data.hql
src_done_path=/griffin/data/batch/demo_src/dt=${dt}/hour=${hour}/_DONE
tgt_done_path=/griffin/data/batch/demo_tgt/dt=${dt}/hour=${hour}/_DONE
hadoop fs -mkdir -p /griffin/data/batch/demo_src/dt=${dt}/hour=${hour}
hadoop fs -mkdir -p /griffin/data/batch/demo_tgt/dt=${dt}/hour=${hour}
hadoop fs -touchz ${src_done_path}
hadoop fs -touchz ${tgt_done_path}
echo "insert data [$partition_date] done"

#next hours
set +e
while true
do
  sudo ./gen_demo_data.sh
  cur_date=`date +%Y%m%d%H`
  next_date=`date -d "+1hour" '+%Y%m%d%H'`
  dt=${next_date:0:8}
  hour=${next_date:8:2}
  partition_date="dt='$dt',hour='$hour'"
  sed s/PARTITION_DATE/$partition_date/ ./insert-data.hql.template > insert-data.hql
  hive -f insert-data.hql
  src_done_path=/griffin/data/batch/demo_src/dt=${dt}/hour=${hour}/_DONE
  tgt_done_path=/griffin/data/batch/demo_tgt/dt=${dt}/hour=${hour}/_DONE
  hadoop fs -mkdir -p /griffin/data/batch/demo_src/dt=${dt}/hour=${hour}
  hadoop fs -mkdir -p /griffin/data/batch/demo_tgt/dt=${dt}/hour=${hour}
  hadoop fs -touchz ${src_done_path}
  hadoop fs -touchz ${tgt_done_path}
  echo "insert data [$partition_date] done"
  sleep 3600
done
set -e
保存好以后执行一次。
#这一行官方没写
/apache/data/demo\$ chmod 755 \*.sh

/apache/data/demo\$ ./gen-hive-data.sh &
在后台运行该脚本,它会每小时向2个hive表生成数据。
过一会儿后,可以在hive中查询数据。
hive> select * from demo_src;
会输出很多很多…看到数据后执行quit;即可
查看在hdfs上创建的相关数据目录
执行hdfs dfs -ls /griffin/data/batch

执行hdfs dfs -ls /griffin/data/batch/demo_src/

创建elasticsearch索引
在控制台用curl命令请求es的接口进行该操作。
curl -k -H "Content-Type: application/json" -X PUT http://127.0.0.1:9200/griffin \
 -d '{
    "aliases": {},
    "mappings": {
        "accuracy": {
            "properties": {
                "name": {
                    "fields": {
                        "keyword": {
                            "ignore_above": 256,
                            "type": "keyword"
                        }
                    },
                    "type": "text"
                },
                "tmst": {
                    "type": "date"
                }
            }
        }
    },
    "settings": {
        "index": {
            "number_of_replicas": "2",
            "number_of_shards": "5"
        }
    }
}'
成功后再请求curl <http://127.0.0.1:9200/griffin>

看到index已经创建成功了。

[外链图片转存失败,源站可能有防盗链机制,建议将图片保存下来直接上传(img-WKZKuuXF-1642471681762)(media/f7f5c7d8136d6f888ea998a860cbe0fa.png)]
三、基于Griffin UI界面功能操作
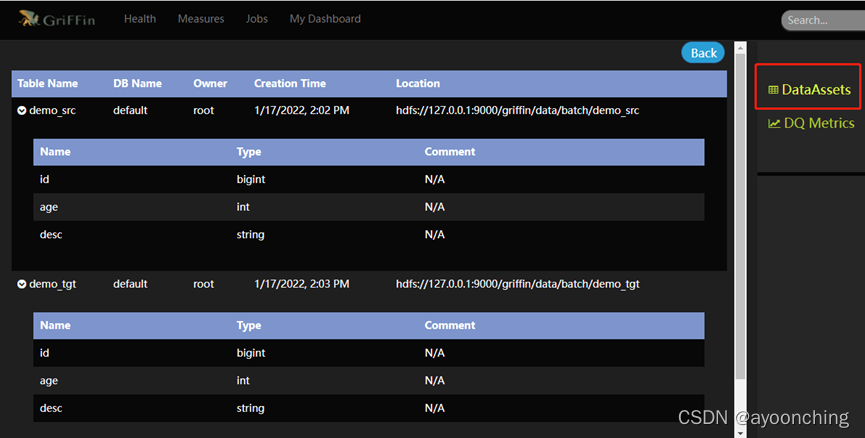
3.1 查看数据资产
点击界面右上方的Data Assets可以看到当前数据资产。
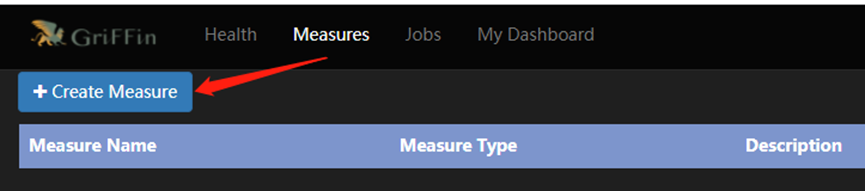
3.2 创建指标
点击导航栏“measures”,再点击“create
measure”,可以通过指标(measure)来处理数据,得到想要的结果。
指标有4种,目前UI界面只提供了2种指标的创建,分别是:
如果你想测算源表和目标表的匹配率,选择accuracy(精确度)
如果你想要检查数据里的特定值(例如null列的数量),选择profiling(分析)
3.3 精确度指标
定义:以这些值与已确定的、事实的源表一致程度来衡量。
步骤:
- 创建measure,选择accuracy,选出source。这里选择demo_src的id列作为source。点next。

- 选择target。这里选择demo_tgt的3个列。

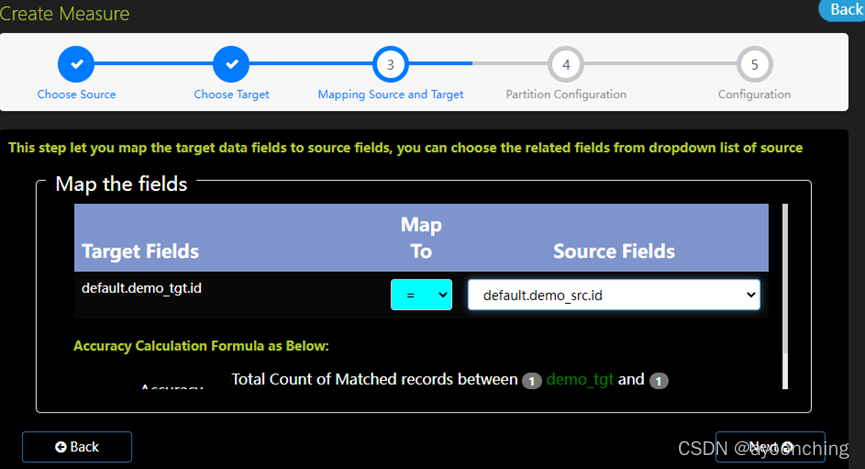
映射源表source和目标表target。首先选择映射方式(Map
To),来设定源到目标的规则。系统提供了6种规则。分别是:= 等号:两个表的对应列数据应该全等。
!= 不等:两个表的对应列数据应该不同。
> 大于:target表列数据大于source表对应的列数据。
>= 大于等于:target表列数据大于等于source表对应的列数据。
< 小于:target列数据小于source表对应的列数据。
<=小于等于:target表列数据小于等于source表对应的列数据。
再选择“source fields”,选定与target列做比较的source列数据。
- 分区设置
为源数据集和目标数据集设置分区配置。
分区大小是hive数据库最小数据单元,用来分割你要计算的数据。
这里Where都填写dt=#yyyyMMdd# AND hour=#HH#
Partition size填写1,时间单位选择hour,timezone时区留空。

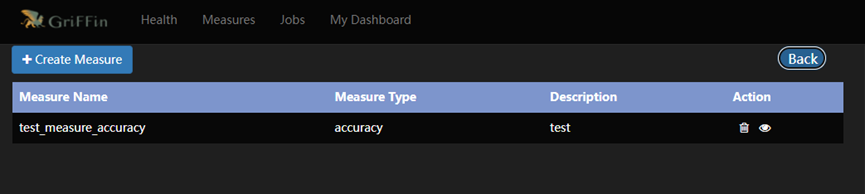
- 设置指标的基本信息。这里写中文会无法保存。写完提交即可。

3.4 创建作业任务(Job)
通过点击“Job”中的“create job”,可以提交一个作业任务,定期执行指标(measure)。

填写圈中的3项,其他的默认。点击submit提交。
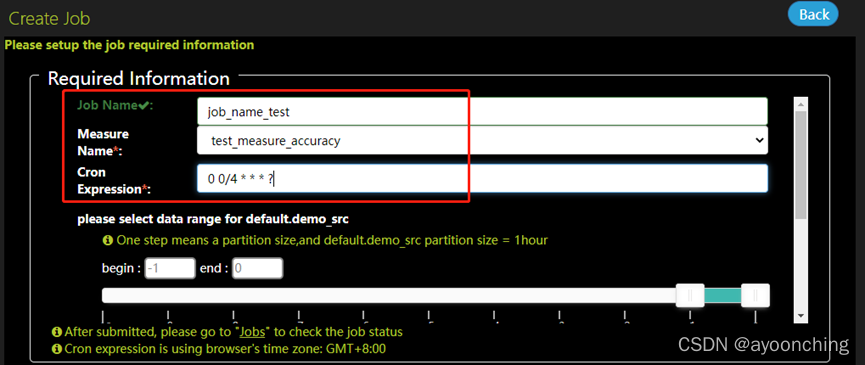

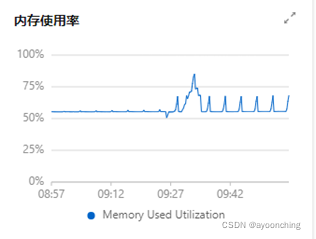
提交后,griffin将会在后台驱动作业,且在计算完毕后,可以在UI界面中的dashboard监控到结果。此处在日志中可能会遇到的相关错误,在2.13章都有提到,解决方案基本是调整pom文件相关依赖,调整application.properties中的参数。总的来说,该部署文档,对于0大数据基础的新手来说,不是十分友好。
附上最终运行demo后的系统截图。