Axios见解+源码浅析
在前后端项目开发过程中,从前台获取后台数据是一个很基本的操作,在我最开始学习的时候,是用XMLHttpRequest用于发送数据,到后面用JQuery封装好的ajax,开始接触前端VUE框架后,用axios来请求数据
为什么使用axios而不是ajax
其实一开始我也有这样的想法,既然已经有了ajax,为什么我们在VUE项目中还是推荐使用axios呢,参考一些文章得出以下结论
主要从以下几个方面来看
大小
axios的体积比ajax要小的多,因为使用ajax要使用JQuery库(性能即王道)
针对方向
axios符合前端MVVM的浪潮ajax本身是针对MVC的编程
实现方法与返回值
axios用promise技术实现对ajax技术的封装 返回值是promise(通过then可以进行链式调用,有效避免了回调地狱的问题)ajax基于原生的XHR开发,XHR本身的架构不清晰,已经有了fetch的替代方案
安全
- axios支持防止
CSRF(跨站请求伪造)

在
axios源码中有防止CSRF的字段,可以在配置的时候设置该字段起到防止CSRF(我在具体开发过程中还没试过这个,有机会试一下)- axios支持防止
浅析源码
GitHub上拉取源码 https://github.com/cookhot/axios/tree/analysis
我将自己的一些见解以注释的形式在下面代码中体现
核心内容在/lib文件下
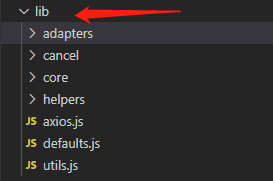
首先分析axios核心文件/lib/axios.js
function createInstance(defaultConfig) {
  var context = new Axios(defaultConfig); //返回Axios的执行上下文this,下面的方法传的都是这个执行上下文,方便复用配置
  var instance = bind(Axios.prototype.request, context); //改变指向,Axios.prototype.request返回的是一个Promise对象,context作为Axios.prototype.request内部的this。

  // Copy axios.prototype to instance
  utils.extend(instance, Axios.prototype, context); //添加对象Axios.prototype的属性来扩展对象instance。就比如Axis.prototype.XXX方法可以通过extend来添加到instance中

  // Copy context to instance
  utils.extend(instance, context);

  return instance;
}
// Create the default instance to be exported
var axios = createInstance(defaults); //创建axios实例

// Expose Axios class to allow class inheritance
axios.Axios = Axios; // 感觉这一步是axios实例继承于Axios类

// Factory for creating new instances
// axios.create方法,将默认配置和instanceConfig(自己的配置)相结合
axios.create = function create(instanceConfig) {
  return createInstance(utils.merge(defaults, instanceConfig));
};
接下来是lib/defaults.js
// 这里是axios的默认配置文件
var defaults = {
  method: 'get',
  adapter: getDefaultAdapter(),
//根据不同数据类型数据,配置请求头,也叫数据转换器
  transformRequest: [function transformRequest(data, headers) {
    normalizeHeaderName(headers, 'Content-Type');
    if (utils.isFormData(data) ||
      utils.isArrayBuffer(data) ||
      utils.isBuffer(data) ||
      utils.isStream(data) ||
      utils.isFile(data) ||
      utils.isBlob(data)
    ) {
      return data;
    }
    if (utils.isArrayBufferView(data)) {
      return data.buffer;
    }
    if (utils.isURLSearchParams(data)) {
      setContentTypeIfUnset(headers, 'application/x-www-form-urlencoded;charset=utf-8');
      return data.toString();
    }
    if (utils.isObject(data)) {
      setContentTypeIfUnset(headers, 'application/json;charset=utf-8');
      return JSON.stringify(data);
    }
    return data;
  }],

  transformResponse: [function transformResponse(data) {
    /*eslint no-param-reassign:0*/
    if (typeof data === 'string') {
      try {
        data = JSON.parse(data);
      } catch (e) { /* Ignore */ }
    }
    return data;
  }],

  /**
   * A timeout in milliseconds to abort a request. If set to 0 (default) a
   * timeout is not created.
   */
  timeout: 0, //超时时间设置
// 防止CSRF攻击字段
  xsrfCookieName: 'XSRF-TOKEN',
  xsrfHeaderName: 'X-XSRF-TOKEN',

  maxContentLength: -1,

  validateStatus: function validateStatus(status) {
    return status >= 200 && status < 300;
  }
};
接下来是lib/utils.js,这里主要是一些工具方法,分析两个我觉得比较重要的方法
/**
 * Accepts varargs expecting each argument to be an object, then
 * immutably merges the properties of each object and returns result.
 *
 * When multiple objects contain the same key the later object in
 * the arguments list will take precedence.
 *
 * Example:
 *
 * ```js
 * var result = merge({foo: 123}, {foo: 456});
 * console.log(result.foo); // outputs 456
 * ```
 *
 * @param {Object} obj1 Object to merge
 * @returns {Object} Result of all merge properties
 */
// 这里主要就是将多个对象的属性合并到一个对象中,相同的属性,后面出现的值会覆盖前面的值
// 比如官方例子中 merge({foo:123}, {foo:456}) 将返回 {foo: 456}
// merge({foo:132}, {hhh:456}), 将返回{foo: 132, hhh: 456}
function merge(/* obj1, obj2, obj3, ... */) {
  var result = {};
  function assignValue(val, key) {
    if (typeof result[key] === 'object' && typeof val === 'object') {
      result[key] = merge(result[key], val);
    } else {
      result[key] = val;
    }
  }

  for (var i = 0, l = arguments.length; i < l; i++) {
    forEach(arguments[i], assignValue);
  }
  return result;
}

/**
 * Extends object a by mutably adding to it the properties of object b.
 *
 * @param {Object} a The object to be extended
 * @param {Object} b The object to copy properties from
 * @param {Object} thisArg The object to bind function to
 * @return {Object} The resulting value of object a
 */
// 这个方法是用来扩展a对象的属性,将b对象上的属性和方法扩展到a上,并指定执行上下文(保证this指向)
function extend(a, b, thisArg) {
  forEach(b, function assignValue(val, key) {
    if (thisArg && typeof val === 'function') {
      a[key] = bind(val, thisArg);
    } else {
      a[key] = val;
    }
  });
  return a;
}
lib下三个核心js已经大致分析完了,接下来我们分析一下,这三个js文件的支撑文件
请求和响应拦截器的实现
axios一个比较核心的内容就是他的请求和响应拦截器了
请求拦截器
在前后端分离的项目中,最常出现的一个场景就是,将后端返回的token,在请求头加上,用于判读那用户身份,这时候我们的请求拦截器就派上用场了,它可以拦截我们发的每一个请求,为其请求头添加字段,这就不用我们每次都自己写请求头了
响应拦截器
既然上面刚刚有讲token用于身份判断,那么我们就接着token来说一下响应拦截器,一般token都是有一个过期时间的,后端在收到我们的请求时,会拿出我们发送的token,判断一下其身份是否过期,如果过期会返回code:401(401是前后端商量决定的,并不是绝对的),如果前端拿到code:401可能就需要给出提示或者跳转到登录页面,这时候就响应拦截器就派上用场了
源码浅析
在lib/core/Axios.js
/**
 * Dispatch a request
 *
 * @param {Object} config The config specific for this request (merged with this.defaults)
 */
Axios.prototype.request = function request(config) {
  /*eslint no-param-reassign:0*/
  // Allow for axios('example/url'[, config]) a la fetch API
  if (typeof config === 'string') {
    config = utils.merge({
      url: arguments[0]
    }, arguments[1]);
  }
  // 将axios默认配置,axios实例配置和请求配置结合
  config = utils.merge(defaults, this.defaults, config);
  config.method = config.method.toLowerCase();

  // Hook up interceptors middleware
  // 拦截器中间件,为什么后面需要一个undefined,是因为需要promise成功的回调和失败的回调
  var chain = [dispatchRequest, undefined];
  var promise = Promise.resolve(config);
  // 请求拦截器
  this.interceptors.request.forEach(function unshiftRequestInterceptors(interceptor) {
    chain.unshift(interceptor.fulfilled, interceptor.rejected); // 将请求添加到拦截器中间件的头部
  });
  // 响应拦截器
  this.interceptors.response.forEach(function pushResponseInterceptors(interceptor) {
    chain.push(interceptor.fulfilled, interceptor.rejected); // 将响应添加到拦截器中间件的尾部
  });
  // 请求2 》 请求1 》 响应1 》 响应2 两两相对应
  // 执行拦截器,后发送的请求将会被先执行
  /*
   [
      this.interceptors.request.fulfilled, this.interceptors.request.rejected,// 请求拦截
      dispatchRequest, undefined,// 发起请求
      this.interceptors.response.fulfilled, this.interceptors.response.rejected,// 响应拦截
    ]
   */
  while (chain.length) {
    promise = promise.then(chain.shift(), chain.shift());
  }

  return promise;
};
发送请求
在lib/core/dispatchRequest.js,dispatchRequest在整个过程中起到一个承上启下的作用
  /*
   [
      this.interceptors.request.fulfilled, this.interceptors.request.rejected,// 请求拦截
      dispatchRequest, undefined,// 发起请求
      this.interceptors.response.fulfilled, this.interceptors.response.rejected,// 响应拦截
    ]
   */
/**
 * Dispatch a request to the server using the configured adapter.
 *
 * @param {object} config The config that is to be used for the request
 * @returns {Promise} The Promise to be fulfilled
 */
module.exports = function dispatchRequest(config) {
  // 请求取消抛出错误
  throwIfCancellationRequested(config);

  // Support baseURL config
  if (config.baseURL && !isAbsoluteURL(config.url)) {
    config.url = combineURLs(config.baseURL, config.url);
  }

  // Ensure headers exist
  // 确保请求头
  config.headers = config.headers || {};

  // Transform request data
  // 根据数据类型转换请求数据
  config.data = transformData(
    config.data,
    config.headers,
    config.transformRequest
  );

  // Flatten headers
  // 请求头扁平化,抽出请求头的common和当前请求的methods合并到首层结构
  config.headers = utils.merge(
    config.headers.common || {},
    config.headers[config.method] || {},
    config.headers || {}
  );
  // 删除header属性里无用的属性
  utils.forEach(
    ['delete', 'get', 'head', 'post', 'put', 'patch', 'common'],
    function cleanHeaderConfig(method) {
      delete config.headers[method];
    }
  );
  // 确认适配器
  var adapter = config.adapter || defaults.adapter;
  // 执行adapter(config)返回Promise然后执行对应操作
  return adapter(config).then(function onAdapterResolution(response) {
    throwIfCancellationRequested(config);

    // Transform response data
    response.data = transformData(
      response.data,
      response.headers,
      config.transformResponse
    );

    return response;
  }, function onAdapterRejection(reason) {
    if (!isCancel(reason)) {
      throwIfCancellationRequested(config);

      // Transform response data
      if (reason && reason.response) {
        reason.response.data = transformData(
          reason.response.data,
          reason.response.headers,
          config.transformResponse
        );
      }
    }

    return Promise.reject(reason);
  });
};
适配器
在axios官网有这样的介绍,其实就是通过适配器(adapter)来做到的
在lib/defaults.js,有默认适配器,如果是浏览器端,就会引入xhr.js,这是对XMLHttpRequest的封装,如果是node环境,封装的就是node的http库
function getDefaultAdapter() {
  var adapter;
  if (typeof XMLHttpRequest !== 'undefined') {
    // For browsers use XHR adapter
    adapter = require('./adapters/xhr');
  } else if (typeof process !== 'undefined') {
    // For node use HTTP adapter
    adapter = require('./adapters/http');
  }
  return adapter;
}
整篇文章到这就基本结束啦,前前后后大概写了一个星期,这是我第一次看源码,可能对部分源码理解的还不够透彻,如果有问题,请各位及时指正
参考文章: