“ 好好学习,天天向上” 本项目的所有源代码下载,链接:https://pan.baidu.com/s/1CtJxWsdWtYwENKIvBuKCNA 提取码:gf31
 )
) 以下所有文件的源代码都创建在上述结构图的相应目录下。
 参考书籍:《Java EE 互联网轻量级框架整合开发 SSM框架(Spring MVC+Spring+Mybatis)和Redis实现》
 ?
? 五分钟掌握Java注解 ?Git命令 ?Java中volatile关键字的最全总结 ✨
 素质三连击✨
本项目的所有源代码下载,链接:https://pan.baidu.com/s/1CtJxWsdWtYwENKIvBuKCNA 提取码:gf31
1. SSM简介
SSM 为 Spring、Spring MVC、Mybatis 组合的简称,常作为数据源较简单的web项目的框架。1.1 Spring
Spring框架中最成功的理念为:IoC(Inversion of Control,控制反转) 和 AOP(Aspect Oriented Programming,面向切面编程)。 在 Spring 中,会认为一切 Java 资源都是 Java Bean,而 IoC 就是一个容器,它的目标就是用来管理 Bean 以及它们之间的关系。你不需要去找资源,只要向 Spring IoC 描述所需要的资源(一般通过 XML 配置文件描述),Spring IoC 就会自己找到你所需要的资源,这样就把 Bean 之间的依赖关系解耦了,使结构更清晰。所以控制反转的含义为:使用者描述所需资源,而控制权在 Spring IoC 容器中,它会根据描述找到使用者所需的资源。 Spring AOP 常用于数据库事务编程。在现实中,有的切面条件跨越了多个对象,并且影响了它们之间的协作,所以此时只用 OOP 并不完善,还需要使用面向切面编程,通过它去管理在切面上的某些对象之间的协作。1.2 Spring MVC
MVC 模式把应用程序分成不同方面(输入逻辑、业务逻、UI逻辑),同时提供这些元素之间的松耦合。- Model:封装了应用程序的数据和由它们组成的 POJO;
- View:负责把模型数据渲染到视图上,将数据以一定的形式展现给用户;
- Controller:负责处理用户请求,并建立适当的模型把它传递给视图渲染。
1.3 Mybatis
MyBatis 是一个基于 Java 的持久层框架,是对 jdbc 的封装,它让数据库底层操作变的透明。Mybatis 的操作都是围绕一个 sqlSessionFactory 实例展开的。Mybatis 通过配置文件关联到各实体类的 Mapper 文件,Mapper 文件中配置了每个类对数据库所需进行的 sql 语句映射。在每次与数据库交互时,通过 sqlSessionFactory 拿到一个sqlSession,再执行 sql 命令。在 Mybatis 中,sqlSessionFactory 可以看为一个数据库连接池,并使用的单例模式;sqlSession 就相当于一个数据库连接,它存活在某个具体的业务请求中。 创建映射器 映射器是 Mybatis 中最重要、最复杂的组件,它由一个接口和对应的 XML 文件(或注解组成)。比如下面这个映射器实例。 我们首先看一下数据库中一个 user 实体的结构:+----------+-------------+------+-----+---------+-------+
| Field | Type | Null | Key | Default | Extra |
+----------+-------------+------+-----+---------+-------+
| id | varchar(11) | NO | PRI | NULL | |
| password | varchar(30) | NO | | NULL | |
| name | varchar(30) | NO | | NULL | |
+----------+-------------+------+-----+---------+-------+package com.eric.pojo;public class User {private String id;private String password;private String name;/**setter and getter**/
}package com.eric.mapper;public interface UserMapper {User selectUser(String id);
}<?xml version="1.0" encoding="UTF-8"?>mapper PUBLIC "-//mybatis.org//DTD Mapper 3.0//EN"
"http://mybatis.org/dtd/mybatis-3-mapper.dtd"><mapper namespace="com.eric.mapper.UserMapper"><select id="selectUser" parameterType="string" resultType="role">
select id, password, name from user where id = #{id}select>mapper>namespace 需要对应于一个存在的 Mapper 接口的全限定名, id 需要对应相应接口中声明方法的名称。在 Mybatis 中, string 是 Java 中 String 类内置的别名;而对于 Java 中的基本类型,如:int,在 Mybatis 中的别名为 _int ,在使用时需要注意这一点(其他的别名类似,可以自己搜索一下)。 到此一个简单的映射器就实现了,并且它只有一个按照 id 搜索出对应 User 的方法。补充:XML 中 DOCTYPE 字段的解析 (参考来源于:https://blog.csdn.net/helloanyone/article/details/6223373) 文档定义类型(DTD,Document Type Definition)声明始终以引入映射器(可以略过,本项目没有使用以下的配置,而是使用 spring 来配置管理的) 接下来我们就考虑怎么引入定义好的映射器了,我们可以在 Mybatis 的配置文件如 mybatis-config.xml 文件中引入,当然我们也可以在 Spring 的配置文件如 applicationContext.xml 中引入,当然二者引入的方式稍有区别。先来简单的介绍一下 Mybatis 的配置文件 mybatis-config.xml。!DOCTYPE开头,空一格后跟着文档根元素的名称。分类:内部 DTD,外部 DTD,外部 DTD 又划分为公共的和私有的。 如果是内部 DTD,则再空一格出现[],在中括号中是文档类型定义的内容。 而对于外部 DTD,私有 DTD 使用 SYSTEM 表示,接着是外部 DTD 的 URL;而公共 DTD 则使用 PUBLIC,接着是 DTD 公共名称,接着是DTD的URL。私有 DTD:公共 DTD:root SYSTEM "http://www.test.org/test.dtd" >公共DTD,DTD 名称格式为"注册//组织//类型 标签//语言":mapper PUBLIC "-//mybatis.org//DTD Mapper 3.0//EN"
"http://mybatis.org/dtd/mybatis-3-mapper.dtd">
- "注册"指示组织是否由国际标准化组织(ISO)注册,
+表示是,-表示不是;- "组织"即组织名称,如:mybatis.org 等;
- "类型"一般是 DTD;
- "标签"是指定公开文本描述,即对所引用的公开文本的唯一描述性名称,后面可附带版本号。
- 最后"语言"是 DTD 语言的 ISO639 语言标识符,如:EN 表示英文,ZH 表示中文。
<?xml  version="1.0" encoding="UTF-8" ?>configurarion PUBLIC "-//mybatis.org//DTD Config 3.0//EN"
"http://mybatis.org/dtd/mybatis-3-config.dtd"><configuration><properties/><settings/><typeAliases/><typeHandlers/><objectFactory/><plugins/><environments><environment><transactionManager/><dataSource/>environment>environments><databaseIdProvider/><mappers/>configuration>.properties 文件,此时外部文件引用方法为:<propertise resource="classpath:*.properties" /><typeAliases><typeAlias alias="user" type="com.eric.pojo.User" />typeAliases><typeAliases><package name="com.eric.pojo" />typeAliases>@Alias() 注解,如下:package com.eric.pojo;@Alias("user2")public class User{
}transactionManager 和 dataSource 。 transactionManager 有两种方式:<transactionManager type="JDBC"/><transactionManager type="MANAGED"/>dataSource 有三种方式:<dataSource type="POOLED"/><dataSource type="UNPOOLED"/><dataSource type="JNDI"/><mappers><mapper resource="com/eric/mapper/userMapper.xml" />mappers><mappers><package name="com.eric.mapper" />mappers><mappers><mapper class="com.eric.mapper.UserMapper" />mappers><mappers><mapper url="file:///var/mappers/com/eric/mapper/userMapper.xml" />mappers>2. 简单的登录功能项目
2.1 数据库脚本
本人使用的 MySQL 5.5.62drop database if exists ssm;
drop table if exists user;
CREATE TABLE user
(
id varchar(11) NOT NULL,
password varchar(30) NOT NULL,
name varchar(30) NOT NULL,
PRIMARY KEY (id)
)ENGINE=InnoDB AUTO_INCREMENT=2 DEFAULT CHARSET=utf8;
insert into user values('123456', '123456', 'Eric');2.2 项目的创建
Maven 项目的创建 本项目是使用 IDEA 2019.3 创建的 Maven 项目,Maven 可以从官网上下载,下载后需要一定的配置,此时需要修改 Maven 的配置文件 settings.xml,一般在目录apache-maven-3.6.3\conf 中(我下载的是apache-maven-3.6.3),修改其内容。- 设置为阿里云的镜像(速度快),使用如下代码:
<mirrors><mirror> <id>nexus-aliyunid> <name>nexus-aliyunname> <url>http://maven.aliyun.com/nexus/content/groups/publicurl> <mirrorOf>centralmirrorOf> mirror> mirrors>- 本地仓库路径可以设置为本地的目录,例如:
<localRepository>C:/Program Files/Java/maven/repositorylocalRepository>IDEA 的配置
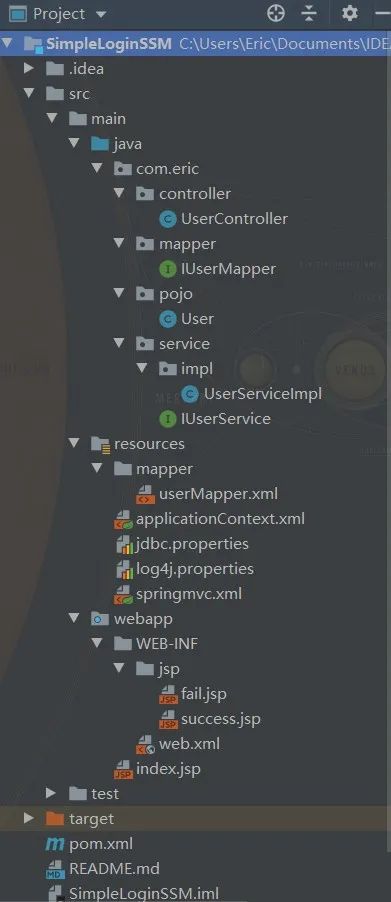
在 IDEA 中创建 Maven 项目,并使用 maven-archetype-webapp 的原型。在 IDEA Settings 里配置 Maven 的home 路径、配置文件 settings.xml 路径和本地仓库路径。 另外还需要在 IDEA 中配置添加一下 Tomcat (有问题找度娘)。 项目的 pom.xml 依赖 见源代码链接:https://pan.baidu.com/s/1CtJxWsdWtYwENKIvBuKCNA 提取码:gf31 最终项目结构 对于本项目,先来看一下最终的结构目录,如下:以下所有文件的源代码都创建在上述结构图的相应目录下。2.3 java 下的源代码及其分析
2.3.1 创建 POJO
首先我们根据数据库创建对应的 POJO 类——User.java,源代码如下(为了简洁起见 setter 和 getter 方法没有粘贴):package com.eric.pojo;public class User {private String id;private String password;private String name;/**setter and getter**/
}2.3.2 创建 Mapper 映射器
mapper 层即 dao 层,是对数据库的访问与操作。 映射器接口:IUserMapper.javapackage com.eric.mapper;import com.eric.pojo.User;import org.apache.ibatis.annotations.Param;public interface IUserMapper {User validateUser(@Param("id") String id, @Param("password") String password);
}@Param("name") ,它的作用是向下面的 userMapper.xml 中多个传递参数,传递的参数名为注解中定义的 name ,当然如果只有一个参数的话并不需要此注解。 映射器 XML 配置文件:userMapper.xml(此文件放在了 resources 的 mapper 目录下)<?xml version="1.0" encoding="UTF-8"?>mapper PUBLIC "-//mybatis.org//DTD Mapper 3.0//EN"
"http://mybatis.org/dtd/mybatis-3-mapper.dtd"><mapper namespace="com.eric.mapper.IUserMapper"><select id="validateUser" resultType="user">
select * from user where id = #{id} and password = #{password}select>mapper>补充:Mybatis (ParameterType) 如何传递多个不同类型的参数 (来源于:https://www.jianshu.com/p/d977eaadd1ed) 方法一:不需要写parameterType参数,使用参数下标public List getXXXBeanList(String xxId, String xxCode);由于是多参数那么就不能使用 parameterType, 改用#{index}是第几个就用第几个的索引,索引从0开始 方法二:基于注解(最简单)<select id="getXXXBeanList" resultType="XXBean">
select * from tbl_name where id = #{0} and name = #{1}select>public List getXXXBeanList(@Param("id")String id, @Param("code")String code);由于是多参数那么就不能使用parameterType, 这里用@Param来指定哪一个 方法三:Map封装<select id="getXXXBeanList" resultType="XXBean">
select * from tbl_name where id = #{id} and name = #{code} select>public List getXXXBeanList(HashMap map);其中hashmap是mybatis自己配置好的直接使用就行。map中key的名字是那个就在#{}使用那个,map如何封装就不用了我说了吧。 方法四:List封装<select id="getXXXBeanList" parameterType="hashmap" resultType="XXBean">
select 字段... from XXX where id=#{xxId} code = #{xxCode} select>public List getXXXBeanList(List list);<select id="getXXXBeanList" resultType="XXBean">
select 字段... from XXX where id in<foreach item="item" index="index" collection="list" open="(" separator="," close=")">
#{item}foreach> select>
2.3.3 创建 Service
Service 一层为项目提供需要的服务。 IUserService.javapackage com.eric.service;import com.eric.pojo.User;public interface IUserService {User validateUser(String id, String password);
}package com.eric.service.impl;import com.eric.mapper.IUserMapper;import com.eric.pojo.User;import com.eric.service.IUserService;import org.springframework.beans.factory.annotation.Autowired;import org.springframework.stereotype.Service;import javax.annotation.Resource;@Service("userService")public class UserServiceImpl implements IUserService {@Resourceprivate IUserMapper userMapper;@Overridepublic User validateUser(String id, String password) {return userMapper.validateUser(id, password);
}
}补充:@AutoWired 和 @Resources 注解 ① Spring注解@Autowired是如何实现的 ② 简单阐述:@AutoWired 和 @Resources 注解的区别
- @Autowired 注解是按类型装配依赖对象,默认情况下它要求依赖对象必须存在,如果允许 null 值,可以设置它 required 属性为 false。
- @Resource 注解和 @Autowired 一样,也可以标注在字段或属性的 setter 方法上,但它默认按名称装配。名称可以通过 @Resource 的 name 属性指定,如果没有指定 name 属性,当注解标注在字段上,即默认取字段的名称作为 bean 名称寻找依赖对象,当注解标注在属性的 setter 方法上,即默认取属性名作为 bean 名称寻找依赖对象。
- @Resources 按名字,是 JDK 的,@Autowired 按类型,是 Spring 的。
2.3.4 创建 Controller 控制层
controller 层是接收用户(前端页面)的请求信息,同时使用服务层的相应功能进行逻辑处理,并将最终结果返回给用户。package com.eric.controller;import com.eric.pojo.User;import com.eric.service.impl.UserServiceImpl;import org.springframework.stereotype.Controller;import org.springframework.web.bind.annotation.RequestMapping;import org.springframework.web.bind.annotation.RequestMethod;import org.springframework.web.bind.annotation.RequestParam;import org.springframework.web.servlet.ModelAndView;import javax.annotation.Resource;@Controller@RequestMapping("/user")public class UserController {@Resourceprivate UserServiceImpl userService;@RequestMapping(value = "/validateUser", method = RequestMethod.POST)public ModelAndView validateUser(@RequestParam("id") String id, @RequestParam("password") String password) {
ModelAndView mv = new ModelAndView();
User user = userService.validateUser(id, password);if (user != null) {
mv.addObject("user", user);
mv.setViewName("success");
}else {
mv.setViewName("fail");
}return mv;
}
}@Contrller注解
@Controller 修饰的类表明这个类是一个控制器类。如果用这个注解,需要在 springmvc.xml 配置文件加上这一段,,这样就可以扫描到此类以及上述的 @Service 修饰的类。@RequestMapping注解
@RequestMapping 是一个用来处理请求地址映射的注解,可用于类或方法上。用于类上,表示类中的所有响应请求的方法都是以该地址作为父路径;用于方法上,表示使用此地址时所调用的具体方法。 RequestMapping 注解有六个属性,下面我们把它分成三类进行说明。- value、method
- consumes、produces
- params、headers
ModelAndView类
addViewName(String viewName) 方法会设置此 ModelAndView 的视图名称,由 DispatcherServlet 通过 ViewResolver 解析。如上述 mv.setViewName("success"); 会自动跳转到 success.jsp 并传递一个 user 参数。 addObject(String attributeName, Object attributeValue) 方法通过 key/value 的方式绑定数据,可以指定返回对象的名字,属性值会返回到新页面的 request 作用域中。2.4 resources 下的配置文件
- mapper 下的 userMapper.xml 文件见 2.2.2
- jdbc.properties 文件,用来配置数据库,代码如下:
driverClassName=com.mysql.jdbc.Driver
url=jdbc:mysql://localhost:3306/ssm?characterEncoding=utf-8
username=root
password=123456
initialSize=5
minIdle=3
maxActive=20- log4j.properties 文件,用来配置日志,代码如下:
#日志输出级别
log4j.rootLogger=DEBUG, stdout
#设置stdout的日志输出控制台
log4j.appender.stdout=org.apache.log4j.ConsoleAppender
#输出日志到控制台的方式,默认为System.out
log4j.appender.stdout.Target = System.out
#设置使用灵活布局
log4j.appender.stdout.layout=org.apache.log4j.PatternLayout
#灵活定义输出格式
log4j.appender.stdout.layout.ConversionPattern=%d{yyyy-MM-dd HH:mm:ss,SSS} -[%p] method:[%c (%rms)] - %m%n- spring 的配置文件 applicationContext.xml
<?xml  version="1.0" encoding="UTF-8"?><beans xmlns="http://www.springframework.org/schema/beans"xmlns:xsi="http://www.w3.org/2001/XMLSchema-instance"xmlns:tx="http://www.springframework.org/schema/tx"xmlns:context="http://www.springframework.org/schema/context"xsi:schemaLocation="http://www.springframework.org/schema/beans
       http://www.springframework.org/schema/beans/spring-beans-3.1.xsd
       http://www.springframework.org/schema/tx
       http://www.springframework.org/schema/tx/spring-tx.xsd
       http://www.springframework.org/schema/context
http://www.springframework.org/schema/context/spring-context.xsd"><bean class="org.springframework.beans.factory.config.PropertyPlaceholderConfigurer"><property name="location" value="classpath:jdbc.properties"/>bean><bean id="dataSource" class="com.alibaba.druid.pool.DruidDataSource"><property name="driverClassName" value="${driverClassName}"/><property name="url" value="${url}"/><property name="username" value="${username}"/><property name="password" value="${password}"/>bean><bean id="sqlSessionFactory" class="org.mybatis.spring.SqlSessionFactoryBean"><property name="dataSource" ref="dataSource"/><property name="typeAliasesPackage" value="com.eric.pojo"/><property name="mapperLocations" value="classpath:mapper/*.xml"/>bean><bean class="org.mybatis.spring.mapper.MapperScannerConfigurer"><property name="sqlSessionFactoryBeanName" value="sqlSessionFactory"/><property name="basePackage" value="com.eric.mapper"/>bean>beans>- springmvc.xml
<?xml  version="1.0" encoding="UTF-8"?><beans xmlns="http://www.springframework.org/schema/beans"xmlns:xsi="http://www.w3.org/2001/XMLSchema-instance"xmlns:context="http://www.springframework.org/schema/context"xmlns:mvc="http://www.springframework.org/schema/mvc"xsi:schemaLocation="http://www.springframework.org/schema/beans
       http://www.springframework.org/schema/beans/spring-beans.xsd
       http://www.springframework.org/schema/context
       http://www.springframework.org/schema/context/spring-context.xsd
       http://www.springframework.org/schema/mvc
       http://www.springframework.org/schema/mvc/spring-mvc-3.0.xsd"><context:component-scan base-package="com.eric"/><mvc:annotation-driven/><mvc:default-servlet-handler/><bean class="org.springframework.web.servlet.view.InternalResourceViewResolver"><property name="viewClass" value="org.springframework.web.servlet.view.JstlView"/><property name="prefix" value="/WEB-INF/jsp/"/><property name="suffix" value=".jsp"/>bean>beans>
2.5 webapp 下的 jsp
index.jsp<%@ page contentType="text/html;charset=UTF-8" language="java" %><html><head><title>登录主页title>head><body><form action="${pageContext.request.contextPath}/user/validateUser" method="post"><label>
ID:<input type="text" name="id">label><label>
密码:<input type="password" name="password">label><input type="submit" value="登录">form>body>html><%@ page contentType="text/html;charset=UTF-8" language="java" %><html><head><title>用户信息title>head><body>
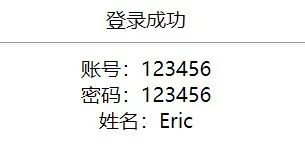
登录成功<hr>
账号:${requestScope.user.id}<br/>
密码:${requestScope.user.password}<br/>
姓名:${requestScope.user.name}<br/>body>html><%@ page contentType="text/html;charset=UTF-8" language="java" %><html><head><title>登录失败title>head><body><h1 align="center">登录失败!h1>body>html>2.4 运行结果
参考书籍:《Java EE 互联网轻量级框架整合开发 SSM框架(Spring MVC+Spring+Mybatis)和Redis实现》?五分钟掌握Java注解 ?Git命令 ?Java中volatile关键字的最全总结 ✨素质三连击✨