第一章 项目简介
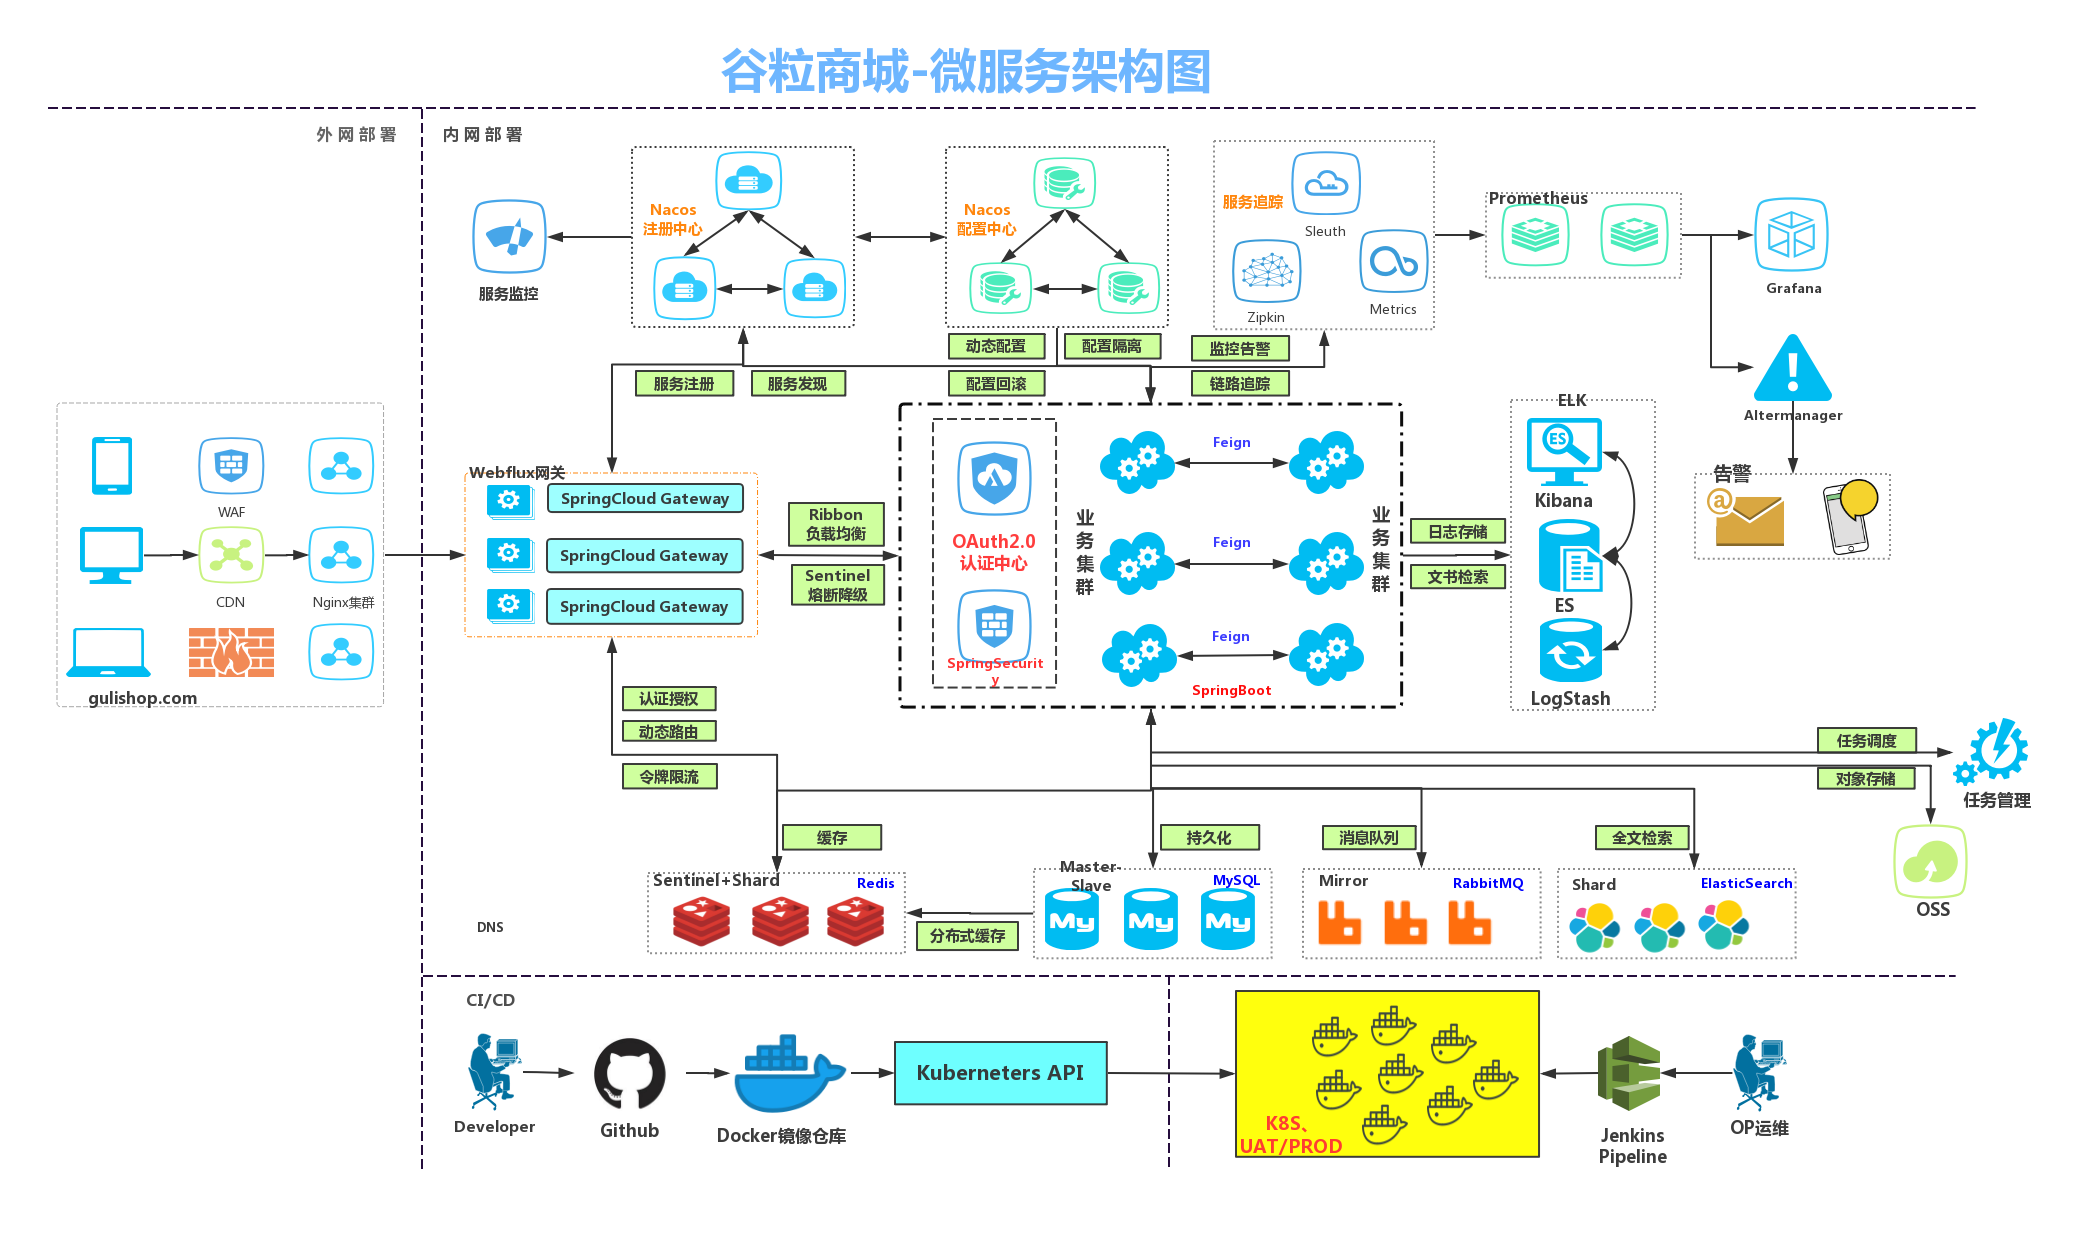
1.1 架构图
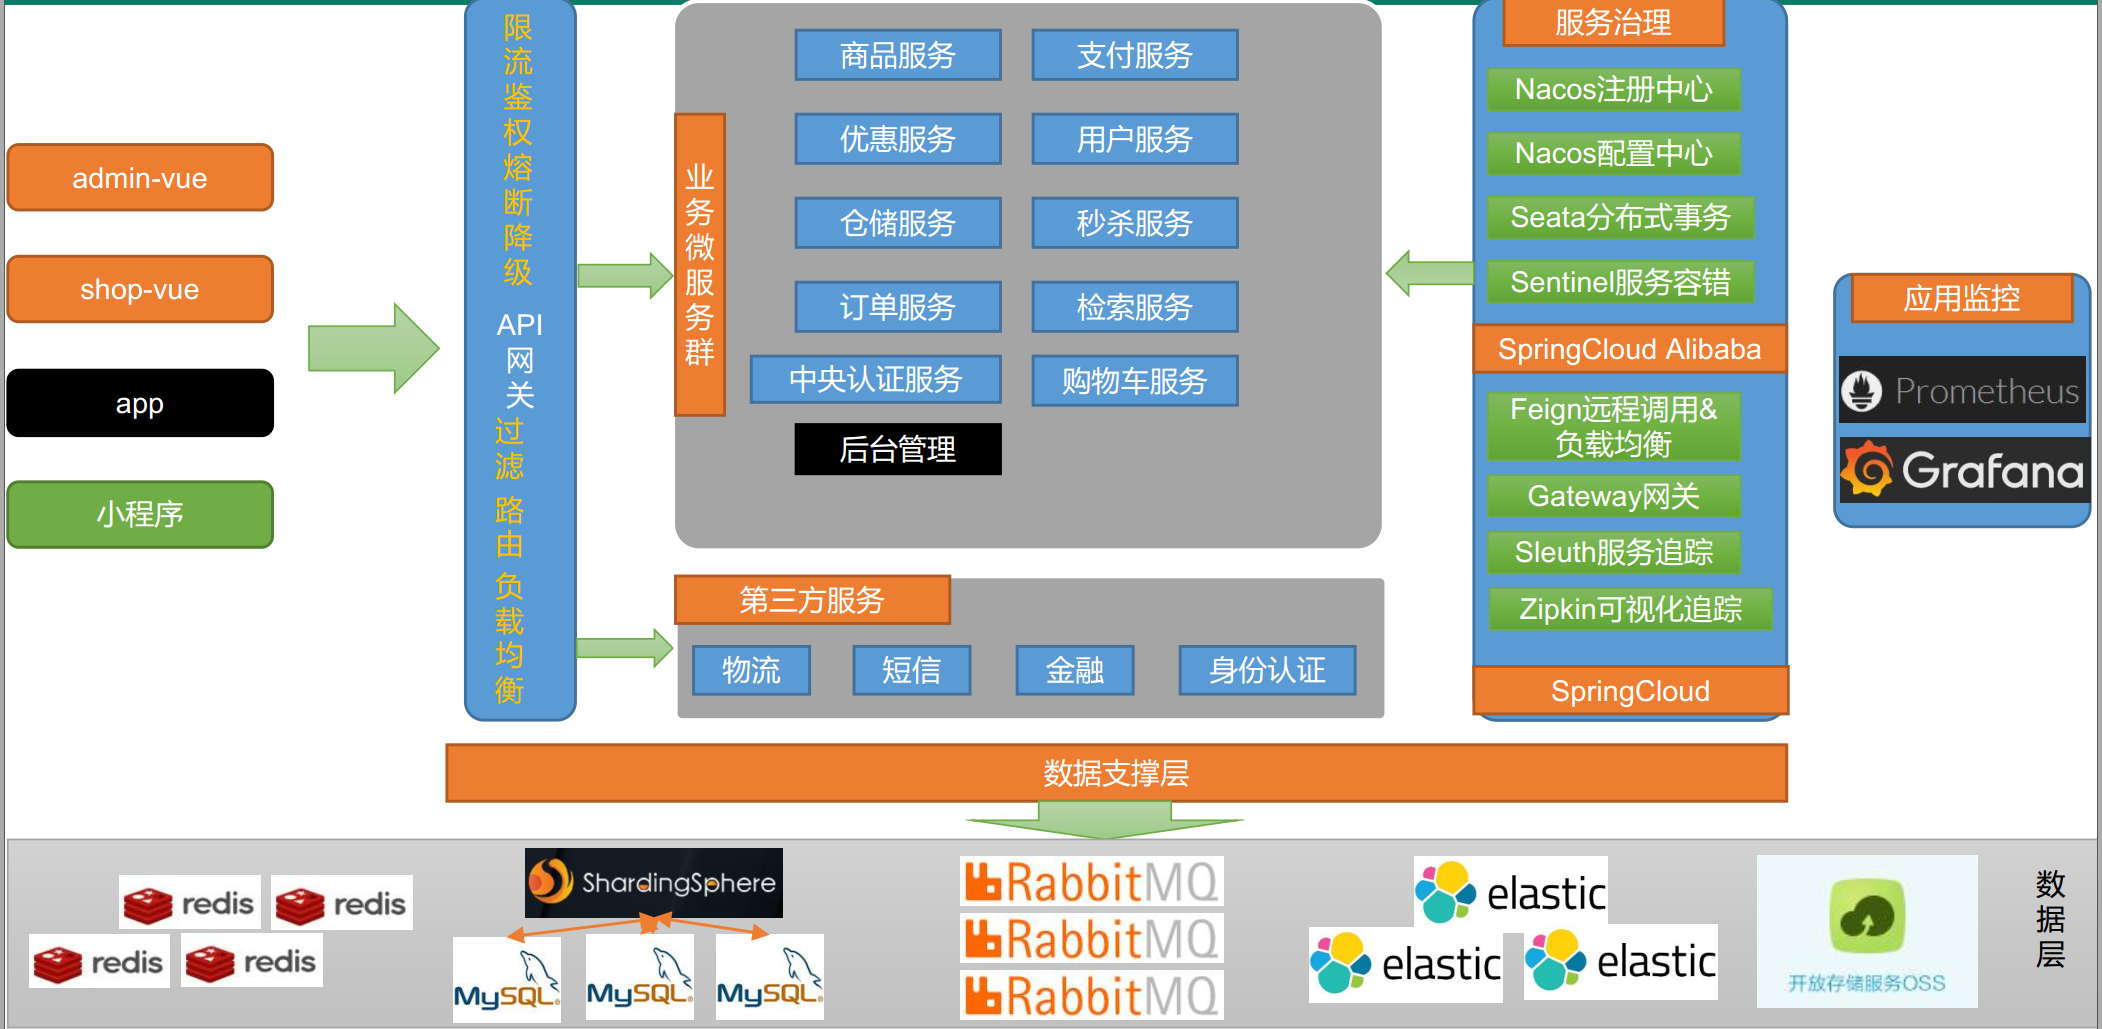
1.2 微服务划分图
1.3 表设计
1.3.1 商品库
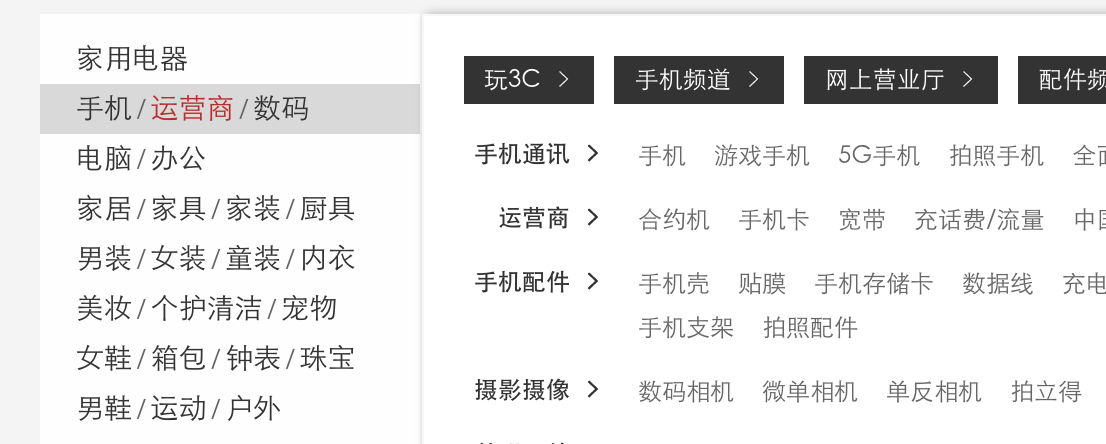
pms_category类别表,如上图,用来展示首页三级分类。
pms_brand品牌表,每个商品都属于某个品牌,用来存品牌的名字和logo等。
pms_category_brand_relation类别和品牌关联表,某个品牌可以属于多个类别。
pms_attr_group属性分组表,如上图,主体为一个属性分组。
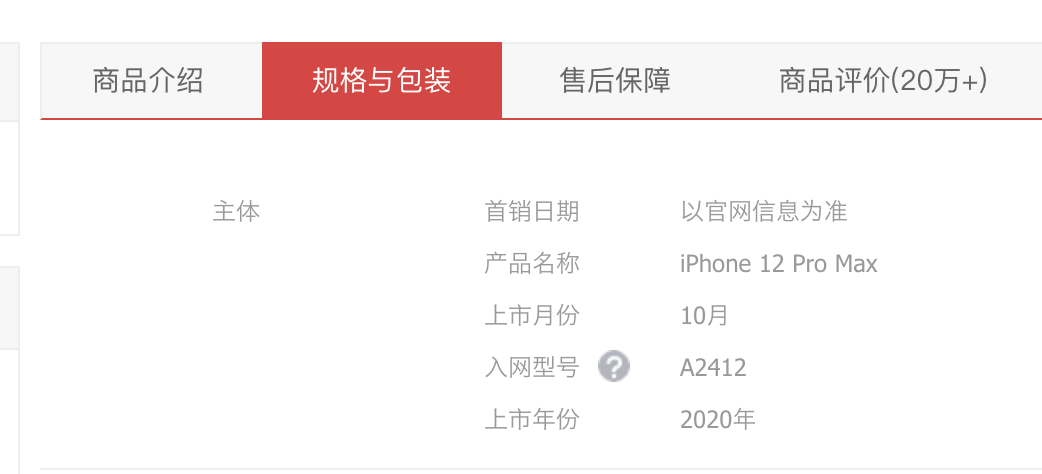
pms_product_attr_value,商品属性值表,记录某个商品某个属性的值,如上图中的2020年。
pms_attr属性表,用来记录一共有哪些属性,这个属性一共可以有哪些值,属于哪个类别。
pms_attr_attrgroup_relation属性与属性分组关联表,一个属性分组可以有多个属性。
pms_sku_sale_attr_balue商品SKU销售属性表记录某个sku某个属性的具体值。比如1号sku颜色是白色,CPU型号是A14。
pms_spu_info,用来记录一个spu的名字、描述、类别、品牌等。
pms_spu_info_desc,以图片的方式记录一个spu的具体介绍。
pms_spu_images,记录一个spu的图库。
pms_sku_info,用来记录一个sku的名字、描述、类别、品牌、标题、价格等。
1.3.2 用户库
ums_member会员表,记录姓名、手机号、密码、昵称、会员等级等等信息。
ums_member_level会员等级表,记录一共有哪些等级。
ums_member_receive_address会员收货地址表,记录某个会员的收货地址信息。
1.3.3 优惠库
sms_member_price 记录某个sku对应某个会员等级的价格。
sms_sku_full_reduction 满减信息表,记录某个sku满多少减多少。
sms_sku_ladder 打折信息表,记录某个sku满多少件打几折。
sms_seckill_session 秒杀场次表,记录某个秒杀场次的开始时间和结束时间。
sms_seckill_sku_relation 记录某个秒杀场次某个sku的秒杀价格、秒杀数量、限购数量。
1.3.4 订单库
oms_order订单表,记录某个订单的订单号、会员id、创建时间、订单总额、应付总额、运费金额、支付方式、订单状态、支付时间、发货时间、确认收货时间、评价时间、收货人信息物流信息等等。
oms_order_item,记录某个订单买的所有商品的详细信息。
oms_payment_info支付信息表,记录某个订单对接其他支付的流水号、金额、状态、回调内容、回调时间等。
1.3.5 库存库
wms_ware_info库存信息表,记录仓库的名字、地址等信息。
wms_ware_sku记录某个仓库某个sku一共有多少库存、已锁定的库存。
wms_ware_order_task库存工作单表,为一个订单创建一个库存工作单。
wms_ware_order_task_detail库存工作单详情表,记录某个工作单中的某个sku的购买个数、仓库id、以及锁定状态。 用来实现分布式锁库存的最终一致性。
第二章 Linux环境准备
2.1 CentOS-7
虚拟机安装CentOS-7
2.2 Docker
 sudo yum install -y yum-utils

 sudo yum-config-manager \
    --add-repo \
    https://download.docker.com/linux/centos/docker-ce.repo

 sudo yum install docker-ce docker-ce-cli containerd.io

 #启动docker
 sudo systemctl start docker

 #开机自启docker
 sudo systemctl enable docker

#镜像加速
sudo mkdir -p /etc/docker

sudo tee /etc/docker/daemon.json <<-'EOF'
{
  "registry-mirrors": ["https://lp2olewb.mirror.aliyuncs.com"]
}
EOF

sudo systemctl daemon-reload

sudo systemctl restart docker
2.3 MySQL
sudo docker pull mysql:5.7

# 运行mysql容器
# --name指定容器名字 -v目录挂载 -p指定端口映射  -e设置mysql参数 -d后台运行
sudo docker run -p 3306:3306 --name mysql \
-v /mydata/mysql/log:/var/log/mysql \
-v /mydata/mysql/data:/var/lib/mysql \
-v /mydata/mysql/conf:/etc/mysql \
-e MYSQL_ROOT_PASSWORD=root \
-d mysql:5.7

#修改mysql配置
vi /mydata/mysql/conf/my.conf

[client]
default-character-set=utf8
[mysql]
default-character-set=utf8
[mysqld]
init_connect='SET collation_connection = utf8_unicode_ci'
init_connect='SET NAMES utf8'
character-set-server=utf8
collation-server=utf8_unicode_ci
skip-character-set-client-handshake
skip-name-resolve

#重启mysql
docker restart mysql

#进入mysql容器
docker exec -it mysql bin/bash
2.4 Redis
docker pull redis

mkdir -p /mydata/redis/conf

touch /mydata/redis/conf/redis.conf

docker run -p 6379:6379 --name redis \
-v /mydata/redis/data:/data \
-v /mydata/redis/conf/redis.conf:/etc/redis/redis.conf \
-d redis redis-server /etc/redis/redis.conf

#redis持久化
vi /mydata/redis/conf/redis.conf
appendonly yes

docker restart redis

# 设置我们要用的容器每次都是自动启动
sudo docker update redis --restart=always
sudo docker update mysql --restart=always
第三章 开发环境准备
3.1 IDEA准备
安装JDK1.8。
plugin里安装插件lombok,mybatisX。
配置maven。
3.2 VSCode准备
安装插件Auto Close Tag、Auto Rename Tag、Chinese、ESlint、HTML CSS Support、HTML Snippets、JavaScript ES6、Live Server、open in brower、Vetur、Vue 3 Snippets
Code-首选项-用户片段 中增加代码模板:
{
    "Print to console": {
        "prefix": "vue",
        "body": [
            "<!-- $1 -->",
            "<template>",
            "<div class='$2'>$5</div>",
            "</template>",
            "",
            "<script>",
            "//这里可以导入其他文件(比如:组件,工具js,第三方插件js,json文件,图片文件等等)",
            "//例如:import 《组件名称》 from '《组件路径》';",
            "",
            "export default {",
            "//import引入的组件需要注入到对象中才能使用",
            "components: {},",
            "data() {",
            "//这里存放数据",
            "return {",
            "",
            "};",
            "},",
            "//监听属性 类似于data概念",
            "computed: {},",
            "//监控data中的数据变化",
            "watch: {},",
            "//方法集合",
            "methods: {",
            "",
            "},",
            "//生命周期 - 创建完成(可以访问当前this实例)",
            "created() {",
            "",
            "},",
            "//生命周期 - 挂载完成(可以访问DOM元素)",
            "mounted() {",
            "",
            "},",
            "beforeCreate() {}, //生命周期 - 创建之前",
            "beforeMount() {}, //生命周期 - 挂载之前",
            "beforeUpdate() {}, //生命周期 - 更新之前",
            "updated() {}, //生命周期 - 更新之后",
            "beforeDestroy() {}, //生命周期 - 销毁之前",
            "destroyed() {}, //生命周期 - 销毁完成",
            "activated() {}, //如果页面有keep-alive缓存功能,这个函数会触发",
            "}",
            "</script>",
            "<style lang='scss' scoped>",
            "//@import url($3); 引入公共css类",
            "$4",
            "</style>"
        ],
        "description": "Log output to console"
    },
    "http-get请求": {
        "prefix": "httpget",
        "body": [
            "this.\\$http({",
            "url:this.\\$http.adornUrl(''),",
            "method:'get',",
            "params:this.\\$http.adornParams({})",
            "}).then(({data})=>{",
            "})"
        ],
        "description": "httpGET请求"
    },
    "http-post请求": {
        "prefix": "httppost",
        "body": [
            "this.\\$http({",
            "url:this.\\$http.adornUrl(''),",
            "method:'post',",
            "data: this.\\$http.adornData(data, false)",
            "}).then(({data})=>{ })"
        ],
        "description": "httpPOST请求"
    },
}
3.3 Chrome浏览器准备
安装Vue.js devtools插件,在插件设置中勾选允许访问文件网址。
3.4 Git设置ssh免密
git config --global user.name "huangzc"
git config --global user.email "540955198@qq.com"

ssh-keygen -t rsa -C "540955198@qq.com"

cat ~/.ssh/id_rsa.pub
#登录码云后,个人头像上点设置--ssh公钥

#测试免密
ssh -T git@gitee.com
3.5 码云创建商城项目
在码云新建仓库,仓库名gulimall,选择语言java,在.gitignore选中maven,许可证选Apache-2.0,勾选使用readme初始化,开发模型选生成/开发模型,创建。
3.6 IDEA导入商城项目
IDEA里面导入刚才创建的仓库。
3.7 创建商城模块
New Module–Spring Initializer–com.hzc.gulimall , Artifact填 gulimall-product,选Spring web和 openFeign。
依次创建 商品服务product、存储服务ware、订单服务order、优惠券服务coupon、用户服务member
注意springboot版本不要太高,本项目选2.1.8.RELEASE。
3.7.1 聚合服务
根目录添加pom.xml,聚合所有服务。
3.7.2 git忽略版本控制
根目录下的.gitignore添加以下规则。
**/mvnw
**/mvnw.cmd
**/.mvn
**/target/
.idea
**/.gitignore
3.8 数据库初始化
3.8.1 建数据库
CREATE SCHEMA `gulimall-oms` DEFAULT CHARACTER SET utf8mb4 COLLATE utf8mb4_unicode_ci ;
CREATE SCHEMA `gulimall-pms` DEFAULT CHARACTER SET utf8mb4 COLLATE utf8mb4_unicode_ci ;
CREATE SCHEMA `gulimall-sms` DEFAULT CHARACTER SET utf8mb4 COLLATE utf8mb4_unicode_ci ;
CREATE SCHEMA `gulimall-ums` DEFAULT CHARACTER SET utf8mb4 COLLATE utf8mb4_unicode_ci ;
CREATE SCHEMA `gulimall-wms` DEFAULT CHARACTER SET utf8mb4 COLLATE utf8mb4_unicode_ci ;
CREATE SCHEMA `gulimall-admin` DEFAULT CHARACTER SET utf8mb4 COLLATE utf8mb4_unicode_ci ;
3.8.2 执行SQL语句
gulimall_oms.sql
gulimall_pms.sql
gulimall_sms.sql
gulimall_ums.sql
gulimall_wms.sql
注意pms_attr表中少了value_type字段
alter pms_attr add value_type column tinyint(4)
3.9 前后端分离后台管理项目
3.9.1 renren-fast后台
git clone https://gitee.com/renrenio/renren-fast.git
根目录pom.xml聚合renren-fast。
在数据库中执行mysql.sql。
3.9.2 renren-fast-vue前端
git clone https://gitee.com/renrenio/renren-fast-vue.git
下载node.js 12版本,设置镜像仓库。
npm config set registry http://registry.npm.taobao.org/
VScode打开fast-vue项目,package.json里面版本修改为 "node-sass": "4.14.1",
终端中输入 npm install。 (mac下需要先安装Xcode软件),npm run dev启动项目。
3.10 逆向工程
拉取逆向工程项目。
git clone https://gitee.com/renrenio/renren-generator.git
以gulimall-product为例,其余模块方法同理。
3.10.1 修改renren-generator中的application.yml
配置mysql的地址,以及库名称。
url: jdbc:mysql://100.68.126.249:3306/gulimall-pms?useUnicode=true&characterEncoding=UTF-8&useSSL=false&serverTimezone=Asia/Shanghai
3.10.2 修改Controller.java.vm文件里
把Shiro有关的注解先注释掉。
// @RequiresPermissions("${moduleName}:${pathName}:update")3.10.3 修改generator.properties
更改mainPath,package,moduleName,author,email,tablePrefix
mainPath=com.hzc
#包名
package=com.hzc.gulimall
moduleName=product
#作者
author=huangzc
#Email
email=540955198@qq.com
#表前缀(类名不会包含表前缀)
tablePrefix=pms_
3.10.4 生成代码
启动RenrenApplication.java,访问http://localhost:80/,点击生成代码。把main放到gulimall-product的同级目录下。
3.10.5 创建gulimall-common模块
创建gulimall-common模块解决类报错问题,pom.xml添加
    <dependencies>
        <!-- mybatisPLUS-->
        <dependency>
            <groupId>com.baomidou</groupId>
            <artifactId>mybatis-plus-boot-starter</artifactId>
            <version>3.3.2</version>
        </dependency>
        <!--简化实体类,用@Data代替getset方法-->
        <dependency>
            <groupId>org.projectlombok</groupId>
            <artifactId>lombok</artifactId>
            <version>1.18.8</version>
        </dependency>
        <!-- httpcomponent包。发送http请求 -->
        <dependency>
            <groupId>org.apache.httpcomponents</groupId>
            <artifactId>httpcore</artifactId>
            <version>4.4.13</version>
        </dependency>
        <dependency>
            <groupId>commons-lang</groupId>
            <artifactId>commons-lang</artifactId>
            <version>2.6</version>
        </dependency>
        <!-- 数据库驱动 https://mvnrepository.com/artifact/mysql/mysql-connector-java -->
        <dependency>
            <groupId>mysql</groupId>
            <artifactId>mysql-connector-java</artifactId>
            <version>8.0.17</version>
        </dependency>
        <!--tomcat里一般都带-->
        <dependency>
            <groupId>javax.servlet</groupId>
            <artifactId>servlet-api</artifactId>
            <version>2.5</version>
            <scope>provided</scope>
        </dependency>
    </dependencies>
然后把所有模块都依赖这个common。
3.10.6 product项目修改
resources目录下新建application.yml
spring:
  datasource:
    username: root
    password: root
    url: jdbc:mysql://100.68.126.249:3306/gulimall-pms?useUnicode=true&characterEncoding=UTF-8&useSSL=false&serverTimezone=Asia/Shanghai
    driver-class-name: com.mysql.jdbc.Driver

# MapperScan
# sql映射文件位置
mybatis-plus:
  mapper-locations: classpath:/mapper/**/*.xml
  global-config:
    db-config:
      id-type: auto
server:
  port: 7000
主启动类加注解
@MapperScan("com.atguigu.gulimall.product.dao")
第四章 整合微服务组件
4.1 设置微服务组件版本
在common项目的pom.xml里添加。这样所有的项目引入微服务组件时就不用指定版本号了。
<dependencyManagement>
    <dependencies>
        <dependency>
            <groupId>com.alibaba.cloud</groupId>
            <artifactId>spring-cloud-alibaba-dependencies</artifactId>
            <version>2.1.0.RELEASE</version>
            <type>pom</type>
            <scope>import</scope>
        </dependency>
    </dependencies>
</dependencyManagement>
4.2 注册中心Nacos
配置依赖
common项目pom.xml添加
        <dependency>
            <groupId>com.alibaba.cloud</groupId>
            <artifactId>spring-cloud-starter-alibaba-nacos-discovery</artifactId>
        </dependency>
安装Nacos
下载nacos 1.2.1版本
启动nacos。
sh startup.sh -m standalone
开启服务注册与发现
所有项目主启动类增加注解@EnableDiscoveryClient
配置地址
所有项目增加服务注册名以及注册中心地址。
application.yml中添加
spring:
  application:
    name: gulimall-coupon
  cloud:
    nacos:
      server-addr: 127.0.0.1:8848
4.3 服务调用openFeign
远程调用的步骤:
- 引入openfeign,之前在增加模块的时候已经勾选了feign组件。
- 编写一个接口,接口告诉SpringCloud这个接口需要调用远程服务。
@FeignClient("gulimall-coupon") //告诉spring cloud这个接口是一个远程客户端,要调用coupon服务,再去调用coupon服务/coupon/coupon/member/list对应的方法
public interface CouponFeignService {
    // 远程服务的url
    @RequestMapping("/coupon/coupon/member/list")//注意写全优惠券类上还有映射//注意我们这个地方不是控制层,所以这个请求映射请求的不是我们服务器上的东西,而是nacos注册中心的
    public R membercoupons();//得到一个R对象
}- 主启动类加注解@EnableFeignClients,要指定远程调用功能放的基础包。
@EnableFeignClients(basePackages="com.hzc.gulimall.member.feign")
4.4 配置中心Nacos
配置依赖
common项目pom.xml添加
        <dependency>
            <groupId>com.alibaba.cloud</groupId>
            <artifactId>spring-cloud-starter-alibaba-nacos-config</artifactId>
        </dependency>
配置地址
在每个项目中创建/src/main/resources/bootstrap.properties
# 改名字,对应nacos里的配置文件名
spring.application.name=gulimall-coupon
spring.cloud.nacos.config.server-addr=127.0.0.1:8848
demo
加@RefreshScope可以不用重启项目实时获取配置中心的数据。
@RefreshScope
@RestController
@RequestMapping("coupon/coupon")
public class CouponController {
    @Autowired
    private CouponService couponService;

    @Value("${coupon.user.name}")
    private String name;
    @Value("${coupon.user.age}")
    private Integer age;
    @RequestMapping("/test")
    public R test(){

        return R.ok().put("name",name).put("age",age);
    }
使用配置中心方案
每个微服务创建自己的命名空间,然后使用配置分组区分环境(dev/test/prod)
4.5 API网关Gateway
添加模块springboot gateway。
主启动类开启注册发现。
排除数据库数据源。由于common项目引入了数据库驱动,这个项目又不需要连数据库,如果不排除数据源的话启动会报错。
@EnableDiscoveryClient
@SpringBootApplication(exclude = DataSourceAutoConfiguration.class)
public class GulimallGatewayApplication {
    public static void main(String[] args) {
        SpringApplication.run(GulimallGatewayApplication.class, args);
    }
}
配置application.properties
spring.cloud.nacos.discovery.server-addr=127.0.0.1:8848
spring.application.name=gulimall-gateway
server.port=88
配置bootstrap.properties nacos配置中心地址
spring.application.name=gulimall-gateway

spring.cloud.nacos.config.server-addr=127.0.0.1:8848
spring.cloud.nacos.config.namespace=bfa85f10-1a9a-460c-a7dc-efa961b45cc1
第五章 前端基础
5.1 ES6
ECMAScript是浏览器脚本语言的规范,JS是规范的具体实现。
let&const
let不会作用到{}外,var会越域跳到{}外。
var可以多次声明同一变量,let会报错。
var定义之前可以使用,let定义之前不可使用。(变量提升问题)
const声明之后不允许改变。
<!DOCTYPE html>
<html lang="en">
<head>
    <meta charset="UTF-8">
    <meta name="viewport" content="width=device-width, initial-scale=1.0">
    <meta http-equiv="X-UA-Compatible" content="ie=edge">
    <title>Document</title>
</head>
<body>


    <script>
       // var 声明的变量往往会越域
       // let 声明的变量有严格局部作用域
//         {
//             var a = 1;
//             let b = 2;
//         }
//         console.log(a);  // 1
//         console.log(b);  // ReferenceError: b is not defined

    // var 可以声明多次
            // let 只能声明一次
//         var m = 1
//         var m = 2
//         let n = 3
// //         let n = 4
//         console.log(m)  // 2
//         console.log(n)  // Identifier 'n' has already been declared

        // var 会变量提升
        // let 不存在变量提升
//         console.log(x);  // undefined
//         var x = 10;
//         console.log(y);   //ReferenceError: y is not defined
//         let y = 20;

        // let
        // 1. const声明之后不允许改变
                // 2. 一但声明必须初始化,否则会报错
        const a = 1;
        a = 3; //Uncaught TypeError: Assignment to constant variable.

    </script>

</body>
</html>
解构表达式
 <script>
        //1、数组解构
        let [a,b,c] = arr;
        console.log(a,b,c)

        const person = {
            name: "jack",
            age: 21,
            language: ['java', 'js', 'css']
        }
        //2、对象解构 // 把name属性变为abc
        const { name: abc, age, language } = person;
        console.log(abc, age, language)
        //3、字符串扩展
        let str = "hello.vue";
        console.log(str.startsWith("hello"));//true
        console.log(str.endsWith(".vue"));//true
        console.log(str.includes("e"));//true
        console.log(str.includes("hello"));//true
        //4、字符串模板
        let ss = `<div>
                    <span>hello world<span>
                </div>`;
        console.log(ss);

       // 2、字符串插入变量和表达式。变量名写在 ${} 中,${} 中可以放入 JavaScript 表达式。
        function fun() {
            return "这是一个函数"
        }
        let info = `我是${abc},今年${age + 10}了, 我想说: ${fun()}`;
        console.log(info);

    </script>
函数优化
    <script>
        //参数写上默认值,没传就会自动使用默认值
        function add2(a, b = 1) {
            return a + b;
        }
        console.log(add2(20));


        //2)、不定参数
        function fun(...values) {
            console.log(values.length)
        }
        fun(1, 2)      //2
        fun(1, 2, 3, 4)  //4

        //3)、箭头函数。lambda
        //以前声明一个方法
        // var print = function (obj) {
        //     console.log(obj);
        // }
        var print = obj => console.log(obj);
        print("hello");

        var sum = function (a, b) {
            c = a + b;
            return a + c;
        }

        var sum2 = (a, b) => a + b;
        console.log(sum2(11, 12));

        var sum3 = (a, b) => {
            c = a + b;
            return a + c;
        }
        console.log(sum3(10, 20))


        const person = {
            name: "hzc",
            age: 21,
            language: ['java', 'js', 'css']
        }

        function hello(person) {
            console.log("hello," + person.name)
        }

        //箭头函数+解构
        var hello2 = ({name}) => console.log("hello," +name);
        hello2(person);

    </script>
对象优化
   <script>
        const person = {
            name: "jack",
            age: 21,
            language: ['java', 'js', 'css']
        }

        console.log(Object.keys(person));//["name", "age", "language"]
        console.log(Object.values(person));//["jack", 21, Array(3)]
        console.log(Object.entries(person));//[Array(2), Array(2), Array(2)]

        const target = { a: 1 };
        const source1 = { b: 2 };
        const source2 = { c: 3 };

        // 合并
        //{a:1,b:2,c:3}
        Object.assign(target, source1, source2);

        console.log(target);//["name", "age", "language"]

        //2)、声明对象简写
        const age = 23
        const name = "张三"
        const person1 = { age: age, name: name }
        // 等价于
        const person2 = { age, name }//声明对象简写
        console.log(person2);

        //3)、对象的函数属性简写
        let person3 = {
            name: "jack",
            // 以前:
            eat: function (food) {
                console.log(this.name + "在吃" + food);
            },
            //箭头函数this不能使用,对象.属性
            eat2: food => console.log(person3.name + "在吃" + food),
            eat3(food) {
                console.log(this.name + "在吃" + food);
            }
        }

        person3.eat("香蕉");
        person3.eat2("苹果")
        person3.eat3("橘子");

        //4)、对象拓展运算符

        // 1、拷贝对象(深拷贝)
        // ...用于取出参数对象所有可遍历属性然后拷贝到当前对象
        let p1 = { name: "Amy", age: 15 }
        let someone = { ...p1 }
        console.log(someone)  //{name: "Amy", age: 15}

        // 2、合并对象
        let age1 = { age: 15 }
        let name1 = { name: "Amy" }
        let p2 = {name:"zhangsan"}
        p2 = { ...age1, ...name1 }
        console.log(p2)
    </script>
map和reduce
   <script>
        //数组中新增了map和reduce方法。
         let arr = ['1', '20', '-5', '3'];

        //map():接收一个函数,将原数组中的所有元素用这个函数处理后放入新数组返回。
        //  arr = arr.map((item)=>{
        //     return item*2
        //  });
         arr = arr.map(item=> item*2);
         console.log(arr);

        //reduce() 为数组中的每一个元素依次执行回调函数,不包括数组中被删除或从未被赋值的元素,
        //[2, 40, -10, 6]
        //arr.reduce(callback,[initialValue])
        /**
         1、previousValue (上一次调用回调返回的值,或者是提供的初始值(initialValue))
         2、currentValue (数组中当前被处理的元素)
         3、index (当前元素在数组中的索引)
         4、array (调用 reduce 的数组)*/
        let result = arr.reduce((a,b)=>{
            console.log("上一次处理后:"+a);
            console.log("当前正在处理:"+b);
            return a + b;
        },100);
        console.log(result)
    </script>
primise
    <script>
        function get(url, data) {
            return new Promise((resolve, reject) => {
                $.ajax({
                    url: url,
                    data: data,
                    success: function (data) {
                        resolve(data);
                    },
                    error: function (err) {
                        reject(err)
                    }
                })
            });
        }

        get("mock/user.json")
            .then((data) => {
                console.log("用户查询成功~~~:", data)
                return get(`mock/user_corse_${data.id}.json`);
            })
            .then((data) => {
                console.log("课程查询成功~~~:", data)
                return get(`mock/corse_score_${data.id}.json`);
            })
            .then((data)=>{
                console.log("课程成绩查询成功~~~:", data)
            })
            .catch((err)=>{ //失败的话catch
                console.log("出现异常",err)
            });

    </script>
模块化
export用于规定模块的对外接口
import用于导入其他模块提供的功能
5.2 Vue
MVVM思想
- M:model 包括数据和一些基本操作
- V:view 视图,页面渲染结果
- VM:View-model,模型与视图间的双向操作
把开发人员从繁琐的DOM操作中解放出来,把关注点放在如何操作Model上。
引入Vue
先npm init -y初始化项目,生成了一个package.json文件,说明他是一个npm管理的项目
npm install vue,安装后在项目node_modules里有vue
页面中引用vue
<body>
    <div id="app">
        <input type="text" v-model="num">
       // v-model实现双向绑定
        <button v-on:click="num++">点赞</button>
      //  v-on:click绑定事件,实现自增
        <button v-on:click="cancel">取消</button>
     //   回调自定义的方法
        <h1> {{name}} ,非常帅,有{{num}}个人为他点赞{{hello()}}</h1>
    </div>

    <!-- 导入依赖 -->
    <script src="./node_modules/vue/dist/vue.js"></script>

    <script>
        //1、vue声明式渲染
        let vm = new Vue({ //生成vue对象
            el: "#app",//绑定元素 div id="app" // 可以指定恰标签,但是不可以指定body标签
            data: {  //封装数据
                name: "张三",  // 也可以使用{} //表单中可以取出
                num: 1
            },
            methods: {  //封装方法
                cancel() {
                    this.num--;
                },
                hello() {
                    return "1"
                }
            }
        });
        //还可以在html控制台vm.name
        //2、双向绑定,模型变化,视图变化。反之亦然。
        //3、事件处理
        //v-xx:指令
        //1、创建vue实例,关联页面的模板,将自己的数据(data)渲染到关联的模板,响应式的
        //2、指令来简化对dom的一些操作。
        //3、声明方法来做更复杂的操作。methods里面可以封装方法。
    </script>
</body>
v-text和v-html
v-text原样展示内容。
v-html会识别html标签,转化后显示。
v-bind
<body>

    <!-- 给html标签的属性绑定 -->
    <div id="app">

        <a v-bind:href="link">gogogo</a>

        <!-- class,style  {class名:加上?}-->
        <span v-bind:class="{active:isActive,'text-danger':hasError}"
          :style="{color: color1,fontSize: size}">你好</span>

    </div>

    <script src="./node_modules/vue/dist/vue.js"></script>

    <script>
        let vm = new Vue({
            el:"#app",
            data:{
                link: "http://www.baidu.com",
                isActive:true,
                hasError:true,
                color1:'red',
                size:'36px'
            }
        })
    </script>
</body>
v-model
<body>

    <!-- 表单项,自定义组件 -->
    <div id="app">
        精通的语言:
        <input type="checkbox" v-model="language" value="Java"> java<br />
        <input type="checkbox" v-model="language" value="PHP"> PHP<br />
        <input type="checkbox" v-model="language" value="Python"> Python<br />
        选中了 {{language.join(",")}}
    </div>

    <script src="./node_modules/vue/dist/vue.js"></script>

    <script>
        let vm = new Vue({
            el: "#app",
            data: {
                language: []
            }
        })
    </script>
</body>
v-on或@绑定事件
v-for
v-if和v-show
v-else和v-else-if
计算属性和过滤器
<body>
    <div id="app">
        <!-- 某些结果是基于之前数据实时计算出来的,我们可以利用计算属性。来完成 -->
        <ul>
            <li>西游记; 价格:{{xyjPrice}},数量:<input type="number" v-model="xyjNum"> </li>
            <li>水浒传; 价格:{{shzPrice}},数量:<input type="number" v-model="shzNum"> </li>
            <li>总价:{{totalPrice}}</li>
            {{msg}}
        </ul>
    </div>
    <script src="./node_modules/vue/dist/vue.js"></script>

    <script>
        //watch可以让我们监控一个值的变化。从而做出相应的反应。
        new Vue({
            el: "#app",
            data: {
                xyjPrice: 99.98,
                shzPrice: 98.00,
                xyjNum: 1,
                shzNum: 1,
                msg: ""
            },
            computed: {
                totalPrice() {
                    return this.xyjPrice * this.xyjNum + this.shzPrice * this.shzNum
                }
            },
            watch: {
                xyjNum(newVal, oldVal) {
                    if (newVal >= 3) {
                        this.msg = "库存超出限制";
                        this.xyjNum = 3
                    } else {
                        this.msg = "";
                    }
                }
            },
        })
    </script>

</body>
<body>
<!-- 过滤器常用来处理文本格式化的操作。过滤器可以用在两个地方:双花括号插值和 v-bind 表达式 -->
<div id="app">
<ul>
<li v-for="user in userList">
{{user.id}} ==> {{user.name}} ==> {{user.gender == 1?"男":"女"}} ==>
{{user.gender | genderFilter}} ==> {{user.gender | gFilter}}
</li>
</ul>
</div>
<script src="./node_modules/vue/dist/vue.js"></script>
<script>
Vue.filter("gFilter", function (val) {
if (val == 1) {
return "男~~~";
} else {
return "女~~~";
}
})
let vm = new Vue({
el: "#app",
data: {
userList: [
{ id: 1, name: 'jacky', gender: 1 },
{ id: 2, name: 'peter', gender: 0 }
]
},
filters: {
//filters 定义局部过滤器,只可以在当前vue实例中使用
genderFilter(val) {
if (val == 1) {
return "男";
} else {
return "女";
}
}
}
})
</script>
</body>
组件化
组件其实也是一个vue实例,因此它在定义时也会接收:data、methods、生命周期函等
不同的是组件不会与页面的元素绑定(所以不写el),否则就无法复用了,因此没有el属性。
但是组件渲染需要html模板,所以增加了template属性,值就是HTML模板
全局组件定义完毕,任何vue实例都可以直接在HTML中通过组件名称来使用组件了
data必须是一个函数,不再是一个对象。
<body>
    <div id="app">
        <button v-on:click="count++">我被点击了 {{count}} 次</button>
        <!-- 每个对象都是独立统计的-->
        <counter></counter>

        <button-counter></button-counter>
    </div>
    <script src="./node_modules/vue/dist/vue.js"></script>


    <script>
        //1、全局声明注册一个组件 // counter标签,代表button
        Vue.component("counter", {
            template: `<button v-on:click="count++">我被点击了 {{count}} 次</button>`,
            data() {
                return {
                    count: 1 // 数据
                }
            }
        });

        //2、局部声明一个组件
        const buttonCounter = {
            template: `<button v-on:click="count++">我被点击了 {{count}} 次~~~</button>`,
            data() {
                return {
                    count: 1
                }
            }
        };

        new Vue({
            el: "#app",
            data: {
                count: 1
            },
            components: { // 要用的组件
                'button-counter': buttonCounter
            }
        })
    </script>
</body>
生命周期和钩子函数
<body>
    <div id="app">
        <span id="num">{{num}}</span>
        <button @click="num++">赞!</button>
        <h2>{{name}},有{{num}}个人点赞</h2>
    </div>

    <script src="./node_modules/vue/dist/vue.js"></script>

    <script>
        let app = new Vue({
            el: "#app",
            data: {
                name: "张三",
                num: 100
            },
            methods: {
                show() {
                    return this.name;
                },
                add() {
                    this.num++;
                }
            },
            beforeCreate() {
                console.log("=========beforeCreate=============");
                console.log("数据模型未加载:" + this.name, this.num);
                console.log("方法未加载:" + this.show());
                console.log("html模板未加载:" + document.getElementById("num"));
            },
            created: function () {
                console.log("=========created=============");
                console.log("数据模型已加载:" + this.name, this.num);
                console.log("方法已加载:" + this.show());
                console.log("html模板已加载:" + document.getElementById("num"));
                console.log("html模板未渲染:" + document.getElementById("num").innerText);
            },
            beforeMount() {
                console.log("=========beforeMount=============");
                console.log("html模板未渲染:" + document.getElementById("num").innerText);
            },
            mounted() {
                console.log("=========mounted=============");
                console.log("html模板已渲染:" + document.getElementById("num").innerText);
            },
            beforeUpdate() {
                console.log("=========beforeUpdate=============");
                console.log("数据模型已更新:" + this.num);
                console.log("html模板未更新:" + document.getElementById("num").innerText);
            },
            updated() {
                console.log("=========updated=============");
                console.log("数据模型已更新:" + this.num);
                console.log("html模板已更新:" + document.getElementById("num").innerText);
            }
        });
    </script>
</body>
模块化
安装组件
sudo npm install webpack -g
sudo npm install -g @vue/cli-init
vue init webpack vue-demo
第六章 开发
6.1 配置网关路由和路径重写
将/api/**的请求负载均衡的路由到renren-fast
路径重写,将localhost:88/api/captcha.jpg重写为localhost:8080/renren-fast/captcha.jpg
spring:
  cloud:
    gateway:
      routes:
        - id: admin_route
          uri: lb://renren-fast
          predicates:
            - Path=/api/**
          filters:
            - RewritePath=/api/?(?<segment>.*), /renren-fast/$\{segment}
6.2 跨域问题
同源策略:协议、域名、端口都要相同,有一个不同都会产生跨域。
网关解决跨域问题。
@Configuration
public class GulimallCorsConfiguration {
    @Bean
    public CorsWebFilter corsFilter() {
        UrlBasedCorsConfigurationSource source = new UrlBasedCorsConfigurationSource();
        CorsConfiguration corsConfiguration = new CorsConfiguration();
        //1、配置跨域
        corsConfiguration.addAllowedHeader("*");
        corsConfiguration.addAllowedMethod("*");
        corsConfiguration.addAllowedOrigin("*");
        corsConfiguration.setAllowCredentials(true);
        source.registerCorsConfiguration("/**", corsConfiguration);
        return new CorsWebFilter(source);
    }
}
6.3 三级菜单功能实现
展示菜单
数据库初始化数据pms_catelog.sql
主要由三个字段呈现树形结构。
cat_id分类id自增, parent_id父类id,cat_level层级。
    @Override
    public List<CategoryEntity> listWithTree() {
        //1、查出所有分类
        List<CategoryEntity> entities = baseMapper.selectList(null);
        List<CategoryEntity> menus = entities.stream().filter(menu -> menu.getParentCid() == 0
        ).map(menu -> {
            menu.setChild(getChilds(menu, entities));
            return menu;
        }).sorted((o1, o2) -> {
            return (o1.getSort() == null ? 0 : o1.getSort()) - (o2.getSort() == null ? 0 : o2.getSort());
        }).collect(Collectors.toList());
        return menus;
    }

    //找到root菜单的所有子菜单
    private List<CategoryEntity> getChilds(CategoryEntity root, List<CategoryEntity> all) {
        List<CategoryEntity> childs = all.stream().filter(menu -> menu.getParentCid() == root.getCatId()
        ).map(menu -> {
            menu.setChild(getChilds(menu, all));
            return menu;
        }).sorted((o1, o2) -> {
            return (o1.getSort() == null ? 0 : o1.getSort()) - (o2.getSort() == null ? 0 : o2.getSort());
        }).collect(Collectors.toList());
        return childs;
    }
renren-fast-vue项目增加菜单

新增文件src/views/modules/product/category.vue
使用ElementUI的树形菜单。 添加请求菜单的方法,把数据存到menus中。
<template>
  <el-tree
    :data="menus"
    show-checkbox
    :props="defaultProps"
    :expand-on-click-node="false"
    node-key="catId"
  >
    <span class="custom-tree-node" slot-scope="{ node, data }">
      <span>{{ node.label }}</span>
      <span>
        <el-button
          v-if="node.level <= 2"
          type="text"
          size="mini"
          @click="() => append(data)"
          >Append</el-button
        >
        <el-button
          v-if="node.childNodes.length == 0"
          type="text"
          size="mini"
          @click="() => remove(node, data)"
          >Delete</el-button
        >
      </span>
    </span>
  </el-tree>
</template>
<script>
  data() {
    return {
      menus: [],
      defaultProps: {
        children: "child",
        label: "name",
      },
    };
  },
  methods: {
    handleNodeClick(data) {
      console.log(data);
    },
    getMenus() {
      this.$http({
        url: this.$http.adornUrl("/product/category/list/tree"),
        method: "get",
      }).then(({ data }) => {
        this.menus = data.data;
      });
    },
  },
  //监听属性 类似于data概念
  computed: {},
  //监控data中的数据变化
  watch: {},

  //生命周期 - 创建完成(可以访问当前this实例)
  created() {
    this.getMenus();
  },
</script>
逻辑删除菜单
修改product.entity.CategoryEntity实体类,添加上@TableLogic,表明使用逻辑删除:
	@TableLogic(value = "1",delval = "0")
	private Integer showStatus;
:default-expanded-keys="expandedKey" 表示默认展示的菜单
 <script>
		remove(node, data) {
      var ids = [data.catId];
      // 弹窗 确认
      this.$confirm(`是否删除【${data.name}】菜单?`, "提示", {
        confirmButtonText: "确定",
        cancelButtonText: "取消",
        type: "warning",
      })
        .then(() => {
          // 确定
          this.$http({
            // 给delete发送
            url: this.$http.adornUrl("/product/category/delete"),
            method: "post",
            data: this.$http.adornData(ids, false),
          }).then(({ data }) => {
            // 删除成功$message
            this.$message({
              message: "菜单删除成功",
              type: "success",
            });
            //删掉之后重新刷新菜单
            this.getMenus();
            //设置需要默认展开的菜单
            this.expandedKey = [node.parent.data.catId];
          });
        })
        .catch(() => {});
    }
 </script>
添加菜单
增加弹框el-dialog,数据与category绑定。默认不展示弹框,点击新增的时候展示弹框。点确定的时候提交表单。
  append(data) {
      console.log("append", data);
      this.dialogType = "add";
      this.title = "添加分类";
      this.dialogVisible = true;
      this.category.parentCid = data.catId;
      this.category.catLevel = data.catLevel * 1 + 1;
      this.category.catId = null;
      this.category.name = "";
      this.category.icon = "";
      this.category.productUnit = "";
      this.category.sort = 0;
      this.category.showStatus = 1;
    },
    addCategory(data) {
      console.log("提交的三级分类数据", this.category);
      this.$http({
        url: this.$http.adornUrl("/product/category/save"),
        method: "post",
        data: this.$http.adornData(this.category, false),
      }).then(({ data }) => {
        this.$message({
          message: "菜单保存成功",
          type: "success",
        });
        //关闭对话框
        this.dialogVisible = false;
        //刷新出新的菜单
        this.getMenus();
        //设置需要默认展开的菜单
        this.expandedKey = [this.category.parentCid];
      });
    },
修改菜单
增加修改按钮,点击修改的时候,展示对话框。
  <el-button type="text" size="mini" @click="() => edit(data)" >Edit</el-button >

    editCategory() {
      //只发自己想要发的数据
      var { catId, name, icon, productUnit } = this.category;
      var data = { catId, name, icon, productUnit };
      this.$http({
        url: this.$http.adornUrl("/product/category/update"),
        method: "post",
        data: this.$http.adornData(data, false),
      }).then(({ data }) => {
        // 修改成功$message
        this.$message({
          message: "菜单修改成功",
          type: "success",
        });
        //关闭对话框
        this.dialogVisible = false;
        //删掉之后重新刷新菜单
        this.getMenus();
        //设置需要默认展开的菜单
        this.expandedKey = [this.category.parentCid];
      });
    },
拖拽菜单
6.4 文件上传
阿里云OSS开通
https://oss.console.aliyun.com/登录自己支付宝账号开通。
增加gulimall-hzc,设置允许post跨域访问。
增加第三方项目模块third-party
增加模块gulimall-third-party,增加oss,web,feign,common依赖,不需要连数据库把common中的mybatis依赖排除。
 <dependencies>
        <dependency>
            <groupId>com.hzc.gulimall</groupId>
            <artifactId>gulimall-common</artifactId>
            <version>0.0.1-SNAPSHOT</version>
            <exclusions>
                <exclusion>
                    <groupId>com.baomidou</groupId>
                    <artifactId>mybatis-plus-boot-starter</artifactId>
                </exclusion>
            </exclusions>
        </dependency>
        <dependency>
            <groupId>org.springframework.boot</groupId>
            <artifactId>spring-boot-starter-web</artifactId>
        </dependency>
        <dependency>
            <groupId>org.springframework.cloud</groupId>
            <artifactId>spring-cloud-starter-openfeign</artifactId>
        </dependency>

        <dependency>
            <groupId>org.springframework.boot</groupId>
            <artifactId>spring-boot-starter-test</artifactId>
            <scope>test</scope>
        </dependency>
        <dependency>
            <groupId>com.alibaba.cloud</groupId>
            <artifactId>spring-cloud-starter-alicloud-oss</artifactId>
            <version>2.1.0.RELEASE</version>
            <type>pom</type>
        </dependency>
    </dependencies>
网关增加路由
        - id: third_party_route
          uri: lb://gulimall-third-party
          predicates:
            - Path=/api/thirdparty/**
          filters:
            - RewritePath=/api/thirdparty/?(?<segment>.*), /$\{segment}
文件上传Controller
@RestController
public class OssController {

    @Autowired
    OSS ossClient;

    @Value("${spring.cloud.alicloud.oss.endpoint}")
    private String endpoint;
    @Value("${spring.cloud.alicloud.oss.bucket}")
    private String bucket;

    @Value("${spring.cloud.alicloud.access-key}")
    private String accessId;


    @RequestMapping("/oss/policy")
    public R policy() {
        //https://gulimall-hello.oss-cn-beijing.aliyuncs.com/hahaha.jpg

        String host = "https://" + bucket + "." + endpoint; // host的格式为 bucketname.endpoint
        // callbackUrl为 上传回调服务器的URL,请将下面的IP和Port配置为您自己的真实信息。
//        String callbackUrl = "http://88.88.88.88:8888";
        String format = new SimpleDateFormat("yyyy-MM-dd").format(new Date());
        String dir = format + "/"; // 用户上传文件时指定的前缀。

        Map<String, String> respMap = null;
        try {
            long expireTime = 30;
            long expireEndTime = System.currentTimeMillis() + expireTime * 1000;
            Date expiration = new Date(expireEndTime);
            PolicyConditions policyConds = new PolicyConditions();
            policyConds.addConditionItem(PolicyConditions.COND_CONTENT_LENGTH_RANGE, 0, 1048576000);
            policyConds.addConditionItem(MatchMode.StartWith, PolicyConditions.COND_KEY, dir);

            String postPolicy = ossClient.generatePostPolicy(expiration, policyConds);
            byte[] binaryData = postPolicy.getBytes("utf-8");
            String encodedPolicy = BinaryUtil.toBase64String(binaryData);
            String postSignature = ossClient.calculatePostSignature(postPolicy);

            respMap = new LinkedHashMap<String, String>();
            respMap.put("accessid", accessId);
            respMap.put("policy", encodedPolicy);
            respMap.put("signature", postSignature);
            respMap.put("dir", dir);
            respMap.put("host", host);
            respMap.put("expire", String.valueOf(expireEndTime / 1000));
            // respMap.put("expire", formatISO8601Date(expiration));


        } catch (Exception e) {
            // Assert.fail(e.getMessage());
            System.out.println(e.getMessage());
        }

        return R.ok().put("data", respMap);
    }
}
服务端签名后直传
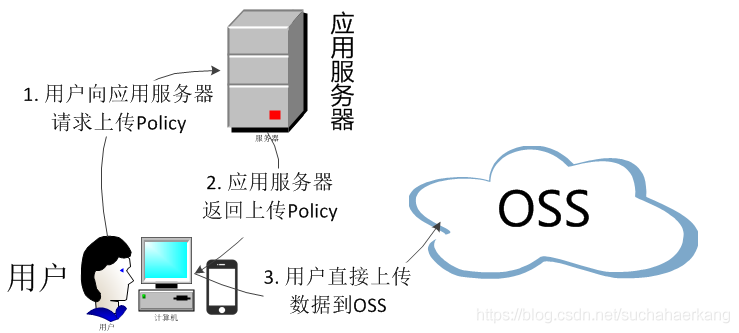
将上传组件upload文件夹加到src/components/中,upload.vue中修改地址 action="http://gulimall-hzc.oss-cn-shanghai.aliyuncs.com"
policy.js中修改第三方项目的地址/thirdparty/oss/policy
引入文件上传即可。
      <el-form-item label="品牌logo地址" prop="logo">
        <!-- <el-input v-model="dataForm.logo" placeholder="品牌logo地址"></el-input> -->
        <single-upload v-model="dataForm.logo"></single-upload>
      </el-form-item>

import SingleUpload from "@/components/upload/singleUpload";
export default {
  components: { SingleUpload }
6.5 统一异常处理
common项目增加状态码枚举
/***
 * 错误码和错误信息定义类
 * 1. 错误码定义规则为5为数字
 * 2. 前两位表示业务场景,最后三位表示错误码。例如:100001。10:通用 001:系统未知异常
 * 3. 维护错误码后需要维护错误描述,将他们定义为枚举形式
 * 错误码列表:
 *  10: 通用
 *      001:参数格式校验
 *  11: 商品
 *  12: 订单
 *  13: 购物车
 *  14: 物流
 *
 *
 */
public enum BizCodeEnume {
    UNKNOW_EXCEPTION(10000, "系统未知异常"),
    VAILD_EXCEPTION(10001, "参数格式校验失败");

    private int code;
    private String msg;

    BizCodeEnume(int code, String msg) {
        this.code = code;
        this.msg = msg;
    }

    public int getCode() {
        return code;
    }

    public String getMsg() {
        return msg;
    }
}
product项目集中处理所有异常
/**
 * 集中处理所有异常
 */
@Slf4j
@RestControllerAdvice(basePackages = "com.hzc.gulimall.product.controller")
public class GulimallExceptionControllerAdvice {
    @ExceptionHandler(value = MethodArgumentNotValidException.class)
    public R handleVaildException(MethodArgumentNotValidException e) {
        log.error("数据校验出现问题{},异常类型:{}", e.getMessage(), e.getClass());
        BindingResult bindingResult = e.getBindingResult();
        Map<String, String> errorMap = new HashMap<>();
        bindingResult.getFieldErrors().forEach((fieldError) -> {
            errorMap.put(fieldError.getField(), fieldError.getDefaultMessage());
        });
        return R.error(BizCodeEnume.VAILD_EXCEPTION.getCode(), BizCodeEnume.VAILD_EXCEPTION.getMsg()).put("data", errorMap);
    }

    @ExceptionHandler(value = Throwable.class)
    public R handleException(Throwable throwable) {
        log.error("错误:", throwable);
        return R.error(BizCodeEnume.UNKNOW_EXCEPTION.getCode(), BizCodeEnume.UNKNOW_EXCEPTION.getMsg());
    }
}
6.6 校验功能
JSR303后台校验
common项目pom.xml增加
  		 <dependency>
            <groupId>javax.validation</groupId>
            <artifactId>validation-api</artifactId>
            <version>2.0.1.Final</version>
        </dependency>
分组校验
controller里增加 @Validated(UpdateGroup.class)
entity里增加注解@URL(message = "logo必须是一个合法的url地址",groups={AddGroup.class,UpdateGroup.class})
自定义校验
编写一个自定义的校验注解
@Documented
@Constraint(validatedBy = { ListValueConstraintValidator.class })
@Target({ METHOD, FIELD, ANNOTATION_TYPE, CONSTRUCTOR, PARAMETER, TYPE_USE })
@Retention(RUNTIME)
public @interface ListValue {
    String message() default "{com.atguigu.common.valid.ListValue.message}";

    Class<?>[] groups() default { };

    Class<? extends Payload>[] payload() default { };

    int[] vals() default { };
}
编写一个自定义的校验器 ConstraintValidator
public class ListValueConstraintValidator implements ConstraintValidator<ListValue, Integer> {

    private Set<Integer> set = new HashSet<>();

    //初始化方法
    @Override
    public void initialize(ListValue constraintAnnotation) {

        int[] vals = constraintAnnotation.vals();
        for (int val : vals) {
            set.add(val);
        }

    }

    //判断是否校验成功

    /**
     * @param value   需要校验的值
     * @param context
     * @return
     */
    @Override
    public boolean isValid(Integer value, ConstraintValidatorContext context) {
        return set.contains(value);
    }
}
关联自定义的校验器和自定义的校验注解
@Constraint(validatedBy = { ListValueConstraintValidator.class })
common项目resource目录下增加文件ValidationMessages.properties,编写自定义错误提示
com.hzc.common.valid.ListValue.message=必须提交指定的值
使用自定义校验
	/**
	 * 显示状态[0-不显示;1-显示]
	 */
	@NotNull
	@ListValue(vals={0,1},groups = {AddGroup.class, UpdateStatusGroup.class})
	private Integer showStatus;
6.7 商品数据库设计
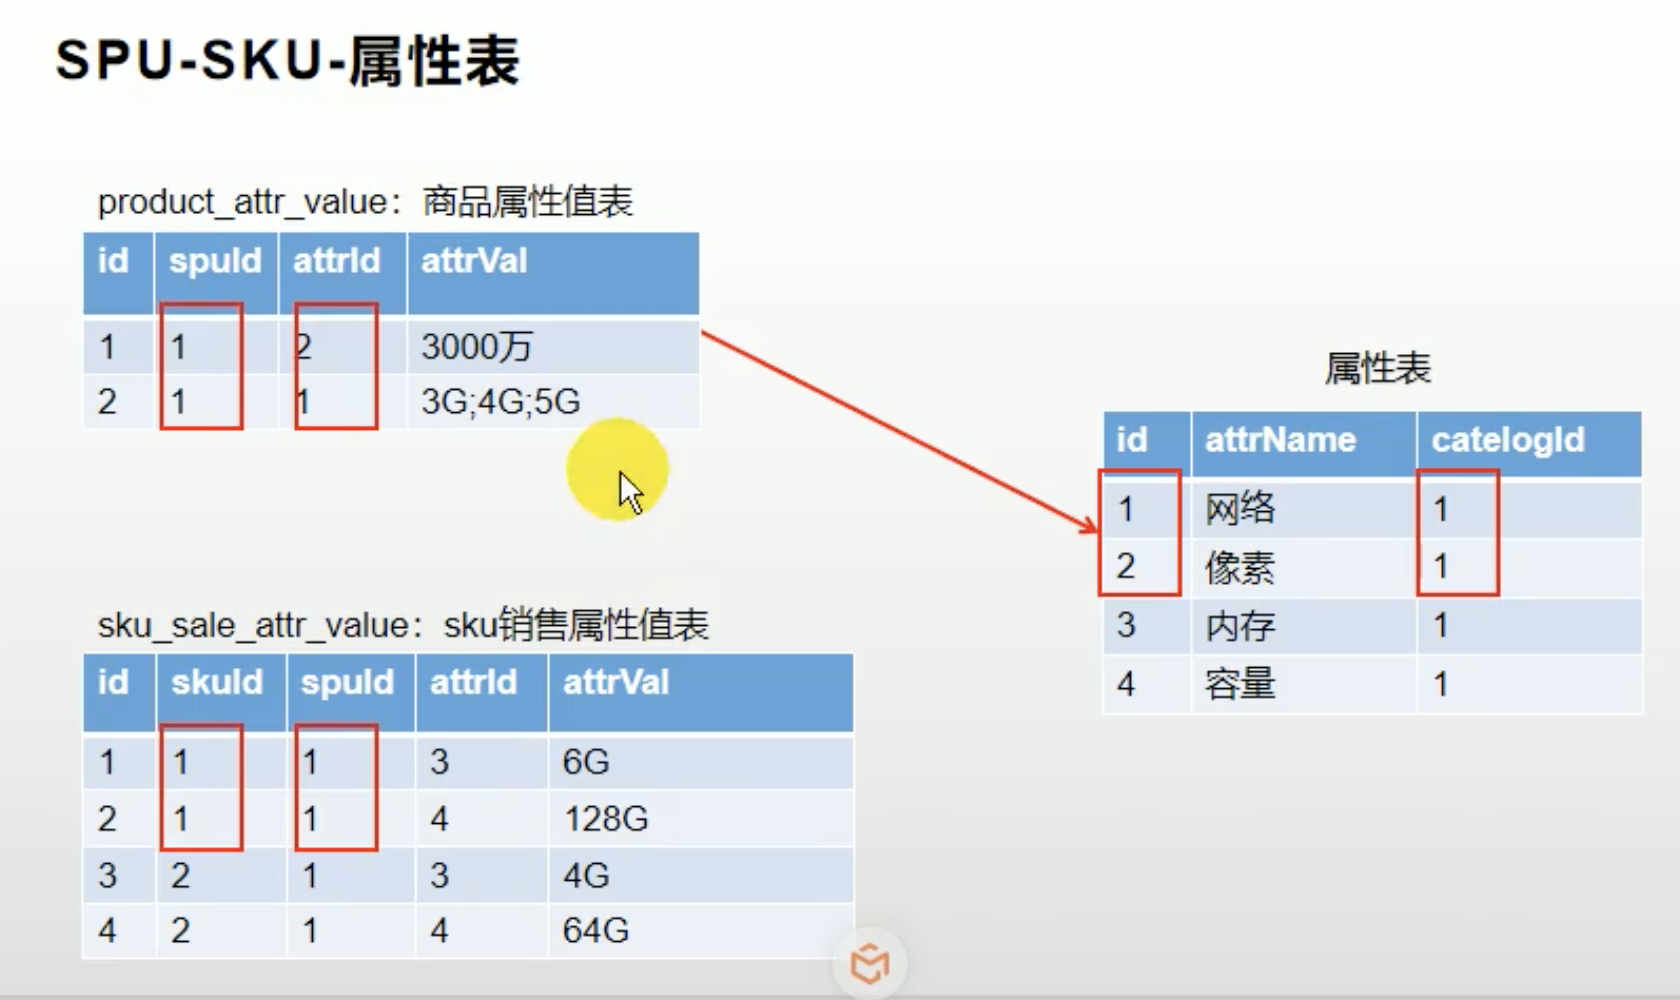
SPU与SKU:
SPU = Standard Product Unit (标准产品单位)
SKU = stock keeping unit(库存量单位)
iphone12就是SPU,iphone12 256G 白色就是SKU。

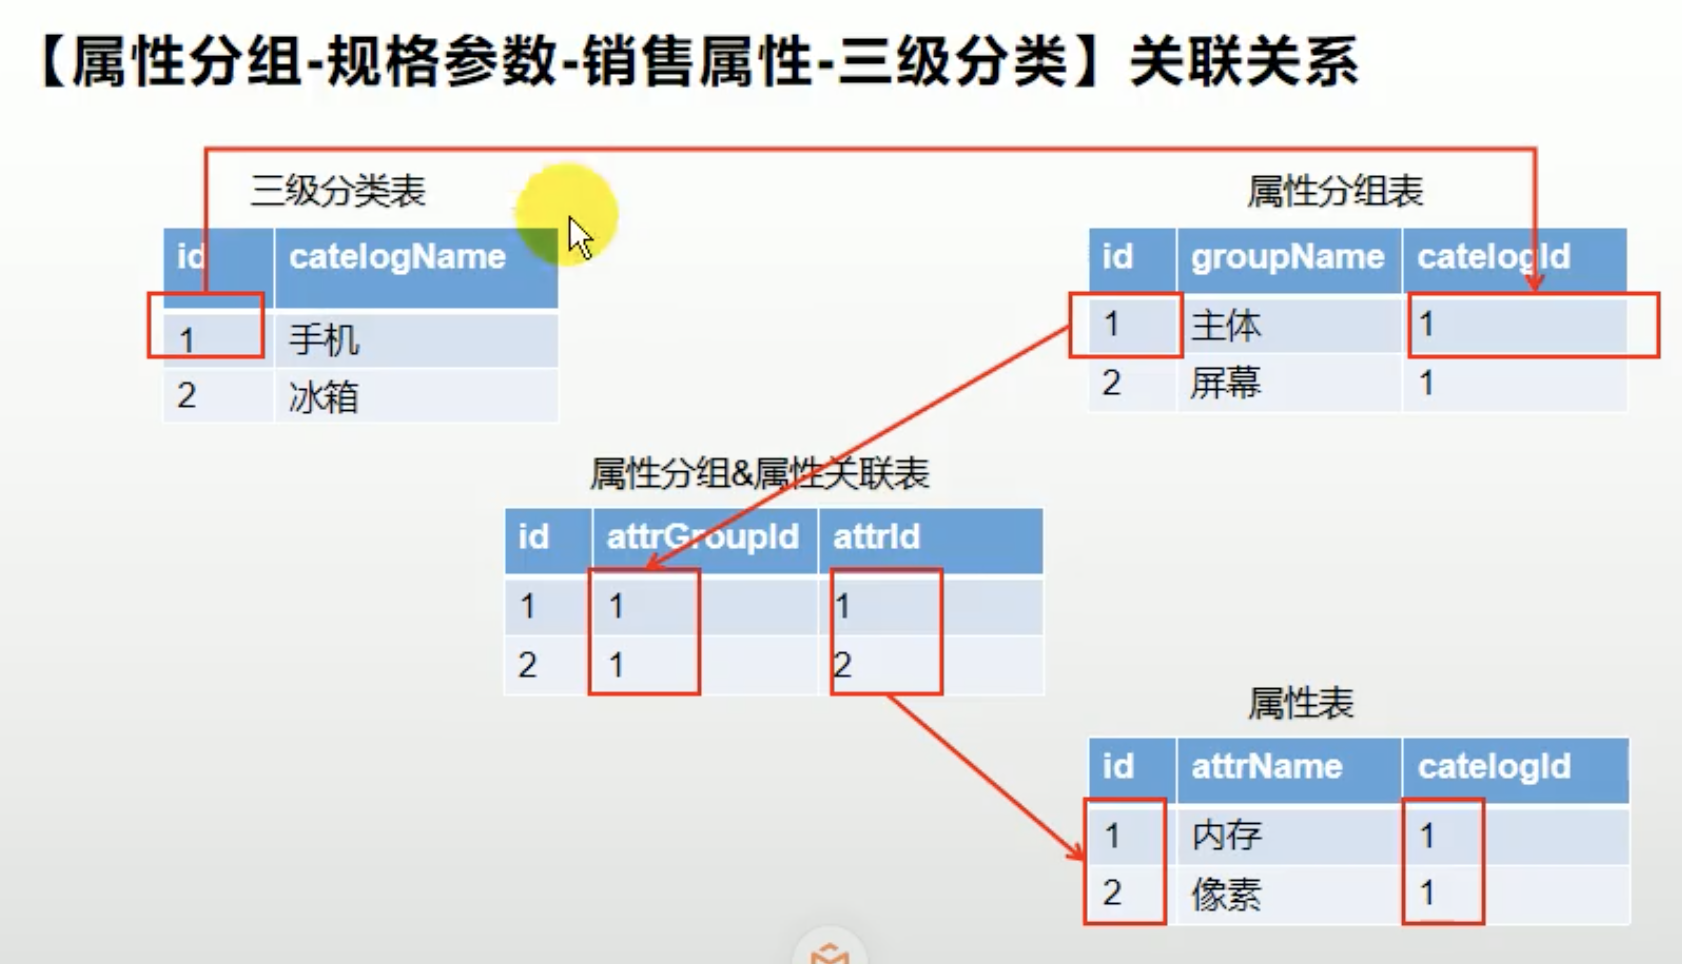
pms_attr属性表记录商品的属性,如图中入网型号、品牌等。
pms_attr_group属性分组表记录商品的分组,如图中主体。
pms_attr_attrgroup_relation记录属性表和分组表的关联关系。
pms_product_attr_value商品属性值表记录某个商品某个属性的值,如图中的华为。
pms_spu_info商品SPU信息表记录某个SPU的信息。
pms_sku_info商品SKU信息表记录某个SKU的信息。
pms_sku_sale_attr_balue商品SKU销售属性表记录销售属性的值。比如1号SKU颜色是蓝色。版本是6G+128G。
6.8 属性分组维护
对应商品系统-平台属性-属性分组。
用来增加某个分类有哪些分组。
加@JsonInclude注解后,不为空时才返回这个字段。
	//不为空时才返回
	@JsonInclude(JsonInclude.Include.NON_EMPTY)
	//不在数据表里的字段必须加这个注解
	@TableField(exist = false)
	private List<CategoryEntity> children;
6.9 MyBatis分页插件配置
创建com.hzc.gulimall.product.config.MyBatisConfig,注意开启事务注解
@Configuration
@EnableTransactionManagement//开启事务
@MapperScan("com.hzc.gulimall.product.dao")
public class MyBatisConfig {
    //引入分页插件
    @Bean
    public PaginationInterceptor paginationInterceptor() {
        PaginationInterceptor paginationInterceptor = new PaginationInterceptor();
        // 设置请求的页面大于最大页后操作, true调回到首页,false 继续请求  默认false
        paginationInterceptor.setOverflow(true);
        // 设置最大单页限制数量,默认 500 条,-1 不受限制
        paginationInterceptor.setLimit(1000);
        // 开启 count 的 join 优化,只针对部分 left join
        paginationInterceptor.setCountSqlParser(new JsqlParserCountOptimize(true));
        return paginationInterceptor;
    }
}
6.10 关联分类功能
品牌brand和分类category多对多的关系,比如小米既可以属于手机又可以属于电视,使用中间表pms_category_brand_relation存储。表中品牌名和分类名进行冗余设计。注意在代码中进行一致性维护,且在serviceImpl中增加事务。
比如在更新品牌的时候,判断品牌名是否为空,不为空,调用categoryBrandRelationService.updateBrand更改管关联表中的品牌名。
数据库修改两种方式,一种使用Wrapper
    @Override
    public void updateBrand(Long brandId, String name) {
        CategoryBrandRelationEntity entity = new CategoryBrandRelationEntity();
        entity.setBrandId(brandId);
        entity.setBrandName(name);
        this.update(entity, new UpdateWrapper<CategoryBrandRelationEntity>().eq("brand_id", brandId));
    }
一种使用SQL
    //dao里面注意带@Param
void updateCategory(@Param("catId") Long catId, @Param("name") String name);
    <update id="updateCategory">
        update `pms_category_brand_relation` set catelog_name = #{name} where catelog_id = #{catId}
    </update>
使用VO
接收页面传递来的数据,封装对象。
将业务处理完成的对象,封装成页面要用的数据。
使用TO
feign远程调用时使用TO。
Controller层
1.处理请求,接收和校验数据
2.交由service业务处理
3.接收service处理完的数据,封装页面指定的vo
    @GetMapping("/brand/list")
    public R relationBrandsList(@RequestParam(value = "catId", required = true) Long catId) {
        List<BrandEntity> brandEntities = categoryBrandRelationService.getBrandsByCatId(catId);
        List<BrandVo> collect = brandEntities.stream().map((item) -> {
            BrandVo brandVo = new BrandVo();
            brandVo.setBrandId(item.getBrandId());
            brandVo.setBrandName(item.getName());
            return brandVo;
        }).collect(Collectors.toList());
        return R.ok().put("data", collect);
    }
统一返回json时间格式转换
application.yml中添加
spring:
	jackson:
  	  date-format: yyyy-MM-dd HH:mm:ss