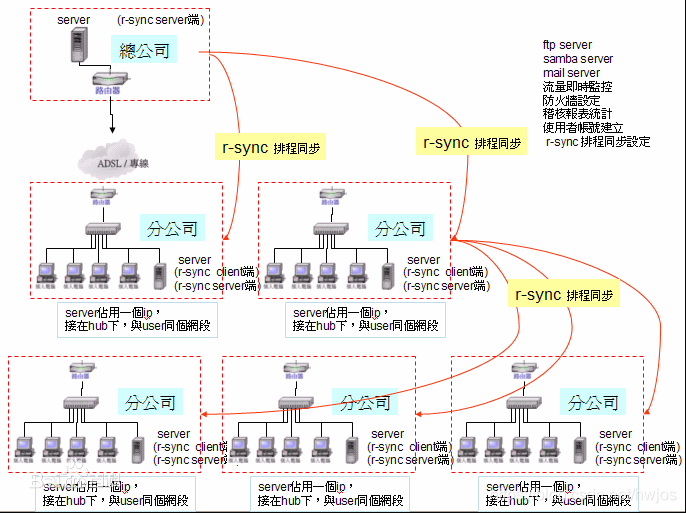
rsync简介:
rsync是可以实现增量备份的工具。配合任务计划,rsync能实现定时或间隔同步,配合inotify或sersync,可以实现触发式的实时同步。
rsync特性
rsync
- 可以镜像保存整个目录树和文件系统
- 可以很容易做到保持原来文件的权限、时间、软硬链接等等
- 无须特殊权限即可安装
- 快速:第一次同步时 rsync 会复制全部内容,但在下一次只传输修改过的文件。rsync 在传输数据的过程中可以实行压缩及解压缩操作,因此可以使用更少的带宽
- 安全:可以使用scp、ssh等方式来传输文件,当然也可以通过直接的socket连接。
- 支持匿名传输,以方便进行网站镜像
rsync的ssh认证协议
rsync命令来同步系统文件之前要先登录remote主机认证,认证过程中用到的协议有2种:
- ssh协议
- rsync协议
rsync server端不用启动rsync的daemon进程,只要获取remote host的用户名和密码就可以直接rsync同步文件
rsync server端因为不用启动daemon进程,所以也不用配置文件/etc/rsyncd.conf
ssh认证协议跟scp的原理是一样的,如果在同步过程中不想输入密码就用ssh-keygen -t rsa打通通道
//这种方式默认是省略了 -e ssh 的,与下面等价:
rsync -avz /SRC -e ssh root@172.16.12.129:/DEST
    -a  //文件宿主变化,时间戳不变
    -z  //压缩数据传输

//当遇到要修改端口的时候,我们可以:
rsync -avz /SRC -e "ssh -p2222" root@172.16.12.129:/DEST
//修改了ssh 协议的端口,默认是22
rsync命令
//rsync的命令格式常用有以下三种:
rsync [OPTION]… SRC DEST
rsync [OPTION]… SRC [USER@]HOST:DEST
rsync [OPTION]… [USER@]HOST:SRC DEST
安装rsync
[root@localhost ~]# yum -y install rsync

[root@localhost ~]# rsync anaconda-ks.cfg root@192.168.11.136:/tmp/
root@192.168.11.136's password:

[root@localhost tmp]# ls
anaconda-ks.cfg
systemd-private-e2f1f8f590b04c81bf943ca987cfff8e-chronyd.service-HoyZQM
vmware-root


[root@localhost ~]# rsyncroot@192.168.11.136:/tmp/anaconda-ks.cfg xixi
root@192.168.11.136's password:
[root@localhost ~]# ls
anaconda-ks.cfg  xixi
[root@localhost ~]#


[root@localhost ~]# rsync xixi -avz root@192.168.11.136:/tmp/
root@192.168.11.136's password:
sending incremental file list
xixi

sent 85 bytes  received 47 bytes  29.33 bytes/sec
total size is 1,193  speedup is 9.04


//rsync常用选项:
    -a, --archive       //归档
    -v, --verbose       //啰嗦模式
    -q, --quiet         //静默模式
    -r, --recursive     //递归
    -p, --perms         //保持原有的权限属性
    -z, --compress      //在传输时压缩,节省带宽,加快传输速度
    --delete            //在源服务器上做的删除操作也会在目标服务器上同步
rsyns+inotify
环境说明:
| 服务器类型 | IP地址 | 应用 操作系统 |
|---|---|---|
| 源服务器 | 192.168.11.131 | rsync notify-tools脚本 centos7/redhat7 |
| 目标服务器 | 192.168.11.137 | rsync centos7/redhat7 |
把源服务器上/etc目录实时同步到目标服务器的/tmp/下
在目标服务端上做以下操作
//关闭防火墙与SELINUX
[root@server ~]# systemctl stop firewalld
[root@server ~]# systemctl disable firewalld
[root@server ~]# getenforce
Enforcing
[root@server ~]#
//修改selinux改为disabled
[root@server ~]# vim /etc/selinux/config
//服务端和客户端都要安装rsync
[root@server ~]# yum -y install rsync
[root@server ~]# yum -y install rsync-damon
[root@client ~]# yum -y install rsync
[root@server ~]# vim  /etc/rsyncd.conf
//设置rsyncd.conf配置文件
[root@localhost ~]# vim /etc/rsyncd.conf

log file = /var/log/rsyncd.log    # 日志文件位置,启动rsync后自动产生这个文件,无需提前创建
pidfile = /var/run/rsyncd.pid     # pid文件的存放位置
lock file = /var/run/rsync.lock   # 支持max connections参数的锁文件
secrets file = /etc/rsync.pass    # 用户认证配置文件,里面保存用户名称和密码,必须手动创建这个文件

[etc_from_client]     # 自定义同步名称
path = /tmp/          # rsync服务端数据存放路径,客户端的数据将同步至此目录
comment = sync etc from client
uid = root        # 设置rsync运行权限为root
gid = root        # 设置rsync运行权限为root
port = 873        # 默认端口
ignore errors     # 表示出现错误忽略错误
use chroot = no       # 默认为true,修改为no,增加对目录文件软连接的备份
read only = no    # 设置rsync服务端为读写权限
list = no     # 不显示rsync服务端资源列表
max connections = 200     # 最大连接数
timeout = 600     # 设置超时时间
auth users = admin        # 执行数据同步的用户名,可以设置多个,用英文状态下逗号隔开
hosts allow = 172.16.12.128   # 允许进行数据同步的客户端IP地址,可以设置多个,用英文状态下逗号隔开
hosts deny = 192.168.1.1      # 禁止数据同步的客户端IP地址,可以设置多个,用英文状态下逗号隔开


//创建用户认证文件
[root@server ~]# echo 'admin:123'>/etc/rsync.pass
[root@server ~]# chmod 600 /etc/rsync.pass

[root@server ~]# chmod 600 /etc/rsync*


[tom@server ~]$ su - tom
[tom@server ~]$ cat  /etc/rsync.pass
cat: /etc/rsync.pass: Permission denied
[tom@server ~]$


[root@server ~]# systemctl enable rsyncd
Created symlink from /etc/systemd/system/multi-user.target.wants/rsyncd.service to /usr/lib/systemd/system/rsyncd.service.
[root@server ~]# systemctl start  rsyncd
[root@server ~]# ss -antl
State       Recv-Q Send-Q                   Local Address:Port                                  Peer Address:Port
LISTEN      0      5                                    *:873                                              *:*
LISTEN      0      128                                  *:22                                               *:*
LISTEN      0      100                          127.0.0.1:25                                               *:*
LISTEN      0      5                                   :::873                                             :::*
LISTEN      0      128                                 :::22                                              :::*
LISTEN      0      100                                ::1:25                                              :::*
[root@server ~]#


//服务端要关闭
//关闭防火墙与SELINUX
[root@server ~]# systemctl stop firewalld
[root@server ~]# systemctl disable firewalld
[root@server ~]# getenforce
Enforcingg
[root@server ~]#
//修改selinux改为disabled
[root@server ~]# vim /etc/selinux/config


//配置yum源
wget -O /etc/yum.repos.d/CentOS-Base.repo https://mirrors.aliyun.com/repo/Centos-8.repo

[root@client yum.repos.d]# vim CentOS-Base.repo
:%s/$releasever/8/g


非阿里云ECS用户会出现 Couldn't resolve host 'mirrors.cloud.aliyuncs.com' 信息,不影响使用。用户也可自行修改相关配置: eg:
sed -i -e '/mirrors.cloud.aliyuncs.com/d' -e '/mirrors.aliyuncs.com/d' /etc/yum.repos.d/CentOS-Base.repo
[root@client ~]# yum clean all 清理缓存

配置epel源
yum install -y https://mirrors.aliyun.com/epel/epel-release-latest-8.noarch.rpm
将 repo 配置中的地址替换为阿里云镜像站地址
sed -i 's|^#baseurl=https://download.fedoraproject.org/pub|baseurl=https://mirrors.aliyun.com|' /etc/yum.repos.d/epel*
sed -i 's|^metalink|#metalink|' /etc/yum.repos.d/epel*
[root@client yum.repos.d]# vim epel.repo
:%s/$releasever/8/g


//创建认证密码文件
[root@localhost ~]# echo '123456' > /etc/rsync.pass
//设置文件权限,只设置文件所有者具有读取、写入权限即可
[root@client ~]# chmod 600 /etc/rsync.pass


//在源服务器上创建测试目录,然后在源服务器运行以下命令

[root@client ~]# mkdir  /runtime
[root@client ~]# cd /runtime/
[root@client runtime]# touch 222
[root@client runtime]# touch 222456

[root@localhost ~]#  rsync -avH --port 873 --progress --delete /runtime admin@192.168.11.140::share --password-file=/etc/rsync.pass
sending incremental file list

sent 99 bytes  received 21 bytes  240.00 bytes/sec
total size is 0  speedup is 0.00
[root@localhost ~]#

//安装inotify-tools工具,实时触发rsync进行同步
//查看服务器内核是否支持inotify
[root@localhost ~]# ll /proc/sys/fs/inotify/
total 0
-rw-r--r-- 1 root root 0 Oct 18 21:19 max_queued_events
-rw-r--r-- 1 root root 0 Oct 18 21:19 max_user_instances
-rw-r--r-- 1 root root 0 Oct 18 21:19 max_user_watches
[root@localhost ~]#


//安装inotify-tools
[root@localhost ~]# yum -y install inotify-tools

//写同步脚本,此步乃最最重要的一步,请慎之又慎。让脚本自动去检测我们制定的目录下 \
//文件发生的变化,然后再执行rsync的命令把它同步到我们的服务器端去
[root@localhost ~]# mkdir /scripts
[root@localhost ~]# cd /scripts/
[root@localhost scripts]# touch inotify.sh
[root@localhost scripts]# chmod 755 inotify.sh
[root@localhost scripts]#
[root@localhost scripts]# vim inotify.sh

#!/bin/bash

host=192.168.11.140  src=/runtime     des=share
password=/etc/rsync.pass
user=admin
inotifywait=/usr/bin/inotifywait

$inotifywait -mrq --timefmt '%Y%m%d %H:%M' --format '%T %w%f%e' -e modify,delete,create,attrib $src \
        | while read files;do
    rsync -avzP --delete  --timeout=100 --password-file=${password} $src $user@$host::$des
        echo "${files} was rsynced" >>/tmp/rsync.log 2>&1
done

//启动脚本
[root@localhost ~]# nohup  /bin/bash /scripts/inotify.sh  &
[root@localhost runtime]# ps -ef |grep  inotify
root        1657    1268  0 21:32 pts/0    00:00:00 /bin/bash /scripts/inotify.sh
root        1658    1657  0 21:32 pts/0    00:00:00 /usr/bin/inotifywait -mrq --timefmt %Y%m%d %H:%M --format %T %w%f%e -e modify,delete,create,attrib /runtime
root        1659    1657  0 21:32 pts/0    00:00:00 /bin/bash /scripts/inotify.sh
root        1670    1268  0 21:34 pts/0    00:00:00 /bin/bash /scripts/inotify.sh
root        1671    1670  0 21:34 pts/0    00:00:00 /usr/bin/inotifywait -mrq --timefmt %Y%m%d %H:%M --format %T %w%f%e -e modify,delete,create,attrib /runtime
root        1672    1670  0 21:34 pts/0    00:00:00 /bin/bash /scripts/inotify.sh
root        1757    1268  0 21:43 pts/0    00:00:00 /bin/bash /scripts/inotify.sh
root        1758    1757  0 21:43 pts/0    00:00:00 /usr/bin/inotifywait -mrq --timefmt %Y%m%d %H:%M --format %T %w%f%e -e modify,delete,create,attrib /runtime
root        1759    1757  0 21:43 pts/0    00:00:00 /bin/bash /scripts/inotify.sh
root        1760    1631  0 21:43 pts/1    00:00:00 /bin/bash /scripts/inotify.sh
root        1761    1760  0 21:43 pts/1    00:00:00 /usr/bin/inotifywait -mrq --timefmt %Y%m%d %H:%M --format %T %w%f%e -e modify,delete,create,attrib /runtime
root        1762    1760  0 21:43 pts/1    00:00:00 /bin/bash /scripts/inotify.sh
root        1778    1268  0 21:45 pts/0    00:00:00 grep --color=auto inotify


[root@localhost runtime]# touch abs

[root@localhost runtime]# ls
a  abs  b

//查看inotify生成的日志
[root@localhost ~]# tail /tmp/rsync.log
20201018 21:44 /runtime/absCREATE was rsynced
20201018 21:44 /runtime/absATTRIB was rsynced
20201018 21:44 /runtime/absCREATE was rsynced
20201018 21:44 /runtime/absATTRIB was rsynced
20201018 21:44 /runtime/absCREATE was rsynced
20201018 21:44 /runtime/absCREATE was rsynced
20201018 21:44 /runtime/absATTRIB was rsynced
20201018 21:44 /runtime/absATTRIB was rsynced


设置脚本开机自动启动:

[root@localhost ~]# chmod +x /etc/rc.d/rc.local
[root@localhost ~]# ll /etc/rc.d/rc.local
-rwxr-xr-x. 1 root root 474 Mar 24  2020 /etc/rc.d/rc.local

[root@localhost ~]# echo 'nohup /bin/bash /scripts/inotify.sh' >> /etc/rc.d/rc.local

[root@localhost ~]# reboot   //重启
 [root@localhost ~]# ps -ef|grep inotify
root         949       1  0 22:00 ?        00:00:00 /bin/bash /scripts/inotify.sh
root         957     949  0 22:00 ?        00:00:00 /usr/bin/inotifywait -mrq --timefmt %Y%m%d %H:%M --format %T %w%f%e -e modify,delete,create,attrib /runtime
root         958     949  0 22:00 ?        00:00:00 /bin/bash /scripts/inotify.sh
root        1265    1230  0 22:01 pts/2    00:00:00 grep --color=auto inotify
[root@localhost ~]#

//到目标服务器上去查看是否把新生成的文件自动传上去了:
[root@localhost ~]# cd /tmp/
[root@localhost tmp]# pwd
/tmp
[root@localhost tmp]# ls
runtime
systemd-private-23d3ed414e974db8965fb20a39a96ed5-chronyd.service-qNAes6
systemd-private-5e85a62be35740588ea9053a4006f7c3-chronyd.service-TR7Wm9
vmware-root
[root@localhost tmp]#
版权声明:本文为hwjos原创文章,遵循CC 4.0 BY-SA版权协议,转载请附上原文出处链接和本声明。