一、Eureka创建服务中心在页面展示
1.前置工作,先创建spring initializr父工程myek,父pom文件修改并添加相关依赖
<properties>
    <java.version>1.8</java.version>
    <project.build.sourceEncoding>UTF-8</project.build.sourceEncoding>
    <project.reporting.outputEncoding>UTF-8</project.reporting.outputEncoding>
    <spring-boot.version>2.3.2.RELEASE</spring-boot.version>
    <spring-cloud.version>Hoxton.SR9</spring-cloud.version>
</properties>

<dependencies>
    <dependency>
        <groupId>org.springframework.boot</groupId>
        <artifactId>spring-boot-starter</artifactId>
    </dependency>
    <dependency>
        <groupId>org.projectlombok</groupId>
        <artifactId>lombok</artifactId>
    </dependency>
    <dependency>
        <groupId>org.springframework.boot</groupId>
        <artifactId>spring-boot-starter-web</artifactId>
    </dependency>
    <dependency>
        <groupId>org.springframework.boot</groupId>
        <artifactId>spring-boot-starter-test</artifactId>
        <scope>test</scope>
        <exclusions>
            <exclusion>
                <groupId>org.junit.vintage</groupId>
                <artifactId>junit-vintage-engine</artifactId>
            </exclusion>
        </exclusions>
    </dependency>
</dependencies>

<dependencyManagement>
    <dependencies>
        <dependency>
            <groupId>org.springframework.boot</groupId>
            <artifactId>spring-boot-dependencies</artifactId>
            <version>${spring-boot.version}</version>
            <type>pom</type>
            <scope>import</scope>
        </dependency>
        <dependency>
            <groupId>org.springframework.cloud</groupId>
            <artifactId>spring-cloud-dependencies</artifactId>
            <version>${spring-cloud.version}</version>
            <type>pom</type>
            <scope>import</scope>
        </dependency>
    </dependencies>
</dependencyManagement>
2.正式创建Maven子模块 myek-regserver
(1) 先在pom文件中增加依赖
<dependencies> <dependency> <groupId>org.springframework.cloud</groupId> <artifactId>spring-cloud-starter-netflix-eureka-server</artifactId> </dependency> </dependencies>
(2)启动类上加开启Eureka服务注解
@SpringBootApplication
@EnableEurekaServer //开启服务
public class RegServerApplication {
public static void main(String[] args) {
SpringApplication.run(RegServerApplication.class,args);
}
}(3)resources下新建 application.yml
spring: application: # 应用名字,eureka 会根据它作为服务id name: regserver server: port: 9100 eureka: client: service-url: # eureka server 的地址, 咱们单实例模式就写自己好了 defaultZone: http://localhost:9100/eureka/ register-with-eureka: false # 不向eureka server 注册自己 fetch-registry: false # 不向eureka server 获取服务列表
(4)打开页面,即可看到eureka服务中心
浏览器打开输入 localhost:9100
二、创建子模块Eureka myek-myprovider---->服务提供者
1.创建服务提供者
(1)新建子module,maven 下一步,修改名字myek-myprovider---->服务提供者 pom文件加依赖 <dependencies> <dependency> <groupId>org.springframework.cloud</groupId> <artifactId>spring-cloud-starter-netflix-eureka-client</artifactId> </dependency> </dependencies>
(2)resources下新建 application.yml
spring:
  application:
    name: myprovider
server:
  port: 9101
eureka:
  client:
    service-url:
      defaultZone: http://localhost:9100/eureka   #注册地址,到哪注册
3.启动类上加@EnableDiscoveryClient注解
@SpringBootApplication
@EnableDiscoveryClient
public class ProviderApplication {
public static void main(String[] args) {
SpringApplication.run(ProviderApplication.class,args);
}
}
4.controller包下新建类InitCtrl
@RestController
@RequestMapping("/myprov")
public class InitCtrl {
@RequestMapping(value = "/hello",method = RequestMethod.GET)
public String sayHello(){
return "hello,world";
}
}
----启动,浏览器输入http://localhost:9101/myprov/hello
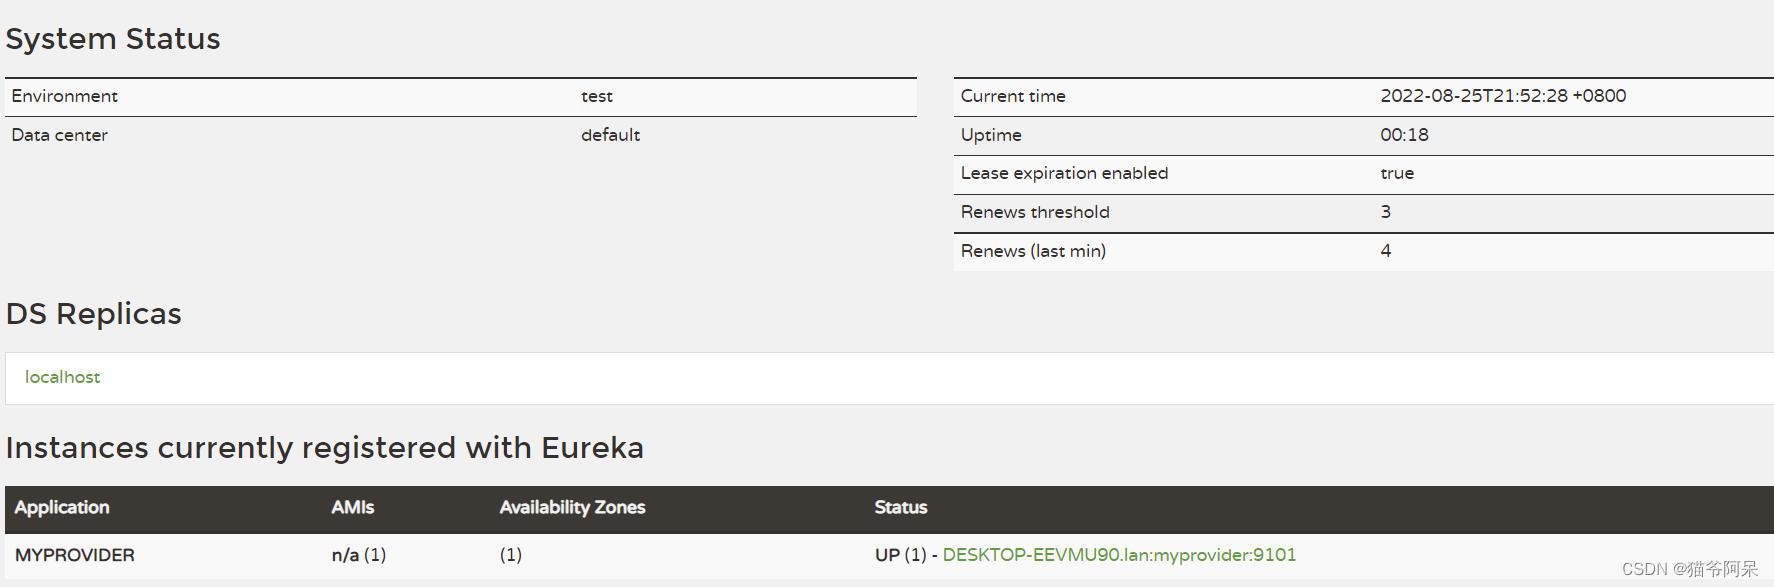
eureka服务中心会出现MYPROVIDER如图:
三、创建子模块Eureka myek-myconsumer---->服务调用者 (调用服务两种方式)
1.方式1:第一种httpclient 帮助理解相当于ajax-
继续新建子module,maven 下一步,修改名字myek-myconsumer---->服务调用者
(1)pom下加依赖--->
<dependencies>
<!-- <dependency>
<groupId>org.springframework.cloud</groupId>
<artifactId>spring-cloud-starter-netflix-eureka-client</artifactId>
</dependency> -->先注释掉,此种方式有它就必须注册
<dependency>
<groupId>org.apache.httpcomponents</groupId>
<artifactId>httpclient</artifactId>
<version>4.5.2</version>
</dependency>
<dependency>
<groupId>com.alibaba</groupId>
<artifactId>fastjson</artifactId>
<version>1.2.47</version>
</dependency>
</dependencies>
(2)resources下新建 application.yml
spring:
application:
name: myconsumer
server:
port: 9102
(3)新建类com.kgc.myek.myconsumer.ConsumerApplication
@SpringBootApplication
public class ConsumerApplication {
public static void main(String[] args) {
SpringApplication.run(ConsumerApplication.class,args);
}
}
(4)新建类com.kgc.myek.myconsumer.controller.ConsumerCtrl
@RestController
@RequestMapping("/mycons")
public class ConsumerCtrl {
@RequestMapping(value = "/find",method = RequestMethod.GET)
public String say(){
//ajax调用provideer 程序接口
CloseableHttpClient client = HttpClientBuilder.create().build();
//生成一个远程调用的地址
HttpGet addr = new HttpGet("http://localhost:9101/myprov/hello");
String infos = null;
try {
//向远程服务器发送消息,并获得response响应
CloseableHttpResponse response = client.execute(addr);
//从响应中获取远程的数据
infos = EntityUtils.toString(response.getEntity());
} catch (IOException e) {
e.printStackTrace();
}
//返回给用户
return infos+",myh";
}
}
----浏览器输入地址localhost:9102/mycons/find2. 方式2:第二种RestTemplate
第二种:RestTemplate ---->须熟练掌握
(1)先写个配置类com.kgc.myek.myconsumer.config.RemoteConfiguration
@Configuration
public class RemoteConfiguration {
@Bean
public RestTemplate getTemplate(){
return new RestTemplate();
}
}
(2)修改ConsumerCtrl代码
@RestController
@RequestMapping("/mycons2")
public class ConsumerCtrl1 {
@Autowired
private RestTemplate template;
@GetMapping(value = "/find2")
public String sayh(){
return template.getForObject("http://localhost:9101/myprov/hello",String.class)+",xxx";
}
}
---------浏览器输入地址:http://localhost:9102/mycons2/find2------
此方法有弊端,端口号,地址等在程序中写死了,如果地址等发生变化,就会报错,除非改掉相应地方,微服中地址太多,修改方案不可行,所以必须用openfeign正确方式3:调用远程连接,使用Openfeign远程调用
(1)添加spring-cloud-starter-openfeign依赖
修改myconsumer的pom文件,dependencies变为: <dependencies> <dependency> <groupId>org.springframework.cloud</groupId> <artifactId>spring-cloud-starter-netflix-eureka-client</artifactId> </dependency> <dependency> <groupId>org.springframework.cloud</groupId> <artifactId>spring-cloud-starter-openfeign</artifactId> </dependency> </dependencies>
(2) 修改yml文件
yml文件修改为
spring:
  application:
    name: myconsumer
server:
  port: 9102
eureka:
  client:
    service-url:
      defaultZone: http://localhost:9100/eureka/
(3)启动类加注解
ConsumerApplication类加@EnableFeignClients 注解:
@SpringBootApplication
@EnableFeignClients
public class ConsumerApplication {
    public static void main(String[] args) {
        SpringApplication.run(ConsumerApplication.class,args);
    }
}
(4) 新建接口com.kgc.myek.myconsumer.remoteservice.HelloService
新建接口com.kgc.myek.myconsumer.remoteservice.HelloService
注意:consumer在调用provider时,按名字在注册中心查的是 工程名/模块名/接口名
@Component //MYPROVIDER为工程名
@FeignClient(value = "MYPROVIDER",path = "/myprov") //path为模块名
public interface HelloService {
//"/hello" 为接口名
@RequestMapping(value = "/hello",method = RequestMethod.GET)
public String sayHello();
}注意:此处用的openfeign,意味着比如某个消费者想要调用某个服务提供者的方法,我们可以设置个接口,在注解中设置,要调用的服务的服务名,和具体的controller跳转地址,方法名和对应的url不变。
(5)在controller中注入刚创建的接口,并调用其方法
ConsumerCtrl 改为
@RestController
@RequestMapping("/mycons")
public class ConsumerCtrl {
@Resource
private HelloService helloService;
@RequestMapping("/myms")
public String says(){
return helloService.sayHello()+",yyds";
}
}
---------浏览器输入地址:localhost:9102/mycons/myms------版权声明:本文为weixin_42433978原创文章,遵循CC 4.0 BY-SA版权协议,转载请附上原文出处链接和本声明。