文章目录
前言
本章主要是介绍CNN的手推过程,展示了CNN正向和反向传播的推导过程,然后用代码手动模拟了卷积的过程,并把计算出来的结果与nn.conv2d计算出来的结果进行验证。
一、CNN手推过程
1. 如下图所示,这是我们要手推的一层神经网络结构。首先是把4 * 3的矩阵X与2 * 3的矩阵U进行卷积,卷积的过程就是指从矩阵x中取与矩阵U一样大小区域进行点对点乘,然后从左到右,从上到下按Z字形滑动,重复进行上述操作至结束,再把得到3 * 1矩阵S的结果通过Relu得到3 * 1的矩阵P,对P做max pooling得到1 * 1的结果,然后再进行softmax。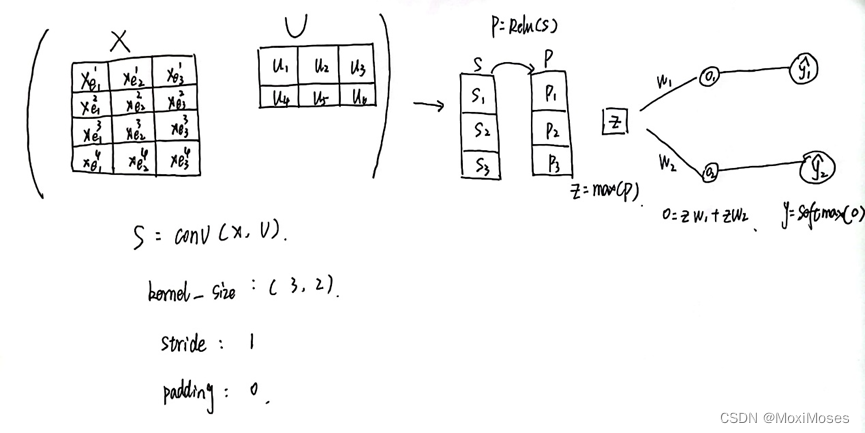
2. 如下图所示,这是我们要初始化结构中的参数,此次要优化的参数是U和W。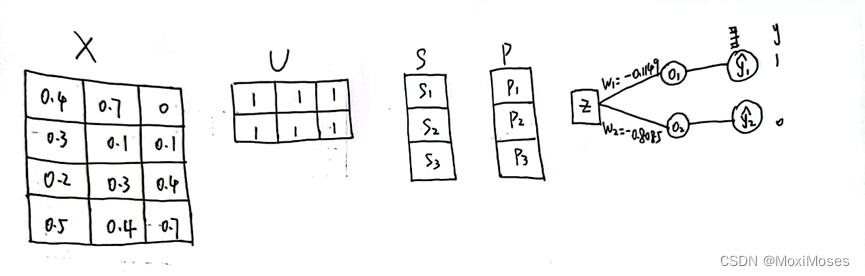
3. 如下图所示,进行卷积后得到3 * 1的结果,然后Relu作为激活函数,得到3 * 1的结果(输入的值大于0取本身,小于0取0),再做max pooling得到2.5(maxpooling取最大值),然后把2.5作为softmax的输入,最后得到结果。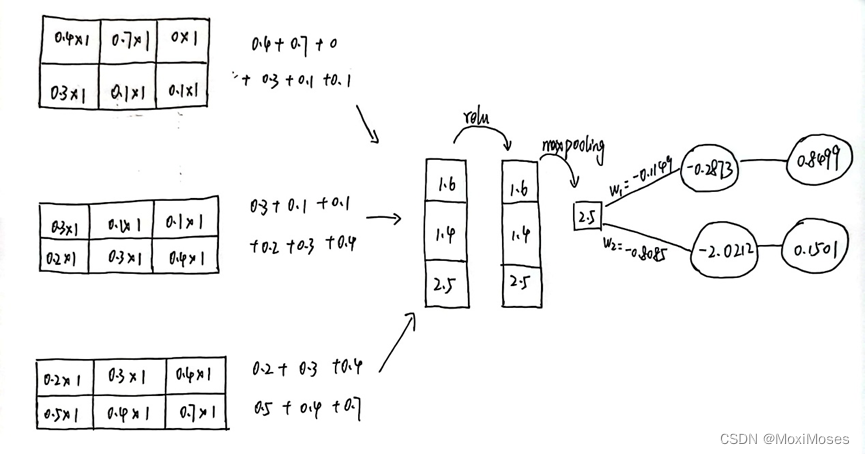
4. 如下图所示,这是反向传播得到的微分值。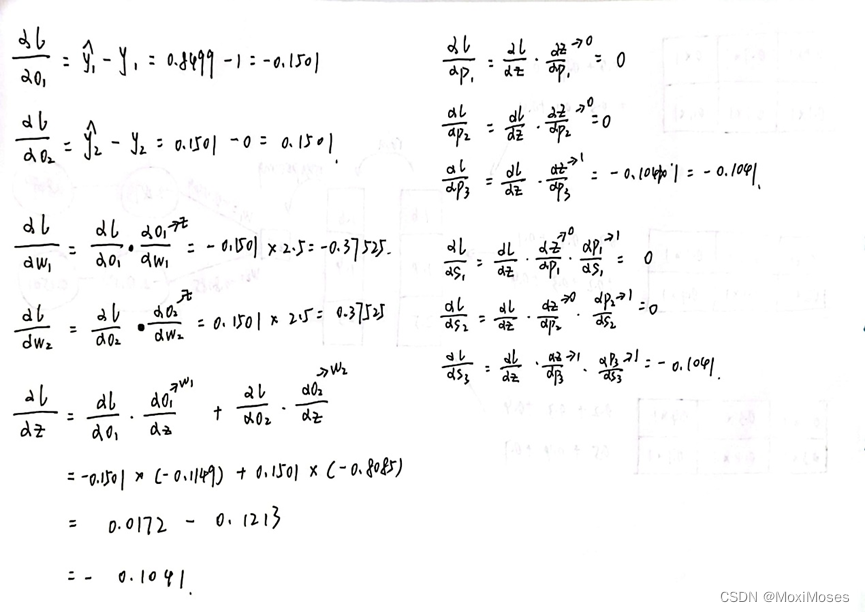
5. 如下图所示,我们可以通过loss对u1求导的过程,去求出loss对U求导的结果。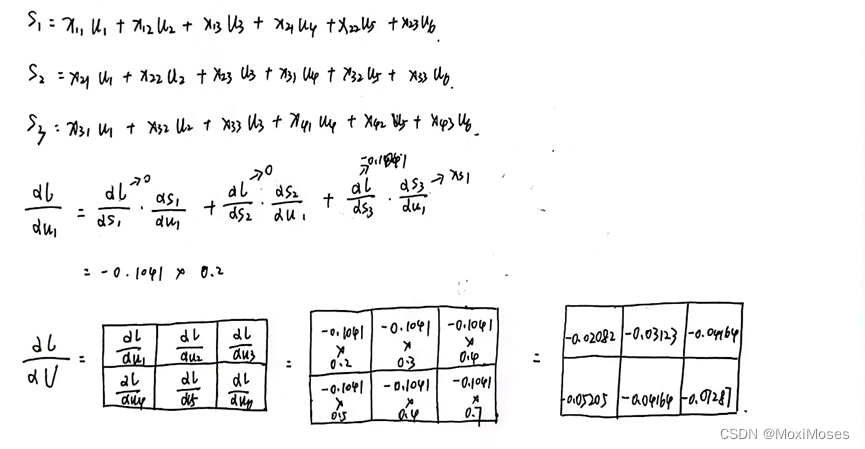
6. 如下图所示,根据所计算出来的gradient,去更新参数(这里的α为learn rate,我们把它定为1)。
二、代码实现PyTorch二维卷积
1.用原始的矩阵运算来实现二维卷积,不考虑batch-size维度和channel维度
1)首先初始化一些张量,随机生成5 * 5的卷积输入特征图,3 * 3的卷积核,bias(默认输出通道数目为1)。定义一个矩阵滑动相乘来实现PyTorch的二维卷积的方法,最后输出矩阵运算实现卷积的结果,并与PyTorch API卷积的结果进行验证。
input = torch.randn(5, 5)  # 卷积输入特征图
kernel = torch.randn(3, 3)  # 卷积核
bias = torch.randn(1)  # 卷积偏置,默认输出通道数目等于1


#step1 用原始的矩阵运算来实现二维卷积,不考虑batch-size维度和channel维度
def matrix_multiplication_for_conv2d(input, kernel, bias=0, stride=1, padding=0):
    if padding > 0:
        input = F.pad(input, (padding, padding, padding, padding))

    input_h, input_w = input.shape
    kernel_h, kernel_w = kernel.shape

    output_h = (floor((input_h - kernel_h) / stride) + 1)  # 卷积输出的高度
    output_w = (floor((input_w - kernel_w) / stride) + 1)  # 卷积输出的宽度
    output = torch.zeros(output_h, output_w)  # 初始化输出矩阵

    for i in range(0, input_h - kernel_h + 1, stride):  # 对高度维进行遍历
        for j in range(0, input_w - kernel_w + 1, stride):  # 对宽度维进行遍历
            region = input[i:i + kernel_h, j:j + kernel_w]  # 取出被核滑动到的区域
            output[int(i / stride), int(j / stride)] = torch.sum(region * kernel) + bias  # 点乘,并赋值给输出位置的元素

    return output


#矩阵运算实现卷积的结果
mat_mul_conv_output = matrix_multiplication_for_conv2d(input, kernel, bias=bias, padding=1)
print(mat_mul_conv_output)

#调用PyTorch API卷积的结果
pytorch_api_conv_output = F.conv2d(input.reshape((1, 1, input.shape[0], input.shape[1])),
                                   kernel.reshape((1, 1, kernel.shape[0], kernel.shape[1])),
                                   padding=1,
                                   bias=bias).squeeze(0).squeeze(0)
print(pytorch_api_conv_output)

#验证成功,矩阵乘法实现的卷积跟PyTorch API的结果一致
flag1 = torch.allclose(mat_mul_conv_output, pytorch_api_conv_output)
print(flag1)
2)如下图所示,验证结果正确。
2.用原始的矩阵运算来实现二维卷积,不考虑batch-size维度和channel维度, flatten版本
这里采用了向量内积的方法,也就是用flatten将矩阵拉直,然后把两个拉直后的矩阵按照向量相乘计算后得到结果。最后输出矩阵运算实现卷积的结果,并与PyTorch API卷积的结果进行验证。
#step2 用原始的矩阵运算来实现二维卷积,不考虑batch-size维度和channel维度, flatten版本
def matrix_multiplication_for_conv2d_flatten(input, kernel, bias=0, stride=1, padding=0):
    if padding > 0:
        input = F.pad(input, (padding, padding, padding, padding))

    input_h, input_w = input.shape
    kernel_h, kernel_w = kernel.shape

    output_h = (floor((input_h - kernel_h) / stride) + 1)  # 卷积输出的高度
    output_w = (floor((input_w - kernel_w) / stride) + 1)  # 卷积输出的宽度
    output = torch.zeros(output_h, output_w)  # 初始化输出矩阵

    region_matrix = torch.zeros(output.numel(), kernel.numel())  # 存储着所有拉直后的特征区域
    kernel_matrix = kernel.reshape((kernel.numel(), 1))  # kernel的列向量(矩阵)形式
    row_index = 0
    for i in range(0, input_h - kernel_h + 1, stride):  # 对高度维进行遍历
        for j in range(0, input_w - kernel_w + 1, stride):  # 对宽度维进行遍历
            region = input[i:i + kernel_h, j:j + kernel_w]  # 取出被核滑动到的区域
            region_vector = torch.flatten(region)
            region_matrix[row_index] = region_vector
            row_index += 1

    output_matrix = region_matrix @ kernel_matrix
    output = output_matrix.reshape((output_h, output_w)) + bias

    return output


#矩阵运算实现卷积的结果,flatten input版本
mat_mul_conv_output_flatten = matrix_multiplication_for_conv2d_flatten(input, kernel, bias=bias, stride=2, padding=1)
print(mat_mul_conv_output_flatten)

pytorch_api_conv_output_flatten = F.conv2d(input.reshape((1, 1, input.shape[0], input.shape[1])),
                                           kernel.reshape((1, 1, kernel.shape[0], kernel.shape[1])),
                                           padding=1,
                                           bias=bias, stride=2).squeeze(0).squeeze(0)
print(pytorch_api_conv_output_flatten)

#验证了flatten版本卷积与PyTorch官方卷积的结果正确
flag2 = torch.allclose(mat_mul_conv_output_flatten, pytorch_api_conv_output_flatten)
print(flag2)
2)如下图所示,验证结果正确。
3.用原始的矩阵运算来实现二维卷积,考虑batch-size维度和channel维度
这里考虑了batch-size维度和channel维度的情况,最后输出矩阵运算实现卷积的结果,并与PyTorch API卷积的结果进行验证。
#step3 用原始的矩阵运算来实现二维卷积,考虑batch-size维度和channel维度
def matrix_multiplication_for_conv2d_full(input, kernel, bias=0, stride=1, padding=0):
    # input, kernel都是4维的张量
    if padding > 0:
        input = F.pad(input, (padding, padding, padding, padding, 0, 0, 0, 0))

    bs, in_channel, input_h, input_w = input.shape
    out_channel, in_channel, kernel_h, kernel_w = kernel.shape
    if bias is None:
        bias = torch.zeros(out_channel)

    output_h = (floor((input_h - kernel_h) / stride) + 1)  # 卷积输出的高度
    output_w = (floor((input_w - kernel_w) / stride) + 1)  # 卷积输出的宽度
    output = torch.zeros(bs, out_channel, output_h, output_w)  # 初始化输出矩阵

    for ind in range(bs):
        for oc in range(out_channel):
            for ic in range(in_channel):
                for i in range(0, input_h - kernel_h + 1, stride):  # 对高度维进行遍历
                    for j in range(0, input_w - kernel_w + 1, stride):  # 对宽度维进行遍历
                        region = input[ind, ic, i:i + kernel_h, j:j + kernel_w]  # 取出被核滑动到的区域
                        # 点乘,并赋值给输出位置的元素
                        output[ind, oc, int(i / stride), int(j / stride)] += torch.sum(region * kernel[oc, ic])
            output[ind, oc] += bias[oc]

    return output


input = torch.randn(2, 2, 5, 5)  # bs*in_channel*in_h*in_w
kernel = torch.randn(3, 2, 3, 3)  # out_channel*in_channel*kernel_h*kernel_w
bias = torch.randn(3)

#验证matrix_multiplication_for_conv2d_full与PyTorch官方API的结果一致性
pytorch_conv2d_api_output = F.conv2d(input, kernel, bias=bias, padding=1, stride=2)
mm_conv2d_full_output = matrix_multiplication_for_conv2d_full(input, kernel, bias=bias, padding=1, stride=2)
flag3 = torch.allclose(pytorch_conv2d_api_output, mm_conv2d_full_output)
print(flag3)
总结
通过本次的学习,我已经能够熟练地掌握对CNN的手动推导,学会去推导公式并计算gradient更新参数。现在能够从矩阵滑动和向量内积的两种方式去手动地用代码模拟卷积的过程,加深了自己对卷积的理解与推导。