目录
在appliciation.xml中配置:(xml的文件后缀需要自己手动更改)
1:zookeeper和kafka的下载介绍:
关于zookeeper和卡夫卡的下载介绍,我在弄这些东西的时候也搞了好久,在网上也翻了很多文章,从中我强力推荐一篇文章来供大家来参考。注意:看这个教程的时候要注意zookeeper和kafka的版本号我建议和文章中的版本号一定要一致!!
文章链接:https://www.cnblogs.com/chenwolong/p/kafka.html
2:zookeeper和kafka的启动
配置好zookeeper和kafka之后,我们先启动zookeeper
zookeeper的启动
打开zookeeper所在的bin文件的cmd命令行,输入:
zkServer.cmd

kafka的启动:(以创建三个broker为例子)
在D:\kafka\kafka_2.12-2.7.0\bin\windows路径中启动cmd命令行
在命令行中输入
kafka-server-start.bat ..\..\config\server.properties运行之后,如法炮制再在D:\kafka\kafka_2.12-2.7.0\bin\windows路径下再打开一个cmd窗口输入
kafka-server-start.bat ..\..\config\server1.properties
server2.properties也是如此。关于server.properties,server1.properties,server2.properties
中的配置,可以看我在《在windows环境下搭建kafka集群》的设置方式。
3:使用spring-boot集成卡夫卡
在使用spring-boot集成的卡夫卡之前,我们一定要启动zookeeper和三个kafka-broker的启动!!!!!!!我发现好多文章都没有写,这对新手来讲可能不太友好,所以在这里提醒一下。
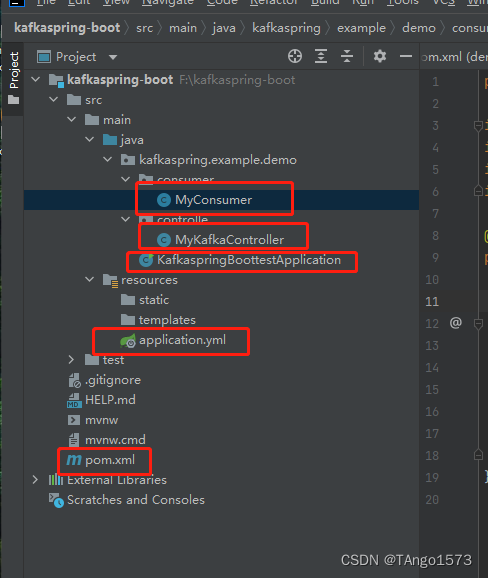
创建一个kafka项目:

custom
http://start.springboot.io把项目文件创建成这个样子:
首先在pom.xml文件中引入依赖:
<dependency>
			<groupId>org.springframework.kafka</groupId>
			<artifactId>spring-kafka</artifactId>
</dependency>
在appliciation.xml中配置:(xml的文件后缀需要自己手动更改)
spring:
  kafka:
    bootstrap-servers: 10.12.37.140:9092,10.12.37.140:9093,10.12.37.140:9094 # 集群的地址
    producer:
      retries: 3   #设置大于0的值,则客户端会将发送失败的记录重新发送。
      batch-size: 16384 #16KB
      buffer-memory: 33554432  #32MB
      acks: 1  #指定消息key和消息体的编码方式。
      key-serializer: org.apache.kafka.common.serialization.StringSerializer  #键的序列化
      value-serializer: org.apache.kafka.common.serialization.StringSerializer # 值的序列化
    consumer:
      group-id: default-group
      enable-auto-commit: false  # 手动提交
      auto-offset-reset: earliest   #当默认的消费组启动的时候,会从默认的第一个消费组开始消费。
      key-deserializer: org.apache.kafka.common.serialization.StringDeserializer
      value-deserializer: org.apache.kafka.common.serialization.StringDeserializer
      max-poll-records: 500  #一次最多拉500条消息。

    listener:
      ack-mode: MANUAL_IMMEDIATE
  redis:
host: 10.12.37.140 
创建生产者

package com.qf.kafka.spring.boot.demo.controller;

import org.springframework.beans.factory.annotation.Autowired;
import org.springframework.kafka.core.KafkaTemplate;
import org.springframework.web.bind.annotation.RequestMapping;
import org.springframework.web.bind.annotation.RestController;

@RestController
@RequestMapping("/msg")
public class MyKafkaController {

  private final static String TOPIC_NAME = "my-replicated-topic";

  @Autowired
  private KafkaTemplate<String,String> kafkaTemplate;

  @RequestMapping("/send")
  public String sendMessage(){

    kafkaTemplate.send(TOPIC_NAME,0,"key","this is a message!");

    return "send success!";

  }


}
创建消费者
package com.qf.kafka.spring.boot.demo.consumer;

import org.apache.kafka.clients.consumer.ConsumerRecord;

import org.springframework.kafka.annotation.KafkaListener;

import org.springframework.kafka.support.Acknowledgment;
import org.springframework.stereotype.Component;

@Component
public class MyConsumer {

  @KafkaListener(topics = "my-replicated-topic",groupId = "MyGroup1")
  public void listenGroup(ConsumerRecord<String, String> record, Acknowledgment ack) {
    String value = record.value();
    System.out.println(value);
    System.out.println(record);
    //手动提交offset
    ack.acknowledge();
  }
Application

package com.qf.kafka.spring.boot.demo;

import org.springframework.boot.SpringApplication;
import org.springframework.boot.autoconfigure.SpringBootApplication;

@SpringBootApplication
public class KafkaSpringBootDemoApplication {

  public static void main(String[] args) {
    SpringApplication.run(KafkaSpringBootDemoApplication.class, args);
  }

}
上面的代码都贴上去之后,点击运行KafkaspringBoottestApplication

然后在打开一个浏览器:输入
http://localhost:8080/msg/send网页端显示:

控制台显示:

版权声明:本文为m0_48339508原创文章,遵循CC 4.0 BY-SA版权协议,转载请附上原文出处链接和本声明。